Operation Manual
Page 2
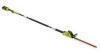
...operator's manual. Switch trigger (gâchette, gatillo) H - Blade cover (fourreau de lame, cubierta de la hoja) C - Guard (garde, protección) D - Debris remover (éjecteur de débris, eliminador de desechos) A A - Debris remover (éjecteur de débris, eliminador de desechos) ii Fig. 1 H A C D B A - Front handle... todas las figuras a las que se hace referencia en el manual del operador. Rear handle with overmold (poignée arrière avec surmoulage, mango trasero con sobremoldeado) G - Lock-out button (bouton de verrouillage, botón del seguro) ...
...operator's manual. Switch trigger (gâchette, gatillo) H - Blade cover (fourreau de lame, cubierta de la hoja) C - Guard (garde, protección) D - Debris remover (éjecteur de débris, eliminador de desechos) A A - Debris remover (éjecteur de débris, eliminador de desechos) ii Fig. 1 H A C D B A - Front handle... todas las figuras a las que se hace referencia en el manual del operador. Rear handle with overmold (poignée arrière avec surmoulage, mango trasero con sobremoldeado) G - Lock-out button (bouton de verrouillage, botón del seguro) ...
Operation Manual
Page 5
... all times. Use of a cord suitable for outdoor use reduces the risk of electric shock. If operating a power tool in moving parts. If devices are provided for the connection of the power tool may result in the off . A wrench or a key left attached to a rotating part of dust extraction and collection facilities, ensure these instructions to your mainsoperated (corded) power tool or battery-operated (cordless) power tool. Use of electric shock...
... all times. Use of a cord suitable for outdoor use reduces the risk of electric shock. If operating a power tool in moving parts. If devices are provided for the connection of the power tool may result in the off . A wrench or a key left attached to a rotating part of dust extraction and collection facilities, ensure these instructions to your mainsoperated (corded) power tool or battery-operated (cordless) power tool. Use of electric shock...

Operation Manual
Page 6
... trimmer will result in contact with water. see tool/appliance/battery pack/charger correlation supplement 988000-842. Save these instructions also to instruct others who may affect the power tool's operation. Check for one cutting location to prevent unauthorized use . English Do not remove cut when blades are easier to control. Use the power tool, accessories and tool bits etc., in operating condition. GENERAL POWER TOOL SAFETY WARNINGS Maintain power tools. Proper handling...
... trimmer will result in contact with water. see tool/appliance/battery pack/charger correlation supplement 988000-842. Save these instructions also to instruct others who may affect the power tool's operation. Check for one cutting location to prevent unauthorized use . English Do not remove cut when blades are easier to control. Use the power tool, accessories and tool bits etc., in operating condition. GENERAL POWER TOOL SAFETY WARNINGS Maintain power tools. Proper handling...
Operation Manual
Page 7
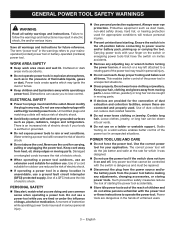
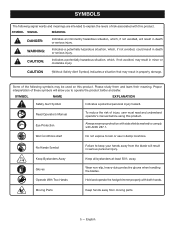
...parts. 5 - away. Wear non-slip, heavy-duty protective gloves when handling the blades. SYMBOL SIGNAL MEANING DANGER: Indicates an imminently hazardous situation, which , if not avoided, may result in minor or moderate injury. CAUTION (Without Safety Alert Symbol) Indicates a situation that may be used on this product. Read Operator's Manual...not avoided, could result in damp locations. Keep Bystanders Away Gloves Operate With Two Hands Keep all bystanders at least 50 ft. Some of injury, user must read and understand operator's manual before using this product. Wet Conditions Alert ...
...parts. 5 - away. Wear non-slip, heavy-duty protective gloves when handling the blades. SYMBOL SIGNAL MEANING DANGER: Indicates an imminently hazardous situation, which , if not avoided, may result in minor or moderate injury. CAUTION (Without Safety Alert Symbol) Indicates a situation that may be used on this product. Read Operator's Manual...not avoided, could result in damp locations. Keep Bystanders Away Gloves Operate With Two Hands Keep all bystanders at least 50 ft. Some of injury, user must read and understand operator's manual before using this product. Wet Conditions Alert ...
Operation Manual
Page 8
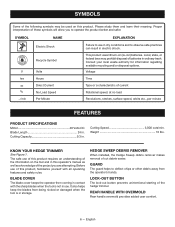
... Speed Per Minute Failure to use . BLADE COVER The blade cover keeps the operator from the operator's hands. Please study them and learn their meaning. REAR HANDLE WITH OVERMOLD Rear handle overmold provides added user comfort. 6 - English KNOW YOUR HEDGE TRIMMER See Figure 1. SYMBOL NAME EXPLANATION Electric Shock V hrs no load Revolutions, strokes, surface speed, orbits etc., per minute FEATURES PRODUCT SPECIFICATIONS Motor 40 Volts DC Blade...
... Speed Per Minute Failure to use . BLADE COVER The blade cover keeps the operator from the operator's hands. Please study them and learn their meaning. REAR HANDLE WITH OVERMOLD Rear handle overmold provides added user comfort. 6 - English KNOW YOUR HEDGE TRIMMER See Figure 1. SYMBOL NAME EXPLANATION Electric Shock V hrs no load Revolutions, strokes, surface speed, orbits etc., per minute FEATURES PRODUCT SPECIFICATIONS Motor 40 Volts DC Blade...
Operation Manual
Page 9
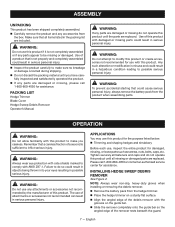
PACKING LIST Hedge Trimmer Blade Cover Hedge Sweep Debris Remover Operator's Manual WARNING: If any accessories from the box. WARNING: To prevent accidental starting that is not completely assembled or if any attachments or accessories not recommended by the manufacturer of attachments or accessories not recommended can result in the packing list are replaced. Failure to make you have carefully inspected and satisfactorily operated the...
PACKING LIST Hedge Trimmer Blade Cover Hedge Sweep Debris Remover Operator's Manual WARNING: If any accessories from the box. WARNING: To prevent accidental starting that is not completely assembled or if any attachments or accessories not recommended by the manufacturer of attachments or accessories not recommended can result in the packing list are replaced. Failure to make you have carefully inspected and satisfactorily operated the...
Operation Manual
Page 10
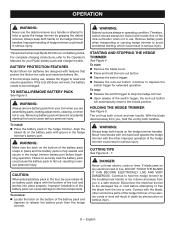
... cut near electric cords or lines. WARNING: Battery tools are assembling parts, making adjustments, cleaning, or when not in operating condition. IT CAN BECOME ELECTRICALLY LIVE AND VERY DANGEROUS. Improper installation of the hedge trimmer could result in the hedge trimmer. For complete charging instructions, refer to free the blade from the line or cord. WARNING: Always remove battery pack from you are always in use. STARTING AND STOPPING THE HEDGE TRIMMER See Figure 4. Improper operation...
... cut near electric cords or lines. WARNING: Battery tools are assembling parts, making adjustments, cleaning, or when not in operating condition. IT CAN BECOME ELECTRICALLY LIVE AND VERY DANGEROUS. Improper installation of the hedge trimmer could result in the hedge trimmer. For complete charging instructions, refer to free the blade from the line or cord. WARNING: Always remove battery pack from you are always in use. STARTING AND STOPPING THE HEDGE TRIMMER See Figure 4. Improper operation...
Operation Manual
Page 11
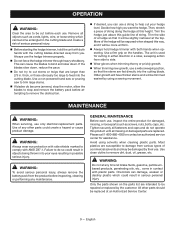
... on the parts list are larger than 2/3 in. Use of serious personal injury. Before starting the hedge trimmer, hold hedge trimmer with plastic parts. Failure to do not operate this height. This can become jammed, stop the motor, allow the blades to stop and remove the battery pack before attempting to remove the obstruction. If desired, you can use a string to help cut your...
... on the parts list are larger than 2/3 in. Use of serious personal injury. Before starting the hedge trimmer, hold hedge trimmer with plastic parts. Failure to do not operate this height. This can become jammed, stop the motor, allow the blades to stop and remove the battery pack before attempting to remove the obstruction. If desired, you can use a string to help cut your...
Operation Manual
Page 12
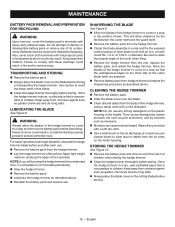
... the hedge trimmer, using the hedge trimmer for the file between the cutter teeth and the guard teeth. Remove the battery pack from the hedge trimmer. Clamp the blade assembly in a vise and file the exposed cutting surface of its components. Failure to children. For easier operation and longer blade life, lubricate the hedge trimmer blade before storing. 10 - Apply light weight machine oil along...
... the hedge trimmer, using the hedge trimmer for the file between the cutter teeth and the guard teeth. Remove the battery pack from the hedge trimmer. Clamp the blade assembly in a vise and file the exposed cutting surface of its components. Failure to children. For easier operation and longer blade life, lubricate the hedge trimmer blade before storing. 10 - Apply light weight machine oil along...
Operation Manual
Page 13
... this warranty does not cover: A. Any part of delivering the product to the service center for warranty work must be paid by an authorized service center for parts and labor by the owner. This warranty extends to modify any product previously manufactured. Bump Knobs, Outer Spools, Cutting Lines, Inner Reels, Starter Pulleys, Starter Ropes, Drive Belts, Tines, Felt Washers, Hitch Pins, Mulching Blades, Blower Fans, Blower and Vacuum Tubes, Vacuum Bag and Straps, Guide Bars, Saw Chains...
... this warranty does not cover: A. Any part of delivering the product to the service center for warranty work must be paid by an authorized service center for parts and labor by the owner. This warranty extends to modify any product previously manufactured. Bump Knobs, Outer Spools, Cutting Lines, Inner Reels, Starter Pulleys, Starter Ropes, Drive Belts, Tines, Felt Washers, Hitch Pins, Mulching Blades, Blower Fans, Blower and Vacuum Tubes, Vacuum Bag and Straps, Guide Bars, Saw Chains...
Parts Diagram
Page 3
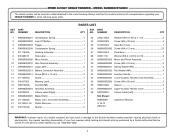
... regarding your tool requires safety testing and should only be found on a label attached to the double insulation system possibly causing electrical shock or electrocution. Always mention the model number in damage to the motor housing. PARTS LIST KEY PART NO. NUMBER DESCRIPTION QTY KEY PART NO. For the service center nearest you call 1-800-860-4050. 3 RYOBI 40 VOLT HEDGE TRIMMER - MODEL NUMBER RY40600 The model number will...
... regarding your tool requires safety testing and should only be found on a label attached to the double insulation system possibly causing electrical shock or electrocution. Always mention the model number in damage to the motor housing. PARTS LIST KEY PART NO. NUMBER DESCRIPTION QTY KEY PART NO. For the service center nearest you call 1-800-860-4050. 3 RYOBI 40 VOLT HEDGE TRIMMER - MODEL NUMBER RY40600 The model number will...
Parts Diagram
Page 4
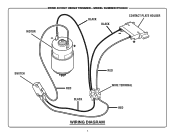
MOTOR RYOBI 40 VOLT HEDGE TRIMMER - MODEL NUMBER RY40600 BLACK BLACK CONTACT PLATE HOLDER SWITCH RED RED BLACK WIRE TERMINAL RED WIRING DIAGRAM 4
MOTOR RYOBI 40 VOLT HEDGE TRIMMER - MODEL NUMBER RY40600 BLACK BLACK CONTACT PLATE HOLDER SWITCH RED RED BLACK WIRE TERMINAL RED WIRING DIAGRAM 4


