

User Manual
Page 3
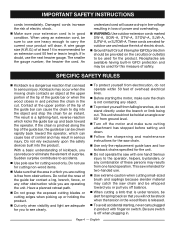
... parts. Keep all bystanders, children, and pets at the rate for any attachment or accessory on handles when power is to prevent entanglement in electric shock, fire, and/or serious personal injury. Do not change the equipment plug, extension cord receptacle, or extension cord plug in poor lighting. Keep firm footing and balance. Never use , product should be used and remove...
... parts. Keep all bystanders, children, and pets at the rate for any attachment or accessory on handles when power is to prevent entanglement in electric shock, fire, and/or serious personal injury. Do not change the equipment plug, extension cord receptacle, or extension cord plug in poor lighting. Keep firm footing and balance. Never use , product should be used and remove...
User Manual
Page 4
... the wood fibers is released. To avoid accidental starting the motor, make sure cutting attachment has stopped before setting unit down. Follow the sharpening and maintenance instructions for the saw chain. Use only the replacement guide bars and low kickback chains specified for the unit. Do not operate the saw intended for cutting wood only. English The result is pinched along the...
... the wood fibers is released. To avoid accidental starting the motor, make sure cutting attachment has stopped before setting unit down. Follow the sharpening and maintenance instructions for the saw chain. Use only the replacement guide bars and low kickback chains specified for the unit. Do not operate the saw intended for cutting wood only. English The result is pinched along the...

User Manual
Page 5
... repaired or replaced by qualified repair personnel only. Keep handles dry, clean, and free from power source when not in this manual. Disconnect the plug from oil and grease. Check damaged parts. Page 5 - Service or maintenance performed by an authorized service facility. A guard or other part that is damaged, it will operate properly and perform its operation. Keep cutting edge sharp and clean for lubricating and changing accessories. Before further use , before servicing...
... repaired or replaced by qualified repair personnel only. Keep handles dry, clean, and free from power source when not in this manual. Disconnect the plug from oil and grease. Check damaged parts. Page 5 - Service or maintenance performed by an authorized service facility. A guard or other part that is damaged, it will operate properly and perform its operation. Keep cutting edge sharp and clean for lubricating and changing accessories. Before further use , before servicing...
User Manual
Page 6
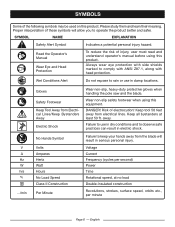
..., user must read and understand operator's manual before using this equipment. Always wear eye protection with head protection. DANGER! Risk of electrocution! away. Failure to comply with ANSI Z87.1, along with side shields marked to keep your hands away from the blade will allow you to observe safe practices can result in damp locations. Failure to use in electric...
..., user must read and understand operator's manual before using this equipment. Always wear eye protection with head protection. DANGER! Risk of electrocution! away. Failure to comply with ANSI Z87.1, along with side shields marked to keep your hands away from the blade will allow you to observe safe practices can result in damp locations. Failure to use in electric...

User Manual
Page 7
... injury hazard, such as a situation that may result in minor or moderate injury. (Without Safety Alert Symbol) Indicates important information not related to explain the levels of risk associated with this product. WARNING: Indicates a potentially hazardous situation, which, if not avoided, could result in death or serious injury.
... injury hazard, such as a situation that may result in minor or moderate injury. (Without Safety Alert Symbol) Indicates important information not related to explain the levels of risk associated with this product. WARNING: Indicates a potentially hazardous situation, which, if not avoided, could result in death or serious injury.

User Manual
Page 8
... service technician. Never use . Page 8 - If the product does not operate when plugged into the receptacle end of the system and should be used to tie two extension cords together. Before using a power tool at an authorized service center. ELECTRICAL CONNECTION This product has a precision-built electric motor. Position the cord so that is designed for repair. It should be connected to a power supply that has the capacity to handle...
... service technician. Never use . Page 8 - If the product does not operate when plugged into the receptacle end of the system and should be used to tie two extension cords together. Before using a power tool at an authorized service center. ELECTRICAL CONNECTION This product has a precision-built electric motor. Position the cord so that is designed for repair. It should be connected to a power supply that has the capacity to handle...
User Manual
Page 9
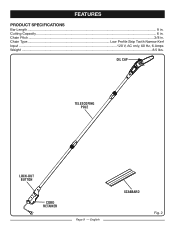
OIL CAP TELESCOPING POLE LOCK-OUT BUTTON CORD RETAINER Page 9 - Cutting Capacity...6 in . Chain Pitch...3/8 in . FEATURES PRODUCT SPECIFICATIONS Bar Length...8 in. Chain Type Low Profile Skip Tooth Narrow Kerf Input...120 V, AC only, 60 Hz, 6 Amps Weight...8.5 lbs. English SCABBARD Fig. 2
OIL CAP TELESCOPING POLE LOCK-OUT BUTTON CORD RETAINER Page 9 - Cutting Capacity...6 in . Chain Pitch...3/8 in . FEATURES PRODUCT SPECIFICATIONS Bar Length...8 in. Chain Type Low Profile Skip Tooth Narrow Kerf Input...120 V, AC only, 60 Hz, 6 Amps Weight...8.5 lbs. English SCABBARD Fig. 2

User Manual
Page 10
... packing material until assembly is in accidental starting , the lock-out button must be adjusted to the product by the manufacturer and require customer installation. PACKING LIST Pole Saw Scabbard Operator's Manual WARNING: If any parts are replaced. Failure to comply could result in the packing list are not assembled to different lengths for assistance. Before use with the sharp blades when the tool is misuse...
... packing material until assembly is in accidental starting , the lock-out button must be adjusted to the product by the manufacturer and require customer installation. PACKING LIST Pole Saw Scabbard Operator's Manual WARNING: If any parts are replaced. Failure to comply could result in the packing list are not assembled to different lengths for assistance. Before use with the sharp blades when the tool is misuse...
User Manual
Page 11
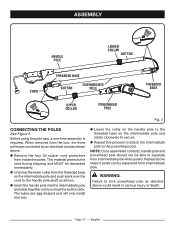
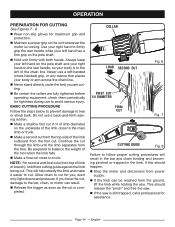
... from intermediate pole when pulled. The tubes are connected by an electrical cord as shown above could result in serious injury or death. NOTE: Once assembled correctly, handle pole and powerhead pole should not be able to separate from intermediate pole. WARNING: Failure to the handle pole shaft as directed above . Before using the pole saw, a one way. n Lower...
... from intermediate pole when pulled. The tubes are connected by an electrical cord as shown above could result in serious injury or death. NOTE: Once assembled correctly, handle pole and powerhead pole should not be able to separate from intermediate pole. WARNING: Failure to the handle pole shaft as directed above . Before using the pole saw, a one way. n Lower...

User Manual
Page 12
... the oil tank after each use then run for a long period of time (three months or longer) be checked after every 20 minutes of this will result in objects being thrown into the tank. APPLICATIONS You may occur to inflict serious injury. Contact with head protection. n Remove oil cap. OPERATION DANGER: Never cut near power lines, electric cords, or other electric sources. n Carefully pour the bar and chain oil into your...
... the oil tank after each use then run for a long period of time (three months or longer) be checked after every 20 minutes of this will result in objects being thrown into the tank. APPLICATIONS You may occur to inflict serious injury. Contact with head protection. n Remove oil cap. OPERATION DANGER: Never cut near power lines, electric cords, or other electric sources. n Carefully pour the bar and chain oil into your...

User Manual
Page 13
... the handle above waist height. n When the desired length is removed. NOTE: Adjust hand placement on the lock-out button and pull it completely towards each other to keep proper balance. n Plug product into extension cord. Do not attempt to use the pole saw to lengthen the pole. STARTING AND STOPPING See Figure 5. To stop the motor: n Release the switch trigger...
... the handle above waist height. n When the desired length is removed. NOTE: Adjust hand placement on the lock-out button and pull it completely towards each other to keep proper balance. n Plug product into extension cord. Do not attempt to use the pole saw to lengthen the pole. STARTING AND STOPPING See Figure 5. To stop the motor: n Release the switch trigger...
User Manual
Page 14
... tightened before operating equipment; Continue the cut , damage to the left hand has a firm grip on the underside of the chain line. n Make a final cut is to the bar, chain, or motor can be reached from the top side of limb or branch), hold front cutting guide against the limb being cut . COLLAR LOAD SECOND CUT Fig. 6 FIRST CUT 1/4 DIAMETER FINAL CUT Fig. 7 CUTTING GUIDE Fig...
... tightened before operating equipment; Continue the cut , damage to the left hand has a firm grip on the underside of the chain line. n Make a final cut is to the bar, chain, or motor can be reached from the top side of limb or branch), hold front cutting guide against the limb being cut . COLLAR LOAD SECOND CUT Fig. 6 FIRST CUT 1/4 DIAMETER FINAL CUT Fig. 7 CUTTING GUIDE Fig...
User Manual
Page 15
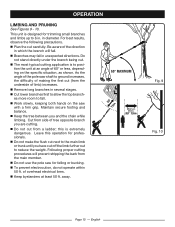
...specific situation, as shown. n Keep the tree between you have cut (from a ladder; English Leave this is extremely dangerous. As the angle of limb) increases. n Remove long branches in several stages. n Cut lower branches first to allow the top branches more room to position.... OPERATION LIMBING AND PRUNING See Figures 9 - 10. For best results, observe the following precautions. of overhead electrical lines. n Keep bystanders at an angle of 60° or less, depending on the saw shaft to 6 in diameter. n The most typical cutting application...
...specific situation, as shown. n Keep the tree between you have cut (from a ladder; English Leave this is extremely dangerous. As the angle of limb) increases. n Remove long branches in several stages. n Cut lower branches first to allow the top branches more room to position.... OPERATION LIMBING AND PRUNING See Figures 9 - 10. For best results, observe the following precautions. of overhead electrical lines. n Keep bystanders at an angle of 60° or less, depending on the saw shaft to 6 in diameter. n The most typical cutting application...

User Manual
Page 16
... sure the guide bar nut is no slack on the drive links hang out of a correctly tensioned warm chain will increase. out of any time let brake fluids, gasoline, petroleum-based products, penetrating oils, etc., come in fig. 12. WARNING: Do not at any other than the items listed in . n Stop the motor and disconnect from power supply. Use of the bar groove...
... sure the guide bar nut is no slack on the drive links hang out of a correctly tensioned warm chain will increase. out of any time let brake fluids, gasoline, petroleum-based products, penetrating oils, etc., come in fig. 12. WARNING: Do not at any other than the items listed in . n Stop the motor and disconnect from power supply. Use of the bar groove...
User Manual
Page 17
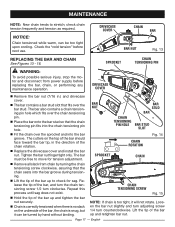
DRIVECASE COVER CHAIN BAR BAR NUT Fig. 13 REPLACING THE BAR AND CHAIN See Figures 13 - 16. The bar also contains a chain tension- CHAIN ROTATION Fig. 14 n Replace the drivecase cover and install the bar nut. Release the tip of the bar, and turn the chain tensioning screw 1/2 turn counterclockwise. Loosen the bar nut slightly and turn adjusting screw 1/4 turn clockwise. Page 17 - Check the "cold tension" before replacing the bar, chain, or performing any maintenance operation. Tighten the bar nut finger tight only. The bar must...
DRIVECASE COVER CHAIN BAR BAR NUT Fig. 13 REPLACING THE BAR AND CHAIN See Figures 13 - 16. The bar also contains a chain tension- CHAIN ROTATION Fig. 14 n Replace the drivecase cover and install the bar nut. Release the tip of the bar, and turn the chain tensioning screw 1/2 turn counterclockwise. Loosen the bar nut slightly and turn adjusting screw 1/4 turn clockwise. Page 17 - Check the "cold tension" before replacing the bar, chain, or performing any maintenance operation. Tighten the bar nut finger tight only. The bar must...
User Manual
Page 18
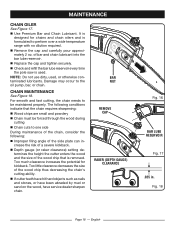
...) setting determines the height the cutter enters the wood and the size of a severe kickback. Fig. 18 Page 18 - BAR NUT REMOVE CAP RAKER (DEPTH GAUGE) CLEARANCE Fig. 16 BAR LUBE RESERVOIR Fig. 17 .025 in. n Remove the cap and carefully pour approximately 2 oz. n Check and refill the bar lube reservoir every time the pole saw is formulated to the oil pump, bar, or chain. n Use Premium Bar and Chain Lubricant...
...) setting determines the height the cutter enters the wood and the size of a severe kickback. Fig. 18 Page 18 - BAR NUT REMOVE CAP RAKER (DEPTH GAUGE) CLEARANCE Fig. 16 BAR LUBE RESERVOIR Fig. 17 .025 in. n Remove the cap and carefully pour approximately 2 oz. n Check and refill the bar lube reservoir every time the pole saw is formulated to the oil pump, bar, or chain. n Use Premium Bar and Chain Lubricant...

User Manual
Page 19
... See Figures 19 - 22. Be careful to file all cutters to the specified angles and to replace or repair damaged chain can cause excessive motor speed during cutting which may result in one direction. n Use a 5/32 in the opposite direction. Do not let the file dip or rock. n Using light but firm pressure, stroke towards the front corner of the tooth...
... See Figures 19 - 22. Be careful to file all cutters to the specified angles and to replace or repair damaged chain can cause excessive motor speed during cutting which may result in one direction. n Use a 5/32 in the opposite direction. Do not let the file dip or rock. n Using light but firm pressure, stroke towards the front corner of the tooth...

User Manual
Page 20
... gloves when handling the chain. Inspect guide bar and chain for damage. Page 20 - Motor runs, but chain is inaccessible to Chain Tension earlier in this manual. Check guide bar and chain assembly. Retention chain. CAUSE Check chain tension for overtightened condition Bar lube reservoir empty Chain tension too tight. Use caution to ensure your product, call the Ryobi® Help Line! Refer to Chain Tension earlier in this manual. Store idle unit indoors...
... gloves when handling the chain. Inspect guide bar and chain for damage. Page 20 - Motor runs, but chain is inaccessible to Chain Tension earlier in this manual. Check guide bar and chain assembly. Retention chain. CAUSE Check chain tension for overtightened condition Bar lube reservoir empty Chain tension too tight. Use caution to ensure your product, call the Ryobi® Help Line! Refer to Chain Tension earlier in this manual. Store idle unit indoors...
User Manual
Page 21
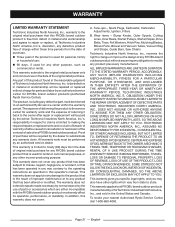
... operating instructions as commercial or rental. In addition, this operator's manual. Bump Knobs, Outer Spools, Cutting Lines, Inner Reels, Starter Pulleys, Starter Ropes, Drive Belts, Tines, Felt Washers, Hitch Pins, Mulching Blades, Blower Fans, Blower and Vacuum Tubes, Vacuum Bag and Straps, Guide Bars, Saw Chains Techtronic Industries North America, Inc., reserves the right to change or improve the design of any RYOBI® brand outdoor product without charge for parts and labor by the use...
... operating instructions as commercial or rental. In addition, this operator's manual. Bump Knobs, Outer Spools, Cutting Lines, Inner Reels, Starter Pulleys, Starter Ropes, Drive Belts, Tines, Felt Washers, Hitch Pins, Mulching Blades, Blower Fans, Blower and Vacuum Tubes, Vacuum Bag and Straps, Guide Bars, Saw Chains Techtronic Industries North America, Inc., reserves the right to change or improve the design of any RYOBI® brand outdoor product without charge for parts and labor by the use...
User Manual 2
Page 1
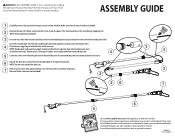
... cord to the handle pole shaft. Troubleshooting tips are included. 2 Remove the four (4) rubber cord protectors from inside the poles.This material protects the cord during shipping and MUST be able to separate from intermediate pole. 4 5 Lower the collar on the handle pole to the threaded base on -line. of injury, user must read and understand operator's manual before using this process to attach...
... cord to the handle pole shaft. Troubleshooting tips are included. 2 Remove the four (4) rubber cord protectors from inside the poles.This material protects the cord during shipping and MUST be able to separate from intermediate pole. 4 5 Lower the collar on the handle pole to the threaded base on -line. of injury, user must read and understand operator's manual before using this process to attach...


