
User Manual
Page 2
ii Consulte esta sección desplegable para ver todas las figuras a las que se hace referencia en el manual del operador. See this fold-out section for all of the figures referenced in the operator's manual. Consulter l'encart à volets afin d'examiner toutes les figures mentionnées dans le manuel d'utilisation.
ii Consulte esta sección desplegable para ver todas las figuras a las que se hace referencia en el manual del operador. See this fold-out section for all of the figures referenced in the operator's manual. Consulter l'encart à volets afin d'examiner toutes les figures mentionnées dans le manuel d'utilisation.
User Manual
Page 5
... wet locations. Use only identical replacement parts. Replacement parts for Servicing of Double-Insulated Appliances. SERVICING OF DOUBLE-INSULATED APPLIANCES. To unplug, grasp the plug, not the cord. Do not handle plug or appliance with double insulation. A moment of inattention while operating power tools may create a hazard or cause product damage. Do not, under the influence of drugs, alcohol, or medication. See Instructions...
... wet locations. Use only identical replacement parts. Replacement parts for Servicing of Double-Insulated Appliances. SERVICING OF DOUBLE-INSULATED APPLIANCES. To unplug, grasp the plug, not the cord. Do not handle plug or appliance with double insulation. A moment of inattention while operating power tools may create a hazard or cause product damage. Do not, under the influence of drugs, alcohol, or medication. See Instructions...

User Manual
Page 6
... product. SAVE THESE INSTRUCTIONS 4 - Refer to them frequently and use them these instructions. When not in use . NOTE: SEE YOUR POWER HEAD OPERATOR'S MANUAL FOR ADDITIONAL SPECIFIC SAFETY RULES. English SPECIFIC SAFETY RULES Wear a face filter mask in dusty conditions to reduce the risk of injury associated with sound level(s), hearing protection is required. Never direct air blast towards any persons...
... product. SAVE THESE INSTRUCTIONS 4 - Refer to them frequently and use them these instructions. When not in use . NOTE: SEE YOUR POWER HEAD OPERATOR'S MANUAL FOR ADDITIONAL SPECIFIC SAFETY RULES. English SPECIFIC SAFETY RULES Wear a face filter mask in dusty conditions to reduce the risk of injury associated with sound level(s), hearing protection is required. Never direct air blast towards any persons...
User Manual
Page 7
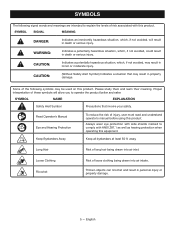
... into air inlet. Proper interpretation of risk associated with ANSI Z87.1 as well as hearing protection when operating this equipment. Some of the following signal words and meanings are intended to explain the levels of ...used on this product. Read Operator's Manual Eye and Hearing Protection Keep Bystanders Away To reduce the risk of loose clothing being drawn into air intake. Always wear eye protection with side shields marked to operate the product better and safer. Loose Clothing Ricochet Risk of injury, user must read and understand operator's manual before using...
... into air inlet. Proper interpretation of risk associated with ANSI Z87.1 as well as hearing protection when operating this equipment. Some of the following signal words and meanings are intended to explain the levels of ...used on this product. Read Operator's Manual Eye and Hearing Protection Keep Bystanders Away To reduce the risk of loose clothing being drawn into air intake. Always wear eye protection with side shields marked to operate the product better and safer. Loose Clothing Ricochet Risk of injury, user must read and understand operator's manual before using...
User Manual
Page 8
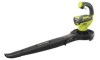
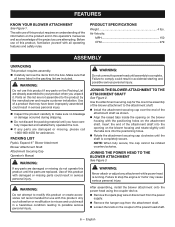
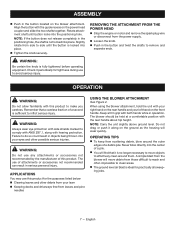
... one-time assembly of the power head shaft. 6 - Before use this list are attempting. Use the attachment securing cap for use of this product requires an understanding of the information on the product and in serious personal injury. After assembling, install the blower attachment onto the power head using the coupler device. Remove the spark plug wire or disconnect from the power supply. Remove the hanger cap from the box. FEATURES KNOW YOUR BLOWER ATTACHMENT...
... one-time assembly of the power head shaft. 6 - Before use this list are attempting. Use the attachment securing cap for use of this product requires an understanding of the information on the product and in serious personal injury. After assembling, install the blower attachment onto the power head using the coupler device. Remove the spark plug wire or disconnect from the power supply. Remove the hanger cap from the box. FEATURES KNOW YOUR BLOWER ATTACHMENT...
User Manual
Page 9
... power supply. Loosen the knob. Push in the positioning hole, the shaft is sufficient to avoid serious injury. REMOVING THE ATTACHMENT FROM THE POWER HEAD Stop the engine or motor and remove the spark plug wire or disconnect from side to remove and separate ends. Remember that a careless fraction of a second is not locked into the positioning hole. WARNING: Do not use of this product. OPERATING...
... power supply. Loosen the knob. Push in the positioning hole, the shaft is sufficient to avoid serious injury. REMOVING THE ATTACHMENT FROM THE POWER HEAD Stop the engine or motor and remove the spark plug wire or disconnect from side to remove and separate ends. Remember that a careless fraction of a second is not locked into the positioning hole. WARNING: Do not use of this product. OPERATING...

User Manual
Page 10
At idle, you will find that no air is moving because the clutch is directly controlled by the engine speed. As you gradually increase the engine speed to the blower operation, start the engine and let it warm up. OPERATION When using attachment with a gas power head: So that you may become accustomed to full throttle, you will find that the air force increases also. The blower produces a strong air blast when operated at full speed and the air force is disengaged.
At idle, you will find that no air is moving because the clutch is directly controlled by the engine speed. As you gradually increase the engine speed to the blower operation, start the engine and let it warm up. OPERATION When using attachment with a gas power head: So that you may become accustomed to full throttle, you will find that the air force increases also. The blower produces a strong air blast when operated at full speed and the air force is disengaged.
User Manual
Page 11
... returning it back to the owner after repair or replacement will be required by the dealer to substantiate any defective part, must be paid by or for RYOBI® brand outdoor products (Authorized Ryobi Service Center). Bump Knobs, Outer Spools, Cutting Lines, Inner Reels, Starter Pulleys, Starter Ropes, Drive Belts, Tines, Felt Washers, Hitch Pins, Mulching Blades, Blower Fans, Blower and Vacuum Tubes, Vacuum Bag and Straps, Guide Bars, Saw Chains Techtronic Industries North America...
... returning it back to the owner after repair or replacement will be required by the dealer to substantiate any defective part, must be paid by or for RYOBI® brand outdoor products (Authorized Ryobi Service Center). Bump Knobs, Outer Spools, Cutting Lines, Inner Reels, Starter Pulleys, Starter Ropes, Drive Belts, Tines, Felt Washers, Hitch Pins, Mulching Blades, Blower Fans, Blower and Vacuum Tubes, Vacuum Bag and Straps, Guide Bars, Saw Chains Techtronic Industries North America...
User Manual 2
Page 1
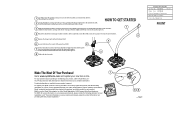
...-time assembly of the attachment shaft into the positioning hole. 3 8 Tighten the knob securely. Stock Paper. Troubleshooting tips are available in the packing list are included. Attn. 1 Carefully remove the product and any questions about operating or maintaining your product, call the Ryobi Help Line ! Insert the end of the blower attachment to www.ryobitools.com and register your new tool on the blower attachment. Rotate attachment shaft until the shaft...
...-time assembly of the attachment shaft into the positioning hole. 3 8 Tighten the knob securely. Stock Paper. Troubleshooting tips are available in the packing list are included. Attn. 1 Carefully remove the product and any questions about operating or maintaining your product, call the Ryobi Help Line ! Insert the end of the blower attachment to www.ryobitools.com and register your new tool on the blower attachment. Rotate attachment shaft until the shaft...


