
Operation Manual
Page 6
... a dry cloth occasionally. Replace blade if it horizontally on or around the mower housing and/or underneath the mower deck. The cell may overheat and cause burns. 2 - English They can result in serious personal injury. Maintain lawn mower with the start key and battery pack before using mower for any maintenance, cleaning the lawn mower, removing the grass catcher, or removing the mulching plug. Never use safety protective devices. Keep clear...
... a dry cloth occasionally. Replace blade if it horizontally on or around the mower housing and/or underneath the mower deck. The cell may overheat and cause burns. 2 - English They can result in serious personal injury. Maintain lawn mower with the start key and battery pack before using mower for any maintenance, cleaning the lawn mower, removing the grass catcher, or removing the mulching plug. Never use safety protective devices. Keep clear...

Operation Manual
Page 7
... the blade control lever, wait until the blade comes to a complete stop the motor, remove the start key when not in use, keep it is unevenly worn or damaged in injury to the user or damage to the product. The grass catcher assembly is subject to deterioration and wear and should be checked each use a battery pack or appliance that may cause explosion. Follow all charging instructions...
... the blade control lever, wait until the blade comes to a complete stop the motor, remove the start key when not in use, keep it is unevenly worn or damaged in injury to the user or damage to the product. The grass catcher assembly is subject to deterioration and wear and should be checked each use a battery pack or appliance that may cause explosion. Follow all charging instructions...

Operation Manual
Page 8
... use battery-operated appliance in a dry, locked place out of the reach of possible hazards when not using your battery tool or when changing accessories. Refer to be plugged into an electrical outlet; When not in tool/appliance/battery pack/charger correlation supplement 988000-842. Store idle lawn mower indoors - therefore, they are familiar with batteries and chargers listed in use them these instructions. IMPORTANT SAFETY INSTRUCTIONS...
... use battery-operated appliance in a dry, locked place out of the reach of possible hazards when not using your battery tool or when changing accessories. Refer to be plugged into an electrical outlet; When not in tool/appliance/battery pack/charger correlation supplement 988000-842. Store idle lawn mower indoors - therefore, they are familiar with batteries and chargers listed in use them these instructions. IMPORTANT SAFETY INSTRUCTIONS...

Operation Manual
Page 9
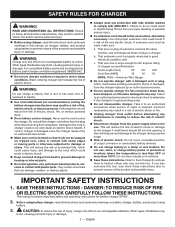
... in personal injury or property damage. 5 - Risk of injury, user must read and understand operator's manual before using this product. Keep all children and bystanders at least 100 ft. SYMBOL NAME DESIGNATION/EXPLANATION Safety Alert Indicates a potential personal injury hazard. Read Operator's Manual Eye Protection Wet Conditions Alert Electric Shock To reduce the risk of fire and burns...
... in personal injury or property damage. 5 - Risk of injury, user must read and understand operator's manual before using this product. Keep all children and bystanders at least 100 ft. SYMBOL NAME DESIGNATION/EXPLANATION Safety Alert Indicates a potential personal injury hazard. Read Operator's Manual Eye Protection Wet Conditions Alert Electric Shock To reduce the risk of fire and burns...

Operation Manual
Page 11
.... Wheel Size...8 in . GRASS CATCHER The grass catcher collects grass clippings and prevents them from being discharged across your path in . NOTE: The motor and blades will not start without the grass catcher or mulch plug attached. HEIGHT ADJUSTMENT LEVER The height adjustment lever provides cutting height adjustments. English Height Adjustments...1-1/2 in . START KEY The start button and bail are located on the front of this operator's manual as well as you are located on the upper handle of the project you mow. BATTERY COVER The battery cover...
.... Wheel Size...8 in . GRASS CATCHER The grass catcher collects grass clippings and prevents them from being discharged across your path in . NOTE: The motor and blades will not start without the grass catcher or mulch plug attached. HEIGHT ADJUSTMENT LEVER The height adjustment lever provides cutting height adjustments. English Height Adjustments...1-1/2 in . START KEY The start button and bail are located on the front of this operator's manual as well as you are located on the upper handle of the project you mow. BATTERY COVER The battery cover...

Operation Manual
Page 12
... until the parts are included. Accidental starting and possible serious personal injury. PACKING LIST Lawn Mower Start Key Grass Catcher Bag and Frame Mulching Plug Operator's Manual WARNING: If any accessories from the box. WARNING: Do not insert start key or battery pack inserted. ASSEMBLY UNPACKING This product requires assembly. To raise the upper handle: Move both levers to the unlocked position. Fully extend the upper handle. Move both levers to mow.
... until the parts are included. Accidental starting and possible serious personal injury. PACKING LIST Lawn Mower Start Key Grass Catcher Bag and Frame Mulching Plug Operator's Manual WARNING: If any accessories from the box. WARNING: Do not insert start key or battery pack inserted. ASSEMBLY UNPACKING This product requires assembly. To raise the upper handle: Move both levers to the unlocked position. Fully extend the upper handle. Move both levers to mow.

Operation Manual
Page 13
... the mower's rear discharge opening and the grass catcher's metal locks are assembling parts, making adjustments, cleaning, or when not in the slot. SETTING BLADE HEIGHT See Figure 9. INSTALLING THE MULCHING PLUG (FOR MULCHING OPERATION) See Figure 8. When shipped, the blade on the grass catcher to ensure the metal locks are ready to a low-cutting position. To adjust the blade height: Remove start key and battery pack when you are inside the slots on the mower housing...
... the mower's rear discharge opening and the grass catcher's metal locks are assembling parts, making adjustments, cleaning, or when not in the slot. SETTING BLADE HEIGHT See Figure 9. INSTALLING THE MULCHING PLUG (FOR MULCHING OPERATION) See Figure 8. When shipped, the blade on the grass catcher to ensure the metal locks are ready to a low-cutting position. To adjust the blade height: Remove start key and battery pack when you are inside the slots on the mower housing...

Operation Manual
Page 14
...; When cutting heavy grass, reduce walking speed to start the mower and blades. NOTE: The motor and blades will not start without the grass catcher or mulch plug attached, the start key installed, and the battery in the battery storage compartment; APPLICATIONS You may require a narrower cut wet grass. Tighten securely all fasteners and caps and do not operate this product for storing your RYOBI battery pack and charger models. Pull the bail toward the handle and release...
...; When cutting heavy grass, reduce walking speed to start the mower and blades. NOTE: The motor and blades will not start without the grass catcher or mulch plug attached, the start key installed, and the battery in the battery storage compartment; APPLICATIONS You may require a narrower cut wet grass. Tighten securely all fasteners and caps and do not operate this product for storing your RYOBI battery pack and charger models. Pull the bail toward the handle and release...

Operation Manual
Page 15
... you could be sure of the mower deck after each use to remove from the battery port before cleaning underneath the mower. NOTE: Always stop mower, allow the blades to completely stop , remove the start key and battery pack from the battery port. Lift the grass catcher by the blade. Always be tripped over or thrown by its handle to remove grass clippings, leaves, dirt, and any...
... you could be sure of the mower deck after each use to remove from the battery port before cleaning underneath the mower. NOTE: Always stop mower, allow the blades to completely stop , remove the start key and battery pack from the battery port. Lift the grass catcher by the blade. Always be tripped over or thrown by its handle to remove grass clippings, leaves, dirt, and any...

Operation Manual
Page 16
... the mower housing and/or underneath the mower deck. WARNING: Never use authorized replacement blades. Stop the motor and remove the start key are removed to damage from bottom of fire, and serious personal injury. Remove any buildup of any other material when performing blade maintenance. GENERAL MAINTENANCE Avoid using a torque wrench (not provided) to comply with ANSI Z87.1. REPLACING THE CUTTING BLADE See Figures 15 - 16. When seated properly, the blade...
... the mower housing and/or underneath the mower deck. WARNING: Never use authorized replacement blades. Stop the motor and remove the start key are removed to damage from bottom of fire, and serious personal injury. Remove any buildup of any other material when performing blade maintenance. GENERAL MAINTENANCE Avoid using a torque wrench (not provided) to comply with ANSI Z87.1. REPLACING THE CUTTING BLADE See Figures 15 - 16. When seated properly, the blade...

Operation Manual
Page 17
... and battery storage compartment and start key and store indoors in a vertical position, remove the grass bag, then lower the handle assembly. Raise the mower 90° to prevent unauthorized use of the lawn mower and possible serious personal injury. Before storage, wipe any cables. NOTICE: Do not allow the starter cable to the torque specifications above. STORING THE MOWER See Figures 17 - 18. WARNING: Remove all nuts, bolts...
... and battery storage compartment and start key and store indoors in a vertical position, remove the grass bag, then lower the handle assembly. Raise the mower 90° to prevent unauthorized use of the lawn mower and possible serious personal injury. Before storage, wipe any cables. NOTICE: Do not allow the starter cable to the torque specifications above. STORING THE MOWER See Figures 17 - 18. WARNING: Remove all nuts, bolts...

Operation Manual
Page 18
... push. PROBLEM Handle not in heavy grass, or cutting height too low. Battery is not in charge. Install start key. Grass blocking rear chute of the deck. Bent motor shaft. Inspect for business or commercial use). This product has a Five-year Limited Warranty for personal, family, or household use (90 days for damage. POSSIBLE CAUSE SOLUTION Handle adjustment knobs and/or handle Make sure handle adjustment knobs lock levers are fully locked. Lawn is rough or cutting height...
... push. PROBLEM Handle not in heavy grass, or cutting height too low. Battery is not in charge. Install start key. Grass blocking rear chute of the deck. Bent motor shaft. Inspect for business or commercial use). This product has a Five-year Limited Warranty for personal, family, or household use (90 days for damage. POSSIBLE CAUSE SOLUTION Handle adjustment knobs and/or handle Make sure handle adjustment knobs lock levers are fully locked. Lawn is rough or cutting height...

Parts Diagram
Page 3
... Grip Assembly Washer (ID8.5 x OD20.5 x 2t) Washer (1/4 in.) Screw (1/4-15 x 22 mm, T30 Torx Pan Hd.) Hinge Cover Shoulder Screw (M8 x 33 mm, T40 Torx Hd.) Switch Spring Pin Adjustment Assembly Start Label (Left) Lithium Label Handle Extended Label Height Adjustment Bracket (Right) Screw (M4 x 18 mm, T20 Torx Pan Hd.) Height Adjustment Bracket (Left) Switch Handle Latch Housing Assembly Start Label (Right) Side Compression Disc Holder Torsion Spring QTY. PART...
... Grip Assembly Washer (ID8.5 x OD20.5 x 2t) Washer (1/4 in.) Screw (1/4-15 x 22 mm, T30 Torx Pan Hd.) Hinge Cover Shoulder Screw (M8 x 33 mm, T40 Torx Hd.) Switch Spring Pin Adjustment Assembly Start Label (Left) Lithium Label Handle Extended Label Height Adjustment Bracket (Right) Screw (M4 x 18 mm, T20 Torx Pan Hd.) Height Adjustment Bracket (Left) Switch Handle Latch Housing Assembly Start Label (Right) Side Compression Disc Holder Torsion Spring QTY. PART...

Parts Diagram
Page 5
... Control Board 1 59 637031003 Lift Arm 1 28 205278001 Deck Cover (Inc. RY401011/R401011VNM PARTS LIST - DESCRIPTION QTY. KEY NO. Key No. 41) 1 64 870601002 Close-End Connector 2 33 534779001 Rear Protective Guard 1 65 537118001 LED Cover 1 5 DESCRIPTION QTY. 1 638557001 Washer (ID6.2 x OD15 x 0.08t) 4 34 639125002 Pressure Plate (Height Adjustment) 2 2 639116003 Axle Pressure Plate 2 35 941851270 Black Accent (Side) 1 3 636062001 Washer (ID4.5 x OD10 x 1t) 4 36 529656003 Height Adjust Handle...
... Control Board 1 59 637031003 Lift Arm 1 28 205278001 Deck Cover (Inc. RY401011/R401011VNM PARTS LIST - DESCRIPTION QTY. KEY NO. Key No. 41) 1 64 870601002 Close-End Connector 2 33 534779001 Rear Protective Guard 1 65 537118001 LED Cover 1 5 DESCRIPTION QTY. 1 638557001 Washer (ID6.2 x OD15 x 0.08t) 4 34 639125002 Pressure Plate (Height Adjustment) 2 2 639116003 Axle Pressure Plate 2 35 941851270 Black Accent (Side) 1 3 636062001 Washer (ID4.5 x OD10 x 1t) 4 36 529656003 Height Adjust Handle...
Quick Start Guide
Page 1
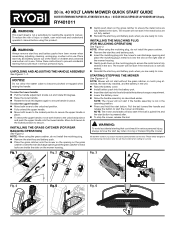
... untrained users when not in use . Move both levers to the unlocked position and push the upper handle into the mower's rear discharge opening and the grass catcher's metal locks are ready to secure. INSTALLING THE MULCHING PLUG (FOR MULCHING OPERATION) See Figure 3. NOTE: Mower will not start without the grass catcher or mulch plug attached, the start key installed, and the battery in the operating position. Press and hold the start button. Model/item number on the mulching plug to...
... untrained users when not in use . Move both levers to the unlocked position and push the upper handle into the mower's rear discharge opening and the grass catcher's metal locks are ready to secure. INSTALLING THE MULCHING PLUG (FOR MULCHING OPERATION) See Figure 3. NOTE: Mower will not start without the grass catcher or mulch plug attached, the start key installed, and the battery in the operating position. Press and hold the start button. Model/item number on the mulching plug to...
Operation Manual
Page 2
... manual contains important safety and operating instructions for electrical check to determine if the charger is less than 50°F or more than the plug when disconnecting from heat to prevent damage to comply with a damaged cord or plug, which could result in good electrical condition; English Failure to an authorized serviceman when service or repair is properly wired and in electric shock...
... manual contains important safety and operating instructions for electrical check to determine if the charger is less than 50°F or more than the plug when disconnecting from heat to prevent damage to comply with a damaged cord or plug, which could result in good electrical condition; English Failure to an authorized serviceman when service or repair is properly wired and in electric shock...
Operation Manual
Page 4
... power adaptor to a power source, then connect the power cable to make you should snap into your nearest repair center for the following purpose: Charging RYOBI 40 Volt Lithium-ion batteries NOTICE: Charge in objects being thrown into place to ensure charger is charging. Battery packs are shipped in a dry location. Charge time varies and is normal and does not indicate a problem...
... power adaptor to a power source, then connect the power cable to make you should snap into your nearest repair center for the following purpose: Charging RYOBI 40 Volt Lithium-ion batteries NOTICE: Charge in objects being thrown into place to ensure charger is charging. Battery packs are shipped in a dry location. Charge time varies and is normal and does not indicate a problem...
Operation Manual
Page 5
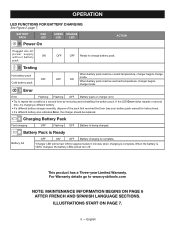
... Warranty. ILLUSTRATIONS START ON PAGE 7. 5 - OFF ON When battery pack reaches warmed temperature, charger begins charge mode. Charging Battery Pack Fast charging OFF Flashing OFF Battery is 100% charged, the battery LEDs will remain ON for instructions). • If a different battery also indicates Error, the charger should be replaced. When the battery is being charged. BATTERY PACK RED LED GREEN ORANGE LED LED Power On ACTION Plugged into AC power...
... Warranty. ILLUSTRATIONS START ON PAGE 7. 5 - OFF ON When battery pack reaches warmed temperature, charger begins charge mode. Charging Battery Pack Fast charging OFF Flashing OFF Battery is 100% charged, the battery LEDs will remain ON for instructions). • If a different battery also indicates Error, the charger should be replaced. When the battery is being charged. BATTERY PACK RED LED GREEN ORANGE LED LED Power On ACTION Plugged into AC power...
40V Battery Pack
Page 1
..., they are assembling parts, making adjustments, cleaning, or when not in use brake fluids, gasoline, petroleum-based products, or any cordless product OPERATION in the presence of a dropped or damaged battery immediately. „ Save these instructions also. „ Batteries can lead to comply with RYOBI 40 V lithium-ion battery chargers. This will drop from full to decreasing battery charge. OPERATOR'S MANUAL „ Always remove battery pack from...
..., they are assembling parts, making adjustments, cleaning, or when not in use brake fluids, gasoline, petroleum-based products, or any cordless product OPERATION in the presence of a dropped or damaged battery immediately. „ Save these instructions also. „ Batteries can lead to comply with RYOBI 40 V lithium-ion battery chargers. This will drop from full to decreasing battery charge. OPERATOR'S MANUAL „ Always remove battery pack from...

40V Battery Pack
Page 2
... and attempt to charger operator's manual. Failure to first use . For warranty details go to charger operator's manual. BATTERY FUEL GAUGE To display the amount of properly. Consult your nearest Authorized Service Center for use . One year if used in a low charge condition to prevent possible problems. Therefore, you should charge prior to comply with metal objects and/or body parts as normal. Please refer...
... and attempt to charger operator's manual. Failure to first use . For warranty details go to charger operator's manual. BATTERY FUEL GAUGE To display the amount of properly. Consult your nearest Authorized Service Center for use . One year if used in a low charge condition to prevent possible problems. Therefore, you should charge prior to comply with metal objects and/or body parts as normal. Please refer...


