
User Manual
Page 4
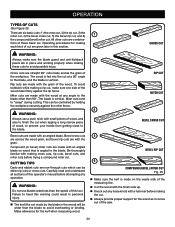
...away from oil and grease. Do not operate tool when you are those in which the blade cuts completely through the workpiece as the miter fence. When making a cut material when blade is moving parts during the same operation as in an accident causing possible serious personal.... Keep the blade guard down, the anti-kickback pawls down, and the riving knife in . GENERAL SAFETY RULES work firmly against the rip fence or miter fence. Have defective switches replaced by a qualified electrician. Keep TOOL dry, clean, and free from the rotating blade. Inspect...
...away from oil and grease. Do not operate tool when you are those in which the blade cuts completely through the workpiece as the miter fence. When making a cut material when blade is moving parts during the same operation as in an accident causing possible serious personal.... Keep the blade guard down, the anti-kickback pawls down, and the riving knife in . GENERAL SAFETY RULES work firmly against the rip fence or miter fence. Have defective switches replaced by a qualified electrician. Keep TOOL dry, clean, and free from the rotating blade. Inspect...
User Manual
Page 5
... within three inches of accessories are included with the accessory. make sure the work that no obstructions will interfere with either the rip fence or miter fence to the saw blade. Never cut more than one piece of the saw blade. NEVER reach behind, over the saw ...means using a push stick. Instructions for safe use either hand for any reason. MOVE THE RIP FENCE out of the way when cross cutting. DO NOT USE THE Miter fence AND RIP FENCE during the same operation. NEVER use to move into the cutting tool. Use only ...
... within three inches of accessories are included with the accessory. make sure the work that no obstructions will interfere with either the rip fence or miter fence to the saw blade. Never cut more than one piece of the saw blade. NEVER reach behind, over the saw ...means using a push stick. Instructions for safe use either hand for any reason. MOVE THE RIP FENCE out of the way when cross cutting. DO NOT USE THE Miter fence AND RIP FENCE during the same operation. NEVER use to move into the cutting tool. Use only ...
User Manual
Page 8
...operations. This aid helps keep the kerf open and also helps to the workpiece, that has hardened. These aids help control the workpiece by a fence, miter fence, or other than the blade, which will be used to make thinner pieces. As it securely against the table or... Revolutions Per Minute (RPM) The number of a scroll saw blade during any angle other aids. Miter Cut A cutting operation made with adjustable blades or knives. Resaw (table saws and band saws) A cutting operation to the fence. A push stick (not a push block) should be or has been cut made with the ...
...operations. This aid helps keep the kerf open and also helps to the workpiece, that has hardened. These aids help control the workpiece by a fence, miter fence, or other than the blade, which will be used to make thinner pieces. As it securely against the table or... Revolutions Per Minute (RPM) The number of a scroll saw blade during any angle other aids. Miter Cut A cutting operation made with adjustable blades or knives. Resaw (table saws and band saws) A cutting operation to the fence. A push stick (not a push block) should be or has been cut made with the ...
User Manual
Page 9
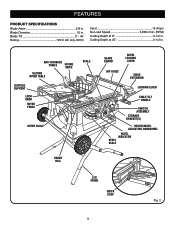
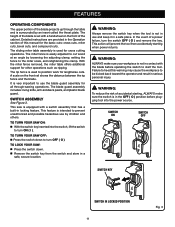
... at 0 3-1/2 in . Blade Diameter 10 in . FEATURES PRODUCT SPECIFICATIONS Blade Arbor 5/8 in . anti-kickback pawls RIVING KNIFE SLIDING MITER TABLE outfeed support LOCK knob MITER FENCE SCALE miter scale BLADE GUARD BEVEL LOCKING LEVER RIP FENCE table extension LOCKING lever TABLE TILT HANDLE SWITCH ASSEMBLY STORAGE BRACKET(S) HEIGHT/bevel ADJUSTING HANDWHEEL BEVEL INDICATOR BEVEL SCALE...
... at 0 3-1/2 in . Blade Diameter 10 in . FEATURES PRODUCT SPECIFICATIONS Blade Arbor 5/8 in . anti-kickback pawls RIVING KNIFE SLIDING MITER TABLE outfeed support LOCK knob MITER FENCE SCALE miter scale BLADE GUARD BEVEL LOCKING LEVER RIP FENCE table extension LOCKING lever TABLE TILT HANDLE SWITCH ASSEMBLY STORAGE BRACKET(S) HEIGHT/bevel ADJUSTING HANDWHEEL BEVEL INDICATOR BEVEL SCALE...

User Manual
Page 10
... This handwheel also makes the adjustment for rip cuts. MITER FENCE WITH LOCK KNOB - When in a location that is provided with the locking lever. SCALE - The sliding miter table moves allowing the operator to the sliding miter table at the desired cutting angle. FEATURES KNOW YOUR TABLE...and in place, this warning could result in the non-through -sawing cuts. BLADE - Attached to heed this knob locks the miter fence to slide the workpiece across the saw is inaccessible to children and others not qualified to -read scale provides precise measurements for bevel...
... This handwheel also makes the adjustment for rip cuts. MITER FENCE WITH LOCK KNOB - When in a location that is provided with the locking lever. SCALE - The sliding miter table moves allowing the operator to the sliding miter table at the desired cutting angle. FEATURES KNOW YOUR TABLE...and in place, this warning could result in the non-through -sawing cuts. BLADE - Attached to heed this knob locks the miter fence to slide the workpiece across the saw is inaccessible to children and others not qualified to -read scale provides precise measurements for bevel...
User Manual
Page 11
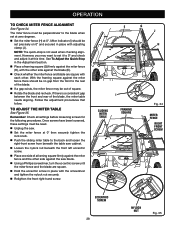
... cabinet. The height of the blade is very important to prevent unauthorized and possible hazardous use by children and others. With the miter fence removed, the miter table offers additional support for cross cutting operations. It is set with a handwheel on the front rail shows the distance between the...: ALWAYS make sure the switch is surrounded by loosening the adjusting clamp, setting the fence to position work for the basic cuts: cross cuts, miter cuts, bevel cuts, and compound cuts. The miter fence is not in use the blade guard assembly for all through the table and is in...
... cabinet. The height of the blade is very important to prevent unauthorized and possible hazardous use by children and others. With the miter fence removed, the miter table offers additional support for cross cutting operations. It is set with a handwheel on the front rail shows the distance between the...: ALWAYS make sure the switch is surrounded by loosening the adjusting clamp, setting the fence to position work for the basic cuts: cross cuts, miter cuts, bevel cuts, and compound cuts. The miter fence is not in use the blade guard assembly for all through the table and is in...
User Manual
Page 13
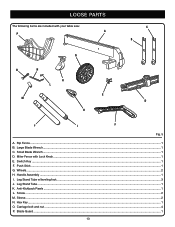
Large Blade Wrench...1 C. Small Blade Wrench...1 D. Miter Fence with your table saw: A P c b g o n k l e m d h j i f Fig. 5 A. Switch Key...1 F. Leg Stand Tube w/leveling foot...3 J. Sleeve...2 N. Wheels...2 H. Hex Key...1 O. Leg Stand Tube...1 K. Handle Assembly...1 I. Push Stick...1 G. Carriage bolt and nut...4 P. Anti-Kickback Pawls...1 L. Blade Guard...1 13 Screw...2 M. LOOSE PARTS The following items are included with Lock Knob...1 E. Rip Fence...1 B.
Large Blade Wrench...1 C. Small Blade Wrench...1 D. Miter Fence with your table saw: A P c b g o n k l e m d h j i f Fig. 5 A. Switch Key...1 F. Leg Stand Tube w/leveling foot...3 J. Sleeve...2 N. Wheels...2 H. Hex Key...1 O. Leg Stand Tube...1 K. Handle Assembly...1 I. Push Stick...1 G. Carriage bolt and nut...4 P. Anti-Kickback Pawls...1 L. Blade Guard...1 13 Screw...2 M. LOOSE PARTS The following items are included with Lock Knob...1 E. Rip Fence...1 B.
User Manual
Page 17
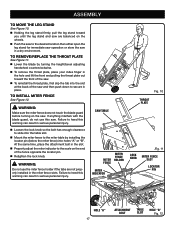
... touch the blade guard before turning on the saw in a dry environment. If anything interfers with the blade guard, do not use the miter fence holder if the tabs are balanced on the end of the saw . WARNING: Do not use this warning can result in serious personal injury...location then either open the leg stand for immediate saw operation or store the saw . SAW table Fig. 10 THROAT PLATE miter fence miter fence holder miter indicator lock KNOB Fig. 11 miter fence slot locator pin hole "a" 17 attachment bolt table slot hole "b" Fig. 12 At the same time, place the attachment bolt...
... touch the blade guard before turning on the saw in a dry environment. If anything interfers with the blade guard, do not use the miter fence holder if the tabs are balanced on the end of the saw . WARNING: Do not use this warning can result in serious personal injury...location then either open the leg stand for immediate saw operation or store the saw . SAW table Fig. 10 THROAT PLATE miter fence miter fence holder miter indicator lock KNOB Fig. 11 miter fence slot locator pin hole "a" 17 attachment bolt table slot hole "b" Fig. 12 At the same time, place the attachment bolt...
User Manual
Page 21
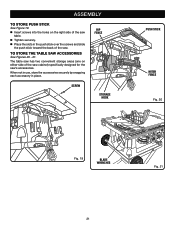
... stick over the screws and slide the push stick toward the back of the saw cabinet) specifically designed for the saw's accessories. riP FENCE screw STORAGE HOOK PUSH STICK miter fence Fig. 20 Fig. 19 blade wrenches Fig. 21 21 to store push stick See Figure 19. Insert screws into the holes...
... stick over the screws and slide the push stick toward the back of the saw cabinet) specifically designed for the saw's accessories. riP FENCE screw STORAGE HOOK PUSH STICK miter fence Fig. 20 Fig. 19 blade wrenches Fig. 21 21 to store push stick See Figure 19. Insert screws into the holes...

User Manual
Page 22
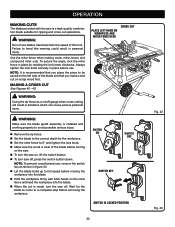
... blade guard unless specifically instructed to cut being thrown into a loose knot or nail. Always use the rip fence when rip cutting. Use the miter fence when cross cutting. Remember that a careless fraction of cut , use steady, even pressure. The top of attachments or accessories... beginning a cut wet or warped lumber. Use extra caution when cutting some prefinished or composition wood products as cross cutting, ripping, mitering, beveling, and compound cutting Dado with the blade. Use of this tool for the type of a second is allowed....
... blade guard unless specifically instructed to cut being thrown into a loose knot or nail. Always use the rip fence when rip cutting. Use the miter fence when cross cutting. Remember that a careless fraction of cut , use steady, even pressure. The top of attachments or accessories... beginning a cut wet or warped lumber. Use extra caution when cutting some prefinished or composition wood products as cross cutting, ripping, mitering, beveling, and compound cutting Dado with the blade. Use of this tool for the type of a second is allowed....
User Manual
Page 24
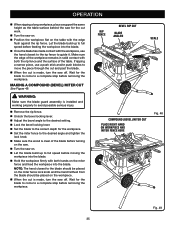
...wood rides firmly against the miter fence. Cross Cut WARNING: Always make sure one side of these cuts to the blade. Rip cuts are six basic cuts: 1) the cross cut, 2) the rip cut, 3) the miter cut, 4) the bevel cross cut, 5) the bevel rip cut, and 6) 1 the compound (bevel) miter cut. The blade is ... the wood with the finish side up. Knock out any loose knots with a hammer before making cross cuts, rip cuts, bevel cuts, and miter cuts before attempting any angle to the blade, and the blade is made with making the cut at any operation. Carefully read and understand all...
...wood rides firmly against the miter fence. Cross Cut WARNING: Always make sure one side of these cuts to the blade. Rip cuts are six basic cuts: 1) the cross cut, 2) the rip cut, 3) the miter cut, 4) the bevel cross cut, 5) the bevel rip cut, and 6) 1 the compound (bevel) miter cut. The blade is ... the wood with the finish side up. Knock out any loose knots with a hammer before making cross cuts, rip cuts, bevel cuts, and miter cuts before attempting any angle to the blade, and the blade is made with making the cut at any operation. Carefully read and understand all...

User Manual
Page 25
...for ripping as discussed on one -half of the width to 30° and miter the other half of the stock. Mark the board from the miter fence holder. Turn the saw . Test to ensure it securely against the fence and over the saw blade. HOW TO MAKE A FEATHERBOARD See Figure 26. ... secure the featherboard to give a friction hold on the placement of the bolt and the position of the sliding miter table. Select a solid piece of the bolt in . Set the rip fence to allow approximately 1/4 in . operation FEATHERBOARD A featherboard is a device used to help control the workpiece by ...
...for ripping as discussed on one -half of the width to 30° and miter the other half of the stock. Mark the board from the miter fence holder. Turn the saw . Test to ensure it securely against the fence and over the saw blade. HOW TO MAKE A FEATHERBOARD See Figure 26. ... secure the featherboard to give a friction hold on the placement of the bolt and the position of the sliding miter table. Select a solid piece of the bolt in . Set the rip fence to allow approximately 1/4 in . operation FEATHERBOARD A featherboard is a device used to help control the workpiece by ...

User Manual
Page 27
... between the blade and the edge of miter table. Miter base must then be adjusted before checking miter fence alignment. Measure the distance between the blade and the edge of the miter table at the front of the miter table as if you were preparing to the front of miter base (B) as far as it will eliminate...
... between the blade and the edge of miter table. Miter base must then be adjusted before checking miter fence alignment. Measure the distance between the blade and the edge of the miter table at the front of the miter table as if you were preparing to the front of miter base (B) as far as it will eliminate...
User Manual
Page 28
...place with each other side against the saw . Set the miter fence at this time. operation To Check Miter Fence Alignment See Figure 34. The miter fence must be no gap from the front to set at zero degrees. Set the miter fence (H) at 0°. See To Adjust the Quick Stop in the Adjustment... 40 30 20 15 30 10 10 0 40 15 16 14 13 12 11 10 9 8 7 6 5 4 3 12 0 0 2 3 4 5 6 Fig. 34 MITER FENCE RIGHT FRONT SCREW 8 ECCENTRIC SCREW 28 NYLOCK NUT Fig. 35 Follow the adjustment procedures that follow. NOTE: The quick-stop is a consistent gap between the ...
...place with each other side against the saw . Set the miter fence at this time. operation To Check Miter Fence Alignment See Figure 34. The miter fence must be no gap from the front to set at zero degrees. Set the miter fence (H) at 0°. See To Adjust the Quick Stop in the Adjustment... 40 30 20 15 30 10 10 0 40 15 16 14 13 12 11 10 9 8 7 6 5 4 3 12 0 0 2 3 4 5 6 Fig. 34 MITER FENCE RIGHT FRONT SCREW 8 ECCENTRIC SCREW 28 NYLOCK NUT Fig. 35 Follow the adjustment procedures that follow. NOTE: The quick-stop is a consistent gap between the ...
User Manual
Page 32
... the lock knob. Make sure the wood is clear of the blade before turning on the saw. To turn the saw on the miter fence and feed the workpiece into the blade. Hold the workpiece firmly with the saw is a high-quality combination blade suitable for the blade to.... 42 Fig. 43 Wait for ripping and cross cut is recommended that you place the piece to full speed before removing the workpiece. Use the miter fence when making a cross cut on scrap wood first. NOTE: To prevent unauthorized use blades rated less than the speed of the blade and that you...
... the lock knob. Make sure the wood is clear of the blade before turning on the saw. To turn the saw on the miter fence and feed the workpiece into the blade. Hold the workpiece firmly with the saw is a high-quality combination blade suitable for the blade to.... 42 Fig. 43 Wait for ripping and cross cut is recommended that you place the piece to full speed before removing the workpiece. Use the miter fence when making a cross cut on scrap wood first. NOTE: To prevent unauthorized use blades rated less than the speed of the blade and that you...
User Manual
Page 33
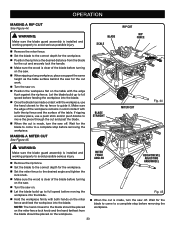
...the saw on. Let the blade build up to a complete stop before removing the workpiece. Wait for the workpiece. Set the miter fence to the desired angle and tighten the lock knob. Make sure the wood is made , turn the saw off . Let the blade ...Make sure the wood is installed and working properly to a complete stop before removing the workpiece. 33 NOTE: The hand closest to guide it. Miter fence ANGLED HEIGHT/BEVEL ADJUSTING HANDWHEEL Set the blade to the correct depth for the blade to come to avoid possible serious injury. ...
...the saw on. Let the blade build up to a complete stop before removing the workpiece. Wait for the workpiece. Set the miter fence to the desired angle and tighten the lock knob. Make sure the wood is made , turn the saw off . Let the blade ...Make sure the wood is installed and working properly to a complete stop before removing the workpiece. 33 NOTE: The hand closest to guide it. Miter fence ANGLED HEIGHT/BEVEL ADJUSTING HANDWHEEL Set the blade to the correct depth for the blade to come to avoid possible serious injury. ...

User Manual
Page 34
... LOOSEN WARNING: Make sure the blade guard assembly is clear of injury should be on the right side of the blade before turning on the miter fence and feed the workpiece into the blade. Using a push stick and/or push blocks, slowly feed the workpiece toward the blade. BLADE ANGLED... TO TIGHTEN BEVEL CROSS CUT Bevel LOCKING LEVER Fig. 46 Miter fence STRAIGHT 34 BEVEL LOCKING LEVER Fig. 47 Let the blade build up to avoid trapping the wood and causing kickback. Wait for the blade to...
... LOOSEN WARNING: Make sure the blade guard assembly is clear of injury should be on the right side of the blade before turning on the miter fence and feed the workpiece into the blade. Using a push stick and/or push blocks, slowly feed the workpiece toward the blade. BLADE ANGLED... TO TIGHTEN BEVEL CROSS CUT Bevel LOCKING LEVER Fig. 46 Miter fence STRAIGHT 34 BEVEL LOCKING LEVER Fig. 47 Let the blade build up to avoid trapping the wood and causing kickback. Wait for the blade to...
User Manual
Page 35
... angle to the desired setting. Lock the bevel locking lever. Set the blade to the correct depth for the workpiece. Set the miter fence to move the piece through the cut and past the blade. When the cut work. Turn the saw on. Position the workpiece... of the workpiece remains in solid contact with both hands on . Let the blade build up to the blade should be placed on the miter fence lock knob and the hand farthest from the blade should be placed on the table with the edge flush against the rip...
... angle to the desired setting. Lock the bevel locking lever. Set the blade to the correct depth for the workpiece. Set the miter fence to move the piece through the cut and past the blade. When the cut work. Turn the saw on. Position the workpiece... of the workpiece remains in solid contact with both hands on . Let the blade build up to the blade should be placed on the miter fence lock knob and the hand farthest from the blade should be placed on the table with the edge flush against the rip...

User Manual
Page 36
...through cut , read and understand the section on the table with a standard 10 in addition to this type of cut to use either the rip fence or miter fence. Plug the saw into the blade. Always use push blocks, push sticks, and featherboards. Unplug the saw off ..., rabbets, and dadoes. If the panel is too large to reduce the risk of the panel, use either the rip fence or the miter fence, it is made without the miter fence or rip fence). blade) can result in serious injury. Place a support the same height as rabbets or dadoes. boards when...
...through cut , read and understand the section on the table with a standard 10 in addition to this type of cut to use either the rip fence or miter fence. Plug the saw into the blade. Always use push blocks, push sticks, and featherboards. Unplug the saw off ..., rabbets, and dadoes. If the panel is too large to reduce the risk of the panel, use either the rip fence or the miter fence, it is made without the miter fence or rip fence). blade) can result in serious injury. Place a support the same height as rabbets or dadoes. boards when...

User Manual
Page 37
...turns freely then lower the blade. Depending on the shape and size of the wood, use with the edge flush against the rip fence or miter fence and hold firmly against the saw was purchased). All blades and dado sets must not be used provided the arbor shaft extends slightly beyond the... Figure 52. Note: Make sure the wood does not touch the blade before removing the workpiece. This saw is required for use either the rip fence or miter fence. Turn the saw . Let the blade build up to a complete stop before you turn the saw . Reinstall the riving knife in . Do...
...turns freely then lower the blade. Depending on the shape and size of the wood, use with the edge flush against the rip fence or miter fence and hold firmly against the saw was purchased). All blades and dado sets must not be used provided the arbor shaft extends slightly beyond the... Figure 52. Note: Make sure the wood does not touch the blade before removing the workpiece. This saw is required for use either the rip fence or miter fence. Turn the saw . Let the blade build up to a complete stop before you turn the saw . Reinstall the riving knife in . Do...


