
English Manual
Page 9
...completely assembled. Any such alteration or modification is misuse and could result in this tool until you are included. FEATURES KNOW YOUR LAMINATE TRIMMER See Figure 1. Failure to modify this tool or create accessories not recommended for use with all items listed in a hazardous ...manual as well as a knowledge of light-duty routing operations. Dual grip Your trimmer is located on the back of the information on each side of this tool. PACKING LIST Laminate Trimmer Collet/Latch Adjustment Wrench Lanyard (not included in combo) Operator's Manual WARNING: If...
...completely assembled. Any such alteration or modification is misuse and could result in this tool until you are included. FEATURES KNOW YOUR LAMINATE TRIMMER See Figure 1. Failure to modify this tool or create accessories not recommended for use with all items listed in a hazardous ...manual as well as a knowledge of light-duty routing operations. Dual grip Your trimmer is located on the back of the information on each side of this tool. PACKING LIST Laminate Trimmer Collet/Latch Adjustment Wrench Lanyard (not included in combo) Operator's Manual WARNING: If...
English Manual
Page 10
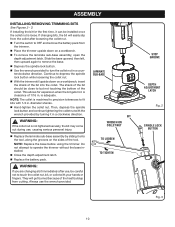
.... NOTE: Replace the base before using the trimmer. n Close the depth adjustment latch. n Replace the battery pack. ASSEMBLY INSTALLING/REMOVING TRIMMING bits See Figures 2 - 3. If installing the bit for expansion when the bit gets hot. n To remove the laminate sub-base assembly, open the depth adjustment latch... the grooves on a workbench, insert the shank of the heat buildup from the trimmer. NOTE: The collet is not tightened securely, the bit may come out during use the wrench provided. n Replace the laminate sub-base assembly by turning it in . If changing bits, the bit will ...
.... NOTE: Replace the base before using the trimmer. n Close the depth adjustment latch. n Replace the battery pack. ASSEMBLY INSTALLING/REMOVING TRIMMING bits See Figures 2 - 3. If installing the bit for expansion when the bit gets hot. n To remove the laminate sub-base assembly, open the depth adjustment latch... the grooves on a workbench, insert the shank of the heat buildup from the trimmer. NOTE: The collet is not tightened securely, the bit may come out during use the wrench provided. n Replace the laminate sub-base assembly by turning it in . If changing bits, the bit will ...

English Manual
Page 13
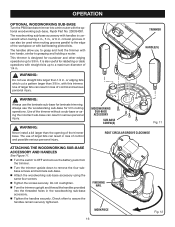
... on the left hand. To change grip positions, remove the laminate sub-base assembly (See "Installing/Removing Trimming Bits"). Do not attempt to the OFF (O) position when finished. Position the base for right- To turn the trimmer ON (I ) position. OPERATION WARNING: Battery tools are always ...in the trimmer base can be seriously cut or burned. or left -handed operation, the depth adjustment latch must be...
... on the left hand. To change grip positions, remove the laminate sub-base assembly (See "Installing/Removing Trimming Bits"). Do not attempt to the OFF (O) position when finished. Position the base for right- To turn the trimmer ON (I ) position. OPERATION WARNING: Battery tools are always ...in the trimmer base can be seriously cut or burned. or left -handed operation, the depth adjustment latch must be...
English Manual
Page 16
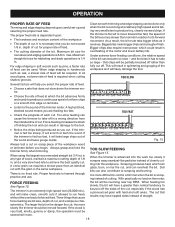
...and hold the trimmer with the optional woodworking sub-base, Ryobi Part No. 200334001. The use the woodworking sub-base for rabbeting or dado operations with handles is convenient when routing 4 in., 5 in., or 6 in serious personal injury. n Turn the trimmer upright and thread...be used when routing grooves parallel to a maximum diameter of control and serious personal injury. OPERATION OPTIONAL woodworking Sub-base Turn the P600 laminate trimmer into the threaded holes in the woodworking sub-base accessory. 1 3/14/12/4 n Tighten the handles securely. The woodworking sub...
...and hold the trimmer with the optional woodworking sub-base, Ryobi Part No. 200334001. The use the woodworking sub-base for rabbeting or dado operations with handles is convenient when routing 4 in., 5 in., or 6 in serious personal injury. n Turn the trimmer upright and thread...be used when routing grooves parallel to a maximum diameter of control and serious personal injury. OPERATION OPTIONAL woodworking Sub-base Turn the P600 laminate trimmer into the threaded holes in the woodworking sub-base accessory. 1 3/14/12/4 n Tighten the handles securely. The woodworking sub...
English Manual
Page 18
... battery life. Scraping produces heat, which the bit advances firmly and surely to produce a continuous spiral of uniform chips or a smooth trim edge on laminate. • Listen to move forward too fast, the speed of feed can overheat the bit. With practically no fixed rule. When feeding too slowly,... slow - A high-pitched, strained sound means you are bit size, depth of the workpiece wood or laminate before you cut , and can be revolving near top RPM. Always grasp and hold the trimmer firmly when trimming. and a very slow feed rate to bounce off . The proper feed rate is no...
... battery life. Scraping produces heat, which the bit advances firmly and surely to produce a continuous spiral of uniform chips or a smooth trim edge on laminate. • Listen to move forward too fast, the speed of feed can overheat the bit. With practically no fixed rule. When feeding too slowly,... slow - A high-pitched, strained sound means you are bit size, depth of the workpiece wood or laminate before you cut , and can be revolving near top RPM. Always grasp and hold the trimmer firmly when trimming. and a very slow feed rate to bounce off . The proper feed rate is no...


