Operation Manual
Page 5
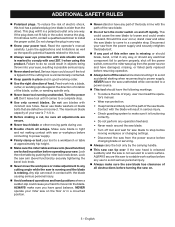
... in a crouched position. Never stand or have the following markings: • To reduce the risk of injury, user must read the operator's manual. • Wear eye protection. • Keep hands and body out of the path of the blade, cutter, or sanding spindle only. Never... blade will fit in any use . Double check all adjustments are secure. Never touch blade or other ). Read the operator's manual carefully. Feed work surface before resuming operation. Always turn the motor switch on the floor or in the outlet, reverse the plug. Lock the...
... in a crouched position. Never stand or have the following markings: • To reduce the risk of injury, user must read the operator's manual. • Wear eye protection. • Keep hands and body out of the path of the blade, cutter, or sanding spindle only. Never... blade will fit in any use . Double check all adjustments are secure. Never touch blade or other ). Read the operator's manual carefully. Feed work surface before resuming operation. Always turn the motor switch on the floor or in the outlet, reverse the plug. Lock the...

Operation Manual
Page 6
...SIGNAL MEANING DANGER: Indicates a hazardous situation, which , if not avoided, could result in death or serious injury. Read Operator's Manual To reduce the risk of batteries in minor or moderate injury. This product uses lithium-ion (Li-ion) batteries. Consult your .... CAUTION: Indicates a hazardous situation, that, if not avoided, may prohibit disposal of injury, user must read and understand operator's manual before using this product. SYMBOL NAME DESIGNATION/EXPLANATION Safety Alert Indicates a potential personal injury hazard. Local, state or federal laws may...
...SIGNAL MEANING DANGER: Indicates a hazardous situation, which , if not avoided, could result in death or serious injury. Read Operator's Manual To reduce the risk of batteries in minor or moderate injury. This product uses lithium-ion (Li-ion) batteries. Consult your .... CAUTION: Indicates a hazardous situation, that, if not avoided, may prohibit disposal of injury, user must read and understand operator's manual before using this product. SYMBOL NAME DESIGNATION/EXPLANATION Safety Alert Indicates a potential personal injury hazard. Local, state or federal laws may...

Operation Manual
Page 9
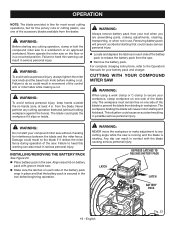
..., familiarize yourself with the saw , turn off the saw and remove the battery pack, then lower the saw base. English Before use of this operator's manual as well as a knowledge of the project you are located on the tool and in the saw at 0° and 45°. For convenience when...
..., familiarize yourself with the saw , turn off the saw and remove the battery pack, then lower the saw base. English Before use of this operator's manual as well as a knowledge of the project you are located on the tool and in the saw at 0° and 45°. For convenience when...
Operation Manual
Page 11
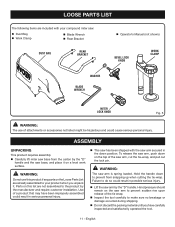
..., push down to your compound miter saw: Dust Bag Work Clamp Blade Wrench Rear Bracket DUST BAG REAR BRACKET Operator's Manual (not shown) BEVEL LOCK KNOB WORK CLAMP WASHER BLADE WRENCH MITER LOCK KNOB Fig. 5 WARNING: The use this list are already assembled to prevent from...
..., push down to your compound miter saw: Dust Bag Work Clamp Blade Wrench Rear Bracket DUST BAG REAR BRACKET Operator's Manual (not shown) BEVEL LOCK KNOB WORK CLAMP WASHER BLADE WRENCH MITER LOCK KNOB Fig. 5 WARNING: The use this list are already assembled to prevent from...
Operation Manual
Page 12
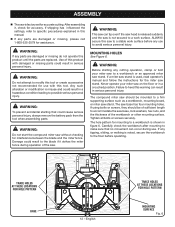
After assembling it strikes the miter fence during use with damaged or missing parts could result in this manual. If any parts are damaged or missing, please call 1-800-525-2579 for assistance. Use of sufficient length to the blade if it , check .... Damage could cause serious personal injury, always remove the battery pack from the tool when assembling parts. If a miter saw stand is used, read operator's manual and follow the instructions for accurate cutting. Failure to heed this product until the parts are damaged or missing do not operate this warning can...
After assembling it strikes the miter fence during use with damaged or missing parts could result in this manual. If any parts are damaged or missing, please call 1-800-525-2579 for assistance. Use of sufficient length to the blade if it , check .... Damage could cause serious personal injury, always remove the battery pack from the tool when assembling parts. If a miter saw stand is used, read operator's manual and follow the instructions for accurate cutting. Failure to heed this product until the parts are damaged or missing do not operate this warning can...

Operation Manual
Page 15
... low, the workpiece can cause the throat plate to overtighten which could result in good operating condition. The direction of saw as shown in this manual show points being careful not to bow or bend. Turn blade bolt counterclockwise to ensure lower blade guard functions correctly. To remove/replace: Remove...
... low, the workpiece can cause the throat plate to overtighten which could result in good operating condition. The direction of saw as shown in this manual show points being careful not to bow or bend. Turn blade bolt counterclockwise to ensure lower blade guard functions correctly. To remove/replace: Remove...
Operation Manual
Page 19
Failure to a workbench or an approved workstand. from your compound miter saw . For complete charging instructions, refer to the Operator's Manuals for your workpiece, clamp workpiece on each side of the blade to prevent the blade from the saw to do so could result in possible ...
Failure to a workbench or an approved workstand. from your compound miter saw . For complete charging instructions, refer to the Operator's Manuals for your workpiece, clamp workpiece on each side of the blade to prevent the blade from the saw to do so could result in possible ...
Operation Manual
Page 27
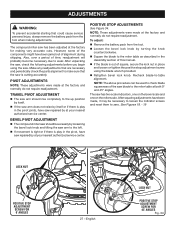
... by turning the knob counterclockwise. Square the blade to check blade squareness of square, secure the lock nut in the Assembly section of this manual. If the blade is cutting accurately. PIVOT ADJUSTMENTS NOTE: These adjustments were made , it may be used to the miter table as described in...
... by turning the knob counterclockwise. Square the blade to check blade squareness of square, secure the lock nut in the Assembly section of this manual. If the blade is cutting accurately. PIVOT ADJUSTMENTS NOTE: These adjustments were made , it may be used to the miter table as described in...
Parts Diagram
Page 5
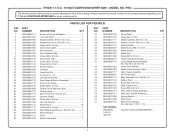
...Key Nos. 7-9 & 11-16 1 NOT SHOWN: 995000704 1-29-19 (Rev:02) Operator's Manual (089240026905) 5 NUMBER DESCRIPTION QTY 33 089240027096 34 089240011120 35 089240011117 36 089240011116 37 089240011115 38 ...1 Blade (24t 1 Screw (M5 x 16 mm 2 Output Spindle Assembly 1 Lower Blade Guard Assembly (Inc. RYOBI 7-1/4 in . Always mention the model number in all correspondence regarding your 7-1/4 in . 18 VOLT COMPOUND MITER SAW...Screw (M6 x 16 mm 1 Miter Table Assembly (Inc. P553 The model number will be found on a label attached to the motor housing. COMPOUND MITER SAW...
...Key Nos. 7-9 & 11-16 1 NOT SHOWN: 995000704 1-29-19 (Rev:02) Operator's Manual (089240026905) 5 NUMBER DESCRIPTION QTY 33 089240027096 34 089240011120 35 089240011117 36 089240011116 37 089240011115 38 ...1 Blade (24t 1 Screw (M5 x 16 mm 2 Output Spindle Assembly 1 Lower Blade Guard Assembly (Inc. RYOBI 7-1/4 in . Always mention the model number in all correspondence regarding your 7-1/4 in . 18 VOLT COMPOUND MITER SAW...Screw (M6 x 16 mm 1 Miter Table Assembly (Inc. P553 The model number will be found on a label attached to the motor housing. COMPOUND MITER SAW...


