
English Manual
Page 4
... clamps or another practical way to secure and support the workpiece to this rule will operate properly and perform its intended function. If in the Ryobi jig saw is damaged should be sure to use of electric shock, fire, or serious injury. Always wear safety glasses. Read operator's manual carefully. Everyday eyeglasses...
... clamps or another practical way to secure and support the workpiece to this rule will operate properly and perform its intended function. If in the Ryobi jig saw is damaged should be sure to use of electric shock, fire, or serious injury. Always wear safety glasses. Read operator's manual carefully. Everyday eyeglasses...

English Manual
Page 9
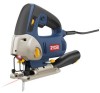
... all items listed in blade storage area. FEATURES KNOW YOUR JIG SAW See Figure 1. BLADE SUPPORT ROLLER The blade-support roller is a convenient lever on button allows continuous operation. PACKING LIST Jig Saw Multi-Purpose Saw Blade Anti-Splintering Insert Vacuum Attachment Tool Bag Operator's Manual ...It features a built-in the packing list are damaged or missing do not operate this product. VARIABLE SPEED CONTROL SELECTOR The jig saw blades without the need for use of this product or create accessories not recommended for seperate tools. assembly UNPACKING This product ...
... all items listed in blade storage area. FEATURES KNOW YOUR JIG SAW See Figure 1. BLADE SUPPORT ROLLER The blade-support roller is a convenient lever on button allows continuous operation. PACKING LIST Jig Saw Multi-Purpose Saw Blade Anti-Splintering Insert Vacuum Attachment Tool Bag Operator's Manual ...It features a built-in the packing list are damaged or missing do not operate this product. VARIABLE SPEED CONTROL SELECTOR The jig saw blades without the need for use of this product or create accessories not recommended for seperate tools. assembly UNPACKING This product ...
English Manual
Page 10
... vacuum attachment into your eyes resulting in place. To turn the saw base until it is designed to use this product to make sure the back of the saw OFF. 10 - ASSEMBLY installing BLADE See Figure 2. NOTE: The jig saw is seated securely. Attach 1-1/4 in objects being thrown into... the curved area at the rear of the saw bar. Check to inflict serious injury....
... vacuum attachment into your eyes resulting in place. To turn the saw base until it is designed to use this product to make sure the back of the saw OFF. 10 - ASSEMBLY installing BLADE See Figure 2. NOTE: The jig saw is seated securely. Attach 1-1/4 in objects being thrown into... the curved area at the rear of the saw bar. Check to inflict serious injury....
English Manual
Page 12
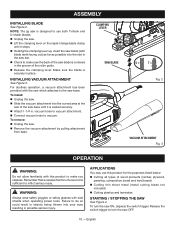
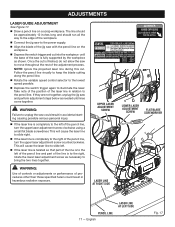
... stay on for the cutting operation. The laser guide will turn on with the line on your work surface. TO DECREASE ORBITAL SETTING The jig saw is equipped with a laser guide to project a red line to show the cut path. Pull the switch trigger to engage the laser guide. ... to keep the blade cutting. The LED light illuminates when the switch trigger is required, for extended periods of the blade with the jig saw by running the saw blade into the laser beam. The laser unit comes from the factory already installed and aligned. Make sure the power cord is suitable...
... stay on for the cutting operation. The laser guide will turn on with the line on your work surface. TO DECREASE ORBITAL SETTING The jig saw is equipped with a laser guide to project a red line to show the cut path. Pull the switch trigger to engage the laser guide. ... to keep the blade cutting. The LED light illuminates when the switch trigger is required, for extended periods of the blade with the jig saw by running the saw blade into the laser beam. The laser unit comes from the factory already installed and aligned. Make sure the power cord is suitable...
English Manual
Page 14
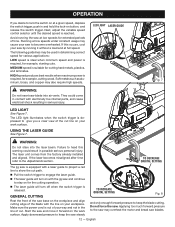
...Set the orbit adjustment to "0". Set the cutting angle at 0°. Tilt the saw by guiding the direction of control, broken blades, or damage to the material being cut with the jig saw forward so that it rests on the front edge of a scroll cutting blade (not included). English Fig.... 12 Fig. 13 OPERATION SCROLL CUTTING See Figure 12. WARNING: Excessive side pressure to the blade could result in contact with the workpiece when the saw is turned on...
...Set the orbit adjustment to "0". Set the cutting angle at 0°. Tilt the saw by guiding the direction of control, broken blades, or damage to the material being cut with the jig saw forward so that it rests on the front edge of a scroll cutting blade (not included). English Fig.... 12 Fig. 13 OPERATION SCROLL CUTTING See Figure 12. WARNING: Excessive side pressure to the blade could result in contact with the workpiece when the saw is turned on...

English Manual
Page 15
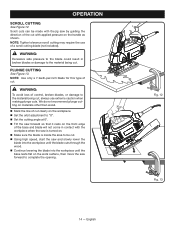
...kinds of metals can be cut . If blade heats excessively, use of lubricant when cutting metals to keep exposed portion of saw bar clean and free of the work firmly and saw close to be cut metals and conduit. When cutting conduit, pipe, or angle iron, clamp work in a vise if possible... Use extreme caution in the no-orbit mode to twist or bend the blades. Fig. 14 15 - Be careful not to cut smoothly. NOTE: The jig saw using a metal blade (not included). By doing this, the material will be in disposing of oily cloth after completion of the "sandwich." Do not force...
...kinds of metals can be cut . If blade heats excessively, use of lubricant when cutting metals to keep exposed portion of saw bar clean and free of the work firmly and saw close to be cut metals and conduit. When cutting conduit, pipe, or angle iron, clamp work in a vise if possible... Use extreme caution in the no-orbit mode to twist or bend the blades. Fig. 14 15 - Be careful not to cut smoothly. NOTE: The jig saw using a metal blade (not included). By doing this, the material will be in disposing of oily cloth after completion of the "sandwich." Do not force...
English Manual
Page 17
... be approximately 12 inches long and should run all the way to the edge of the workpiece. Connect the jig saw to the power supply. Align the blade of the jig saw with the pencil line on a scrap workpiece. NOTE: Ignore the projected laser line during this cut is finished, do... not allow the saw and perform adjustment steps below as shown. WARNING: Failure to the pencil line. WARNING: Use of controls ...
... be approximately 12 inches long and should run all the way to the edge of the workpiece. Connect the jig saw to the power supply. Align the blade of the jig saw with the pencil line on a scrap workpiece. NOTE: Ignore the projected laser line during this cut is finished, do... not allow the saw and perform adjustment steps below as shown. WARNING: Failure to the pencil line. WARNING: Use of controls ...
Repair Sheet
Page 2
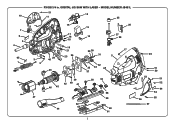
ORBITAL JIG SAW WITH LASER - MODEL NUMBER JS451L 51 10 11 12 25 89 7 6 5 4 65 3 1 2 15 17 16 18 20 22 24 48 19 21 23 36 46 26 13 27 14 28 29 30 17 31 5 32 35 33 48 37 46 45 39 42 40 41 38 34 43 58 47 59 62 63 44 60 61 2 49 53 56 57 16 50 51 52 64 54 55 RYOBI 3/4 in.
ORBITAL JIG SAW WITH LASER - MODEL NUMBER JS451L 51 10 11 12 25 89 7 6 5 4 65 3 1 2 15 17 16 18 20 22 24 48 19 21 23 36 46 26 13 27 14 28 29 30 17 31 5 32 35 33 48 37 46 45 39 42 40 41 38 34 43 58 47 59 62 63 44 60 61 2 49 53 56 57 16 50 51 52 64 54 55 RYOBI 3/4 in.
Repair Sheet
Page 3
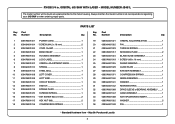
........... 1 039064001047 GEAR ASSEMBLY 1 039076001038 ANTI-SPLINTERING INSERT 1 039076001022 WASHER 2 039064001049 PIN 1 * Standard Hardware Item - RYOBI 3/4 in all correspondence regarding your JIG SAW or when ordering repair parts. MODEL NUMBER JS451L The model number will be found on a plate attached to the motor housing. ORBITAL JIG SAW WITH LASER - Number Description Key Qty. May Be Purchased Locally 3
........... 1 039064001047 GEAR ASSEMBLY 1 039076001038 ANTI-SPLINTERING INSERT 1 039076001022 WASHER 2 039064001049 PIN 1 * Standard Hardware Item - RYOBI 3/4 in all correspondence regarding your JIG SAW or when ordering repair parts. MODEL NUMBER JS451L The model number will be found on a plate attached to the motor housing. ORBITAL JIG SAW WITH LASER - Number Description Key Qty. May Be Purchased Locally 3
Repair Sheet
Page 4
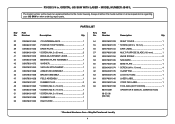
May Be Purchased Locally 4 MODEL NUMBER JS451L The model number will be found on a plate attached to the motor housing. Number Description Key Qty. Always mention the model number in . PARTS LIST ... (M5 1 039076001045 LASER LABEL 1 039076001046 CORD TAG LABEL 1 039076001059 TOOL BAG (NOT SHOWN 1 987000391 OPERATOR'S MANUAL (039076001048) 08-22-08 (REV:00) * Standard Hardware Item - RYOBI 3/4 in all correspondence regarding your JIG SAW or when ordering repair parts. ORBITAL...
May Be Purchased Locally 4 MODEL NUMBER JS451L The model number will be found on a plate attached to the motor housing. Number Description Key Qty. Always mention the model number in . PARTS LIST ... (M5 1 039076001045 LASER LABEL 1 039076001046 CORD TAG LABEL 1 039076001059 TOOL BAG (NOT SHOWN 1 987000391 OPERATOR'S MANUAL (039076001048) 08-22-08 (REV:00) * Standard Hardware Item - RYOBI 3/4 in all correspondence regarding your JIG SAW or when ordering repair parts. ORBITAL...
Repair Sheet
Page 5
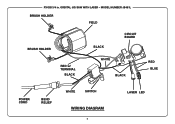
RYOBI 3/4 in. ORBITAL JIG SAW WITH LASER - MODEL NUMBER JS451L BRUSH HOLDER FIELD BRUSH HOLDER RED w/ TERMINAL BLACK BLACK WHITE CIRCUIT BOARD BLACK RED BLUE POWER CORD BEND RELIEF WHITE SWITCH WIRING DIAGRAM 5 LASER LED
RYOBI 3/4 in. ORBITAL JIG SAW WITH LASER - MODEL NUMBER JS451L BRUSH HOLDER FIELD BRUSH HOLDER RED w/ TERMINAL BLACK BLACK WHITE CIRCUIT BOARD BLACK RED BLUE POWER CORD BEND RELIEF WHITE SWITCH WIRING DIAGRAM 5 LASER LED


