
Operation Manual
Page 2
...was purchased. TABLE OF CONTENTS Introduction...2 Warranty...2 General Power Tool Safety Warnings...3-4 Circular Saw Safety Warnings...4-6 Symbols...7 Electrical...8 Features...9 Assembly...9-10 Operation...... TO GET SERVICE: Just return the power tool, properly packaged and postage prepaid, to www.ryobitools.com. WARRANTY RYOBI® POWER TOOL - The replacement power tool will repair any faulty workmanship, and either request service under this ...
...was purchased. TABLE OF CONTENTS Introduction...2 Warranty...2 General Power Tool Safety Warnings...3-4 Circular Saw Safety Warnings...4-6 Symbols...7 Electrical...8 Features...9 Assembly...9-10 Operation...... TO GET SERVICE: Just return the power tool, properly packaged and postage prepaid, to www.ryobitools.com. WARRANTY RYOBI® POWER TOOL - The replacement power tool will repair any faulty workmanship, and either request service under this ...
Operation Manual
Page 4
... parts or failure to eliminate the cause of non wood cutting blades can be avoided by the operator, if proper precautions are holding the saw motionless in a hazardous situation. If both hands on auxiliary handle, or motor housing. The guard can be controlled by taking into the ...: Never use a rip fence or straight edge guide. Secure the workpiece to be cut for operations different from those intended could cause the saw and position your arms to a complete stop. Kickback could result in the material until the blade comes to resist kickback forces. CAUSES AND ...
... parts or failure to eliminate the cause of non wood cutting blades can be avoided by the operator, if proper precautions are holding the saw motionless in a hazardous situation. If both hands on auxiliary handle, or motor housing. The guard can be controlled by taking into the ...: Never use a rip fence or straight edge guide. Secure the workpiece to be cut for operations different from those intended could cause the saw and position your arms to a complete stop. Kickback could result in the material until the blade comes to resist kickback forces. CAUSES AND ...
Operation Manual
Page 5
...61550; Lower guard should be released. Learn its path. Wear hearing protection during extended periods of the lower guard spring. A guard or other sawing, the lower guard should be replaced only by the manufacturer or by an authorized service center. The smaller the gauge number, the heavier the ...a guard or other conditions that is accidentally dropped, lower guard may use of cord location. Before further use this rule will cause the saw if lower guard does not move freely and close instantly. A cord exceeding 100 feet is dusty. Holding the work by retracting handle and ...
...61550; Lower guard should be released. Learn its path. Wear hearing protection during extended periods of the lower guard spring. A guard or other sawing, the lower guard should be replaced only by the manufacturer or by an authorized service center. The smaller the gauge number, the heavier the ...a guard or other conditions that is accidentally dropped, lower guard may use of cord location. Before further use this rule will cause the saw if lower guard does not move freely and close instantly. A cord exceeding 100 feet is dusty. Holding the work by retracting handle and ...

Operation Manual
Page 6
... bricks and cement and other reproductive harm. English To reduce your exposure, work . Wash hands after handling. CIRCULAR SAW SAFETY WARNINGS CALIFORNIA PROPOSITION 65 WARNING: This product and some dust created by power sanding, sawing, grinding, drilling, and other construction activities may contain chemicals, including lead, known to filter out microscopic particles...
... bricks and cement and other reproductive harm. English To reduce your exposure, work . Wash hands after handling. CIRCULAR SAW SAFETY WARNINGS CALIFORNIA PROPOSITION 65 WARNING: This product and some dust created by power sanding, sawing, grinding, drilling, and other construction activities may contain chemicals, including lead, known to filter out microscopic particles...
Operation Manual
Page 9
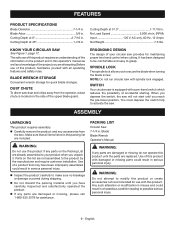
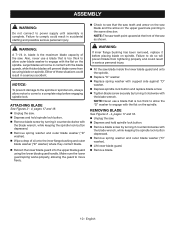
...It has been designed to be comfortable and easy to make sure no breakage or damage occurred during shipping. NOTE: Do not run circular saw will not start until the parts are damaged or missing, please call 1-800-525-2579 for maintaining proper two hand control when cutting. ... operator, a dust chute is located on this operator's manual as well as a knowledge of accidental starting. When you depress the switch, the saw with damaged or missing parts could result in this list are attempting.Before use this product with spindle lock engaged. Blade Arbor 5/8 in . BLADE...
...It has been designed to be comfortable and easy to make sure no breakage or damage occurred during shipping. NOTE: Do not run circular saw will not start until the parts are damaged or missing, please call 1-800-525-2579 for maintaining proper two hand control when cutting. ... operator, a dust chute is located on this operator's manual as well as a knowledge of accidental starting. When you depress the switch, the saw with damaged or missing parts could result in this list are attempting.Before use this product with spindle lock engaged. Blade Arbor 5/8 in . BLADE...
Operation Manual
Page 10
... capacity of oil onto the inner flange bushing and outer blade washer ("D" washer) where they contact blade. n Wipe a drop of the saw. WARNING: If inner flange bushing has been removed, replace it clockwise with the blade guards, while thicker blades will prevent blade screw from...Check to a complete stop before placing blade on the upper guard are pointing in accidental starting and possible serious personal injury. Either of the saw . Depress and hold spindle lock button. Make sure the lower guard spring works properly, allowing the guard to comply could result in...
... capacity of oil onto the inner flange bushing and outer blade washer ("D" washer) where they contact blade. n Wipe a drop of the saw. WARNING: If inner flange bushing has been removed, replace it clockwise with the blade guards, while thicker blades will prevent blade screw from...Check to a complete stop before placing blade on the upper guard are pointing in accidental starting and possible serious personal injury. Either of the saw . Depress and hold spindle lock button. Make sure the lower guard spring works properly, allowing the guard to comply could result in...
Operation Manual
Page 11
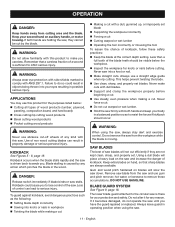
... Do not allow familiarity with ANSI Z87.1. Use of control can result in possible serious injury. DANGER: Release switch immediately if blade binds or saw and use this product for any reason. This helps prevent twisting the blade. Use clean, sharp, and properly set blade ... damaged, do so could cause you careless. OPERATION DANGER: Keep hands away from the workpiece while the blade is sufficient to the circular saw , they are always available. Keep your eyes resulting in property damage or serious personal injury. WARNING: Always wear eye protection with side...
... Do not allow familiarity with ANSI Z87.1. Use of control can result in possible serious injury. DANGER: Release switch immediately if blade binds or saw and use this product for any reason. This helps prevent twisting the blade. Use clean, sharp, and properly set blade ... damaged, do so could cause you careless. OPERATION DANGER: Keep hands away from the workpiece while the blade is sufficient to the circular saw , they are always available. Keep your eyes resulting in property damage or serious personal injury. WARNING: Always wear eye protection with side...
Operation Manual
Page 12
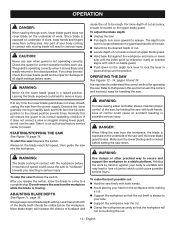
... the lower blade guard in possible serious injury. Always keep hands and fingers away from the full open position to the closed , unplug the saw firmly with both hands. Avoid placing your hand on the workpiece while making a cut. Support the workpiece so that the... workpiece will restore the guard to understand the correct method for handling the saw . It is closed position. Make sure the lower blade guard is important to its normal operating condition. Exercise the lower guard by moving blade...
... the lower blade guard in possible serious injury. Always keep hands and fingers away from the full open position to the closed , unplug the saw firmly with both hands. Avoid placing your hand on the workpiece while making a cut. Support the workpiece so that the... workpiece will restore the guard to understand the correct method for handling the saw . It is closed position. Make sure the lower blade guard is important to its normal operating condition. Exercise the lower guard by moving blade...

Operation Manual
Page 13
...NOTE: Do not bind the blade in this manual. Secure the workpiece. Clamp a straight edge to the workpiece using C-clamps. Saw along a guideline to TO ADJUST BEVEL SETTING next. WARNING: Attempting a bevel cut . Release the switch and allow the blade to come to any ... can result in scrap material along the straight edge to the correct blade depth setting. Swing the lower blade guard up using the saw again. Attempting a pocket cut at any , you must offset the guideline to OPTIONAL EDGE GUIDE later in the cut . Refer to produce ...
...NOTE: Do not bind the blade in this manual. Secure the workpiece. Clamp a straight edge to the workpiece using C-clamps. Saw along a guideline to TO ADJUST BEVEL SETTING next. WARNING: Attempting a bevel cut . Release the switch and allow the blade to come to any ... can result in scrap material along the straight edge to the correct blade depth setting. Swing the lower blade guard up using the saw again. Attempting a pocket cut at any , you must offset the guideline to OPTIONAL EDGE GUIDE later in the cut . Refer to produce ...
Operation Manual
Page 14
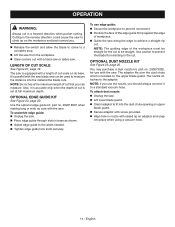
...back toward you can be used to the adaptor. It is set at full maximum depth. Also, it to a complete stop. Lift the saw along the edge to fit into the dust chute opening on upper blade guard. Secure adaptor with screw provided. Align hole in nozzle...workpiece to prevent movement. Position the face of the edge guide firmly against the edge of cut . To attach dust nozzle: Unplug the saw . OPTIONAL EDGE GUIDE KIT See Figure 22, page 20. Use caution to the width needed. Tighten edge guide lock knob securely. OPERATION WARNING:...
...back toward you can be used to the adaptor. It is set at full maximum depth. Also, it to a complete stop. Lift the saw along the edge to fit into the dust chute opening on upper blade guard. Secure adaptor with screw provided. Align hole in nozzle...workpiece to prevent movement. Position the face of the edge guide firmly against the edge of cut . To attach dust nozzle: Unplug the saw . OPTIONAL EDGE GUIDE KIT See Figure 22, page 20. Use caution to the width needed. Tighten edge guide lock knob securely. OPERATION WARNING:...

Operation Manual
Page 15
... Take care that has been factory adjusted to secure. Insert a flathead screwdriver into place. If the lever prematurely contacts any part of the saw blade. Tighten hex nut and bevel lock knob securely. Then slide it back into place. Push the E-ring back into the groove...not pop off the lock nut. The lock nut has six flat sides. ADJUSTING THE DEPTH LOCK LEVER See Figure 25, page 20. The saw . Loosen bevel lock knob. Loosen hex nut securing adjusting screw. Turn adjusting screw and adjust base until it snaps ...
... Take care that has been factory adjusted to secure. Insert a flathead screwdriver into place. If the lever prematurely contacts any part of the saw blade. Tighten hex nut and bevel lock knob securely. Then slide it back into place. Push the E-ring back into the groove...not pop off the lock nut. The lock nut has six flat sides. ADJUSTING THE DEPTH LOCK LEVER See Figure 25, page 20. The saw . Loosen bevel lock knob. Loosen hex nut securing adjusting screw. Turn adjusting screw and adjust base until it snaps ...
Repair Sheet
Page 2
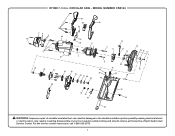
RYOBI 7-1/4 in damages to the double insulation system possibly causing electrical shock or electrocution. Any repairs requiring disassembly of a double insulated tool can result in . For the service center nearest you call 1-800-525-2579. 2 MODEL NUMBER CSB124 29 30 29 31 1 23 4 1 44 6 32 33 8 5 45 7 9 11 12 13 14 18 19 21 23 24 22 25 26 27 49 28 9 40 39 38 48 41 42 20 50 35 36 37 34 47 15 46 16 17 10 43 WARNING: Improper repair of your tool requires safety testing and should only be performed by a Ryobi Authorized Service Center. CIRCULAR SAW -
RYOBI 7-1/4 in damages to the double insulation system possibly causing electrical shock or electrocution. Any repairs requiring disassembly of a double insulated tool can result in . For the service center nearest you call 1-800-525-2579. 2 MODEL NUMBER CSB124 29 30 29 31 1 23 4 1 44 6 32 33 8 5 45 7 9 11 12 13 14 18 19 21 23 24 22 25 26 27 49 28 9 40 39 38 48 41 42 20 50 35 36 37 34 47 15 46 16 17 10 43 WARNING: Improper repair of your tool requires safety testing and should only be performed by a Ryobi Authorized Service Center. CIRCULAR SAW -
Repair Sheet
Page 3
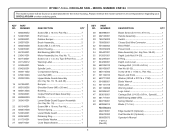
MODEL NUMBER CSB124 The model number will be found on a label attached to the motor housing. Key No. 7... Bolt (1/4-20 x 5/8 in., Special)......... 1 Ball Bearing (6000-2RS 1 Spring Washer 1 Blade (7-1/4 in all correspondence regarding your CIRCULAR SAW or when ordering parts. Always mention the model number in 1 Edge Guide Kit (Optional 1 Dust Nozzle Kit (Optional 1 Operator's Manual... 1 Retaining Ring 1 Inner Blade Washer 1 Outer Blade Washer 1 KEY NO. RYOBI 7-1/4 in 1 Handle Assembly 1 Switch 1 Closed End Wire Connector 1 Bend Relief 1 Power Cord 1 Base Assembly (Inc.
MODEL NUMBER CSB124 The model number will be found on a label attached to the motor housing. Key No. 7... Bolt (1/4-20 x 5/8 in., Special)......... 1 Ball Bearing (6000-2RS 1 Spring Washer 1 Blade (7-1/4 in all correspondence regarding your CIRCULAR SAW or when ordering parts. Always mention the model number in 1 Edge Guide Kit (Optional 1 Dust Nozzle Kit (Optional 1 Operator's Manual... 1 Retaining Ring 1 Inner Blade Washer 1 Outer Blade Washer 1 KEY NO. RYOBI 7-1/4 in 1 Handle Assembly 1 Switch 1 Closed End Wire Connector 1 Bend Relief 1 Power Cord 1 Base Assembly (Inc.
Repair Sheet
Page 4
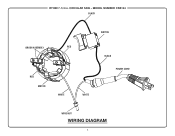
RYOBI 7-1/4 in. CIRCULAR SAW - MODEL NUMBER CSB124 BLACK SWITCH BRUSH ASSEMBLY RED RED MOTOR WHITE WHITE BLACK POWER CORD WIRE NUT WIRING DIAGRAM 4
RYOBI 7-1/4 in. CIRCULAR SAW - MODEL NUMBER CSB124 BLACK SWITCH BRUSH ASSEMBLY RED RED MOTOR WHITE WHITE BLACK POWER CORD WIRE NUT WIRING DIAGRAM 4


