
Owners Manual
Page 2
... Contents Section Page Important Safety Instructions 2 Introduction 4 Unpacking and Checking Carton Contents 4 Caster/Caster Foot Assembly 4 Filter Removal and Installation 5 Wet/Dry Vac Assembly 6 Insert Hose 6 To Store Your Accessories 7 Operation 7 Vacuuming Dry Materials 8 Vacuuming Liquids 8 Section Page Emptying the Drum 9 Moving the Wet/Dry Vac 9 Blowing Feature 9 Maintenance 10 Filter...
... Contents Section Page Important Safety Instructions 2 Introduction 4 Unpacking and Checking Carton Contents 4 Caster/Caster Foot Assembly 4 Filter Removal and Installation 5 Wet/Dry Vac Assembly 6 Insert Hose 6 To Store Your Accessories 7 Operation 7 Vacuuming Dry Materials 8 Vacuuming Liquids 8 Section Page Emptying the Drum 9 Moving the Wet/Dry Vac 9 Blowing Feature 9 Maintenance 10 Filter...
Owners Manual
Page 3
...DOUBLE INSULATED GROUNDING NOT REQUIRED. To reduce the frequency of static shocks in severe eye damage. ! Observe the following warnings that appear on the hose or Vac. CAUTION: • To reduce the risk of hearing damage, wear ear protectors when using as a sprayer. - WARNING: To reduce...use with damaged cord, plug or other hazardous materials. To reduce power loss, use a 14 gauge extension cord if 25 to Vac, use only Ridgid recommended accessories. • When using for outdoor use. The operation of any ventilation openings blocked; SP6765-2 12 GALLON ES 2/3/12 2:00 PM ...
...DOUBLE INSULATED GROUNDING NOT REQUIRED. To reduce the frequency of static shocks in severe eye damage. ! Observe the following warnings that appear on the hose or Vac. CAUTION: • To reduce the risk of hearing damage, wear ear protectors when using as a sprayer. - WARNING: To reduce...use with damaged cord, plug or other hazardous materials. To reduce power loss, use a 14 gauge extension cord if 25 to Vac, use only Ridgid recommended accessories. • When using for outdoor use. The operation of any ventilation openings blocked; SP6765-2 12 GALLON ES 2/3/12 2:00 PM ...
Owners Manual
Page 4
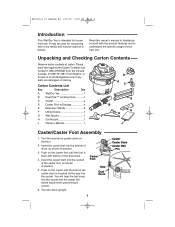
...). 5. Insert the caster feet into the socket of drum, as shown (4 places). 3. Carton Contents List Key Description Qty A Wet/Dry Vac 1 B Dual-Flex™ Locking Hose ...........1 C Caster 4 D Caster Foot w/Storage 4 E Extension Wands 2 F Utility Nozzle 1 G Wet Nozzle 1 H Car Nozzle 1 J Owner's Manual 1 D A C B F E H G J Caster/Caster ... dust drum. 4. It may be used for household use. Check each item against the Carton Contents List. Contact 1-800-4-RIDGID from the US and Canada, 01-800-701-9811 from Mexico, or E-mail us at [email protected] if any parts...
...). 5. Insert the caster feet into the socket of drum, as shown (4 places). 3. Carton Contents List Key Description Qty A Wet/Dry Vac 1 B Dual-Flex™ Locking Hose ...........1 C Caster 4 D Caster Foot w/Storage 4 E Extension Wands 2 F Utility Nozzle 1 G Wet Nozzle 1 H Car Nozzle 1 J Owner's Manual 1 D A C B F E H G J Caster/Caster ... dust drum. 4. It may be used for household use. Check each item against the Carton Contents List. Contact 1-800-4-RIDGID from the US and Canada, 01-800-701-9811 from Mexico, or E-mail us at [email protected] if any parts...
Owners Manual
Page 6
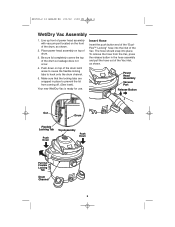
... Locking Tab Push Down Top Assembly Push Down Pull Out Flexible Locking Tab Drum Channel 6 Place power head assembly on top of the Vac. The hose should snap into the inlet of the drum latch areas to cause the flexible locking tabs to prevent the lid from coming off. (See inset...). To remove the hose from the Vac, press the release button in place to hook onto the drum channel. 5. Make sure that the locking tabs are snapped in the...
... Locking Tab Push Down Top Assembly Push Down Pull Out Flexible Locking Tab Drum Channel 6 Place power head assembly on top of the Vac. The hose should snap into the inlet of the drum latch areas to cause the flexible locking tabs to prevent the lid from coming off. (See inset...). To remove the hose from the Vac, press the release button in place to hook onto the drum channel. 5. Make sure that the locking tabs are snapped in the...
Owners Manual
Page 7
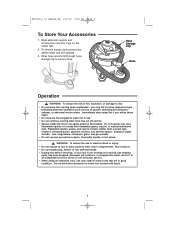
Hose Storage Clip Hose Operation ! Immediately stop using Vac if you may fail to notice important signs indicating abnormal operation such as it to an ...extension wands and accessories over the rings on the caster feet. 2. Do not operate Vac near flammable liquids or in good condition. Wrap hose around lid through hose storage clip to Vac: • Do not leave Vac running when float has cut off suction. • Sparks inside the motor can ...and accessories, lightly rotate and pull upward. 3. If your Vac is not working as loss of fire, explosion, or damage to secure hose.
Hose Storage Clip Hose Operation ! Immediately stop using Vac if you may fail to notice important signs indicating abnormal operation such as it to an ...extension wands and accessories over the rings on the caster feet. 2. Do not operate Vac near flammable liquids or in good condition. Wrap hose around lid through hose storage clip to Vac: • Do not leave Vac running when float has cut off suction. • Sparks inside the motor can ...and accessories, lightly rotate and pull upward. 3. If your Vac is not working as loss of fire, explosion, or damage to secure hose.
Owners Manual
Page 8
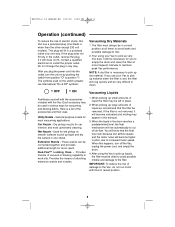
... quickly and be used on by pushing the switch from position "O" to the Vac, do not run motor with the Vac. Dual-Flex™ Locking Hose - When picking up liquids, the filter must always be necessary for most upholstery cleaning. After using your Vac to Vac. 2. Do not change the plug...
... quickly and be used on by pushing the switch from position "O" to the Vac, do not run motor with the Vac. Dual-Flex™ Locking Hose - When picking up liquids, the filter must always be necessary for most upholstery cleaning. After using your Vac to Vac. 2. Do not change the plug...
Owners Manual
Page 9
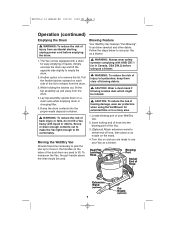
... slightly to lift comfortably. Scoop or drain enough contents out to make the Vac light enough to empty the drum. 2. Insert locking end of hose into the proper waste disposal container. ! Turn Vac on the sides of the lid to use your Wet/Dry Vac. 2. The Vac comes...above the inlet should be inhaled. ! Pull the flexible latches outward on a clean area while emptying drum or changing filter. 5. Dual-Flex Locking Hose Blowing Port Swivel End of hearing damage, wear ear protectors when using the Vac/Blower for easy emptying of blowing debris. ! Blowing Feature Your Wet...
... slightly to lift comfortably. Scoop or drain enough contents out to make the Vac light enough to empty the drum. 2. Insert locking end of hose into the proper waste disposal container. ! Turn Vac on the sides of the lid to use your Wet/Dry Vac. 2. The Vac comes...above the inlet should be inhaled. ! Pull the flexible latches outward on a clean area while emptying drum or changing filter. 5. Dual-Flex Locking Hose Blowing Port Swivel End of hearing damage, wear ear protectors when using the Vac/Blower for easy emptying of blowing debris. ! Blowing Feature Your Wet...
Owners Manual
Page 10
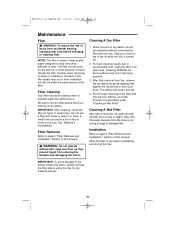
...with holes or tears in the living quarters. 3. The debris will not affect the performance of this manual. Take care that water pressure from a hose or spigot. Handle the filter carefully when removing to dry before changing or cleaning filter. Be sure to page 5 "Filter Removal and Installation" Section... and float, as described under "Cleaning A Wet Filter" Cleaning A Wet Filter After filter is removed, run water through the filter from the hose is made of dust to accumulated dust, clean the filter in the filter pleats may occur from installation but will loosen and fall. 4.
...with holes or tears in the living quarters. 3. The debris will not affect the performance of this manual. Take care that water pressure from a hose or spigot. Handle the filter carefully when removing to dry before changing or cleaning filter. Be sure to page 5 "Filter Removal and Installation" Section... and float, as described under "Cleaning A Wet Filter" Cleaning A Wet Filter After filter is removed, run water through the filter from the hose is made of dust to accumulated dust, clean the filter in the filter pleats may occur from installation but will loosen and fall. 4.
Owners Manual
Page 11
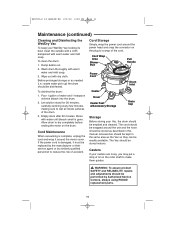
...1 teaspoon chlorine bleach into the drum. 2. To clean the drum: 1. Cord Storage Simply, wrap the power cord around the unit and the hose should be stored as described in the same area as needed (i.e.; Accessories should be kept in this manual. WARNING: To assure product SAFETY and ..., unplug the cord and wrap it must be replaced by the manufacturer or their service agent or by Authorized Service Centers, always using RIDGID replacement parts. 11 waste water pick up) the drum should be wrapped around the power head and snap the connector on the drum....
...1 teaspoon chlorine bleach into the drum. 2. To clean the drum: 1. Cord Storage Simply, wrap the power cord around the unit and the hose should be stored as described in the same area as needed (i.e.; Accessories should be kept in this manual. WARNING: To assure product SAFETY and ..., unplug the cord and wrap it must be replaced by the manufacturer or their service agent or by Authorized Service Centers, always using RIDGID replacement parts. 11 waste water pick up) the drum should be wrapped around the power head and snap the connector on the drum....

Owners Manual
Page 12
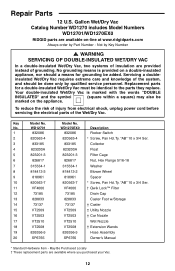
...™ Filter Drain Cap Caster Foot w/Storage † Caster † Utility Nozzle † Car Nozzle Wet Nozzle † Extension Wands Dual-Flex™ Locking Hose Assembly Owner's Manual * Standard Hardware Item - Replacement parts for grounding be added. Key Model No. Ty. No grounding means is marked with the words "DOUBLE... of injury from electrical shock, unplug power cord before servicing the electrical parts of the Wet/Dry Vac. Gallon Wet/Dry Vac Catalog Number WD1270 includes Model Numbers WD12701/WD1270EX0 RIDGID parts are available where you purchased your Vac. 12
...™ Filter Drain Cap Caster Foot w/Storage † Caster † Utility Nozzle † Car Nozzle Wet Nozzle † Extension Wands Dual-Flex™ Locking Hose Assembly Owner's Manual * Standard Hardware Item - Replacement parts for grounding be added. Key Model No. Ty. No grounding means is marked with the words "DOUBLE... of injury from electrical shock, unplug power cord before servicing the electrical parts of the Wet/Dry Vac. Gallon Wet/Dry Vac Catalog Number WD1270 includes Model Numbers WD12701/WD1270EX0 RIDGID parts are available where you purchased your Vac. 12
Parts Guide
Page 2
...Lock™ Filter Drain Cap Caster Foot w/Storage † Caster † Utility Nozzle † Car Nozzle Wet Nozzle † Extension Wands Hose Assembly Owner's Manual * Standard Hardware Item - No grounding means is marked with the words "DOUBLE INSULATED" and the symbol (square within a ...; These replacement parts are provided instead of grounding. Repair Parts 12 U.S. Gallon Wet/Dry Vac Catalog Number WD1270 includes Model Numbers WD12701/WD1270EX0 RIDGID parts are available on a double-insulated appliance, nor should be marked on the appliance. WARNING SERVICING OF...
...Lock™ Filter Drain Cap Caster Foot w/Storage † Caster † Utility Nozzle † Car Nozzle Wet Nozzle † Extension Wands Hose Assembly Owner's Manual * Standard Hardware Item - No grounding means is marked with the words "DOUBLE INSULATED" and the symbol (square within a ...; These replacement parts are provided instead of grounding. Repair Parts 12 U.S. Gallon Wet/Dry Vac Catalog Number WD1270 includes Model Numbers WD12701/WD1270EX0 RIDGID parts are available on a double-insulated appliance, nor should be marked on the appliance. WARNING SERVICING OF...