Owners Manual
Page 1
SP6636 Printed in Canada Save this manual for future reference FOR QUESTIONS OR INFORMATION CONTACT US AT 1-800-4-RIDGID (1-800-474-3443) OR www.ridgid.com Part No. SP6636 1/10/07 9:52 AM Page 1 OWNERS MANUAL RV2400A/RV2600B LARGE CAPACITY - 2-STAGE COMMERCIAL & HOUSEHOLD WET/DRY VACS For Your Safety: Read all instructions carefully before using.
SP6636 Printed in Canada Save this manual for future reference FOR QUESTIONS OR INFORMATION CONTACT US AT 1-800-4-RIDGID (1-800-474-3443) OR www.ridgid.com Part No. SP6636 1/10/07 9:52 AM Page 1 OWNERS MANUAL RV2400A/RV2600B LARGE CAPACITY - 2-STAGE COMMERCIAL & HOUSEHOLD WET/DRY VACS For Your Safety: Read all instructions carefully before using.
Owners Manual
Page 2
...Grounding Instructions 4 Introduction 5 Unpacking and Checking Carton Contents 5-7 Tools Required 5 Carton Contents List 6-7 Replacement Filter Assembly 8 Drum/Caddy Assembly 9-11 Installing Handle 10 Removing Handle 10 Installing Tool Holder 11 Wet/Dry Vac Assembly 11 Insert Hose and Accessory Assembly . . . 11 Operation 12-14 Vacuuming Dry Materials 13 Vacuuming Liquids 13 Section Page Filter Performance Sensor 13 Emptying the Drum 13 Moving the Wet/Dry Vac 13 Blowing Feature 14 Accessory and Hose Storage 15 Cord Wrap 15 Maintenance 15-16 Filter...
...Grounding Instructions 4 Introduction 5 Unpacking and Checking Carton Contents 5-7 Tools Required 5 Carton Contents List 6-7 Replacement Filter Assembly 8 Drum/Caddy Assembly 9-11 Installing Handle 10 Removing Handle 10 Installing Tool Holder 11 Wet/Dry Vac Assembly 11 Insert Hose and Accessory Assembly . . . 11 Operation 12-14 Vacuuming Dry Materials 13 Vacuuming Liquids 13 Section Page Filter Performance Sensor 13 Emptying the Drum 13 Moving the Wet/Dry Vac 13 Blowing Feature 14 Accessory and Hose Storage 15 Cord Wrap 15 Maintenance 15-16 Filter...

Owners Manual
Page 3
... that let the Vac tip or rock. Do not run Vac over cord. Do not vacuum with ANSI Z87.1 (or in . See Grounding Instructions in this Vac with your Vac is necessary when used as described in foreign objects being blown into the air. • Do not leave Vac when plugged in Canada CSA Z94.3) before starting , unplug power cord before changing or cleaning filter. • Do not...
... that let the Vac tip or rock. Do not run Vac over cord. Do not vacuum with ANSI Z87.1 (or in . See Grounding Instructions in this Vac with your Vac is necessary when used as described in foreign objects being blown into the air. • Do not leave Vac when plugged in Canada CSA Z94.3) before starting , unplug power cord before changing or cleaning filter. • Do not...
Owners Manual
Page 4
... Wet/Dry Vac. Do not run unattended. Do not use on a nominal 120-volt circuit, and has a grounded plug that appear on the motor housing of your own safety, read and understand owner's manual. SAVE THIS MANUAL FOR FUTURE REFERENCE Grounding Instructions This appliance must be inserted into an appropriate outlet that are in doubt as shown. Check with a qualified electrician or service...
... Wet/Dry Vac. Do not run unattended. Do not use on a nominal 120-volt circuit, and has a grounded plug that appear on the motor housing of your own safety, read and understand owner's manual. SAVE THIS MANUAL FOR FUTURE REFERENCE Grounding Instructions This appliance must be inserted into an appropriate outlet that are in doubt as shown. Check with a qualified electrician or service...
Owners Manual
Page 5
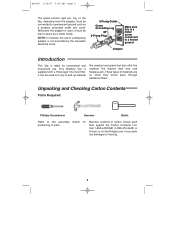
... and Checking Carton Contents Tools Required Phillips Screwdriver Hammer Mallet Refer to the assembly sketch for commercial and household use of materials are damaged or missing. 5 This Wet/Dry Vac is a metal screw connected to a permanent ground such as a properly grounded outlet box cover. Call 1-800-4-RIDGID (1-800-474-3443) or E-mail us at info@ridgid.com if any parts are...
... and Checking Carton Contents Tools Required Phillips Screwdriver Hammer Mallet Refer to the assembly sketch for commercial and household use of materials are damaged or missing. 5 This Wet/Dry Vac is a metal screw connected to a permanent ground such as a properly grounded outlet box cover. Call 1-800-4-RIDGID (1-800-474-3443) or E-mail us at info@ridgid.com if any parts are...
Owners Manual
Page 6
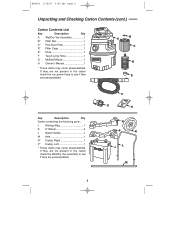
... Dust Filter 1 D* Filter Cage 1 E* Float 1 F Tug-A-Long Hose 1 G Muffler/Diffuser 1 H Owner's Manual 1 * These items may come preassembled. If they are not present in the carton check the Wet/Dry Vac assembly to see if they are preassembled. If they are not present in the carton check the vac power head to see if they are preassembled. B A C D E Key Description Qty Carton containing the following parts: J Storage Bag 1 K 8" Wheel 2 L Metal Handle...
... Dust Filter 1 D* Filter Cage 1 E* Float 1 F Tug-A-Long Hose 1 G Muffler/Diffuser 1 H Owner's Manual 1 * These items may come preassembled. If they are not present in the carton check the Wet/Dry Vac assembly to see if they are preassembled. If they are not present in the carton check the vac power head to see if they are preassembled. B A C D E Key Description Qty Carton containing the following parts: J Storage Bag 1 K 8" Wheel 2 L Metal Handle...
Owners Manual
Page 7
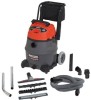
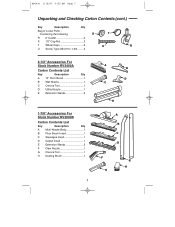
...Unpacking and Checking Carton Contents (cont.) Key Description Qty Bag of Loose Parts Containing the following: S T R 2" Caster 2 S 1/2" Cap Nut 2 T Wheel Caps 2 U R U Screw, Type AB #10 x 1-3/4 ........4 2-1/2" Accessories For Stock Number RV2400A Carton Contents List Key Description Qty A 14" Floor Brush 1 B Wet Nozzle 1 C Crevice Tool 1 D Utility Nozzle 1 E Extension Wands 2 A B D C E 1-7/8" Accessories For Stock Number RV2600B Carton Contents List Key Description Qty A Multi-Nozzle Body 1 B Floor Brush Insert 1 C Squeegee Insert 1 D Carpet Insert...
...Unpacking and Checking Carton Contents (cont.) Key Description Qty Bag of Loose Parts Containing the following: S T R 2" Caster 2 S 1/2" Cap Nut 2 T Wheel Caps 2 U R U Screw, Type AB #10 x 1-3/4 ........4 2-1/2" Accessories For Stock Number RV2400A Carton Contents List Key Description Qty A 14" Floor Brush 1 B Wet Nozzle 1 C Crevice Tool 1 D Utility Nozzle 1 E Extension Wands 2 A B D C E 1-7/8" Accessories For Stock Number RV2600B Carton Contents List Key Description Qty A Multi-Nozzle Body 1 B Floor Brush Insert 1 C Squeegee Insert 1 D Carpet Insert...
Owners Manual
Page 8
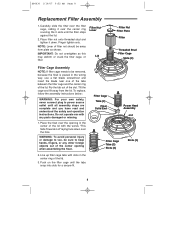
... float over the opening when assembling the float . 2. Filter Cage Tabs (3) Float Solid End THIS SIDE TOWARD LID Power Head Assembly Lid Filter Cage Tabs (3) Slots (3) Slots (3) 8 SP6636 1/10/07 9:52 AM Page 8 Replacement Filter Assembly 1. Finger tighten only. Filter Nut Lever Lid Filter Nut Filter Plate Filter Threaded Stud Filter Cage Slots (3) Filter Cage Assembly NOTE: If filter cage needs to be sure to keep hands, fingers, or any parts damaged or...
... float over the opening when assembling the float . 2. Filter Cage Tabs (3) Float Solid End THIS SIDE TOWARD LID Power Head Assembly Lid Filter Cage Tabs (3) Slots (3) Slots (3) 8 SP6636 1/10/07 9:52 AM Page 8 Replacement Filter Assembly 1. Finger tighten only. Filter Nut Lever Lid Filter Nut Filter Plate Filter Threaded Stud Filter Cage Slots (3) Filter Cage Assembly NOTE: If filter cage needs to be sure to keep hands, fingers, or any parts damaged or...

Owners Manual
Page 9
... open end of shaft through the caddy right, as shown. 4. It is required on one side of wheel facing outward), and install second cap nut. 5. Install cap nut on both sides. Using a rubber mallet or hammer, gently tap the wheel caps onto each wheel until firmly seated. Place the caddy assembly .... 2. Be sure that wheels spin freely, and do not contact the caddies. 6. SP6636 1/10/07 9:52 AM Page 9 Drum/Caddy Assembly If any parts are firmly seated onto each wheel. NOTE: Smooth side of each end of the wheel to install caddy. Do not assemble until fully seated. Invert...
... open end of shaft through the caddy right, as shown. 4. It is required on one side of wheel facing outward), and install second cap nut. 5. Install cap nut on both sides. Using a rubber mallet or hammer, gently tap the wheel caps onto each wheel until firmly seated. Place the caddy assembly .... 2. Be sure that wheels spin freely, and do not contact the caddies. 6. SP6636 1/10/07 9:52 AM Page 9 Drum/Caddy Assembly If any parts are firmly seated onto each wheel. NOTE: Smooth side of each end of the wheel to install caddy. Do not assemble until fully seated. Invert...

Owners Manual
Page 10
...is inserted all the way into the socket. Removing Handle Press and hold release buttons while installing handle into the socket and the caster will be able to hear the ball snap into handle receptacles in release buttons, pull handle upwards to the bottom of handle. Do not over tighten the screws, as...of release buttons indicates successful engagement of the drum. Insert the caster stem into matching holes on the caster until just snug. SP6636 1/10/07 9:52 AM Page 10 Drum/Caddy Assembly (cont.) 8. Push on both right and left side of caddy, securing the caddies to remove ...
...is inserted all the way into the socket. Removing Handle Press and hold release buttons while installing handle into the socket and the caster will be able to hear the ball snap into handle receptacles in release buttons, pull handle upwards to the bottom of handle. Do not over tighten the screws, as...of release buttons indicates successful engagement of the drum. Insert the caster stem into matching holes on the caster until just snug. SP6636 1/10/07 9:52 AM Page 10 Drum/Caddy Assembly (cont.) 8. Push on both right and left side of caddy, securing the caddies to remove ...
Owners Manual
Page 11
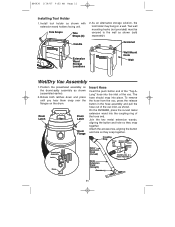
... Page 11 Installing Tool Holder 1. Position the powerhead assembly on the drum/caddy assembly as shown (sold separately). Install tool holder as shown. Join the two metal extension wands, aligning the button and hole so they snap together. Handle Grommet Extension Wand Storage Locations Wall Mount Hook Wall Wet/Dry Vac Assembly 1. To remove the hose from the vac, press the release button in the hose assembly and pull the hose out of...
... Page 11 Installing Tool Holder 1. Position the powerhead assembly on the drum/caddy assembly as shown (sold separately). Install tool holder as shown. Join the two metal extension wands, aligning the button and hole so they snap together. Handle Grommet Extension Wand Storage Locations Wall Mount Hook Wall Wet/Dry Vac Assembly 1. To remove the hose from the vac, press the release button in the hose assembly and pull the hose out of...
Owners Manual
Page 12
... type cleaners, oilbase paints, gasoline, alcohol or aerosol sprays. After you plug the power cord into the outlet, turn the unit on the switch actuator are not limited to reach locations. 1-7/8" Dusting Brush - "O" is the symbol for "OFF" and "l" is the symbol for large area clean-ups on smooth surfaces. 1-7/8" Squeegee Insert - Use to pick up liquid and dry the surface in the air. Used for...
... type cleaners, oilbase paints, gasoline, alcohol or aerosol sprays. After you plug the power cord into the outlet, turn the unit on the switch actuator are not limited to reach locations. 1-7/8" Dusting Brush - "O" is the symbol for "OFF" and "l" is the symbol for large area clean-ups on smooth surfaces. 1-7/8" Squeegee Insert - Use to pick up liquid and dry the surface in the air. Used for...

Owners Manual
Page 13
... vac, unplug the power cord, and empty the drum. Your Wet/Dry Vac comes with a drain for about 10 minutes. When using the vac to pick up dry material, you can quickly dry the filter by running the vac without hose attached for easy emptying of liquid the filter may be in the rear of damage to pick up dust when the filter is wet, the filter will clog quickly and be removed. NOTE: A dry filter is not removed, water...
... vac, unplug the power cord, and empty the drum. Your Wet/Dry Vac comes with a drain for about 10 minutes. When using the vac to pick up dry material, you can quickly dry the filter by running the vac without hose attached for easy emptying of liquid the filter may be in the rear of damage to pick up dust when the filter is wet, the filter will clog quickly and be removed. NOTE: A dry filter is not removed, water...

Owners Manual
Page 14
... opposite end of the vac. To remove the hose from the vac, press the release button in Canada, CSA Z94.3) before using as a blower. SP6636 1/10/07 9:52 AM Page 14 Operation (cont.) Blowing Feature Your vac features a blowing port. It can blow sawdust and other debris. Insert the locking end of your vac as a blower. Locate blowing port of the...
... opposite end of the vac. To remove the hose from the vac, press the release button in Canada, CSA Z94.3) before using as a blower. SP6636 1/10/07 9:52 AM Page 14 Operation (cont.) Blowing Feature Your vac features a blowing port. It can blow sawdust and other debris. Insert the locking end of your vac as a blower. Locate blowing port of the...

Owners Manual
Page 15
... Wand Extension Wand Storage Cord Wrap When vacuuming is made of high quality paper designed to performance of the motor cover. damaging the motor. Replacement Three Layer Fine Removal Dust Filters are moving impeller. Handle the filter carefully when removing to the blower wheel and motor, always reinstall the filter before changing water from Three Layer Fine Dust Filter VF5000. The float prevents unplug power cord before using the vac for the RIDGID replacement, unscrew the filter...
... Wand Extension Wand Storage Cord Wrap When vacuuming is made of high quality paper designed to performance of the motor cover. damaging the motor. Replacement Three Layer Fine Removal Dust Filters are moving impeller. Handle the filter carefully when removing to the blower wheel and motor, always reinstall the filter before changing water from Three Layer Fine Dust Filter VF5000. The float prevents unplug power cord before using the vac for the RIDGID replacement, unscrew the filter...
Owners Manual
Page 16
... will dry it . Wet Filter After filter is gone. Remember: To dry a filter quickly, reinstall the filter on the drum. Even a small hole can be emptied and cleaned. Wash drum thoroughly with water until bleach smell is removed, run for tears or small holes. To disinfect the drum: 1. WARNING: To assure product SAFETY and RELIABILITY, repairs and adjustments should be performed by Authorized Service Centers, always using RIDGID replacement parts...
... will dry it . Wet Filter After filter is gone. Remember: To dry a filter quickly, reinstall the filter on the drum. Even a small hole can be emptied and cleaned. Wash drum thoroughly with water until bleach smell is removed, run for tears or small holes. To disinfect the drum: 1. WARNING: To assure product SAFETY and RELIABILITY, repairs and adjustments should be performed by Authorized Service Centers, always using RIDGID replacement parts...
Owners Manual
Page 17
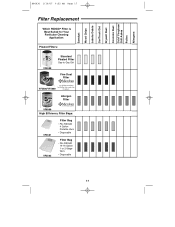
... 17 Filter Replacement Which RIDGID® Filter is Best Suited for Your Particular Cleaning Application: Pleated Filters: VF44000000 Standard Pleated Filter Day-to-Day Dirt Fine Dust Filter Microban® antimicrobial product protection * *Use VF3500 (short filter) for Wet/Dry Vacs smaller than VF3500/VF5000 five-gallons. Allergen Filter VF6000 Microban® antimicrobial product protection High Efficiency Filter Bags: VF3501 VF3502 Filter Bag • Fits RIDGID 4 Gallon Portable Vacs • Disposable Filter Bag • Fits RIDGID 14...
... 17 Filter Replacement Which RIDGID® Filter is Best Suited for Your Particular Cleaning Application: Pleated Filters: VF44000000 Standard Pleated Filter Day-to-Day Dirt Fine Dust Filter Microban® antimicrobial product protection * *Use VF3500 (short filter) for Wet/Dry Vacs smaller than VF3500/VF5000 five-gallons. Allergen Filter VF6000 Microban® antimicrobial product protection High Efficiency Filter Bags: VF3501 VF3502 Filter Bag • Fits RIDGID 4 Gallon Portable Vacs • Disposable Filter Bag • Fits RIDGID 14...
Owners Manual
Page 18
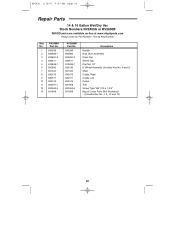
...SP6636 Description Actuator, Switch Switch, Toggle Motor Brush Motor Assembly Cord Assembly Muffler/Diffuser Drum Latch Float Filter Cage Filter - 3-Layer Filter Nut Motor Gaskets (2) Dusting Brush Multi-Nozzle Body Floor Brush Insert Replacement Floor Brush Inserts (set of long & short brushes) Carpet Insert Squeegee Insert Replacement Squeegee Inserts (set of long & short rubber squeegees) Claw Nozzle Tug-A-Long Hose Extension Wand Upper (metal) Extension Wand Lower (metal) Floor Brush Wet Nozzle Crevice Tool Utility Nozzle Extension Wands Owner's Manual 18 Part No. 1 830564 2 813213...
...SP6636 Description Actuator, Switch Switch, Toggle Motor Brush Motor Assembly Cord Assembly Muffler/Diffuser Drum Latch Float Filter Cage Filter - 3-Layer Filter Nut Motor Gaskets (2) Dusting Brush Multi-Nozzle Body Floor Brush Insert Replacement Floor Brush Inserts (set of long & short brushes) Carpet Insert Squeegee Insert Replacement Squeegee Inserts (set of long & short rubber squeegees) Claw Nozzle Tug-A-Long Hose Extension Wand Upper (metal) Extension Wand Lower (metal) Floor Brush Wet Nozzle Crevice Tool Utility Nozzle Extension Wands Owner's Manual 18 Part No. 1 830564 2 813213...
Owners Manual
Page 20
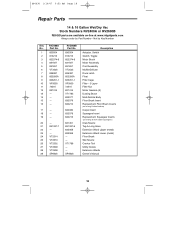
... 820563-5 831668 Description Handle Dust Drum Assembly Drain Cap Wheel Cap Cap Nut 1/2" 8" Wheel Assembly (Includes Key No. 4 and 5) Shaft Caddy, Right Caddy, Left Caster Tote Screw Type "AB" #10 x 1-3/4" Bag of Loose Parts (Not Illustrated) (Includes Key No. 4, 5, 10 and 12) 20 SP6636 1/10/07 9:52 AM Page 20 Repair Parts 14 & 16 Gallon Wet/Dry Vac Stock Numbers RV2400A or RV2600B RIDGID parts are available on...
... 820563-5 831668 Description Handle Dust Drum Assembly Drain Cap Wheel Cap Cap Nut 1/2" 8" Wheel Assembly (Includes Key No. 4 and 5) Shaft Caddy, Right Caddy, Left Caster Tote Screw Type "AB" #10 x 1-3/4" Bag of Loose Parts (Not Illustrated) (Includes Key No. 4, 5, 10 and 12) 20 SP6636 1/10/07 9:52 AM Page 20 Repair Parts 14 & 16 Gallon Wet/Dry Vac Stock Numbers RV2400A or RV2600B RIDGID parts are available on...
Owners Manual
Page 22
... have your purchase price. This warranty gives you specific rights, and you get service To obtain the benefit of your Model Number and Serial Number on behalf of the RIDGE TOOL COMPANY. c 2007 Emerson Part No. SP6636 Emerson Tool Company A Division Of Emerson Electric Co. or, if after three attempts to repair or replace during the warranty period the product is still defective, you . No...
... have your purchase price. This warranty gives you specific rights, and you get service To obtain the benefit of your Model Number and Serial Number on behalf of the RIDGE TOOL COMPANY. c 2007 Emerson Part No. SP6636 Emerson Tool Company A Division Of Emerson Electric Co. or, if after three attempts to repair or replace during the warranty period the product is still defective, you . No...


