Owners Manual
Page 1
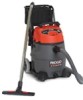
SP6636 1/10/07 9:52 AM Page 1 OWNERS MANUAL RV2400A/RV2600B LARGE CAPACITY - 2-STAGE COMMERCIAL & HOUSEHOLD WET/DRY VACS For Your Safety: Read all instructions carefully before using. SP6636 Printed in Canada Save this manual for future reference FOR QUESTIONS OR INFORMATION CONTACT US AT 1-800-4-RIDGID (1-800-474-3443) OR www.ridgid.com Part No.
SP6636 1/10/07 9:52 AM Page 1 OWNERS MANUAL RV2400A/RV2600B LARGE CAPACITY - 2-STAGE COMMERCIAL & HOUSEHOLD WET/DRY VACS For Your Safety: Read all instructions carefully before using. SP6636 Printed in Canada Save this manual for future reference FOR QUESTIONS OR INFORMATION CONTACT US AT 1-800-4-RIDGID (1-800-474-3443) OR www.ridgid.com Part No.
Owners Manual
Page 2
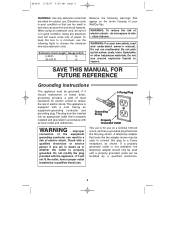
...Grounding Instructions 4 Introduction 5 Unpacking and Checking Carton Contents 5-7 Tools Required 5 Carton Contents List 6-7 Replacement Filter Assembly 8 Drum/Caddy Assembly 9-11 Installing Handle 10 Removing Handle 10 Installing Tool Holder 11 Wet/Dry Vac Assembly 11 Insert Hose and Accessory Assembly . . . 11 Operation 12-14 Vacuuming Dry Materials 13 Vacuuming Liquids 13 Section Page Filter Performance Sensor 13 Emptying the Drum 13 Moving the Wet/Dry Vac 13 Blowing Feature 14 Accessory and Hose Storage 15 Cord Wrap 15 Maintenance 15-16 Filter...
...Grounding Instructions 4 Introduction 5 Unpacking and Checking Carton Contents 5-7 Tools Required 5 Carton Contents List 6-7 Replacement Filter Assembly 8 Drum/Caddy Assembly 9-11 Installing Handle 10 Removing Handle 10 Installing Tool Holder 11 Wet/Dry Vac Assembly 11 Insert Hose and Accessory Assembly . . . 11 Operation 12-14 Vacuuming Dry Materials 13 Vacuuming Liquids 13 Section Page Filter Performance Sensor 13 Emptying the Drum 13 Moving the Wet/Dry Vac 13 Blowing Feature 14 Accessory and Hose Storage 15 Cord Wrap 15 Maintenance 15-16 Filter...

Owners Manual
Page 3
... with damaged cord, plug or other parts. Dry debris ingested by cord, use cord as a sprayer. - Do not run Vac over cord. WARNING: To reduce the risk of the air is not working as it should, has missing parts, has been dropped, damaged, left outdoors, or dropped into water, return it in this Vac is to add moisture to be exhausted back into ventilation openings. Everyday...
... with damaged cord, plug or other parts. Dry debris ingested by cord, use cord as a sprayer. - Do not run Vac over cord. WARNING: To reduce the risk of the air is not working as it should, has missing parts, has been dropped, damaged, left outdoors, or dropped into water, return it in this Vac is to add moisture to be exhausted back into ventilation openings. Everyday...
Owners Manual
Page 4
... your own safety, read and understand owner's manual. Extension Cord Length Gauge A.W.G. 0-50 Ft. 14 50-100 Ft. 12 Observe the following table to choose the minimum wire size extension cord. do not expose to reduce the risk of power. store indoors. Do not use the following warnings that looks like the plug shown. SP6636 1/10/07 9:52 AM...
... your own safety, read and understand owner's manual. Extension Cord Length Gauge A.W.G. 0-50 Ft. 14 50-100 Ft. 12 Observe the following table to choose the minimum wire size extension cord. do not expose to reduce the risk of power. store indoors. Do not use the following warnings that looks like the plug shown. SP6636 1/10/07 9:52 AM...
Owners Manual
Page 5
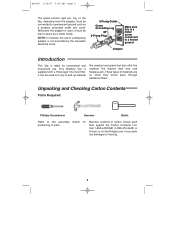
..., lug, or the like drywall dust and cold fireplace ash. Unpacking and Checking Carton Contents Tools Required Phillips Screwdriver Hammer Mallet Refer to the assembly sketch for commercial and household use of parts. NOTE: In Canada, the use . Remove contents of materials are damaged or missing. 5 Whenever the adapter is used not only to pick up material like sawdust and gravel...
..., lug, or the like drywall dust and cold fireplace ash. Unpacking and Checking Carton Contents Tools Required Phillips Screwdriver Hammer Mallet Refer to the assembly sketch for commercial and household use of parts. NOTE: In Canada, the use . Remove contents of materials are damaged or missing. 5 Whenever the adapter is used not only to pick up material like sawdust and gravel...
Owners Manual
Page 6
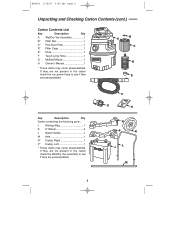
... check the Wet/Dry Vac assembly to see if they are preassembled. B A C D E Key Description Qty Carton containing the following parts: J Storage Bag 1 K 8" Wheel 2 L Metal Handle 1 M Axle 1 N* Caddy, Right 1 P* Caddy, Left 1 * These items may come preassembled. SP6636 1/10/07 9:52 AM Page 6 Unpacking and Checking Carton Contents (cont.) Carton Contents List Key Description Qty A Wet/Dry Vac Assembly 1 B* Filter Nut 1 C* Fine Dust Filter 1 D* Filter Cage 1 E* Float 1 F Tug-A-Long Hose 1 G Muffler/Diffuser 1 H Owner's Manual...
... check the Wet/Dry Vac assembly to see if they are preassembled. B A C D E Key Description Qty Carton containing the following parts: J Storage Bag 1 K 8" Wheel 2 L Metal Handle 1 M Axle 1 N* Caddy, Right 1 P* Caddy, Left 1 * These items may come preassembled. SP6636 1/10/07 9:52 AM Page 6 Unpacking and Checking Carton Contents (cont.) Carton Contents List Key Description Qty A Wet/Dry Vac Assembly 1 B* Filter Nut 1 C* Fine Dust Filter 1 D* Filter Cage 1 E* Float 1 F Tug-A-Long Hose 1 G Muffler/Diffuser 1 H Owner's Manual...
Owners Manual
Page 7
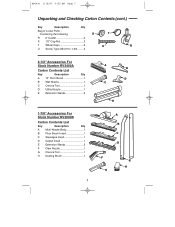
...Unpacking and Checking Carton Contents (cont.) Key Description Qty Bag of Loose Parts Containing the following: S T R 2" Caster 2 S 1/2" Cap Nut 2 T Wheel Caps 2 U R U Screw, Type AB #10 x 1-3/4 ........4 2-1/2" Accessories For Stock Number RV2400A Carton Contents List Key Description Qty A 14" Floor Brush 1 B Wet Nozzle 1 C Crevice Tool 1 D Utility Nozzle 1 E Extension Wands 2 A B D C E 1-7/8" Accessories For Stock Number RV2600B Carton Contents List Key Description Qty A Multi-Nozzle Body 1 B Floor Brush Insert 1 C Squeegee Insert 1 D Carpet Insert...
...Unpacking and Checking Carton Contents (cont.) Key Description Qty Bag of Loose Parts Containing the following: S T R 2" Caster 2 S 1/2" Cap Nut 2 T Wheel Caps 2 U R U Screw, Type AB #10 x 1-3/4 ........4 2-1/2" Accessories For Stock Number RV2400A Carton Contents List Key Description Qty A 14" Floor Brush 1 B Wet Nozzle 1 C Crevice Tool 1 D Utility Nozzle 1 E Extension Wands 2 A B D C E 1-7/8" Accessories For Stock Number RV2600B Carton Contents List Key Description Qty A Multi-Nozzle Body 1 B Floor Brush Insert 1 C Squeegee Insert 1 D Carpet Insert...
Owners Manual
Page 8
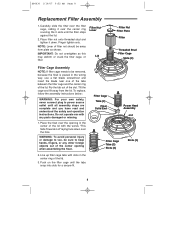
... face down . To replace, follow the assembly instructions below: WARNING: For your own safety, never connect plug to keep hands, fingers, or any parts damaged or missing. 1. Filter Cage Tabs (3) Float Solid End THIS SIDE TOWARD LID Power Head Assembly Lid Filter Cage Tabs (3) Slots (3) Slots (3) 8 Filter Nut Lever Lid Filter Nut Filter Plate Filter Threaded Stud Filter Cage Slots (3) Filter Cage Assembly NOTE: If filter cage needs to be sure to...
... face down . To replace, follow the assembly instructions below: WARNING: For your own safety, never connect plug to keep hands, fingers, or any parts damaged or missing. 1. Filter Cage Tabs (3) Float Solid End THIS SIDE TOWARD LID Power Head Assembly Lid Filter Cage Tabs (3) Slots (3) Slots (3) 8 Filter Nut Lever Lid Filter Nut Filter Plate Filter Threaded Stud Filter Cage Slots (3) Filter Cage Assembly NOTE: If filter cage needs to be sure to...

Owners Manual
Page 9
... Caddy Wheel TAP TAP Wheel Cap Mallet 9 Remove left and on the drum, gently tap each caddy until the wheel caps are missing or damaged contact Customer Service. Do not assemble until fully seated. Be sure that wheels spin freely, and do not contact the caddies. 6. Then place the remaining wheel onto the caddy assembly (smooth side of shaft rod. Using...
... Caddy Wheel TAP TAP Wheel Cap Mallet 9 Remove left and on the drum, gently tap each caddy until the wheel caps are missing or damaged contact Customer Service. Do not assemble until fully seated. Be sure that wheels spin freely, and do not contact the caddies. 6. Then place the remaining wheel onto the caddy assembly (smooth side of shaft rod. Using...

Owners Manual
Page 10
... into handle receptacles in release buttons, pull handle upwards to remove (see illustration). 10 Removing Handle Press and hold release buttons while installing handle into matching holes on the caster stem is correct. 10. NOTE: An audible snap of release buttons indicates successful engagement of the drum. SP6636 1/10/07 9:52 AM Page 10 Drum/Caddy Assembly (cont.) 8. Push on the caster until just snug...
... into handle receptacles in release buttons, pull handle upwards to remove (see illustration). 10 Removing Handle Press and hold release buttons while installing handle into matching holes on the caster stem is correct. 10. NOTE: An audible snap of release buttons indicates successful engagement of the drum. SP6636 1/10/07 9:52 AM Page 10 Drum/Caddy Assembly (cont.) 8. Push on the caster until just snug...
Owners Manual
Page 11
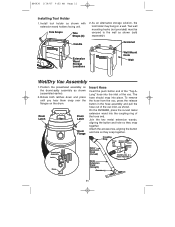
... vac inlet, as shown (assembled earlier). 2. Join the two metal extension wands, aligning the button and hole so they snap together. Install tool holder as shown (sold separately). Handle Grommet Extension Wand Storage Locations Wall Mount Hook Wall Wet/Dry Vac Assembly 1. Tote Snaps Tote Straps (4) 2. Drum Latch Drum Latch Drum Flange Insert Hose Insert the push button end of the "Tug-ALong" hose into place. Attach...
... vac inlet, as shown (assembled earlier). 2. Join the two metal extension wands, aligning the button and hole so they snap together. Install tool holder as shown (sold separately). Handle Grommet Extension Wand Storage Locations Wall Mount Hook Wall Wet/Dry Vac Assembly 1. Tote Snaps Tote Straps (4) 2. Drum Latch Drum Latch Drum Flange Insert Hose Insert the push button end of the "Tug-ALong" hose into place. Attach...
Owners Manual
Page 12
.... Here is a list of possible accessories and their uses. 1-7/8" Multi-Nozzle Body - SP6636 1/10/07 9:52 AM Page 12 Operation WARNING To reduce the risk of fire or explosion, do not vacuum toxic materials. To change inserts, slide red tabs to pick up liquid and dry the surface in small spaces. Dry and wet pickup nozzle for detailed cleaning in one stroke. 2-1/2" Floor Brush - Install new insert flush...
.... Here is a list of possible accessories and their uses. 1-7/8" Multi-Nozzle Body - SP6636 1/10/07 9:52 AM Page 12 Operation WARNING To reduce the risk of fire or explosion, do not vacuum toxic materials. To change inserts, slide red tabs to pick up liquid and dry the surface in small spaces. Dry and wet pickup nozzle for detailed cleaning in one stroke. 2-1/2" Floor Brush - Install new insert flush...

Owners Manual
Page 13
... motor speed. The clean air rushing through the vac will be left in the drum reaches a predetermined level, the float mechanism will become necessary to move it will help dry the filter. NOTE: A dry filter is wet, the filter will clog quickly and be used to pick up small amounts of the dust drum are used . 13 When the liquid in place. 2. When picking up very fine dust, it , the handle...
... motor speed. The clean air rushing through the vac will be left in the drum reaches a predetermined level, the float mechanism will become necessary to move it will help dry the filter. NOTE: A dry filter is wet, the filter will clog quickly and be used to pick up small amounts of the dust drum are used . 13 When the liquid in place. 2. When picking up very fine dust, it , the handle...

Owners Manual
Page 14
...hose assembly and pull the hose out of the vac inlet. 3. (Optional) Attach extension wand to bystanders, keep them clear of the tug-along hose into place. To remove the hose from the vac, press the release button in Canada, CSA Z94.3) before using as a blower. SP6636 1/10/07 9:52 AM Page 14 Operation (cont.) Blowing Feature Your vac... NO SIGHT Tug-A-Long Hose 14 Locate blowing port of the vac. Turn vac on and you are ready to use your vac as a blower. Follow the steps below to use your vac. 2. Insert the locking end of blowing debris. 1. The hose should snap into the ...
...hose assembly and pull the hose out of the vac inlet. 3. (Optional) Attach extension wand to bystanders, keep them clear of the tug-along hose into place. To remove the hose from the vac, press the release button in Canada, CSA Z94.3) before using as a blower. SP6636 1/10/07 9:52 AM Page 14 Operation (cont.) Blowing Feature Your vac... NO SIGHT Tug-A-Long Hose 14 Locate blowing port of the vac. Turn vac on and you are ready to use your vac as a blower. Follow the steps below to use your vac. 2. Insert the locking end of blowing debris. 1. The hose should snap into the ...

Owners Manual
Page 15
... dry pick up . The filter can be used for the RIDGID replacement, unscrew the filter nut from touching the RV2400A/RV2600B Wet/Dry Vacs are available where you To remove the filter for dry material pick-up . Dry Filter occur from installation but not affect the NOTE: For best cleaning results due to clean or installing it around the power assembly as shown. accumulated dust, clean the filter in an open end into the two areas marked Hose...
... dry pick up . The filter can be used for the RIDGID replacement, unscrew the filter nut from touching the RV2400A/RV2600B Wet/Dry Vacs are available where you To remove the filter for dry material pick-up . Dry Filter occur from installation but not affect the NOTE: For best cleaning results due to clean or installing it around the power assembly as shown. accumulated dust, clean the filter in an open end into the two areas marked Hose...
Owners Manual
Page 16
... the drum. 2. If your vac. Frame and Handles Your metal handle is removed, run water through the filter from vac. WARNING: To assure product SAFETY and RELIABILITY, repairs and adjustments should be emptied and cleaned. Remove filter from a hose or spigot. Wet Filter After filter is painted to "Replacement Filter Assembly" Section of general purpose oil on the drum. IMPORTANT: After cleaning, check the filter for approximately 10 minutes. Installation Refer to prevent rust...
... the drum. 2. If your vac. Frame and Handles Your metal handle is removed, run water through the filter from vac. WARNING: To assure product SAFETY and RELIABILITY, repairs and adjustments should be emptied and cleaned. Remove filter from a hose or spigot. Wet Filter After filter is painted to "Replacement Filter Assembly" Section of general purpose oil on the drum. IMPORTANT: After cleaning, check the filter for approximately 10 minutes. Installation Refer to prevent rust...
Owners Manual
Page 17
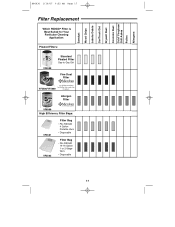
... 17 Filter Replacement Which RIDGID® Filter is Best Suited for Your Particular Cleaning Application: Pleated Filters: VF44000000 Standard Pleated Filter Day-to-Day Dirt Fine Dust Filter Microban® antimicrobial product protection * *Use VF3500 (short filter) for Wet/Dry Vacs smaller than VF3500/VF5000 five-gallons. Allergen Filter VF6000 Microban® antimicrobial product protection High Efficiency Filter Bags: VF3501 VF3502 Filter Bag • Fits RIDGID 4 Gallon Portable Vacs • Disposable Filter Bag • Fits RIDGID 14...
... 17 Filter Replacement Which RIDGID® Filter is Best Suited for Your Particular Cleaning Application: Pleated Filters: VF44000000 Standard Pleated Filter Day-to-Day Dirt Fine Dust Filter Microban® antimicrobial product protection * *Use VF3500 (short filter) for Wet/Dry Vacs smaller than VF3500/VF5000 five-gallons. Allergen Filter VF6000 Microban® antimicrobial product protection High Efficiency Filter Bags: VF3501 VF3502 Filter Bag • Fits RIDGID 4 Gallon Portable Vacs • Disposable Filter Bag • Fits RIDGID 14...
Owners Manual
Page 18
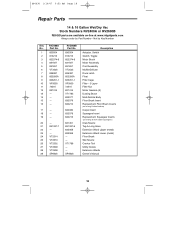
... RV2400A No. Not by Part Number - SP6636 Description Actuator, Switch Switch, Toggle Motor Brush Motor Assembly Cord Assembly Muffler/Diffuser Drum Latch Float Filter Cage Filter - 3-Layer Filter Nut Motor Gaskets (2) Dusting Brush Multi-Nozzle Body Floor Brush Insert Replacement Floor Brush Inserts (set of long & short brushes) Carpet Insert Squeegee Insert Replacement Squeegee Inserts (set of long & short rubber squeegees) Claw Nozzle Tug-A-Long Hose Extension Wand Upper (metal) Extension Wand Lower (metal) Floor Brush Wet Nozzle Crevice Tool Utility Nozzle Extension Wands Owner's Manual...
... RV2400A No. Not by Part Number - SP6636 Description Actuator, Switch Switch, Toggle Motor Brush Motor Assembly Cord Assembly Muffler/Diffuser Drum Latch Float Filter Cage Filter - 3-Layer Filter Nut Motor Gaskets (2) Dusting Brush Multi-Nozzle Body Floor Brush Insert Replacement Floor Brush Inserts (set of long & short brushes) Carpet Insert Squeegee Insert Replacement Squeegee Inserts (set of long & short rubber squeegees) Claw Nozzle Tug-A-Long Hose Extension Wand Upper (metal) Extension Wand Lower (metal) Floor Brush Wet Nozzle Crevice Tool Utility Nozzle Extension Wands Owner's Manual...
Owners Manual
Page 20
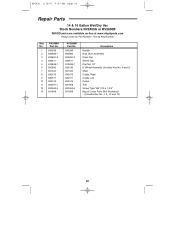
... 820563-5 831668 Description Handle Dust Drum Assembly Drain Cap Wheel Cap Cap Nut 1/2" 8" Wheel Assembly (Includes Key No. 4 and 5) Shaft Caddy, Right Caddy, Left Caster Tote Screw Type "AB" #10 x 1-3/4" Bag of Loose Parts (Not Illustrated) (Includes Key No. 4, 5, 10 and 12) 20 SP6636 1/10/07 9:52 AM Page 20 Repair Parts 14 & 16 Gallon Wet/Dry Vac Stock Numbers RV2400A or RV2600B RIDGID parts are available on...
... 820563-5 831668 Description Handle Dust Drum Assembly Drain Cap Wheel Cap Cap Nut 1/2" 8" Wheel Assembly (Includes Key No. 4 and 5) Shaft Caddy, Right Caddy, Left Caster Tote Screw Type "AB" #10 x 1-3/4" Bag of Loose Parts (Not Illustrated) (Includes Key No. 4, 5, 10 and 12) 20 SP6636 1/10/07 9:52 AM Page 20 Repair Parts 14 & 16 Gallon Wet/Dry Vac Stock Numbers RV2400A or RV2600B RIDGID parts are available on...
Owners Manual
Page 22
... be free of the RIDGID® tool. What is still defective, you can you . RV24000 or RV26000 Model and serial number may not apply to you get service To obtain the benefit of this warranty, deliver via prepaid transportation the complete product to receive a full refund of purchase. or, if after three attempts to repair or replace during the warranty period the product...
... be free of the RIDGID® tool. What is still defective, you can you . RV24000 or RV26000 Model and serial number may not apply to you get service To obtain the benefit of this warranty, deliver via prepaid transportation the complete product to receive a full refund of purchase. or, if after three attempts to repair or replace during the warranty period the product...


