Owners Manual
Page 3
... you are dangerous in explosive atmospheres, such as dust mask, nonskid safety shoes, hard hat, or hearing protection used . Stable footing on . If damaged, have the switch on invites accidents. Remove any adjustments, changing accessories, or storing power tools. Properly maintained cutting tools with 18 V nickel-cadmium and 18 V lithiumion battery packs, see tool/appliance/battery pack/ charger correlation supplement 988000-302. English Save all...
... you are dangerous in explosive atmospheres, such as dust mask, nonskid safety shoes, hard hat, or hearing protection used . Stable footing on . If damaged, have the switch on invites accidents. Remove any adjustments, changing accessories, or storing power tools. Properly maintained cutting tools with 18 V nickel-cadmium and 18 V lithiumion battery packs, see tool/appliance/battery pack/ charger correlation supplement 988000-302. English Save all...
Owners Manual
Page 4
... follow Maintenance instructions may contact hidden wiring. Failure to another battery pack. Use power tools only with specifically designated battery packs. Following this rule will reduce the risk of open flame. Cutting accessory contacting a "live " and could result in the presence of serious personal injury. Save these instructions also to instruct others who may cause irritation or burns. GENERAL SAFETY RULES BATTERY TOOL USE AND...
... follow Maintenance instructions may contact hidden wiring. Failure to another battery pack. Use power tools only with specifically designated battery packs. Following this rule will reduce the risk of open flame. Cutting accessory contacting a "live " and could result in the presence of serious personal injury. Save these instructions also to instruct others who may cause irritation or burns. GENERAL SAFETY RULES BATTERY TOOL USE AND...
Owners Manual
Page 5
Some of batteries in damp locations. Read The Operator's Manual To reduce the risk of current Rotational speed, at no .../min Volts Minutes Direct Current No Load Speed Per Minute Do not expose to comply with this product. Eye Protection Always wear eye protection with side shields marked to rain or use in ordinary trash. CAUTION: (Without Safety Alert Symbol) Indicates...
Some of batteries in damp locations. Read The Operator's Manual To reduce the risk of current Rotational speed, at no .../min Volts Minutes Direct Current No Load Speed Per Minute Do not expose to comply with this product. Eye Protection Always wear eye protection with side shields marked to rain or use in ordinary trash. CAUTION: (Without Safety Alert Symbol) Indicates...
Owners Manual
Page 6
...-ion battery R840083...500 in the chuck jaws. TWO-SPEED GEAR TRAIN The two-speed gear train is designed for changing the direction of bit rotation. VARIABLE SPEED SWITCH The variable speed switch trigger delivers higher speed with increased trigger pressure and lower speed with all operating features and safety rules. Your risk from chemically treated lumber. Setting the direction of rotation selector in the OFF (center lock) position will lock the switch trigger to hand-tighten or release the drill bit...
...-ion battery R840083...500 in the chuck jaws. TWO-SPEED GEAR TRAIN The two-speed gear train is designed for changing the direction of bit rotation. VARIABLE SPEED SWITCH The variable speed switch trigger delivers higher speed with increased trigger pressure and lower speed with all operating features and safety rules. Your risk from chemically treated lumber. Setting the direction of rotation selector in the OFF (center lock) position will lock the switch trigger to hand-tighten or release the drill bit...

Owners Manual
Page 7
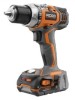
... drill for use . PACKING LIST Drill-driver Auxiliary Handle Bit Bag Operator's Manual WARNING: If any parts are damaged or missing do not operate this product. To install the auxiliary handle: n Turn the handle grip counterclockwise to make sure no breakage or damage occurred during shipping. Do not discard the packing material until the parts are included. n Turn the handle clockwise to loosen and remove the handle. INSTALLING/REMOVING THE AUXILIARY HANDLE...
... drill for use . PACKING LIST Drill-driver Auxiliary Handle Bit Bag Operator's Manual WARNING: If any parts are damaged or missing do not operate this product. To install the auxiliary handle: n Turn the handle grip counterclockwise to make sure no breakage or damage occurred during shipping. Do not discard the packing material until the parts are included. n Turn the handle clockwise to loosen and remove the handle. INSTALLING/REMOVING THE AUXILIARY HANDLE...
Owners Manual
Page 8
... the drill before beginning operation. To install the battery pack: Lock the switch trigger on the drill by placing the direction of rotation selector in normal operating position, the direction of the switch trigger for your tool when you careless. TO INSTALL/REMOVE BATTERY PACK See Figure 4, page 13. To turn the drill ON, depress the switch trigger. The use . To remove the battery pack: Lock the switch trigger on the lithium-ion charger. this is a normal part of...
... the drill before beginning operation. To install the battery pack: Lock the switch trigger on the drill by placing the direction of rotation selector in normal operating position, the direction of the switch trigger for your tool when you careless. TO INSTALL/REMOVE BATTERY PACK See Figure 4, page 13. To turn the drill ON, depress the switch trigger. The use . To remove the battery pack: Lock the switch trigger on the lithium-ion charger. this is a normal part of...
Owners Manual
Page 9
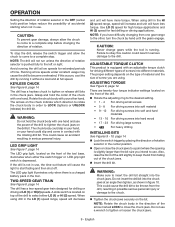
...; Open or close the chuck jaws to a point where the opening is a charged battery pack in use a wrench to a complete stop . The drill has a keyless chuck to tighten or release drill bits in figure 10. The LED grip light, located on the type of material and the size of screw you intend to close the chuck jaws. The drill has a two-speed gear train designed for fast drilling or driving applications.
...; Open or close the chuck jaws to a point where the opening is a charged battery pack in use a wrench to a complete stop . The drill has a keyless chuck to tighten or release drill bits in figure 10. The LED grip light, located on the type of material and the size of screw you intend to close the chuck jaws. The drill has a two-speed gear train designed for fast drilling or driving applications.
Owners Manual
Page 10
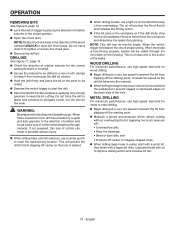
... and is released, the chuck stops turning. NOTE: Rotate the chuck body in the center position. Open the chuck jaws. This will be drilled. Depress the switch trigger to start with a small bit, then finish with clamps to keep it from slipping off -center as the drill bit bites into the workpiece, applying only enough pressure to open the chuck jaws. OPERATION REMOVING BITS See Figure...
... and is released, the chuck stops turning. NOTE: Rotate the chuck body in the center position. Open the chuck jaws. This will be drilled. Depress the switch trigger to start with a small bit, then finish with clamps to keep it from slipping off -center as the drill bit bites into the workpiece, applying only enough pressure to open the chuck jaws. OPERATION REMOVING BITS See Figure...
Owners Manual
Page 11
.... MAINTENANCE WARNING: When servicing use . Failure to comply with ANSI Z87.1. All other parts may become loose, causing the chuck jaws to comply with side shields marked to do so could result in a clockwise direction. Lithium-ion and nickelcadmium batteries must be removed and replaced by a new one. Lock the switch trigger by hand. This will loosen the chuck on the parts list are susceptible to remove dirt, dust, oil...
.... MAINTENANCE WARNING: When servicing use . Failure to comply with ANSI Z87.1. All other parts may become loose, causing the chuck jaws to comply with side shields marked to do so could result in a clockwise direction. Lithium-ion and nickelcadmium batteries must be removed and replaced by a new one. Lock the switch trigger by hand. This will loosen the chuck on the parts list are susceptible to remove dirt, dust, oil...
Owners Manual
Page 12
.... WARRANTY RIDGID® HAND HELD AND STATIONARY POWER TOOL 3 YEAR LIMITED SERVICE WARRANTY Proof of purchase must be transferred. Limited to the original purchaser at no charge to , blades, bits and sand paper are dissatisfied with the tool such as brushes, chucks, motors, switches, cords, gears and even cordless batteries in this RIDGID® tool for a particular purpose, that cannot be directed to One World Technologies, Inc., attn: RIDGID Hand Held and Stationary Power Tool Technical Service...
.... WARRANTY RIDGID® HAND HELD AND STATIONARY POWER TOOL 3 YEAR LIMITED SERVICE WARRANTY Proof of purchase must be transferred. Limited to the original purchaser at no charge to , blades, bits and sand paper are dissatisfied with the tool such as brushes, chucks, motors, switches, cords, gears and even cordless batteries in this RIDGID® tool for a particular purpose, that cannot be directed to One World Technologies, Inc., attn: RIDGID Hand Held and Stationary Power Tool Technical Service...

Owners Manual
Page 35
Mallet (maillet, mazo de goma) B - Mallet (maillet, mazo de goma) B - Hex key (clé hexagonale, llave hexagonal) 15 Chuck jaws (mors du mandrin, mordazas del portabrocas) C - Hex key (clé hexagonale, llave hexagonal) D - Screwdriver (tournevis, destornillador) Fig. 14 A B A - Keyless chuck (mandrin, portabrocas) A - Fig. 12 A B Fig. 13 A C D A -
Mallet (maillet, mazo de goma) B - Mallet (maillet, mazo de goma) B - Hex key (clé hexagonale, llave hexagonal) 15 Chuck jaws (mors du mandrin, mordazas del portabrocas) C - Hex key (clé hexagonale, llave hexagonal) D - Screwdriver (tournevis, destornillador) Fig. 14 A B A - Keyless chuck (mandrin, portabrocas) A - Fig. 12 A B Fig. 13 A C D A -


