Owners Manual
Page 1
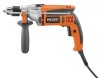
When properly cared for buying a RIDGID product. Thank you for , it will give you years of rugged, trouble-free performance. WARNING: To reduce the risk of operation, and operator safety. OPERATOR'S MANUAL 1/2 in. SAVE THIS MANUAL FOR FUTURE REFERENCE 1 HAMMER DRILL DOUBLE INSULATED R5013 Your hammer drill has been engineered and manufactured to our high standard for dependability, ease of injury, the user must read and understand the operator's manual before using this product.
When properly cared for buying a RIDGID product. Thank you for , it will give you years of rugged, trouble-free performance. WARNING: To reduce the risk of operation, and operator safety. OPERATOR'S MANUAL 1/2 in. SAVE THIS MANUAL FOR FUTURE REFERENCE 1 HAMMER DRILL DOUBLE INSULATED R5013 Your hammer drill has been engineered and manufactured to our high standard for dependability, ease of injury, the user must read and understand the operator's manual before using this product.

Owners Manual
Page 4
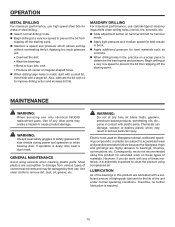
... or its applications and limitations, as well as those dust masks that the safety of work with impact drills. GENERAL SAFETY RULES SERVICE Have your power tool serviced by power sanding, sawing, grinding, drilling, and other construction activities contains chemicals known to cause cancer, birth defects or other reproductive harm. WARNING...
... or its applications and limitations, as well as those dust masks that the safety of work with impact drills. GENERAL SAFETY RULES SERVICE Have your power tool serviced by power sanding, sawing, grinding, drilling, and other construction activities contains chemicals known to cause cancer, birth defects or other reproductive harm. WARNING...
Owners Manual
Page 8
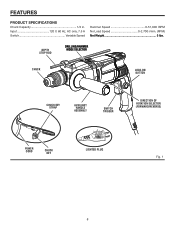
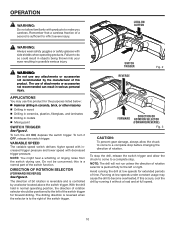
FEATURES PRODUCT SPECIFICATIONS Chuck Capacity 1/2 in. DEPTH STOP ROD DRILLING/HAMMER MODE SELECTOR CHUCK LOCK-ON BUTTON CHUCK KEY STRAP AUXILIARY HANDLE ASSEMBLY SWITCH TRIGGER DIRECTION OF ROTATION SELECTOR (FORWARD/REVERSE) P0WER CORD CHUCK KEY LIGHTED PLUG Fig. 1 8 Input 120 V, 60 Hz, AC only, 7.5 A Switch Variable Speed Hammer Speed 0-51,000 BPM No Load Speed 0-2,700 r/min. (RPM) Net Weight 5 lbs.
FEATURES PRODUCT SPECIFICATIONS Chuck Capacity 1/2 in. DEPTH STOP ROD DRILLING/HAMMER MODE SELECTOR CHUCK LOCK-ON BUTTON CHUCK KEY STRAP AUXILIARY HANDLE ASSEMBLY SWITCH TRIGGER DIRECTION OF ROTATION SELECTOR (FORWARD/REVERSE) P0WER CORD CHUCK KEY LIGHTED PLUG Fig. 1 8 Input 120 V, 60 Hz, AC only, 7.5 A Switch Variable Speed Hammer Speed 0-51,000 BPM No Load Speed 0-2,700 r/min. (RPM) Net Weight 5 lbs.
Owners Manual
Page 9
... Chuck Key Chuck Key Strap Operator's Manual WARNING: If any parts are damaged or missing do not operate this product. PACKING LIST Hammer Drill Auxiliary Handle Assembly with decreased trigger pressure. WARNING: Do not connect to make sure no breakage or damage occurred during shipping. ...could result in use when installing or removing bits and removing the chuck. When not in serious personal injury. AUXILIARY HANDLE ASSEMBLY Your drill is the number of this warning could result in the packing list are included. Inspect the product carefully to power supply ...
... Chuck Key Chuck Key Strap Operator's Manual WARNING: If any parts are damaged or missing do not operate this product. PACKING LIST Hammer Drill Auxiliary Handle Assembly with decreased trigger pressure. WARNING: Do not connect to make sure no breakage or damage occurred during shipping. ...could result in use when installing or removing bits and removing the chuck. When not in serious personal injury. AUXILIARY HANDLE ASSEMBLY Your drill is the number of this warning could result in the packing list are included. Inspect the product carefully to power supply ...
Owners Manual
Page 10
..., always allow familiarity with products to make you careless. SWITCH TRIGGER REVERSE Fig. 2 APPLICATIONS You may cause the drill to a complete stop . To turn the drill ON, depress the switch trigger. this product for extended periods of the switch function. LOCK-ON BUTTON WARNING: Always... wear safety goggles or safety glasses with decreased trigger pressure. The use this is controlled by running the drill at full speed. 10 NOTE: You might hear a whistling or ringing noise from the switch during use any attachments or accessories ...
..., always allow familiarity with products to make you careless. SWITCH TRIGGER REVERSE Fig. 2 APPLICATIONS You may cause the drill to a complete stop . To turn the drill ON, depress the switch trigger. this product for extended periods of the switch function. LOCK-ON BUTTON WARNING: Always... wear safety goggles or safety glasses with decreased trigger pressure. The use this is controlled by running the drill at full speed. 10 NOTE: You might hear a whistling or ringing noise from the switch during use any attachments or accessories ...
Owners Manual
Page 11
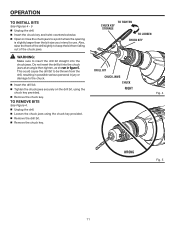
.... Open or close the chuck jaws to a point where the opening is slightly larger than the bit size you intend to insert the drill bit straight into the chuck jaws at an angle then tighten, as shown in possible serious personal injury or damage to be thrown from falling... out of the drill slightly to keep the bit from the drill, resulting in figure 5. TO REMOVE BITS See Figure 4. Unplug the drill. Loosen the chuck jaws using the chuck key provided. Remove the chuck key....
.... Open or close the chuck jaws to a point where the opening is slightly larger than the bit size you intend to insert the drill bit straight into the chuck jaws at an angle then tighten, as shown in possible serious personal injury or damage to be thrown from falling... out of the drill slightly to keep the bit from the drill, resulting in figure 5. TO REMOVE BITS See Figure 4. Unplug the drill. Loosen the chuck jaws using the chuck key provided. Remove the chuck key....

Owners Manual
Page 12
...can also be aligned with the surface of control. This secures the depth stop rod helps control the depth of the rod to the required drilling depth. NOTE: For convenience and ease of cut. The depth stop rod at the desired depth of starting threads, the hex nut has... the auxiliary handle assembly to help prevent loss of the workpiece. Adjust the depth stop clamp. Be sure the auxiliary handle is packed with the drill for left hand use. OPERATION USING THE AUXILIARY HANDLE ASSEMBLY See Figures 6 - 7. It also secures the auxiliary handle. NOTE: When properly installed, ...
...can also be aligned with the surface of control. This secures the depth stop rod helps control the depth of the rod to the required drilling depth. NOTE: For convenience and ease of cut. The depth stop rod at the desired depth of starting threads, the hex nut has... the auxiliary handle assembly to help prevent loss of the workpiece. Adjust the depth stop clamp. Be sure the auxiliary handle is packed with the drill for left hand use. OPERATION USING THE AUXILIARY HANDLE ASSEMBLY See Figures 6 - 7. It also secures the auxiliary handle. NOTE: When properly installed, ...
Owners Manual
Page 13
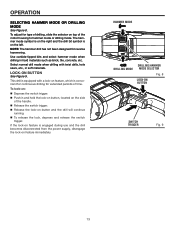
...61550; Push in hard materials such as brick, tile, concrete, etc. To lock-on feature, which is convenient for continuous drilling for reverse hammering. HAMMER MODE DRILLING MODE DRILLING/HAMMER MODE SELECTOR LOCK-ON BUTTON Fig. 8 SWITCH TRIGGER Fig. 9 13 The hammer mode symbol is on the right and... lock-on the side of the motor housing to hammer mode or drilling mode. This drill is equipped with twist drills, hole saws, etc., in soft materials. Use carbide-tipped bits and select hammer mode when drilling in and hold the lock-on button, located on feature immediately. ...
...61550; Push in hard materials such as brick, tile, concrete, etc. To lock-on feature, which is convenient for continuous drilling for reverse hammering. HAMMER MODE DRILLING MODE DRILLING/HAMMER MODE SELECTOR LOCK-ON BUTTON Fig. 8 SWITCH TRIGGER Fig. 9 13 The hammer mode symbol is on the right and... lock-on the side of the motor housing to hammer mode or drilling mode. This drill is equipped with twist drills, hole saws, etc., in soft materials. Use carbide-tipped bits and select hammer mode when drilling in and hold the lock-on button, located on feature immediately. ...
Owners Manual
Page 14
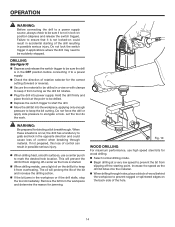
... low speed to prevent the bit from the workpiece and determine the reason for jamming. Increase the speed as the drill bit bites into the material.� When drilling through holes, place a block of wood behind the workpiece to prevent ragged or splintered edges on could cause loss ...of control when breaking through material. When these situations occur, the drill has a tendency to grab and kick in the opposite direction and could result in accidental starting point. If not prepared, this loss of...
... low speed to prevent the bit from the workpiece and determine the reason for jamming. Increase the speed as the drill bit bites into the material.� When drilling through holes, place a block of wood behind the workpiece to prevent ragged or splintered edges on could cause loss ...of control when breaking through material. When these situations occur, the drill has a tendency to grab and kick in the opposite direction and could result in accidental starting point. If not prepared, this loss of...
Owners Manual
Page 15
... air. Chemicals can damage, weaken or destroy plastic which allows cutting without overheating the bit. OPERATION METAL DRILLING� For maximum performance, use only identical RIDGID replacement parts. Also, lubricate the bit with side shields during power tool operation or when blowing dust. ...If operation is required. 15 WARNING: Do not at a very low speed to improve drilling action and increase bit life. ...
... air. Chemicals can damage, weaken or destroy plastic which allows cutting without overheating the bit. OPERATION METAL DRILLING� For maximum performance, use only identical RIDGID replacement parts. Also, lubricate the bit with side shields during power tool operation or when blowing dust. ...If operation is required. 15 WARNING: Do not at a very low speed to improve drilling action and increase bit life. ...
Owners Manual
Page 16
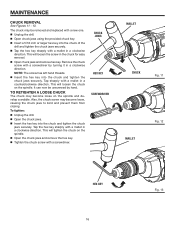
...become loose, causing the chuck jaws to bind and prevent them from closing. To tighten: Unplug the drill. Open the chuck jaws. Insert the hex key into the chuck and tighten the chuck ...a wobble. It can now be removed and replaced with a new one. Unplug the drill. Open chuck jaws using the provided chuck key. Insert a 5/16 inch or larger hex ...key into the chuck of the drill and tighten the chuck jaws securely. Tap the hex key sharply with a mallet in a counterclockwise...
...become loose, causing the chuck jaws to bind and prevent them from closing. To tighten: Unplug the drill. Open the chuck jaws. Insert the hex key into the chuck and tighten the chuck ...a wobble. It can now be removed and replaced with a new one. Unplug the drill. Open chuck jaws using the provided chuck key. Insert a 5/16 inch or larger hex ...key into the chuck of the drill and tighten the chuck jaws securely. Tap the hex key sharply with a mallet in a counterclockwise...
Owners Manual
Page 18
... sure to the motor housing. When ordering repair parts, always give the following information: Model No. HAMMER DRILL DOUBLE INSULATED R5013 Customer Service Information: For parts or service, contact your nearest RIDGID authorized service center. R5013 Serial No. 987000-060 01-23-07 (REV:00) 18 For the location of this tool is found... you , please call or visit. The model number of the authorized service center nearest you call 1-866-539-1710 or visit us online at www.ridgid.com. Please record the serial number in .
... sure to the motor housing. When ordering repair parts, always give the following information: Model No. HAMMER DRILL DOUBLE INSULATED R5013 Customer Service Information: For parts or service, contact your nearest RIDGID authorized service center. R5013 Serial No. 987000-060 01-23-07 (REV:00) 18 For the location of this tool is found... you , please call or visit. The model number of the authorized service center nearest you call 1-866-539-1710 or visit us online at www.ridgid.com. Please record the serial number in .


