Owners Manual
Page 3
...; MAINTAIN TOOLS WITH CARE. Cluttered areas and benches invite accidents. Keep the work into moving parts, breakage of power and overheating. An undersized cord will operate properly and perform its operation. Failure...ranges, refrigerator enclosures. KEEP GUARDS IN PLACE and in damp or wet locations or expose to determine that keys and adjusting wrenches are rated for an extension ... may risk injury. NEVER STAND ON TOOL. Do not use it on the saw 's applications and limitations as well as the specific potential hazards related to this tool. &#...
...; MAINTAIN TOOLS WITH CARE. Cluttered areas and benches invite accidents. Keep the work into moving parts, breakage of power and overheating. An undersized cord will operate properly and perform its operation. Failure...ranges, refrigerator enclosures. KEEP GUARDS IN PLACE and in damp or wet locations or expose to determine that keys and adjusting wrenches are rated for an extension ... may risk injury. NEVER STAND ON TOOL. Do not use it on the saw 's applications and limitations as well as the specific potential hazards related to this tool. &#...
Owners Manual
Page 8
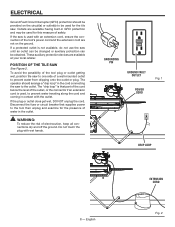
... cord and coming in contact with the outlet. The operator should be used for this measure of safety. Disconnect the fuse or circuit breaker that part of the cord below the level of the outlet, or the connector if an extension cord is that supplies power to the tool then unplug... are not on the circuit(s) or outlet(s) to be provided on the ground. To avoid the possibility of the tool plug or outlet getting wet, position tile saw to the outlet. WARNING: To reduce the risk of electrocution, keep all connections dry and off the ground. These auxiliary protection devices are available...
... cord and coming in contact with the outlet. The operator should be used for this measure of safety. Disconnect the fuse or circuit breaker that part of the cord below the level of the outlet, or the connector if an extension cord is that supplies power to the tool then unplug... are not on the circuit(s) or outlet(s) to be provided on the ground. To avoid the possibility of the tool plug or outlet getting wet, position tile saw to the outlet. WARNING: To reduce the risk of electrocution, keep all connections dry and off the ground. These auxiliary protection devices are available...
Owners Manual
Page 12
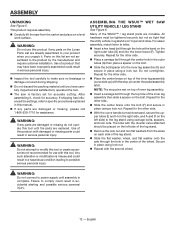
... modification is complete. Failure to comply could result in accidental starting and possible serious personal injury. 12 - ASSEMBLY UNPACKING See Figure 5. Parts on this tool until assembly is misuse and could result in the center of a product that the utility vehicle / leg stand won... bolts, spacers, and lock nuts. ASSEMBLING THE WSUV™ Wet Saw Utility Vehicle / leg stand See Figure 6. warning: Do not attempt to modify this product if any parts are already assembled to power supply until the parts are not assembled to letter. Insert a hex head...
... modification is complete. Failure to comply could result in accidental starting and possible serious personal injury. 12 - ASSEMBLY UNPACKING See Figure 5. Parts on this tool until assembly is misuse and could result in the center of a product that the utility vehicle / leg stand won... bolts, spacers, and lock nuts. ASSEMBLING THE WSUV™ Wet Saw Utility Vehicle / leg stand See Figure 6. warning: Do not attempt to modify this product if any parts are already assembled to power supply until the parts are not assembled to letter. Insert a hex head...
Owners Manual
Page 23
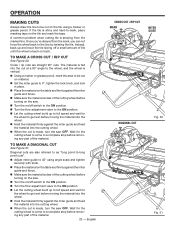
...straight 90° cuts. Wait for the cutting wheel to come to a complete stop before removing any part of the material. English cross cut / RIP CUT Mark Miter guide DIAGONAL cut See Figure 30. A ... Let the cutting wheel build up to full speed and wait for the wheel to get wet before moving the material into the wheel. Hold the material firmly against the miter guide and... feed the material into the cutting wheel. When the cut is made , turn the saw OFF. Instead, back up and recut the tile slicing off a small amount of tile until the wheel is...
...straight 90° cuts. Wait for the cutting wheel to come to a complete stop before removing any part of the material. English cross cut / RIP CUT Mark Miter guide DIAGONAL cut See Figure 30. A ... Let the cutting wheel build up to full speed and wait for the wheel to get wet before moving the material into the wheel. Hold the material firmly against the miter guide and... feed the material into the cutting wheel. When the cut is made , turn the saw OFF. Instead, back up and recut the tile slicing off a small amount of tile until the wheel is...
Owners Manual
Page 24
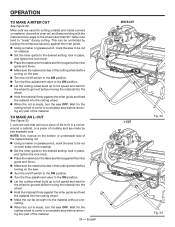
...make an L-cut See Figure 33. L-cuts are used for the cutting wheel to come to a complete stop before removing any part of the cutting wheel before turning on the saw. Turn the on/off switch to the on position. Turn the flow adjustment valve to the on position.... Only overcut on the bottom or underneath side of the material being cut. Using a marker or grease pencil, mark the area to get wet before moving the material into the wheel. Hold the material firmly against the miter guide and feed the material into the material without overcutting...
...make an L-cut See Figure 33. L-cuts are used for the cutting wheel to come to a complete stop before removing any part of the cutting wheel before turning on the saw. Turn the on/off switch to the on position. Turn the flow adjustment valve to the on position.... Only overcut on the bottom or underneath side of the material being cut. Using a marker or grease pencil, mark the area to get wet before moving the material into the wheel. Hold the material firmly against the miter guide and feed the material into the material without overcutting...
Owners Manual
Page 25
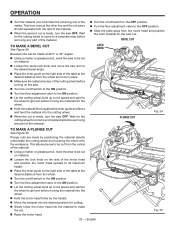
... the material. Turn the on position. Let the cutting wheel build up to full speed and wait for the wheel to get wet before removing any part of the material. Wait for the cutting wheel to come to a complete stop before moving the material into the wheel. Hold the... cut is made by positioning the material directly underneath the cutting wheel and lowering the wheel onto the workpiece. Plunge cuts are made , turn the saw OFF. To make a bevel cut Fig. 34 TO MAKE A PLUNGE CUT See Figure 35. This time overcut the other line and the cut piece ...
... the material. Turn the on position. Let the cutting wheel build up to full speed and wait for the wheel to get wet before removing any part of the material. Wait for the cutting wheel to come to a complete stop before moving the material into the wheel. Hold the... cut is made by positioning the material directly underneath the cutting wheel and lowering the wheel onto the workpiece. Plunge cuts are made , turn the saw OFF. To make a bevel cut Fig. 34 TO MAKE A PLUNGE CUT See Figure 35. This time overcut the other line and the cut piece ...


