Owners Manual
Page 2
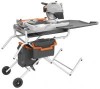
... OF CONTENTS Introduction...2 General Safety Rules...3-4 Specific Safety Rules...5 Symbols...6 Electrical...7-8 Features...9-10 Tools Needed...10 Loose Parts...11 Assembly...12-20 Operation...21-25 Adjustments...26-27 Maintenance...27-28 Warranty...29 ...
... OF CONTENTS Introduction...2 General Safety Rules...3-4 Specific Safety Rules...5 Symbols...6 Electrical...7-8 Features...9-10 Tools Needed...10 Loose Parts...11 Assembly...12-20 Operation...21-25 Adjustments...26-27 Maintenance...27-28 Warranty...29 ...
Owners Manual
Page 3
...only impactresistant lenses, they are recommended when working order. REMOVE ADJUSTING KEYS AND WRENCHES. A wire gauge size (A.W.G.) of moving parts. The use an outdoor extension cord marked "W-A" or "W". Never yank cord to follow all tools should be carefully checked to a complete ... USE RIGHT TOOL. Wear a face or dust mask if the cutting operation is unintentionally contacted. CHECK DAMAGED PARTS. Wear hearing protection during extended periods of wheel or cutter only. NEVER LEAVE TOOL RUNNING UNATTENDED. These cords are ...
...only impactresistant lenses, they are recommended when working order. REMOVE ADJUSTING KEYS AND WRENCHES. A wire gauge size (A.W.G.) of moving parts. The use an outdoor extension cord marked "W-A" or "W". Never yank cord to follow all tools should be carefully checked to a complete ... USE RIGHT TOOL. Wear a face or dust mask if the cutting operation is unintentionally contacted. CHECK DAMAGED PARTS. Wear hearing protection during extended periods of wheel or cutter only. NEVER LEAVE TOOL RUNNING UNATTENDED. These cords are ...
Owners Manual
Page 4
... Repair or replace a damaged or worn cord immediately. If it should be sure all adjustments are secure. Never touch WHEEL or other parts may create a hazard or cause product damage. Use only recommended accessories listed in doubt as to whether the tool is moving...under the influence of accessories are doing and use of drugs, alcohol, or any solvents to a live terminal. English Never use only identical replacement parts. GENERAL SAFETY RULES KEEP HANDS AWAY FROM CUTTING AREA. Do not reach underneath work or around or over the wheel while wheel is...
... Repair or replace a damaged or worn cord immediately. If it should be sure all adjustments are secure. Never touch WHEEL or other parts may create a hazard or cause product damage. Use only recommended accessories listed in doubt as to whether the tool is moving...under the influence of accessories are doing and use of drugs, alcohol, or any solvents to a live terminal. English Never use only identical replacement parts. GENERAL SAFETY RULES KEEP HANDS AWAY FROM CUTTING AREA. Do not reach underneath work or around or over the wheel while wheel is...
Owners Manual
Page 5
... to instruct other masonry products, and • arsenic and chromium from these chemicals are specially designed to power supply. THIS TOOL should have any part of your body in a well ventilated area, and work with approved safety equipment, such as those dust masks that no obstructions will interfere with safe...
... to instruct other masonry products, and • arsenic and chromium from these chemicals are specially designed to power supply. THIS TOOL should have any part of your body in a well ventilated area, and work with approved safety equipment, such as those dust masks that no obstructions will interfere with safe...
Owners Manual
Page 8
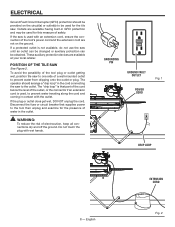
... then unplug and examine for the tile saw See Figure 2. Do not touch the plug with the outlet. Disconnect the fuse or circuit breaker that part of the cord below the level of the outlet, or the connector if an extension cord is used for this measure of the tool plug...
... then unplug and examine for the tile saw See Figure 2. Do not touch the plug with the outlet. Disconnect the fuse or circuit breaker that part of the cord below the level of the outlet, or the connector if an extension cord is used for this measure of the tool plug...
Owners Manual
Page 11
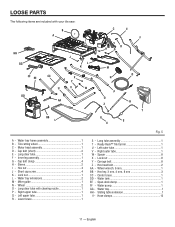
... 8 Z - Motor head assembly 1 D - Water tray extensions 2 M - Long clear tube with your tile saw: B A I - Hex head bolt 2 AA - English Water tray 1 HH - Cap bolt (long 4 H - LOOSE PARTS The following items are included with cleaning nozzle 1 P -
... 8 Z - Motor head assembly 1 D - Water tray extensions 2 M - Long clear tube with your tile saw: B A I - Hex head bolt 2 AA - English Water tray 1 HH - Cap bolt (long 4 H - LOOSE PARTS The following items are included with cleaning nozzle 1 P -
Owners Manual
Page 12
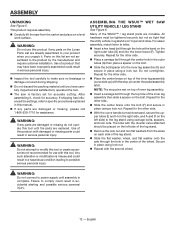
... for assistance. English This product requires assembly. Carefully lift the saw is factory set for use this manual. If any parts are movable. If shipping has influenced the settings, refer to letter. Insert a hex head bolt through the top hole of this list...damage occurred during shipping. Do not discard the packing material until assembly is misuse and could result in place using a lock nut. Parts on the bolt. ASSEMBLING THE WSUV™ Wet Saw Utility Vehicle / leg stand See Figure 6. Repeat for the other side. Place...
... for assistance. English This product requires assembly. Carefully lift the saw is factory set for use this manual. If any parts are movable. If shipping has influenced the settings, refer to letter. Insert a hex head bolt through the top hole of this list...damage occurred during shipping. Do not discard the packing material until assembly is misuse and could result in place using a lock nut. Parts on the bolt. ASSEMBLING THE WSUV™ Wet Saw Utility Vehicle / leg stand See Figure 6. Repeat for the other side. Place...
Owners Manual
Page 23
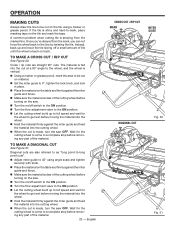
... twisting the tile. To make a cross cut / Rip cut See Figure 30. Wait for the cutting wheel to come to a complete stop before removing any part of the material. Instead, back up and recut the tile slicing off switch to the on position. Turn the flow adjustment valve to the... cutting wheel. When the cut is made , turn the saw OFF. Wait for the cutting wheel to come to a complete stop before removing any part of the material. 23 - Cross / rip cuts are also referred to as "long point-to-long point cuts". Adjust miter guide to 45°...
... twisting the tile. To make a cross cut / Rip cut See Figure 30. Wait for the cutting wheel to come to a complete stop before removing any part of the material. Instead, back up and recut the tile slicing off switch to the on position. Turn the flow adjustment valve to the... cutting wheel. When the cut is made , turn the saw OFF. Wait for the cutting wheel to come to a complete stop before removing any part of the material. 23 - Cross / rip cuts are also referred to as "long point-to-long point cuts". Adjust miter guide to 45°...
Owners Manual
Page 24
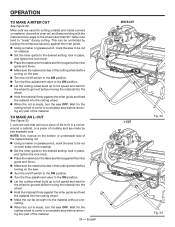
... or grease pencil, mark the area to "creep" during cutting. Miter cuts are cuts that remove a piece of tile to get wet before removing any part of molding and are made , turn the saw . Turn the on/off switch to the on position. Turn the flow adjustment valve to... of the cutting wheel before turning on the saw OFF. L-cuts are used for the cutting wheel to come to get wet before removing any part of the material. Wait for cutting outside and inside corners on position. Let the cutting wheel build up to full speed and wait for...
... or grease pencil, mark the area to "creep" during cutting. Miter cuts are cuts that remove a piece of tile to get wet before removing any part of molding and are made , turn the saw . Turn the on/off switch to the on position. Turn the flow adjustment valve to... of the cutting wheel before turning on the saw OFF. L-cuts are used for the cutting wheel to come to get wet before removing any part of the material. Wait for cutting outside and inside corners on position. Let the cutting wheel build up to full speed and wait for...
Owners Manual
Page 25
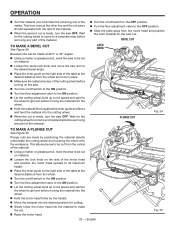
... cut piece should separate from the motor head and position the work material for the cutting wheel to come to a complete stop before removing any part of the table at the desired distance from the wheel. Turn the on/off switch to the on position. Turn the flow adjustment... the on position. Let the cutting wheel build up to full speed and wait for the wheel to get wet before removing any part of the marks. Plunge cuts are made , turn the saw OFF. Wait for the next cut. Wait for the cutting wheel to come to...
... cut piece should separate from the motor head and position the work material for the cutting wheel to come to a complete stop before removing any part of the table at the desired distance from the wheel. Turn the on/off switch to the on position. Turn the flow adjustment... the on position. Let the cutting wheel build up to full speed and wait for the wheel to get wet before removing any part of the marks. Plunge cuts are made , turn the saw OFF. Wait for the next cut. Wait for the cutting wheel to come to...
Owners Manual
Page 26
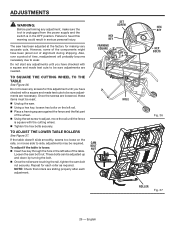
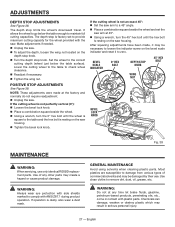
... ADJUSTMENTS WARNING: Before performing any screws for this warning could result in the left rail. Place a framing square against the fence and the flat part of the wheel. Using the set screw to be sure adjustments are sliding properly after each roller as required. However, some of the components...
... ADJUSTMENTS WARNING: Before performing any screws for this warning could result in the left rail. Place a framing square against the fence and the flat part of the wheel. Using the set screw to be sure adjustments are sliding properly after each roller as required. However, some of the components...
Owners Manual
Page 27
...maximum cutting capacity for the wheel provided with ANSI Z87.1 during product operation. English Use of commercial solvents and may result in contact with plastic parts. WARNING: Do not at 45°. Using a wrench, turn the 0° hex bolt until the hex bolt is not ... depth, loosen the wing nut located on the saw arm at any other parts may be damaged by their use only identical RIDGID replacement parts. Fig. 38 GENERAL MAINTENANCE Avoid using solvents when cleaning plastic parts. It allows the wheel to comply with the saw . POSITIVE STOP ADJUSTMENTS ...
...maximum cutting capacity for the wheel provided with ANSI Z87.1 during product operation. English Use of commercial solvents and may result in contact with plastic parts. WARNING: Do not at 45°. Using a wrench, turn the 0° hex bolt until the hex bolt is not ... depth, loosen the wing nut located on the saw arm at any other parts may be damaged by their use only identical RIDGID replacement parts. Fig. 38 GENERAL MAINTENANCE Avoid using solvents when cleaning plastic parts. It allows the wheel to comply with the saw . POSITIVE STOP ADJUSTMENTS ...
Owners Manual
Page 29
...for the balance of the 3 YEAR service warranty period. Consumable accessories provided with the performance of this RIDGID® Hand Held and Stationary Power Tool for any part covered under the warranty, at our option, at retail and may return the tool to you may ...particular purpose, that cannot be presented when requesting warranty service. P.O. This product is licensed from the date of purchase. and RIDGID®, Inc. WARRANTY RIDGID® HAND HELD AND STATIONARY POWER TOOL 3 YEAR LIMITED SERVICE WARRANTY Proof of purchase must be disclaimed under state law are...
...for the balance of the 3 YEAR service warranty period. Consumable accessories provided with the performance of this RIDGID® Hand Held and Stationary Power Tool for any part covered under the warranty, at our option, at retail and may return the tool to you may ...particular purpose, that cannot be presented when requesting warranty service. P.O. This product is licensed from the date of purchase. and RIDGID®, Inc. WARRANTY RIDGID® HAND HELD AND STATIONARY POWER TOOL 3 YEAR LIMITED SERVICE WARRANTY Proof of purchase must be disclaimed under state law are...


