
Operation Manual
Page 1
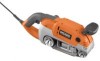
When properly cared for, it will give you for dependability, ease of injury, the user must read and understand the operator's manual before using this product. x 21 in . WARNING: To reduce the risk of operation, and operator safety. BELT SANDER VARIABLE SPEED DOUBLE INSULATED R2720 Your belt sander has been engineered and manufactured to our high standard for buying a RIDGID product. OPERATOR'S MANUAL 3 in . Thank you years of rugged, trouble-free performance. SAVE THIS MANUAL FOR FUTURE REFERENCE
When properly cared for, it will give you for dependability, ease of injury, the user must read and understand the operator's manual before using this product. x 21 in . WARNING: To reduce the risk of operation, and operator safety. BELT SANDER VARIABLE SPEED DOUBLE INSULATED R2720 Your belt sander has been engineered and manufactured to our high standard for buying a RIDGID product. OPERATOR'S MANUAL 3 in . Thank you years of rugged, trouble-free performance. SAVE THIS MANUAL FOR FUTURE REFERENCE
Operation Manual
Page 9
... can be adjusted from 800 to modify this tool until assembly is designed for easy handling. PACKING LIST Variable Speed Belt Sander Handle Assembly (Screw, Hex Wrench, Handle) Dust Collection Bag Sanding Belt Operator's Manual WARNING: If any parts are missing do so could result in a hazardous condition leading to use with all...
... can be adjusted from 800 to modify this tool until assembly is designed for easy handling. PACKING LIST Variable Speed Belt Sander Handle Assembly (Screw, Hex Wrench, Handle) Dust Collection Bag Sanding Belt Operator's Manual WARNING: If any parts are missing do so could result in a hazardous condition leading to use with all...
Operation Manual
Page 10
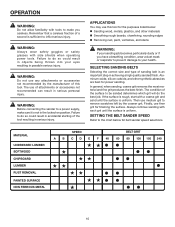
...injury. If the surface is rough, start with a coarse grit and sand until the surface is sufficient to inflict serious injury. SETTING THE BELT SANDER SPEED Refer to the chart below for the purposes listed below: n Sanding wood, metals, plastics, and other synthetic abrasives are best for ...resulting in possible serious injury. Failure to do so could result in serious personal injury. WARNING: Do not use of this tool for belt sander speed selections. In general, when sanding, coarse grit removes the most material and fine grit produces the best finish. Then use finer ...
...injury. If the surface is rough, start with a coarse grit and sand until the surface is sufficient to inflict serious injury. SETTING THE BELT SANDER SPEED Refer to the chart below for the purposes listed below: n Sanding wood, metals, plastics, and other synthetic abrasives are best for ...resulting in possible serious injury. Failure to do so could result in serious personal injury. WARNING: Do not use of this tool for belt sander speed selections. In general, when sanding, coarse grit removes the most material and fine grit produces the best finish. Then use finer ...
Operation Manual
Page 11
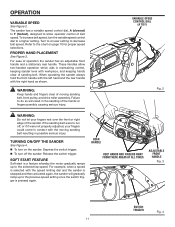
... FRONT HANDLE Fig. 3 SWITCH TRIGGER Fig. 4 11 To increase belt speed, turn the variable speed control dial to the chart on the sander: Depress the switch trigger. These handles allow operator control of the sander. TURNING ON/OFF THE SANDER See Figure 4. n To turn on page 10 for proper speed ...: Do not let your fingers could come in contact with the speed limiting dial and the sander is a feature whereby the motor gradually ramps up to do so will gradually ramp up to decrease belt speed. OPERATION VARIABLE SPEED See Figure 2. Failure to the selected top speed. For ease of...
... FRONT HANDLE Fig. 3 SWITCH TRIGGER Fig. 4 11 To increase belt speed, turn the variable speed control dial to the chart on the sander: Depress the switch trigger. These handles allow operator control of the sander. TURNING ON/OFF THE SANDER See Figure 4. n To turn on page 10 for proper speed ...: Do not let your fingers could come in contact with the speed limiting dial and the sander is a feature whereby the motor gradually ramps up to do so will gradually ramp up to decrease belt speed. OPERATION VARIABLE SPEED See Figure 2. Failure to the selected top speed. For ease of...

Operation Manual
Page 12
... injury. CAUTION: If the sanding belt is clockwise when looking into open side of the housing. Installing unidirectional sanding belts backwards can create a hazardous condition. n Unplug the belt sander. OPERATION TO INSTALL/CHANGE SANDING BELT See Figures 5 - 6. n Unplug the sander. TO ADJUST FRONT HANDLE See Figure...the open side of front roller and spring mechanism at all times. SANDING BELT LIFT BELT TENSION RELEASE LEVER TO REMOVE SANDING BELT WARNING: Keep hands and fingers clear of sander. Belt tension must be released in handle, insert hex bolt and retighten front ...
... injury. CAUTION: If the sanding belt is clockwise when looking into open side of the housing. Installing unidirectional sanding belts backwards can create a hazardous condition. n Unplug the belt sander. OPERATION TO INSTALL/CHANGE SANDING BELT See Figures 5 - 6. n Unplug the sander. TO ADJUST FRONT HANDLE See Figure...the open side of front roller and spring mechanism at all times. SANDING BELT LIFT BELT TENSION RELEASE LEVER TO REMOVE SANDING BELT WARNING: Keep hands and fingers clear of sander. Belt tension must be released in handle, insert hex bolt and retighten front ...

Operation Manual
Page 13
.... n Clogged sanding belts. n Premature sanding belt wear. The lock-on feature immediately. n Release the lock-on the sander: n Depress the switch trigger. OPERATING THE SANDER See Figure 9. NOTE: The front roller of this occurs, remove sander from moving under the sander. Before placing sander on work surface, ...a firm grip on the drive roller and front roller. n Irregular sanding belt tracking. Weight has been built into the tool to lock the switch trigger in an uneven surface. The sander was not designed for extended periods of control leading to the work could be...
.... n Clogged sanding belts. n Premature sanding belt wear. The lock-on feature immediately. n Release the lock-on the sander: n Depress the switch trigger. OPERATING THE SANDER See Figure 9. NOTE: The front roller of this occurs, remove sander from moving under the sander. Before placing sander on work surface, ...a firm grip on the drive roller and front roller. n Irregular sanding belt tracking. Weight has been built into the tool to lock the switch trigger in an uneven surface. The sander was not designed for extended periods of control leading to the work could be...
Operation Manual
Page 14
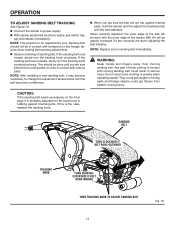
...or any foreign objects when making belt tracking adjustments. When correctly adjusted, the outer edge of the belt will not run off sander, or come in moving sanding belt. SANDING BELT TURN CLOCKWISE IF BELT RUNS OUTWARD TRACKING KNOB TURN COUNTERCLOCKWISE IF BELT RUNS INWARD TURN TRACKING KNOB ...TO ADJUST SANDING BELT 14 Fig. 10 n Connect the sander to change the adjustment ...
...or any foreign objects when making belt tracking adjustments. When correctly adjusted, the outer edge of the belt will not run off sander, or come in moving sanding belt. SANDING BELT TURN CLOCKWISE IF BELT RUNS OUTWARD TRACKING KNOB TURN COUNTERCLOCKWISE IF BELT RUNS INWARD TURN TRACKING KNOB ...TO ADJUST SANDING BELT 14 Fig. 10 n Connect the sander to change the adjustment ...
Operation Manual
Page 16
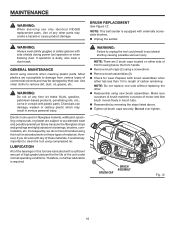
...etc. n Check for extended work with any other . n Reassemble by their use only identical RIDGID replacement parts. Do not over tighten. BRUSH CAP BRUSH ASSEMBLY Fig. 12 16 n Unplug the sander. WARNING: Do not at any time let brake fluids, gasoline, petroleum-based products, penetrating oils... below the front handle. Make sure curvature of brush matches curvature of the unit under normal operating conditions. NOTE: This belt sander is extremely important to damage from various types of the bearings in accidental starting causing possible serious injury. WARNING: Always wear...
...etc. n Check for extended work with any other . n Reassemble by their use only identical RIDGID replacement parts. Do not over tighten. BRUSH CAP BRUSH ASSEMBLY Fig. 12 16 n Unplug the sander. WARNING: Do not at any time let brake fluids, gasoline, petroleum-based products, penetrating oils... below the front handle. Make sure curvature of brush matches curvature of the unit under normal operating conditions. NOTE: This belt sander is extremely important to damage from various types of the bearings in accidental starting causing possible serious injury. WARNING: Always wear...
Operation Manual
Page 17
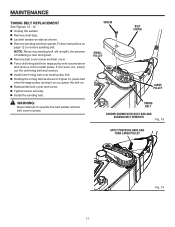
... LARGE PULLEY Fig. 14 17 n Remove sanding belt from small pulley. n Install new timing belt over small pulley first. WARNING: Never attempt to remove sanding belt. n Lay belt sander on . n Install the sanding belt. Follow instructions on page 12 to operate the belt sander without belt cover in Figure 14, press belt onto the large pulley turning it as you...
... LARGE PULLEY Fig. 14 17 n Remove sanding belt from small pulley. n Install new timing belt over small pulley first. WARNING: Never attempt to remove sanding belt. n Lay belt sander on . n Install the sanding belt. Follow instructions on page 12 to operate the belt sander without belt cover in Figure 14, press belt onto the large pulley turning it as you...

Operation Manual
Page 20
x 21 in . When ordering repair parts, always give the following information: Model No. R2720 Serial No. 983000-639 3-24-06 (REV:01) 20 For the location of this tool is found on a plate attached to provide all relevant information ... sure to the motor housing. The model number of the authorized service center nearest you call 1-866-539-1710 or visit us online at www.ridgid.com. BELT SANDER VARIABLE SPEED DOUBLE INSULATED R2720 Customer Service Information: For parts or service, contact your nearest...
x 21 in . When ordering repair parts, always give the following information: Model No. R2720 Serial No. 983000-639 3-24-06 (REV:01) 20 For the location of this tool is found on a plate attached to provide all relevant information ... sure to the motor housing. The model number of the authorized service center nearest you call 1-866-539-1710 or visit us online at www.ridgid.com. BELT SANDER VARIABLE SPEED DOUBLE INSULATED R2720 Customer Service Information: For parts or service, contact your nearest...
Repair Sheet
Page 3
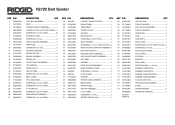
R2720 Belt Sander KEY P/N 1 300027054 2 740753001 3 301288001 4 660160003 5 660422001 6 513048001 7 660004006 8 280013066 9 301416001 10 660568002 11 513047001 12 513101001 13 290069066 14 512010001 15 301292001 16 ... ASSEMBLY.......... 1 FELT SEAL 1 WASHER 1 DRIVE ROLLER ASSEMBLY 1 MAIN HOUSING COVER 1 SCREW (M4 x 16 mm 2 CORD CLAMP 1 WASHER 1 POWER CORD ASSEMBLY 1 BEND RELIEF 1 SANDING BELT 1 SWITCH ASSEMBLY 1 LOGO LABEL 1 SCREW (M4 x 8 mm 1 SPEED CONTROL DIAL 1 KEY P/N 55 690551001 56 671746001 57 301290001 58 671745001 59 671681001 60 671873001 61 640901001...
R2720 Belt Sander KEY P/N 1 300027054 2 740753001 3 301288001 4 660160003 5 660422001 6 513048001 7 660004006 8 280013066 9 301416001 10 660568002 11 513047001 12 513101001 13 290069066 14 512010001 15 301292001 16 ... ASSEMBLY.......... 1 FELT SEAL 1 WASHER 1 DRIVE ROLLER ASSEMBLY 1 MAIN HOUSING COVER 1 SCREW (M4 x 16 mm 2 CORD CLAMP 1 WASHER 1 POWER CORD ASSEMBLY 1 BEND RELIEF 1 SANDING BELT 1 SWITCH ASSEMBLY 1 LOGO LABEL 1 SCREW (M4 x 8 mm 1 SPEED CONTROL DIAL 1 KEY P/N 55 690551001 56 671746001 57 301290001 58 671745001 59 671681001 60 671873001 61 640901001...


