Operation Manual
Page 9
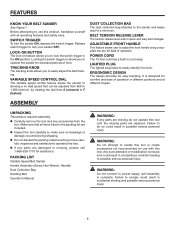
... not recommended for use this tool until the missing parts are damaged or missing, please call 1-866-539-1710 for extended periods of time. Locking the switch trigger on feature allows you to develop a no breakage or damage occurred during shipping. VARIABLE SPEED CONTROL DIAL The ... requires assembly. n Carefully remove the tool and any parts are replaced. Make sure that can be adjusted from 800 to easily adjust the belt tracking. n Do not discard the packing material until assembly is designed for easy handling. WARNING: Do not connect to power supply until you...
... not recommended for use this tool until the missing parts are damaged or missing, please call 1-866-539-1710 for extended periods of time. Locking the switch trigger on feature allows you to develop a no breakage or damage occurred during shipping. VARIABLE SPEED CONTROL DIAL The ... requires assembly. n Carefully remove the tool and any parts are replaced. Make sure that can be adjusted from 800 to easily adjust the belt tracking. n Do not discard the packing material until assembly is designed for easy handling. WARNING: Do not connect to power supply until you...
Operation Manual
Page 11
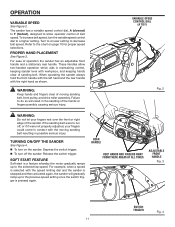
.... These handles allow operator control of moving sanding belt resulting in maintaining control, keeping sander level with workpiece, and keeping hands clear of the sander. TURNING ON/OFF THE SANDER See Figure 4. REAR HANDLE KEEP HANDS AND FINGERS AWAY FROM THESE AREAS AT ALL TIMES ADJUSTABLE FRONT HANDLE Fig. 3 SWITCH TRIGGER Fig...
.... These handles allow operator control of moving sanding belt resulting in maintaining control, keeping sander level with workpiece, and keeping hands clear of the sander. TURNING ON/OFF THE SANDER See Figure 4. REAR HANDLE KEEP HANDS AND FINGERS AWAY FROM THESE AREAS AT ALL TIMES ADJUSTABLE FRONT HANDLE Fig. 3 SWITCH TRIGGER Fig...

Operation Manual
Page 12
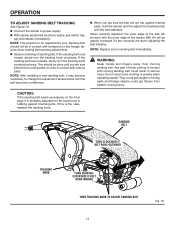
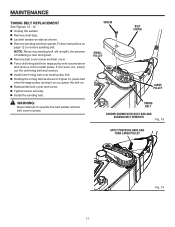
...bridge. dle. n Return hex key to hex key storage area located on the sanding belt to that the arrow inside of belt is clockwise when looking into open side of front roller and spring mechanism at all times. n Position sander as shown. Failure to do so could result in order to ...desired position aligning notch in handle mount on front han- Belt tension must be released in fingers getting pinched, causing possible serious injury....
...bridge. dle. n Return hex key to hex key storage area located on the sanding belt to that the arrow inside of belt is clockwise when looking into open side of front roller and spring mechanism at all times. n Position sander as shown. Failure to do so could result in order to ...desired position aligning notch in handle mount on front han- Belt tension must be released in fingers getting pinched, causing possible serious injury....

Operation Manual
Page 13
...provide the proper weight on the front roller could result in loss of time. Locking the switch trigger on feature immediately. n Push in - n Release the lock-on the sander: n Depress the switch trigger. NOTE: If the sanding belt moves while sanding, you have the lock-on feature engaged during use... and the sander is accidentally disconnected from the power supply, disengage the lock-on allows you might need to give the most efficient pressure at all times. The importance of the sander...
...provide the proper weight on the front roller could result in loss of time. Locking the switch trigger on feature immediately. n Push in - n Release the lock-on the sander: n Depress the switch trigger. NOTE: If the sanding belt moves while sanding, you have the lock-on feature engaged during use... and the sander is accidentally disconnected from the power supply, disengage the lock-on allows you might need to give the most efficient pressure at all times. The importance of the sander...
Operation Manual
Page 14
... injury. CAUTION: If the sanding belt wears excessively on the inner edge it may become necessary to power supply. n Connect the sander to change the adjustment several times until you are spent adjusting the belt tracking. If the sanding belt runs inward, slowly turn the tracking... knob counterclockwise. Belt life will be in contact with workpiece or any foreign objects when making...
... injury. CAUTION: If the sanding belt wears excessively on the inner edge it may become necessary to power supply. n Connect the sander to change the adjustment several times until you are spent adjusting the belt tracking. If the sanding belt runs inward, slowly turn the tracking... knob counterclockwise. Belt life will be in contact with workpiece or any foreign objects when making...
Operation Manual
Page 16
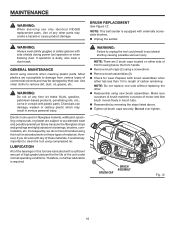
NOTE: This belt sander is required. LUBRICATION All of the bearings in . n Remove brush caps...dust mask. NOTE: There are susceptible to clean the tool using compressed air. n Reassemble by their use only identical RIDGID replacement parts. WARNING: Do not at any other . Use of front housing below the front handle. Replace both brush... assemblies when either side of any time let brake fluids, gasoline, petroleum-based products, penetrating oils, etc., come in brush tube. Make sure curvature...
NOTE: This belt sander is required. LUBRICATION All of the bearings in . n Remove brush caps...dust mask. NOTE: There are susceptible to clean the tool using compressed air. n Reassemble by their use only identical RIDGID replacement parts. WARNING: Do not at any other . Use of front housing below the front handle. Replace both brush... assemblies when either side of any time let brake fluids, gasoline, petroleum-based products, penetrating oils, etc., come in brush tube. Make sure curvature...
Operation Manual
Page 17
... large pulley with a screwdriver and remove it is worn out, simply cut the old timing belt and remove. n Lay belt sander on side as you press the belt on page 12 to operate the belt sander without belt cover in Figure 14, press belt onto the large pulley turning it as shown. n Tighten screw securely. Follow instructions...
... large pulley with a screwdriver and remove it is worn out, simply cut the old timing belt and remove. n Lay belt sander on side as you press the belt on page 12 to operate the belt sander without belt cover in Figure 14, press belt onto the large pulley turning it as shown. n Tighten screw securely. Follow instructions...
Repair Sheet
Page 3
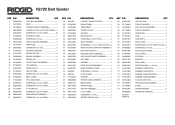
R2720 Belt Sander KEY P/N 1 300027054 2 740753001 3 301288001 4 660160003 5 660422001 6 513048001...49 560801001 50 900718003 51 301417001 52 940114120 53 660208010 54 343056001 DESCRIPTION QTY CONTACT PLATE STOPPER 1 HEX NUT (M8 1 TIMING BELT 1 DRIVEN PULLEY 1 WASHER 1 BACKING PAD 1 SCREW (M4 x 6 mm TORX 2 WAVY WASHER 1 SCREW (M4 ... 1 MAIN HOUSING COVER 1 SCREW (M4 x 16 mm 2 CORD CLAMP 1 WASHER 1 POWER CORD ASSEMBLY 1 BEND RELIEF 1 SANDING BELT 1 SWITCH ASSEMBLY 1 LOGO LABEL 1 SCREW (M4 x 8 mm 1 SPEED CONTROL DIAL 1 KEY P/N 55 690551001 56 671746001 57 ...
R2720 Belt Sander KEY P/N 1 300027054 2 740753001 3 301288001 4 660160003 5 660422001 6 513048001...49 560801001 50 900718003 51 301417001 52 940114120 53 660208010 54 343056001 DESCRIPTION QTY CONTACT PLATE STOPPER 1 HEX NUT (M8 1 TIMING BELT 1 DRIVEN PULLEY 1 WASHER 1 BACKING PAD 1 SCREW (M4 x 6 mm TORX 2 WAVY WASHER 1 SCREW (M4 ... 1 MAIN HOUSING COVER 1 SCREW (M4 x 16 mm 2 CORD CLAMP 1 WASHER 1 POWER CORD ASSEMBLY 1 BEND RELIEF 1 SANDING BELT 1 SWITCH ASSEMBLY 1 LOGO LABEL 1 SCREW (M4 x 8 mm 1 SPEED CONTROL DIAL 1 KEY P/N 55 690551001 56 671746001 57 ...


