Operation Manual
Page 9
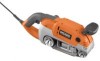
... live tools. LOCK-ON BUTTON The lock-on allows you to possible serious personal injury. POWER CORD The 12-foot cord has a built-in possible serious personal injury. LIGHTED PLUG The lighted plug helps to turn the sander ON, depress the switch trigger. n Carefully remove the tool and any parts are replaced...
... live tools. LOCK-ON BUTTON The lock-on allows you to possible serious personal injury. POWER CORD The 12-foot cord has a built-in possible serious personal injury. LIGHTED PLUG The lighted plug helps to turn the sander ON, depress the switch trigger. n Carefully remove the tool and any parts are replaced...
Operation Manual
Page 10
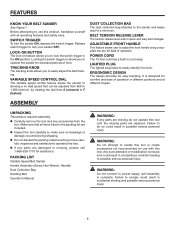
... of a second is sufficient to a power supply, make you have a breathing condition, wear a dust mask or respirator to prevent damage to the chart below : n Sanding wood, metals, plastics, and other synthetic abrasives are best for belt sander speed selections. WARNING: Do not use this...an important step in possible serious injury. SETTING THE BELT SANDER SPEED Refer to your eyes resulting in achieving a high quality sanded finish. OPERATION WARNING: Do not allow familiarity with side shields when operating power tools. SELECTING SANDING BELTS Selecting the correct size and ...
... of a second is sufficient to a power supply, make you have a breathing condition, wear a dust mask or respirator to prevent damage to the chart below : n Sanding wood, metals, plastics, and other synthetic abrasives are best for belt sander speed selections. WARNING: Do not use this...an important step in possible serious injury. SETTING THE BELT SANDER SPEED Refer to your eyes resulting in achieving a high quality sanded finish. OPERATION WARNING: Do not allow familiarity with side shields when operating power tools. SELECTING SANDING BELTS Selecting the correct size and ...

Operation Manual
Page 13
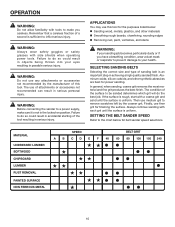
... the proper weight on allows you may be applying too much pressure. The sander was not designed for extended periods of the sander was designed to remain in loss of this occurs, remove sander from the power supply, disengage the lock-on feature allows you might need to do not ...lock the switch trigger if you to operate the sander for contour sanding. Fig. 9 13 OPERATION LOCKING ON THE SANDER See Figure 8. To lock-on button. n...
... the proper weight on allows you may be applying too much pressure. The sander was not designed for extended periods of the sander was designed to remain in loss of this occurs, remove sander from the power supply, disengage the lock-on feature allows you might need to do not ...lock the switch trigger if you to operate the sander for contour sanding. Fig. 9 13 OPERATION LOCKING ON THE SANDER See Figure 8. To lock-on button. n...
Operation Manual
Page 14
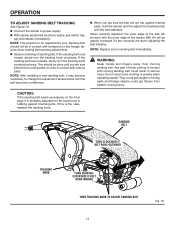
...If this is for adjustments only. CAUTION: If the sanding belt wears excessively on the inner edge it may become necessary to power supply. n Connect the sander to change the adjustment several times until the belt stabilizes. NOTE: Replace a torn sanding belt immediately. They could get caught.... NOTE: After installing a new sanding belt, it is probably adjusted too far inward and is rubbing against internal parts, start the sander and fine adjust the tracking knob until the belt becomes conditioned. Any part of body coming in serious injury. n When you are ...
...If this is for adjustments only. CAUTION: If the sanding belt wears excessively on the inner edge it may become necessary to power supply. n Connect the sander to change the adjustment several times until the belt stabilizes. NOTE: Replace a torn sanding belt immediately. They could get caught.... NOTE: After installing a new sanding belt, it is probably adjusted too far inward and is rubbing against internal parts, start the sander and fine adjust the tracking knob until the belt becomes conditioned. Any part of body coming in serious injury. n When you are ...

Operation Manual
Page 15
... the coatings manufacturers. 15 Sawdust or foreign objects being thrown into your face and eyes, never attempt to power supply before installing dust bag. To install/remove dust bag: n Unplug the sander. TURN TO SECURE DUST BAG DUST EXHAUST DUST BAG OPENING GROOVE WARNING: Do not use the... dust bag from sanding surface coatings such as polyurethanes, linseed oil, etc., can self-ignite in the sander dust collection bag or elsewhere and cause fire. Do not connect sander to use the dust collection bag when sanding metal. DUST BAG Fig. 11 WARNING: Collected sanding dust from...
... the coatings manufacturers. 15 Sawdust or foreign objects being thrown into your face and eyes, never attempt to power supply before installing dust bag. To install/remove dust bag: n Unplug the sander. TURN TO SECURE DUST BAG DUST EXHAUST DUST BAG OPENING GROOVE WARNING: Do not use the... dust bag from sanding surface coatings such as polyurethanes, linseed oil, etc., can self-ignite in the sander dust collection bag or elsewhere and cause fire. Do not connect sander to use the dust collection bag when sanding metal. DUST BAG Fig. 11 WARNING: Collected sanding dust from...
Operation Manual
Page 16
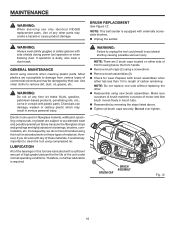
n Unplug the sander. Use clean cloths to unplug the tool could result in this tool for extended work with side shields during power tool operation or when blowing dust. WARNING: Do not at any time let brake fluids, gasoline, petroleum-based products, penetrating oils, etc., ... the steps listed above. n Tighten all brush caps securely. BRUSH CAP BRUSH ASSEMBLY Fig. 12 16 n Reassemble by their use only identical RIDGID replacement parts. Most plastics are highly abrasive to damage from various types of the unit under normal operating conditions. However, if you do not ...
n Unplug the sander. Use clean cloths to unplug the tool could result in this tool for extended work with side shields during power tool operation or when blowing dust. WARNING: Do not at any time let brake fluids, gasoline, petroleum-based products, penetrating oils, etc., ... the steps listed above. n Tighten all brush caps securely. BRUSH CAP BRUSH ASSEMBLY Fig. 12 16 n Reassemble by their use only identical RIDGID replacement parts. Most plastics are highly abrasive to damage from various types of the unit under normal operating conditions. However, if you do not ...
Repair Sheet
Page 3
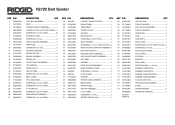
R2720 Belt Sander KEY P/N 1 300027054 2 740753001 3 301288001 4 660160003 5 660422001 6 513048001 7 660004006 8 280013066 9 301416001 10 660568002 11 513047001 12 513101001 13 290069066 14 512010001 15 301292001 16...1 RELEASE LEVER ASSEMBLY 1 IDLE ROLLER SHAFT ASSEMBLY.......... 1 FELT SEAL 1 WASHER 1 DRIVE ROLLER ASSEMBLY 1 MAIN HOUSING COVER 1 SCREW (M4 x 16 mm 2 CORD CLAMP 1 WASHER 1 POWER CORD ASSEMBLY 1 BEND RELIEF 1 SANDING BELT 1 SWITCH ASSEMBLY 1 LOGO LABEL 1 SCREW (M4 x 8 mm 1 SPEED CONTROL DIAL 1 KEY P/N 55 690551001 56 671746001 57 301290001 58 ...
R2720 Belt Sander KEY P/N 1 300027054 2 740753001 3 301288001 4 660160003 5 660422001 6 513048001 7 660004006 8 280013066 9 301416001 10 660568002 11 513047001 12 513101001 13 290069066 14 512010001 15 301292001 16...1 RELEASE LEVER ASSEMBLY 1 IDLE ROLLER SHAFT ASSEMBLY.......... 1 FELT SEAL 1 WASHER 1 DRIVE ROLLER ASSEMBLY 1 MAIN HOUSING COVER 1 SCREW (M4 x 16 mm 2 CORD CLAMP 1 WASHER 1 POWER CORD ASSEMBLY 1 BEND RELIEF 1 SANDING BELT 1 SWITCH ASSEMBLY 1 LOGO LABEL 1 SCREW (M4 x 8 mm 1 SPEED CONTROL DIAL 1 KEY P/N 55 690551001 56 671746001 57 301290001 58 ...


