
Owners Manual
Page 1
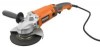
OPERATOR'S MANUAL 7 in. Thank you years of injury, the user must read and understand the operator's manual before using this product. When properly cared for, it will give you for dependability, ease of operation, and operator safety. WARNING: To reduce the risk of rugged, trouble-free performance. ANGLE GRINDER DOUBLE INSULATED R1020 Your angle grinder has been engineered and manufactured to our high standards for buying a RIDGID® product. SAVE THIS MANUAL FOR FUTURE REFERENCE
OPERATOR'S MANUAL 7 in. Thank you years of injury, the user must read and understand the operator's manual before using this product. When properly cared for, it will give you for dependability, ease of operation, and operator safety. WARNING: To reduce the risk of rugged, trouble-free performance. ANGLE GRINDER DOUBLE INSULATED R1020 Your angle grinder has been engineered and manufactured to our high standards for buying a RIDGID® product. SAVE THIS MANUAL FOR FUTURE REFERENCE
Owners Manual
Page 9
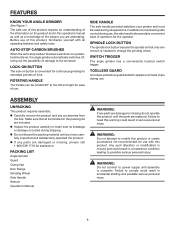
... carbon brushes wear down to a predetermined level, the angle grinder automatically switches off, ruling out the possibility of operation for the operator. Switch trigger The angle grinder has a conveniently located switch trigger. PACKING LIST Angle Grinder Guard Clamp Nut Disc Flange Grinding Wheel Side Handle Wrench... to the left and right for use of this operator's manual as well as a knowledge of time. FEATURES KNOW YOUR Angle Grinder See Figure 1. The safe use with all items listed in this product requires an understanding of the information on button is complete...
... carbon brushes wear down to a predetermined level, the angle grinder automatically switches off, ruling out the possibility of operation for the operator. Switch trigger The angle grinder has a conveniently located switch trigger. PACKING LIST Angle Grinder Guard Clamp Nut Disc Flange Grinding Wheel Side Handle Wrench... to the left and right for use of this operator's manual as well as a knowledge of time. FEATURES KNOW YOUR Angle Grinder See Figure 1. The safe use with all items listed in this product requires an understanding of the information on button is complete...
Owners Manual
Page 11
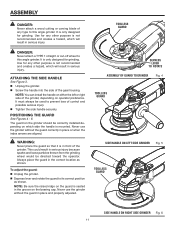
... to prevent loss of any type to this angle grinder. This could result in serious injury. TOOLLESS GUARD depress lever to grinder Fig. 4 TOOLLESS GUARD SIDE HANDLE ON LEFT SIDE GRINDER Fig. 5 TOOLLESS GUARD SIDE HANDLE ON RIGHT SIDE GRINDER Fig. 6 11 Note: You can install ... guard: Unplug the grinder. � Depress lever and rotate the guard to this angle grinder. Attaching the Side Handle See Figure 3. Unplug the grinder. Screw the handle into the side of the grinder, depending on which will result in ...
... to prevent loss of any type to this angle grinder. This could result in serious injury. TOOLLESS GUARD depress lever to grinder Fig. 4 TOOLLESS GUARD SIDE HANDLE ON LEFT SIDE GRINDER Fig. 5 TOOLLESS GUARD SIDE HANDLE ON RIGHT SIDE GRINDER Fig. 6 11 Note: You can install ... guard: Unplug the grinder. � Depress lever and rotate the guard to this angle grinder. Attaching the Side Handle See Figure 3. Unplug the grinder. Screw the handle into the side of the grinder, depending on which will result in ...

Owners Manual
Page 12
...familiarity with this product. lock-on feature immediately. The use this product. handle rotate left and right. � Unplug the angle grinder. � Depress the handle lock button and rotate the handle to the desired position. � Release handle lock ... WARNING: To prevent loss of attachments or accessories not recommended can be rotated 90˚ to inflict severe injury. To turn the grinder ON: Depress the switch trigger. The handle can result in and hold the lock-on button, located on feature is ...
...familiarity with this product. lock-on feature immediately. The use this product. handle rotate left and right. � Unplug the angle grinder. � Depress the handle lock button and rotate the handle to the desired position. � Release handle lock ... WARNING: To prevent loss of attachments or accessories not recommended can be rotated 90˚ to inflict severe injury. To turn the grinder ON: Depress the switch trigger. The handle can result in and hold the lock-on button, located on feature is ...
Owners Manual
Page 13
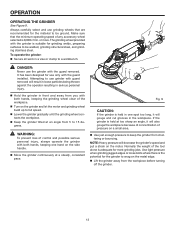
... the grinding wheel contacts the workpiece. Keep the grinder tilted at too sharp an angle, it will result in loose particles being thrown against the operator resulting in serious personal injury. Hold the grinder in the workpiece. Attempting to keep the grinder from you with guard removed will gouge and cut grooves...
... the grinding wheel contacts the workpiece. Keep the grinder tilted at too sharp an angle, it will result in loose particles being thrown against the operator resulting in serious personal injury. Hold the grinder in the workpiece. Attempting to keep the grinder from you with guard removed will gouge and cut grooves...
Owners Manual
Page 14
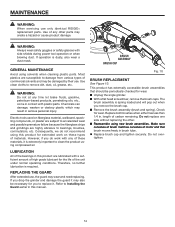
...tool operation or when blowing dust. However, if you do not recommend using new brush assemblies. Check for wear. Unplug the angle grinder. With a flat head screwdriver, remove the brush caps. Make sure curvature of brush matches curvature of any of these types...damage from various types of materials. Do not overtighten. 14 If operation is required. REPLACING THE GUARD After extended use only identical RIDGID® replacement parts. WARNING: Always wear safety goggles or safety glasses with a sufficient amount of high grade lubricant for extended work ...
...tool operation or when blowing dust. However, if you do not recommend using new brush assemblies. Check for wear. Unplug the angle grinder. With a flat head screwdriver, remove the brush caps. Make sure curvature of brush matches curvature of any of these types...damage from various types of materials. Do not overtighten. 14 If operation is required. REPLACING THE GUARD After extended use only identical RIDGID® replacement parts. WARNING: Always wear safety goggles or safety glasses with a sufficient amount of high grade lubricant for extended work ...

Owners Manual
Page 16
... the serial number in . When ordering repair parts, always give the following information: Model No. R1020 Serial No. 987000-290 2-5-08 (REV:01) ANGLE GRINDER DOUBLE INSULATED R1020 Customer Service Information: For parts or service, contact your nearest RIDGID® authorized service center. For the location of this product is found on a plate attached to... 7 in the space provided below. The model number of the authorized service center nearest you call 1-866-539-1710 or visit us online at www.ridgid.com.
... the serial number in . When ordering repair parts, always give the following information: Model No. R1020 Serial No. 987000-290 2-5-08 (REV:01) ANGLE GRINDER DOUBLE INSULATED R1020 Customer Service Information: For parts or service, contact your nearest RIDGID® authorized service center. For the location of this product is found on a plate attached to... 7 in the space provided below. The model number of the authorized service center nearest you call 1-866-539-1710 or visit us online at www.ridgid.com.
