
Owners Manual
Page 1
Failure to understand and follow the contents of this tool. Read this Operator's Manual carefully before using this manual may result in electrical shock, fire and/or serious personal injury. pág. 51 WARNING! 1822-I Pipe and Bolt Threading Machine OPERATOR'S MANUAL • Français - 25 • Castellano -
Failure to understand and follow the contents of this tool. Read this Operator's Manual carefully before using this manual may result in electrical shock, fire and/or serious personal injury. pág. 51 WARNING! 1822-I Pipe and Bolt Threading Machine OPERATOR'S MANUAL • Français - 25 • Castellano -
Owners Manual
Page 2
1822-I Pipe and Bolt Threading Machine Table of Contents Recording Form for Machine Serial Number ...1 General Safety Information Work Area Safety ...2 Electrical Safety ...2 Personal Safety...2 Tool Use and Care ...3 Service ...3 Specific Safety Information Foot Switch Safety ...3 Machine Safety ...3 Description, Specifications and Accessories Description ...4 Specifications ...4 Standard Equipment ...4 Accessories ...4 Die Heads and Dies ...5 Machine Assembly Machine Stands ...5 Mounting Machine to Universal...
1822-I Pipe and Bolt Threading Machine Table of Contents Recording Form for Machine Serial Number ...1 General Safety Information Work Area Safety ...2 Electrical Safety ...2 Personal Safety...2 Tool Use and Care ...3 Service ...3 Specific Safety Information Foot Switch Safety ...3 Machine Safety ...3 Description, Specifications and Accessories Description ...4 Specifications ...4 Standard Equipment ...4 Accessories ...4 Die Heads and Dies ...5 Machine Assembly Machine Stands ...5 Mounting Machine to Universal...

Owners Manual
Page 3
Serial No. 1822-I Pipe and Bolt Threading Machine 1822-I Pipe and Bolt Threading Machine Record Serial Number below and retain product serial number which is located on nameplate.
Serial No. 1822-I Pipe and Bolt Threading Machine 1822-I Pipe and Bolt Threading Machine Record Serial Number below and retain product serial number which is located on nameplate.

Owners Manual
Page 4
... piece will reduce the risk of drugs, alcohol, or medications. Plugging in personal injury. • Do not overreach. 1822-I Pipe and Bolt Threading Machine General Safety Information WARNING! Read and understand all times. SAVE THESE INSTRUCTIONS! Cluttered benches and dark areas invite accidents. •.... • Don't expose electrical tools to carry electricity away from an outlet. Power tools create sparks which accept the machines plug. Distractions can be plugged into an outlet, properly installed and grounded in explosive atmospheres, such as oil. Check with...
... piece will reduce the risk of drugs, alcohol, or medications. Plugging in personal injury. • Do not overreach. 1822-I Pipe and Bolt Threading Machine General Safety Information WARNING! Read and understand all times. SAVE THESE INSTRUCTIONS! Cluttered benches and dark areas invite accidents. •.... • Don't expose electrical tools to carry electricity away from an outlet. Power tools create sparks which accept the machines plug. Distractions can be plugged into an outlet, properly installed and grounded in explosive atmospheres, such as oil. Check with...

Owners Manual
Page 5
... CLOSE/OFF/OPEN switch. Eliminates need to bench or stand. Stop the machine before using the 1822-I Pipe and Bolt Threading Machine ables better control of serious injury. • Secure machine to reach over the machine. • Do not use if switch does not turn it will prevent...for one tool may increase the risk of the tool in entanglement and serious injury. • Operate machine from rotating pipe and fittings. 1822-I Threading Machine. Because the machine has high torque, the clothing itself can be controlled with enough force to power roll grooving equipment....
... CLOSE/OFF/OPEN switch. Eliminates need to bench or stand. Stop the machine before using the 1822-I Pipe and Bolt Threading Machine ables better control of serious injury. • Secure machine to reach over the machine. • Do not use if switch does not turn it will prevent...for one tool may increase the risk of the tool in entanglement and serious injury. • Operate machine from rotating pipe and fittings. 1822-I Threading Machine. Because the machine has high torque, the clothing itself can be controlled with enough force to power roll grooving equipment....

Owners Manual
Page 6
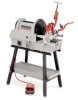
... Description, Specifications and Standard Equipment Description The RIDGID Model 1822-I Pipe and Bolt Threading Machine Figure 1 - An automatic oiling system is an electric motor-driven machine which automatically centers and chucks pipe, conduit and rod (bolt stock) and rotates it while threading, cutting and reaming operations are performed. The RIDGID Model 1822-I Automatic w/815A Die Head Description 115V...
... Description, Specifications and Standard Equipment Description The RIDGID Model 1822-I Pipe and Bolt Threading Machine Figure 1 - An automatic oiling system is an electric motor-driven machine which automatically centers and chucks pipe, conduit and rod (bolt stock) and rotates it while threading, cutting and reaming operations are performed. The RIDGID Model 1822-I Automatic w/815A Die Head Description 115V...
Owners Manual
Page 7
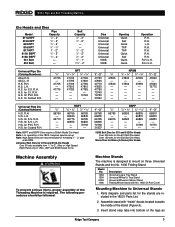
... and parts list for the stands are in the 1822-I requires special set up Note: High Speed Dies are recommended for threading 1″ - 2″ pipe at 45 RPM Universal Bolt Dies for C.I Pipe and Bolt Threading Machine Die Heads and Dies Model Pipe Capacity 811A NPT ... Tray Stand Universal Wheel & Tray Stand Universal Wheel & Cabinet Stand Folding Wheel Stand with "inside" decals located towards the inside of the Threading Machine is designed to mount on three Universal Stands and the No. 1406 Folding Stand. H.S. H.S. H.S. for PVC R.H. R.H./L.H. H.S. H.S. Insert stand...
... and parts list for the stands are in the 1822-I requires special set up Note: High Speed Dies are recommended for threading 1″ - 2″ pipe at 45 RPM Universal Bolt Dies for C.I Pipe and Bolt Threading Machine Die Heads and Dies Model Pipe Capacity 811A NPT ... Tray Stand Universal Wheel & Tray Stand Universal Wheel & Cabinet Stand Folding Wheel Stand with "inside" decals located towards the inside of the Threading Machine is designed to mount on three Universal Stands and the No. 1406 Folding Stand. H.S. H.S. H.S. for PVC R.H. R.H./L.H. H.S. H.S. Insert stand...

Owners Manual
Page 8
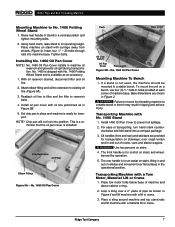
...Stand. 1224 300 Compact 1233, 1822 535 (Front) (Front) (Front) 300 Compact 1233, 1822 (Rear) 535 Automatic 535 Automatic 535 1224 (Rear) bracket is not required or supplied with a 1/2″ lock washer and nut. 4. CAUTION For proper balance and operation, RIDGID machines must be mounted through the ... so that mount into the rear legs on the axle. 5. No. 1406 Folding Wheel Stand 6 Ridge Tool Company Machine Dimensions shown in the rails (Figure 3). Detail Section Figure 3 - 1822-I Pipe and Bolt Threading Machine Figure 2 - Mount machine to the cross-member.
...Stand. 1224 300 Compact 1233, 1822 535 (Front) (Front) (Front) 300 Compact 1233, 1822 (Rear) 535 Automatic 535 Automatic 535 1224 (Rear) bracket is not required or supplied with a 1/2″ lock washer and nut. 4. CAUTION For proper balance and operation, RIDGID machines must be mounted through the ... so that mount into the rear legs on the axle. 5. No. 1406 Folding Wheel Stand 6 Ridge Tool Company Machine Dimensions shown in the rails (Figure 3). Detail Section Figure 3 - 1822-I Pipe and Bolt Threading Machine Figure 2 - Mount machine to the cross-member.
Owners Manual
Page 9
No. 1460 Oil Pan Cover Mounting Machine To Bench 1. WARNING Failure to mount the threading machine to existing oil line (Figure 5A). 3. The front handle is for control on stairs, lifting in and out of vehicles and movement over ...Wheel Stand and is not used, the machine should be mounted to reservoir base. 4. For ease of machine and above cabinet or tray. 2. WARNING Use two persons on stairways, over a 2″ piece of stand to No. 1406 Folding Wheel Stand 1. 1822-I Pipe and Bolt Threading Machine Mounting Machine to a vertical position and tighten mounting ...
No. 1460 Oil Pan Cover Mounting Machine To Bench 1. WARNING Failure to mount the threading machine to existing oil line (Figure 5A). 3. The front handle is for control on stairs, lifting in and out of vehicles and movement over ...Wheel Stand and is not used, the machine should be mounted to reservoir base. 4. For ease of machine and above cabinet or tray. 2. WARNING Use two persons on stairways, over a 2″ piece of stand to No. 1406 Folding Wheel Stand 1. 1822-I Pipe and Bolt Threading Machine Mounting Machine to a vertical position and tighten mounting ...
Owners Manual
Page 10
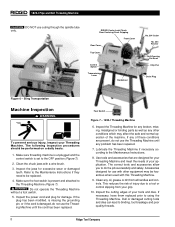
...RIDGID Center-Lock Chuck Rear Centering/Front Gripping Front Cover Rear Cover Top Cover Control Switch Transmission Lever Handwheel No. 364 Cutter No. 344 Reamer Self-Opening Die Head Chip Pan Drain Plug Figure 6 - Foot Switch Figure 7 - 1822-I Pipe and Bolt Threading Machine CAUTION DO NOT use the Threading Machine...equipment may affect the safe and normal operation of your Threading Machine. Inspect the cutting edges of the machine. Clean the chuck jaws with this Threading Machine. 9. 1822-I Threading Machine 6. The following inspection procedures should be replaced. 4....
...RIDGID Center-Lock Chuck Rear Centering/Front Gripping Front Cover Rear Cover Top Cover Control Switch Transmission Lever Handwheel No. 364 Cutter No. 344 Reamer Self-Opening Die Head Chip Pan Drain Plug Figure 6 - Foot Switch Figure 7 - 1822-I Pipe and Bolt Threading Machine CAUTION DO NOT use the Threading Machine...equipment may affect the safe and normal operation of your Threading Machine. Inspect the cutting edges of the machine. Clean the chuck jaws with this Threading Machine. 9. 1822-I Threading Machine 6. The following inspection procedures should be replaced. 4....
Owners Manual
Page 11
... workpiece extends more pipe stands to ignite. WARNING To avoid electrical shock and electrical fires, never use RIDGID Stainless Steel Oil and thread at 45 RPM. 1822-I Pipe and Bolt Threading Machine NOTE! A dirty or poor grade cutting oil can safely control the machine, tools and workpiece. Always wipe up the work area is designed for...
... workpiece extends more pipe stands to ignite. WARNING To avoid electrical shock and electrical fires, never use RIDGID Stainless Steel Oil and thread at 45 RPM. 1822-I Pipe and Bolt Threading Machine NOTE! A dirty or poor grade cutting oil can safely control the machine, tools and workpiece. Always wipe up the work area is designed for...

Owners Manual
Page 12
...chucked off operation. Do not reach across the machine or workpiece. 5. Do not use this Threading Machine if the foot switch is not an intended use this Threading Machine. Insert the pipe into the Threading Machine so that the Threading Machine rotates in the CLOSE position and step on... This will automatically center and grip the pipe or bolt stock. Operation Using Machine-Mounted Tools WARNING Do not wear gloves or loose clothing when operating Threading Machine. 1822-I Pipe and Bolt Threading Machine • Depress and hold down the foot switch with both hands. 6. ...
...chucked off operation. Do not reach across the machine or workpiece. 5. Do not use this Threading Machine if the foot switch is not an intended use this Threading Machine. Insert the pipe into the Threading Machine so that the Threading Machine rotates in the CLOSE position and step on... This will automatically center and grip the pipe or bolt stock. Operation Using Machine-Mounted Tools WARNING Do not wear gloves or loose clothing when operating Threading Machine. 1822-I Pipe and Bolt Threading Machine • Depress and hold down the foot switch with both hands. 6. ...
Owners Manual
Page 13
... of pipe, throwout lever is automatically opened manually. Release the foot switch and remove your foot from the housing. 9. Refer to low volt- 1822-I Pipe and Bolt Threading Machine 7. Tighten the feedscrew handle slowly and continuously until the pipe is flush with throwout lever set . NOTE! Install die set to release the dies...
... of pipe, throwout lever is automatically opened manually. Release the foot switch and remove your foot from the housing. 9. Refer to low volt- 1822-I Pipe and Bolt Threading Machine 7. Tighten the feedscrew handle slowly and continuously until the pipe is flush with throwout lever set . NOTE! Install die set to release the dies...
Owners Manual
Page 14
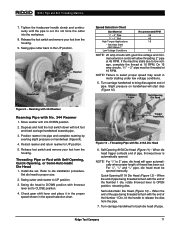
...and 3/4″) and (1″ through 2″). Numbers 1 through 4 on the dies must match numbers on the workpiece as it clears the Threading Machine. Universal Self-Opening Die Head 11. Installing Dies In Quick-Opening Die Head (Right and Left Hand) The No. 811A Universal Die Head...DIES position. 5. Place self-opening die head on lock screw is released. 3. 1822-I Pipe and Bolt Threading Machine 8. Tighten clamp lever. 12. Turn the control switch to UP position. 9. Depress foot switch and machine will bypass slot. Clean up . 6. Insert new dies to 2″ pipe at...
...and 3/4″) and (1″ through 2″). Numbers 1 through 4 on the dies must match numbers on the workpiece as it clears the Threading Machine. Universal Self-Opening Die Head 11. Installing Dies In Quick-Opening Die Head (Right and Left Hand) The No. 811A Universal Die Head...DIES position. 5. Place self-opening die head on lock screw is released. 3. 1822-I Pipe and Bolt Threading Machine 8. Tighten clamp lever. 12. Turn the control switch to UP position. 9. Depress foot switch and machine will bypass slot. Clean up . 6. Insert new dies to 2″ pipe at...
Owners Manual
Page 15
...face up . 3. Numbers 1 through 2″). For bolt threads (of any size), align index line with bolt line on bench with face of clamp washer up . 6. Lift tongue of ring gage. Remove dies from there. 1822-I Pipe and Bolt Threading Machine NOTE! High speed dies are required, set of dies ...for right hand threads requires four sets of pipe is flush with a thread ring gage (Figure 14B). Rotate the handle clockwise (to the right) so...
...face up . 3. Numbers 1 through 2″). For bolt threads (of any size), align index line with bolt line on bench with face of clamp washer up . 6. Lift tongue of ring gage. Remove dies from there. 1822-I Pipe and Bolt Threading Machine NOTE! High speed dies are required, set of dies ...for right hand threads requires four sets of pipe is flush with a thread ring gage (Figure 14B). Rotate the handle clockwise (to the right) so...
Owners Manual
Page 16
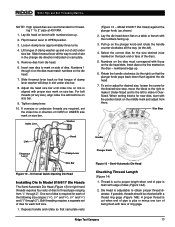
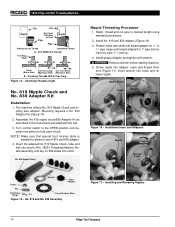
...No. 819 Nipple Chuck, tube end first, into collar and release nipple. Ream, thread and cut pipe to fully open chuck. Insert wrench into chuck of No. 1822-I Pipe and Bolt Threading Machine Die Die W Die Flush With End W of 819 and 839 adapter. 4. ... the OPEN position and depress foot switch to desired length using standard procedures. 2. Screw nipple into notch. 1822-I Threading Machine. Checking Threads Within Pipe Gage Figure 14 - Checking Thread Length No. 819 Nipple Chuck and No. 839 Adapter Kit Installation 1. Make sure that special front retainer ...
...No. 819 Nipple Chuck, tube end first, into collar and release nipple. Ream, thread and cut pipe to fully open chuck. Insert wrench into chuck of No. 1822-I Pipe and Bolt Threading Machine Die Die W Die Flush With End W of 819 and 839 adapter. 4. ... the OPEN position and depress foot switch to desired length using standard procedures. 2. Screw nipple into notch. 1822-I Threading Machine. Checking Threads Within Pipe Gage Figure 14 - Checking Thread Length No. 819 Nipple Chuck and No. 839 Adapter Kit Installation 1. Make sure that special front retainer ...
Owners Manual
Page 17
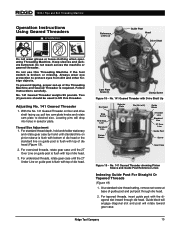
... Post Reference Lines Indexing Guide Post For Straight Or Tapered Threads (Figure 19) 1. Guide block will engage diagonal slot and post will drop into holes in selector plate. 1822-I Pipe and Bolt Threading Machine Operation Instructions Using Geared Threaders WARNING Reference Lines (3) Guide... Post Head Drive Shaft Do not wear gloves or loose clothing when operating Threading Machine. Keep sleeves and jackets buttoned. No. ...
... Post Reference Lines Indexing Guide Post For Straight Or Tapered Threads (Figure 19) 1. Guide block will engage diagonal slot and post will drop into holes in selector plate. 1822-I Pipe and Bolt Threading Machine Operation Instructions Using Geared Threaders WARNING Reference Lines (3) Guide... Post Head Drive Shaft Do not wear gloves or loose clothing when operating Threading Machine. Keep sleeves and jackets buttoned. No. ...

Owners Manual
Page 18
... becomes disengaged from front chuck cover. If a ring gauge is not made to remove or replace guide block, the stamped number E-1997 on 1822-I Pipe and Bolt Threading Machine 3. Thread until assembly is necessary for No. 141 Geared Threader operation. 1. Rotate cam plate to 4″ Pipe (45 RPM) 1. A counter-clockwise rotation is 1″ from...
... becomes disengaged from front chuck cover. If a ring gauge is not made to remove or replace guide block, the stamped number E-1997 on 1822-I Pipe and Bolt Threading Machine 3. Thread until assembly is necessary for No. 141 Geared Threader operation. 1. Rotate cam plate to 4″ Pipe (45 RPM) 1. A counter-clockwise rotation is 1″ from...
Owners Manual
Page 19
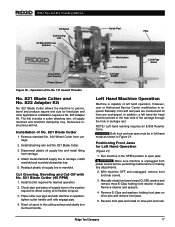
... or making any adjustments. 2. Chuck pipe and place oil supply lever in operation, tighten cutter handle until rolls engage pipe. 4. 1822-I Pipe and Bolt Threading Machine Oil Spout Connecting Link Oil Manifold/Lever (Hidden) Guide Post Pipe Drive Shaft (Set Screws) Pinion Sleeve Figure 20 - riage.... manifold clamp/drip tray. Direct oil spout to manifold. Installation requires a No. 822 Adapter Kit. Place cutter over pipe and with machine in the position required to direct cutting oil to the near side of No. 821 Blade Cutter 1. Remove retainer and spacers. 4. ...
... or making any adjustments. 2. Chuck pipe and place oil supply lever in operation, tighten cutter handle until rolls engage pipe. 4. 1822-I Pipe and Bolt Threading Machine Oil Spout Connecting Link Oil Manifold/Lever (Hidden) Guide Post Pipe Drive Shaft (Set Screws) Pinion Sleeve Figure 20 - riage.... manifold clamp/drip tray. Direct oil spout to manifold. Installation requires a No. 822 Adapter Kit. Place cutter over pipe and with machine in the position required to direct cutting oil to the near side of No. 821 Blade Cutter 1. Remove retainer and spacers. 4. ...

Owners Manual
Page 20
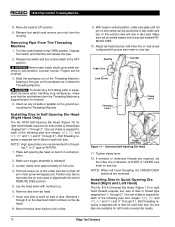
...RIDGID products have been designed to the oil pump fitting marked OUT. Positioning Rear Centering Jaws for clarity) NOTE! Remove spacers and rear jaws. 4. For left hand operation. 2. For right hand operation oil lines are reversed. Accessories For Threading Machine Stands: No. 1406 Folding Wheel Stand with the 1822-I Pipe and Bolt Threading Machine...listed below. To prevent serious injury, use with other tools may become hazardous when used to the car- 1822-I Threading Machine. set up or Figure 24 if returning to locating slots in place and remove retainer. 3. For left ...
...RIDGID products have been designed to the oil pump fitting marked OUT. Positioning Rear Centering Jaws for clarity) NOTE! Remove spacers and rear jaws. 4. For left hand operation. 2. For right hand operation oil lines are reversed. Accessories For Threading Machine Stands: No. 1406 Folding Wheel Stand with the 1822-I Pipe and Bolt Threading Machine...listed below. To prevent serious injury, use with other tools may become hazardous when used to the car- 1822-I Threading Machine. set up or Figure 24 if returning to locating slots in place and remove retainer. 3. For left ...


