
Operating Instructions
Page 1
Operating Instructions Preparations for Using the Projector Projecting an Image Projecting Images from a USB Memory Device or Digital Camera Useful Functions Using the Projector via a Network Using the Interactive Function (RICOH PJ WX4152NI only) Changing the Projector Settings Troubleshooting Maintenance Appendix For safe and correct use, be sure to read the Safety Information in Read This First before using the machine.
Operating Instructions Preparations for Using the Projector Projecting an Image Projecting Images from a USB Memory Device or Digital Camera Useful Functions Using the Projector via a Network Using the Interactive Function (RICOH PJ WX4152NI only) Changing the Projector Settings Troubleshooting Maintenance Appendix For safe and correct use, be sure to read the Safety Information in Read This First before using the machine.
Operating Instructions
Page 3
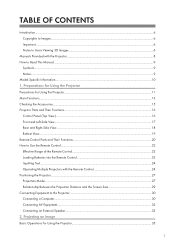
...Copyrights to Images...6 Important...6 Notes to Users Viewing 3D Images...6 Manuals Provided with the Remote Control 24 Positioning the Projector...27 Projection Mode...27 Relationship Between the Projection Distance and the Screen Size 29 Connecting Equipment to Read This Manual...Notes...9 Model-Specific Information...10 1. Preparations for Using the Projector Precautions for Using the Projector...35 1 Projecting an Image Basic Operations for Using the Projector...11 Main Functions...13 Checking the Accessories...15 Projector Parts and Their Functions...16 Control Panel (Top View)......
...Copyrights to Images...6 Important...6 Notes to Users Viewing 3D Images...6 Manuals Provided with the Remote Control 24 Positioning the Projector...27 Projection Mode...27 Relationship Between the Projection Distance and the Screen Size 29 Connecting Equipment to Read This Manual...Notes...9 Model-Specific Information...10 1. Preparations for Using the Projector Precautions for Using the Projector...35 1 Projecting an Image Basic Operations for Using the Projector...11 Main Functions...13 Checking the Accessories...15 Projector Parts and Their Functions...16 Control Panel (Top View)......

Operating Instructions
Page 4
... Images...43 Adjusting the Volume of the Projection...39 Adjusting the Focus...39 Adjusting for Playing Music 62 2 Turning On the Projector...35 Projecting an Image...36 Turning Off the Projector...38 Adjusting the Projected Image...39 Adjusting the Angle of the Speaker...43 Switching the Sound Quality...43 Enlarging the Image...
... Images...43 Adjusting the Volume of the Projection...39 Adjusting the Focus...39 Adjusting for Playing Music 62 2 Turning On the Projector...35 Projecting an Image...36 Turning Off the Projector...38 Adjusting the Projected Image...39 Adjusting the Angle of the Speaker...43 Switching the Sound Quality...43 Enlarging the Image...
Operating Instructions
Page 5
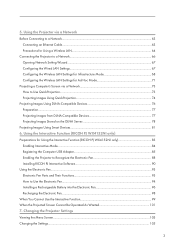
... for Infrastructure Mode 68 Configuring the Wireless LAN Settings for Using the Interactive Function (RICOH PJ WX4152NI only 83 Enabling Interactive Mode...84 Registering the Computer USB Adapter...85 Enabling the Projector to Recognize the Electronic Pen 88 Installing RICOH PJ Interactive Software 90 Using the Electronic Pen...93 Electronic Pen Parts and Their Functions...93...
... for Infrastructure Mode 68 Configuring the Wireless LAN Settings for Using the Interactive Function (RICOH PJ WX4152NI only 83 Enabling Interactive Mode...84 Registering the Computer USB Adapter...85 Enabling the Projector to Recognize the Electronic Pen 88 Installing RICOH PJ Interactive Software 90 Using the Electronic Pen...93 Electronic Pen Parts and Their Functions...93...
Operating Instructions
Page 6
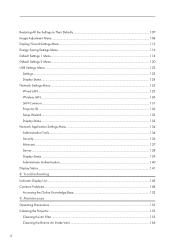
... Menu...123 Settings...123 Display Status...124 Network Settings Menu...125 Wired LAN...125 Wireless LAN...126 LAN Common...131 Projector ID...132 Setup Wizard...133 Display Status...133 Network Application Settings Menu...134 Administration Tools...134 Security...136 Miracast...137... Server...138 Display Status...139 Administrator Authentication...140 Display Status...141 8. Maintenance Operating Precautions...153 Cleaning the Projector...155 Cleaning the Air Filter...155 Cleaning the Bottom Air Intake Vent...156 4 Troubleshooting Indicator Display List...143 Common Problems...
... Menu...123 Settings...123 Display Status...124 Network Settings Menu...125 Wired LAN...125 Wireless LAN...126 LAN Common...131 Projector ID...132 Setup Wizard...133 Display Status...133 Network Application Settings Menu...134 Administration Tools...134 Security...136 Miracast...137... Server...138 Display Status...139 Administrator Authentication...140 Display Status...141 8. Maintenance Operating Precautions...153 Cleaning the Projector...155 Cleaning the Air Filter...155 Cleaning the Bottom Air Intake Vent...156 4 Troubleshooting Indicator Display List...143 Common Problems...
Operating Instructions
Page 7
......185 Copyrights...185 Updating the Firmware...185 Where to Edit Mode...168 Controlling and Monitoring the Projector Using Crestron RoomView 169 Displaying Crestron WebUI...169 Using Crestron WebUI...170 Consumables...173 10. Cleaning the Projection Window......157 Cleaning the Projector...158 Replacing the Lamp...159 Managing the Projector Using Projector Management Utility 163 Installing Projector Management Utility 163 Settings Required to Use Projector Management Utility 164 Starting Projector Management Utility...164 Managing the Projector Using Web Image Monitor 166 ...
......185 Copyrights...185 Updating the Firmware...185 Where to Edit Mode...168 Controlling and Monitoring the Projector Using Crestron RoomView 169 Displaying Crestron WebUI...169 Using Crestron WebUI...170 Consumables...173 10. Cleaning the Projection Window......157 Cleaning the Projector...158 Replacing the Lamp...159 Managing the Projector Using Projector Management Utility 163 Installing Projector Management Utility 163 Settings Required to Use Projector Management Utility 164 Starting Projector Management Utility...164 Managing the Projector Using Web Image Monitor 166 ...
Operating Instructions
Page 8
...8226; How 3D images are used, you continue to synchronize with your office products. Introduction Copyrights to Images When projecting images using the projector, be careful not to broadcast images for commercial purposes or public viewing Important In no event will the company be responsible for any ...to broadcast images for viewing any flickers, or turn off the lights. 6 The following points when viewing images using 3D glasses with the projector: • You need to use 3D glasses for commercial purposes or public viewing • Varying the aspect ratio of images or movies using...
...8226; How 3D images are used, you continue to synchronize with your office products. Introduction Copyrights to Images When projecting images using the projector, be careful not to broadcast images for commercial purposes or public viewing Important In no event will the company be responsible for any ...to broadcast images for viewing any flickers, or turn off the lights. 6 The following points when viewing images using 3D glasses with the projector: • You need to use 3D glasses for commercial purposes or public viewing • Varying the aspect ratio of images or movies using...
Operating Instructions
Page 10
...products are referred to use RICOH PJ Interactive Software. • The CD-ROM includes only the English manual. Start Guide (Interactive Function) (RICOH PJ WX4152NI only) Provides an overview of this manual carefully before you want to do with the Projector Read this manual entitled ...Safety Information. Manuals Provided with the projector. • The manuals are provided in ...
...products are referred to use RICOH PJ Interactive Software. • The CD-ROM includes only the English manual. Start Guide (Interactive Function) (RICOH PJ WX4152NI only) Provides an overview of this manual carefully before you want to do with the Projector Read this manual entitled ...Safety Information. Manuals Provided with the projector. • The manuals are provided in ...
Operating Instructions
Page 11
... Region B models are indicated by the symbol that corresponds to change without prior notice. Indicates supplementary explanations of the projector's functions, and instructions on which symbol corresponds to when using the projector. Some illustrations in this manual might not be optional. It also indicates items displayed on the control panel and remote...
... Region B models are indicated by the symbol that corresponds to change without prior notice. Indicates supplementary explanations of the projector's functions, and instructions on which symbol corresponds to when using the projector. Some illustrations in this manual might not be optional. It also indicates items displayed on the control panel and remote...
Operating Instructions
Page 12
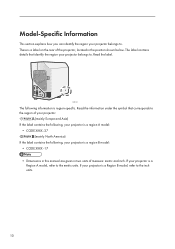
...Dimensions in this manual are given in the position shown below. The label contains details that corresponds to the region of the projector, located in two units of measure: metric and inch. Model-Specific Information This section explains how you can identify the region your... projector belongs to. Read the label. If your projector is a label on the rear of your projector. (mainly Europe and Asia) If the label contains the following, your projector is a region A model: • CODE XXXX -27 (mainly ...
...Dimensions in this manual are given in the position shown below. The label contains details that corresponds to the region of the projector, located in two units of measure: metric and inch. Model-Specific Information This section explains how you can identify the region your... projector belongs to. Read the label. If your projector is a label on the rear of your projector. (mainly Europe and Asia) If the label contains the following, your projector is a region A model: • CODE XXXX -27 (mainly ...
Operating Instructions
Page 13
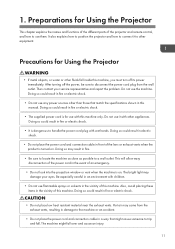
... chapter explains the names and functions of the different parts of the projector and remote control, and how to other than those that match the ...an emergency. • Do not look into the projection window or vent when the machine is for Using the Projector • If metal objects, or water or other appliances. The bright light may result in fire or electric shock...8226; Do not place low heat resistant material near the exhaust vents. It also explains how to position the projector and how to connect it with other fluids fall . Do not use it to use any power sources other...
... chapter explains the names and functions of the different parts of the projector and remote control, and how to other than those that match the ...an emergency. • Do not look into the projection window or vent when the machine is for Using the Projector • If metal objects, or water or other appliances. The bright light may result in fire or electric shock...8226; Do not place low heat resistant material near the exhaust vents. It also explains how to position the projector and how to connect it with other fluids fall . Do not use it to use any power sources other...
Operating Instructions
Page 14
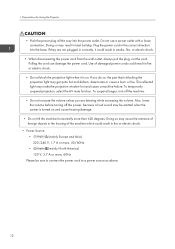
...; (mainly Europe and Asia) 220-240 V, 1.7 A or more, 50/60Hz • (mainly North America) 120 V, 3.7 A or more than ±20 degrees. Preparations for Using the Projector • Push the power plug all the way into the base. If they are listening while increasing the volume. To suspend longer, turn off the...
...; (mainly Europe and Asia) 220-240 V, 1.7 A or more, 50/60Hz • (mainly North America) 120 V, 3.7 A or more than ±20 degrees. Preparations for Using the Projector • Push the power plug all the way into the base. If they are listening while increasing the volume. To suspend longer, turn off the...
Operating Instructions
Page 15
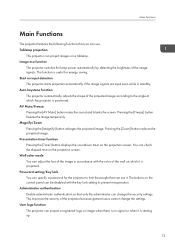
...of the projected image according to prevent misoperation. Pressing the [Zoom] button reduces the projected image. Start on input detection The projector starts projection automatically if the image signals are input even while in accordance with the key lock setting to the angle at which... the projection screen. AV Mute/Freeze Pressing the [AV Mute] button mutes the sound and blanks the screen. User logo function The projector can use . Presentation timer function Pressing the [Timer] button displays the countdown timer on the projection screen. Magnify/Zoom Pressing the [...
...of the projected image according to prevent misoperation. Pressing the [Zoom] button reduces the projected image. Start on input detection The projector starts projection automatically if the image signals are input even while in accordance with the key lock setting to the angle at which... the projection screen. AV Mute/Freeze Pressing the [AV Mute] button mutes the sound and blanks the screen. User logo function The projector can use . Presentation timer function Pressing the [Timer] button displays the countdown timer on the projection screen. Magnify/Zoom Pressing the [...
Operating Instructions
Page 16
... PC, and "Discussion mode" that is used for Using the Projector Presentations without a computer The projector can project JPEG and MPEG files stored on the projection screen. 14 1. Preparations for connecting the projector and a computer to JPEG format using JPEG Conversion Tool and then... project them using the projector. It is possible to convert PowerPoint materials to project images. QuickProjection QuickProjection is...
... PC, and "Discussion mode" that is used for Using the Projector Presentations without a computer The projector can project JPEG and MPEG files stored on the projection screen. 14 1. Preparations for connecting the projector and a computer to JPEG format using JPEG Conversion Tool and then... project them using the projector. It is possible to convert PowerPoint materials to project images. QuickProjection QuickProjection is...
Operating Instructions
Page 17
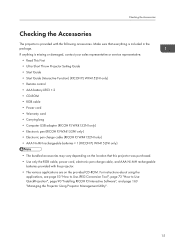
... sales representative or service representative. • Read This First • Ultra Short Throw Projector Setting Guide • Start Guide • Start Guide (Interactive Function) (RICOH PJ WX4152NI only) • Remote control • AAA battery LR03 × 2 • CD...USB adapter (RICOH PJ WX4152NI only) • Electronic pen (RICOH PJ WX4152NI only) • Electronic pen charge cable (RICOH PJ WX4152NI only) • AAA Ni-MH rechargeable batteries × 1 (RICOH PJ WX4152NI only) • The bundled accessories may vary depending on the location that this projector was purchased....
... sales representative or service representative. • Read This First • Ultra Short Throw Projector Setting Guide • Start Guide • Start Guide (Interactive Function) (RICOH PJ WX4152NI only) • Remote control • AAA battery LR03 × 2 • CD...USB adapter (RICOH PJ WX4152NI only) • Electronic pen (RICOH PJ WX4152NI only) • Electronic pen charge cable (RICOH PJ WX4152NI only) • AAA Ni-MH rechargeable batteries × 1 (RICOH PJ WX4152NI only) • The bundled accessories may vary depending on the location that this projector was purchased....
Operating Instructions
Page 18
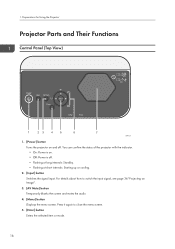
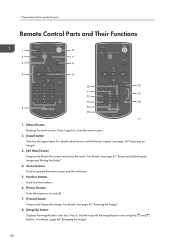
... Temporarily blanks the screen and mutes the audio 4. [Menu] button Displays the menu screen. Preparations for Using the Projector Projector Parts and Their Functions Control Panel (Top View) 1 23 4 5 6 7 DPE139 1. [Power] button Turns the projector on . • Off: Power is on and off . • Flashing at long intervals: Standby. • Flashing at short...
... Temporarily blanks the screen and mutes the audio 4. [Menu] button Displays the menu screen. Preparations for Using the Projector Projector Parts and Their Functions Control Panel (Top View) 1 23 4 5 6 7 DPE139 1. [Power] button Turns the projector on . • Off: Power is on and off . • Flashing at long intervals: Standby. • Flashing at short...
Operating Instructions
Page 19
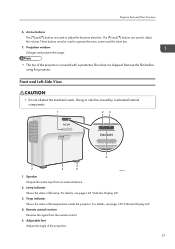
Projection window Enlarges and projects the image. • The top of the projection. 17 Remove the film before using the projector. Adjustable feet Adjusts the angle of the projector is covered with a protective film when it is shipped. Front and Left-Side View • Do not obstruct the machine's vents. Doing so...adjust the keystone distortion. The [ ] and [ ] buttons are also used to adjust the volume. Remote control receiver Receives the signal from an external device. 2. Projector Parts and Their Functions 6. Lamp indicator Shows the status of the temperature inside the...
Projection window Enlarges and projects the image. • The top of the projection. 17 Remove the film before using the projector. Adjustable feet Adjusts the angle of the projector is covered with a protective film when it is shipped. Front and Left-Side View • Do not obstruct the machine's vents. Doing so...adjust the keystone distortion. The [ ] and [ ] buttons are also used to adjust the volume. Remote control receiver Receives the signal from an external device. 2. Projector Parts and Their Functions 6. Lamp indicator Shows the status of the temperature inside the...
Operating Instructions
Page 20
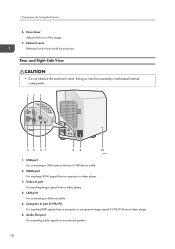
Preparations for Using the Projector 6. HDMI port For inputting HDMI signals from a video player. 6. Computer In port (Y/Pb/Pr) For inputting RGB signals from a computer or component image signals (Y/Pb/... air from a video player. 4. USB port For connecting a USB memory device or USB device cable. 2. Video In port For inputting image signals from inside the projector. Doing so risks fire caused by overheated internal components. 12 3 4 5 67 89 10 CZE104 1. 1. LAN port For connecting an Ethernet cable. 5. Focus lever Adjusts the...
Preparations for Using the Projector 6. HDMI port For inputting HDMI signals from a video player. 6. Computer In port (Y/Pb/Pr) For inputting RGB signals from a computer or component image signals (Y/Pb/... air from a video player. 4. USB port For connecting a USB memory device or USB device cable. 2. Video In port For inputting image signals from inside the projector. Doing so risks fire caused by overheated internal components. 12 3 4 5 67 89 10 CZE104 1. 1. LAN port For connecting an Ethernet cable. 5. Focus lever Adjusts the...
Operating Instructions
Page 21
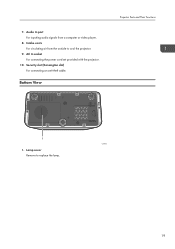
Security slot (Kensington slot) For connecting an anti-theft cable. Lamp cover Remove to cool the projector. 9. 7. Intake vents For circulating air from a computer or video player. 8. AC In socket For connecting the power cord set provided with the projector. 10. Bottom View Projector Parts and Their Functions 1 CZE105 1. Audio In port For inputting audio signals from the outside to replace the lamp. 19
Security slot (Kensington slot) For connecting an anti-theft cable. Lamp cover Remove to cool the projector. 9. 7. Intake vents For circulating air from a computer or video player. 8. AC In socket For connecting the power cord set provided with the projector. 10. Bottom View Projector Parts and Their Functions 1 CZE105 1. Audio In port For inputting audio signals from the outside to replace the lamp. 19
Operating Instructions
Page 22
Arrow buttons Used to enter numbers. 6. [Power] button Turns the projector on and off. 7. [Freeze] button Temporarily freezes the image. For details, page 44 "Enlarging the Image". 20 1. Number buttons Used to operate the menu screen ...] button Temporarily blanks the screen and mutes the audio. Press it , and then specify the magnification ratio using the [ ] and [ ] buttons. Preparations for Using the Projector Remote Control Parts and Their Functions 1 6 2 7 3 8 4 9 10 16 11 17 12 13 18 5 14 15 CZE108 1. [Menu] button Displays the menu screen...
Arrow buttons Used to enter numbers. 6. [Power] button Turns the projector on and off. 7. [Freeze] button Temporarily freezes the image. For details, page 44 "Enlarging the Image". 20 1. Number buttons Used to operate the menu screen ...] button Temporarily blanks the screen and mutes the audio. Press it , and then specify the magnification ratio using the [ ] and [ ] buttons. Preparations for Using the Projector Remote Control Parts and Their Functions 1 6 2 7 3 8 4 9 10 16 11 17 12 13 18 5 14 15 CZE108 1. [Menu] button Displays the menu screen...