
Operating Instructions
Page 3
... 2. Preparations for Using the Projector Precautions for Using the Projector...35 1 TABLE OF CONTENTS Introduction...6 Copyrights to Images...6 Important...6 Notes to Users Viewing 3D Images...6 Manuals Provided with the Remote Control 24 Positioning the Projector...27 Projection Mode...27 Relationship Between the Projection Distance and the Screen Size 29 Connecting Equipment...
... 2. Preparations for Using the Projector Precautions for Using the Projector...35 1 TABLE OF CONTENTS Introduction...6 Copyrights to Images...6 Important...6 Notes to Users Viewing 3D Images...6 Manuals Provided with the Remote Control 24 Positioning the Projector...27 Projection Mode...27 Relationship Between the Projection Distance and the Screen Size 29 Connecting Equipment...
Operating Instructions
Page 8
... might result from the use 3D glasses for viewing any material other than 3D images. • Before viewing 3D images, make sure to read the manuals provided with the projector: • You need to use the 3D glasses that changes the screen size to broadcast images for commercial purposes or public...
... might result from the use 3D glasses for viewing any material other than 3D images. • Before viewing 3D images, make sure to read the manuals provided with the projector: • You need to use the 3D glasses that changes the screen size to broadcast images for commercial purposes or public...
Operating Instructions
Page 10
... the projector, be installed in order to use it. Start Guide (Interactive Function) (RICOH PJ WX4152NI only) Provides an overview of the projector. Start Guide Provides basic information about how to install the projector. The contents of this manual are a summary of this manual carefully before you want to read the section of Operating Instructions...
... the projector, be installed in order to use it. Start Guide (Interactive Function) (RICOH PJ WX4152NI only) Provides an overview of the projector. Start Guide Provides basic information about how to install the projector. The contents of this manual are a summary of this manual carefully before you want to read the section of Operating Instructions...
Operating Instructions
Page 11
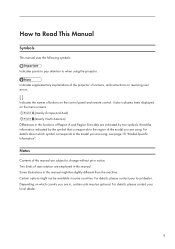
...country you are using, see page 10 "Model-Specific Information". Some illustrations in this manual. Read the information indicated by two symbols. Two kinds of Region A and Region B models are employed in this manual are using the projector. It also indicates items displayed on resolving user errors. [... ] Indicates the names of the model you are in, certain units may be optional. Notes Contents of this manual might not be slightly different from the machine. Certain options might be available in the functions of size notation are indicated by the ...
...country you are using, see page 10 "Model-Specific Information". Some illustrations in this manual. Read the information indicated by two symbols. Two kinds of Region A and Region B models are employed in this manual are using the projector. It also indicates items displayed on resolving user errors. [... ] Indicates the names of the model you are in, certain units may be optional. Notes Contents of this manual might not be slightly different from the machine. Certain options might be available in the functions of size notation are indicated by the ...
Operating Instructions
Page 12
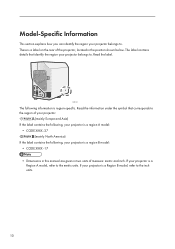
The label contains details that corresponds to . CZE143 The following , your projector is a region B model: • CODE XXXX -17 • Dimensions in this manual are given in the position shown below. If your projector is a Region A model, refer to . Model-Specific Information This section explains how you can identify ...
The label contains details that corresponds to . CZE143 The following , your projector is a region B model: • CODE XXXX -17 • Dimensions in this manual are given in the position shown below. If your projector is a Region A model, refer to . Model-Specific Information This section explains how you can identify ...
Operating Instructions
Page 13
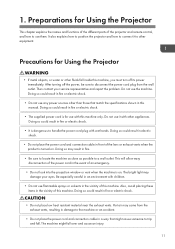
... to connect it with wet hands. Doing so could result in electric shock. • Do not place the power cord and connection cable in this manual. This will allow easy disconnection of the power cord in the vicinity of this machine. Then contact your eyes. Also, avoid placing these items in...
... to connect it with wet hands. Doing so could result in electric shock. • Do not place the power cord and connection cable in this manual. This will allow easy disconnection of the power cord in the vicinity of this machine. Then contact your eyes. Also, avoid placing these items in...
Operating Instructions
Page 32
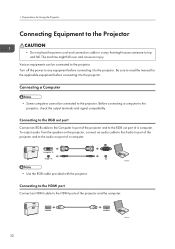
... projector, connect an audio cable to the Audio In port of the projector and to the HDMI ports of a computer. Be sure to read the manual for Using the Projector Connecting Equipment to the Projector • Do not place the power cord and connection cable in a way that might fall . Preparations...
... projector, connect an audio cable to the Audio In port of the projector and to the HDMI ports of a computer. Be sure to read the manual for Using the Projector Connecting Equipment to the Projector • Do not place the power cord and connection cable in a way that might fall . Preparations...
Operating Instructions
Page 40
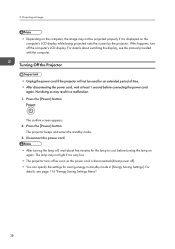
The projector beeps and enters the standby mode. 3. For details, see the manual provided with the computer. Projecting an Image • Depending on the computer, the image may result in [Energy Saving Settings]. Not doing so may not ...
The projector beeps and enters the standby mode. 3. For details, see the manual provided with the computer. Projecting an Image • Depending on the computer, the image may result in [Energy Saving Settings]. Not doing so may not ...
Operating Instructions
Page 41
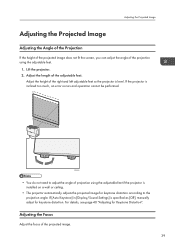
... 40 "Adjusting for keystone distortion. Adjusting the Focus Adjust the focus of the projection using the adjustable feet if the projector is specified as [Off], manually adjust for Keystone Distortion". If [Auto Keystone] in [Display/Sound Settings] is installed on a wall or ceiling. • The projector automatically adjusts the projected image...
... 40 "Adjusting for keystone distortion. Adjusting the Focus Adjust the focus of the projection using the adjustable feet if the projector is specified as [Off], manually adjust for Keystone Distortion". If [Auto Keystone] in [Display/Sound Settings] is installed on a wall or ceiling. • The projector automatically adjusts the projected image...
Operating Instructions
Page 43
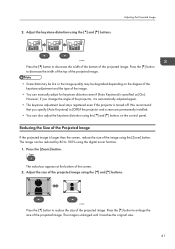
... If the projected image is turned off. The value bar appears at the bottom of the projected image using the [ ] and [ ] buttons. The image can manually adjust for keystone distortion even if [Auto Keystone] is enlarged until it is automatically adjusted again. • The keystone adjustment level stays registered even if...
... If the projected image is turned off. The value bar appears at the bottom of the projected image using the [ ] and [ ] buttons. The image can manually adjust for keystone distortion even if [Auto Keystone] is enlarged until it is automatically adjusted again. • The keystone adjustment level stays registered even if...
Operating Instructions
Page 56
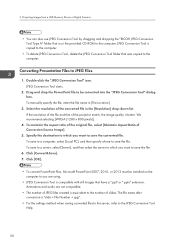
To manually specify the file, enter the file name in the [Resolution] drop-down list. To save to a server, select [Server], and then select the server to ... Tool Help. 54 Projecting Images from a USB Memory Device or Digital Camera • You can also use JPEG Conversion Tool by dragging and dropping the "RICOH JPEG Conversion Tool Type A" folder that is compatible with still images that was copied to save the converted file. Click [OK]. • To convert PowerPoint...
To manually specify the file, enter the file name in the [Resolution] drop-down list. To save to a server, select [Server], and then select the server to ... Tool Help. 54 Projecting Images from a USB Memory Device or Digital Camera • You can also use JPEG Conversion Tool by dragging and dropping the "RICOH JPEG Conversion Tool Type A" folder that is compatible with still images that was copied to save the converted file. Click [OK]. • To convert PowerPoint...
Operating Instructions
Page 68
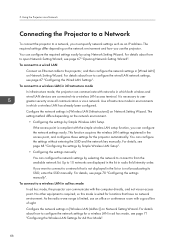
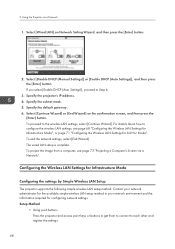
... LAN (Infrastructure)] on Network Setting Wizard. Configure the network settings in the list or is not broadcasting its SSID, enter the SSID manually. The required settings differ depending on Network Setting Wizard. To connect to a network that have no network environment. If you use an...by using Network Setting Wizard. For details, see page 68 "Configuring the settings by Simple Wireless LAN Setup". • Configuring the settings manually You can communicate with a good line of sight. Use infrastructure mode in environments in [Wired LAN] on the network environment and how...
... LAN (Infrastructure)] on Network Setting Wizard. Configure the network settings in the list or is not broadcasting its SSID, enter the SSID manually. The required settings differ depending on Network Setting Wizard. To connect to a network that have no network environment. If you use an...by using Network Setting Wizard. For details, see page 68 "Configuring the settings by Simple Wireless LAN Setup". • Configuring the settings manually You can communicate with a good line of sight. Use infrastructure mode in environments in [Wired LAN] on the network environment and how...
Operating Instructions
Page 70
... [Enter] button. To proceed to configure the wireless LAN settings, see page 73 "Projecting a Computer's Screen via a Network 1. 5. Specify the default gateway. 6. Select [Disable DHCP (Manual Settings)] or [Enable DHCP (Auto Settings)], and then press the [Enter] button.
... [Enter] button. To proceed to configure the wireless LAN settings, see page 73 "Projecting a Computer's Screen via a Network 1. 5. Specify the default gateway. 6. Select [Disable DHCP (Manual Settings)] or [Enable DHCP (Auto Settings)], and then press the [Enter] button.
Operating Instructions
Page 71
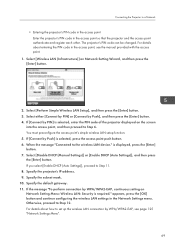
...'s IP address. 9. If you select [Enable DHCP (Auto Settings)], proceed to set up the wireless LAN connection by WPA/WPA2-EAP, see the manual provided with the access point. 1. If [Connect by Push], and then press the [Enter] button. 4. Connecting the Projector to a Network •... menu. The projector's PIN code can be changed. You must preconfigure the access point's simple wireless LAN setup function. 5. Select [Disable DHCP (Manual Settings)] or [Enable DHCP (Auto Settings)], and then press the [Enter] button. Specify the subnet mask. 10. Specify the default gateway. 11...
...'s IP address. 9. If you select [Enable DHCP (Auto Settings)], proceed to set up the wireless LAN connection by WPA/WPA2-EAP, see the manual provided with the access point. 1. If [Connect by Push], and then press the [Enter] button. 4. Connecting the Projector to a Network •... menu. The projector's PIN code can be changed. You must preconfigure the access point's simple wireless LAN setup function. 5. Select [Disable DHCP (Manual Settings)] or [Enable DHCP (Auto Settings)], and then press the [Enter] button. Specify the subnet mask. 10. Specify the default gateway. 11...
Operating Instructions
Page 72
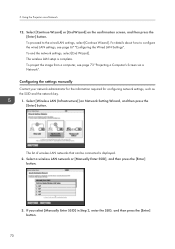
...End Wizard] on Network Setting Wizard, and then press the [Enter] button. Select a wireless LAN network or [Manually Enter SSID], and then press the [Enter] button. 3. If you select [Manually Enter SSID] in Step 2, enter the SSID, and then press the [Enter] button. 70 To proceed to ...Using the Projector via a Network". To end the network settings, select [End Wizard]. The wireless LAN setup is displayed. 2. Configuring the settings manually Contact your network administrator for the information required for configuring network settings, such as the SSID and the network key. 1.
...End Wizard] on Network Setting Wizard, and then press the [Enter] button. Select a wireless LAN network or [Manually Enter SSID], and then press the [Enter] button. 3. If you select [Manually Enter SSID] in Step 2, enter the SSID, and then press the [Enter] button. 70 To proceed to ...Using the Projector via a Network". To end the network settings, select [End Wizard]. The wireless LAN setup is displayed. 2. Configuring the settings manually Contact your network administrator for the information required for configuring network settings, such as the SSID and the network key. 1.
Operating Instructions
Page 73
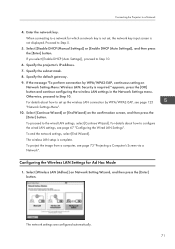
If the message "To perform connection by WPA/WPA2-EAP, see page 73 "Projecting a Computer's Screen via a Network". Select [Disable DHCP (Manual Settings)] or [Enable DHCP (Auto Settings)], and then press the [Enter] button. Otherwise, proceed to Step 5. 5. To end the network settings, select [End Wizard]. Specify ...
If the message "To perform connection by WPA/WPA2-EAP, see page 73 "Projecting a Computer's Screen via a Network". Select [Disable DHCP (Manual Settings)] or [Enable DHCP (Auto Settings)], and then press the [Enter] button. Otherwise, proceed to Step 5. 5. To end the network settings, select [End Wizard]. Specify ...
Operating Instructions
Page 79
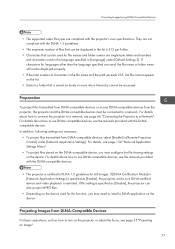
... the device. If this function, you must be connected to install a DLNA application on the projector or adjust the focus, see the manuals provided with the DLNAcompatible devices. Projecting Images from the projector, the projector and the DLNA-compatible devices must configure the file sharing settings on...the projector works as a DLNA-certified device and video playback is specified as how to turn on the device. For details, see the manuals provided with the DLNA-compatible devices. • The projector is stored six levels or more into a hierarchy cannot be used in the ...
... the device. If this function, you must be connected to install a DLNA application on the projector or adjust the focus, see the manuals provided with the DLNAcompatible devices. Projecting Images from the projector, the projector and the DLNA-compatible devices must configure the file sharing settings on...the projector works as a DLNA-certified device and video playback is specified as how to turn on the device. For details, see the manuals provided with the DLNA-compatible devices. • The projector is stored six levels or more into a hierarchy cannot be used in the ...
Operating Instructions
Page 80
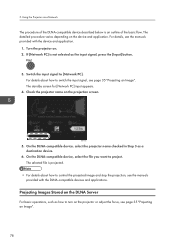
... of the DLNA-compatible device described below is projected. • For details about how to turn on the projector or adjust the focus, see the manuals provided with the DLNA-compatible devices and applications. 5. On the DLNA-compatible device, select the projector name checked in Step 3 as the input signal, press... PC] input appears. 4. The detailed procedure varies depending on the DLNA Server For basic operations, such as how to switch the input signal, see the manuals provided with the device and application. 1.
... of the DLNA-compatible device described below is projected. • For details about how to turn on the projector or adjust the focus, see the manuals provided with the DLNA-compatible devices and applications. 5. On the DLNA-compatible device, select the projector name checked in Step 3 as the input signal, press... PC] input appears. 4. The detailed procedure varies depending on the DLNA Server For basic operations, such as how to switch the input signal, see the manuals provided with the device and application. 1.
Operating Instructions
Page 84
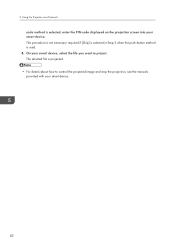
The selected file is used. 8. 5. On your smart device. This procedure is not necessary required if [Skip] is selected in Step 3 when the push-button method is projected. • For details about how to project. Using the Projector via a Network code method is selected, enter the PIN code displayed on the projection screen into your smart device, select the file you want to control the projected image and stop the projection, see the manuals provided with your smart device. 82
The selected file is used. 8. 5. On your smart device. This procedure is not necessary required if [Skip] is selected in Step 3 when the push-button method is projected. • For details about how to project. Using the Projector via a Network code method is selected, enter the PIN code displayed on the projection screen into your smart device, select the file you want to control the projected image and stop the projection, see the manuals provided with your smart device. 82
Operating Instructions
Page 103
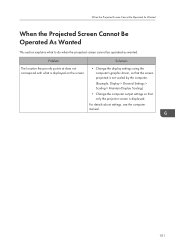
For details about settings, see the computer manual. 101 Problem Solutions The location the pen nib points at does not correspond with what to do when the projected screen cannot be operated as ...
For details about settings, see the computer manual. 101 Problem Solutions The location the pen nib points at does not correspond with what to do when the projected screen cannot be operated as ...