
User Guide
Page 20
If you are included. • LCD viewfinder (VF-1) • VF-1 case • VF-1 user guide • VF-1 warranty • Turn the camera off when attaching the LCD viewfinder. 18 About GX200 VF KIT In addition to the items included with GX200, the following items are using the camera for the first time, read this section.
If you are included. • LCD viewfinder (VF-1) • VF-1 case • VF-1 user guide • VF-1 warranty • Turn the camera off when attaching the LCD viewfinder. 18 About GX200 VF KIT In addition to the items included with GX200, the following items are using the camera for the first time, read this section.

User Guide
Page 22
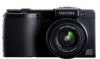
Note Attaching the neck strap (ST-2) and lens cap (supplied) to the camera Remove the end of the neck strap (ST-2) from the connector and attach it as shown in the figure. Note For information on optional accessories, see P.249. • For the latest information on optional accessories, see the Ricoh website (http://www.ricohpmmc.com/). 20 If you are using the camera for the first time, read this section. Soft Case (SC-45) Neck Strap (ST-2) ST-1 cannot be used.
Note Attaching the neck strap (ST-2) and lens cap (supplied) to the camera Remove the end of the neck strap (ST-2) from the connector and attach it as shown in the figure. Note For information on optional accessories, see P.249. • For the latest information on optional accessories, see the Ricoh website (http://www.ricohpmmc.com/). 20 If you are using the camera for the first time, read this section. Soft Case (SC-45) Neck Strap (ST-2) ST-1 cannot be used.

User Guide
Page 24
Soft Case (SC-45) Neck Strap (ST-2) Remove the ring cap before attaching. Camera System and Accessories If you are using the camera for the first time, read this section. Cable Switch (CA-1) Rechargeable Battery (DB-60) (supplied) Battery Charger (BJ-6) (supplied) AC ...Adapter (AC-4c) Optional accessories Commercially available * The LCD viewfinder (VF-1) is included in the GX200 VF KIT. External Flash LCD...
Soft Case (SC-45) Neck Strap (ST-2) Remove the ring cap before attaching. Camera System and Accessories If you are using the camera for the first time, read this section. Cable Switch (CA-1) Rechargeable Battery (DB-60) (supplied) Battery Charger (BJ-6) (supplied) AC ...Adapter (AC-4c) Optional accessories Commercially available * The LCD viewfinder (VF-1) is included in the GX200 VF KIT. External Flash LCD...

User Guide
Page 35
... when using AAA alkaline batteries is not used, so recharge them before use other rechargeable lithium-ion batteries. 33 Do not use . If the camera is used . • The battery may not supply power immediately after each 10 shots). • The storage capacity of an AAA alkaline battery... depends on the use only the specified rechargeable lithium-ion battery (DB-60). In such a case, recharge the batteries two or three times before use the camera for a long period of shots is for the first time, read this section. Turn the...
... when using AAA alkaline batteries is not used, so recharge them before use other rechargeable lithium-ion batteries. 33 Do not use . If the camera is used . • The battery may not supply power immediately after each 10 shots). • The storage capacity of an AAA alkaline battery... depends on the use only the specified rechargeable lithium-ion battery (DB-60). In such a case, recharge the batteries two or three times before use the camera for a long period of shots is for the first time, read this section. Turn the...

User Guide
Page 46
... zoom function (GP.48) • When the exposure time is increased (GP.89) When the J symbol appears on the picture display, this section. To prevent camera shake, try any of the following cases: • When shooting in a dark place without using the flash • When using the... camera for the first time, read this indicates that camera shake may occur. If you move the camera when pressing the shutter release button, the still image might not come out clearly due to...
... zoom function (GP.48) • When the exposure time is increased (GP.89) When the J symbol appears on the picture display, this section. To prevent camera shake, try any of the following cases: • When shooting in a dark place without using the flash • When using the... camera for the first time, read this indicates that camera shake may occur. If you move the camera when pressing the shutter release button, the still image might not come out clearly due to...

User Guide
Page 56
A setting of two seconds is useful for the first time, read this case, if you are using the camera for preventing camera shake. 1 Turn the mode dial to 5. 2 Press the t (Self-timer) button. • The Self-timer symbol appears on the screen. • The [10] to the ... the symbol indicates the number of the t button changes the self-timer setting in self-timer mode even after the image is shot. Note The camera remains in the following order: 10sec, 2sec, and Self-timer Off. 3 Press the shutter release button. • The focus is locked, and the AF auxiliary...
A setting of two seconds is useful for the first time, read this case, if you are using the camera for preventing camera shake. 1 Turn the mode dial to 5. 2 Press the t (Self-timer) button. • The Self-timer symbol appears on the screen. • The [10] to the ... the symbol indicates the number of the t button changes the self-timer setting in self-timer mode even after the image is shot. Note The camera remains in the following order: 10sec, 2sec, and Self-timer Off. 3 Press the shutter release button. • The focus is locked, and the AF auxiliary...

User Guide
Page 85
... to switch between JPEG and RAW mode. (GP.105) 83 Caution Pressing the Fn1/Fn2 button does not switch to JPEG mode in the following cases. • [Pic Quality/Size] is set to RAW mode (GP.105) • [Continuous Mode] is set to a setting other than [Off] (GP.127) Note •...; Turning the camera off or changing the [Set Fn1/2 Button] setting after switching to RAW mode returns the setting to JPEG mode. • When shooting in orange on...
... to switch between JPEG and RAW mode. (GP.105) 83 Caution Pressing the Fn1/Fn2 button does not switch to JPEG mode in the following cases. • [Pic Quality/Size] is set to RAW mode (GP.105) • [Continuous Mode] is set to a setting other than [Off] (GP.127) Note •...; Turning the camera off or changing the [Set Fn1/2 Button] setting after switching to RAW mode returns the setting to JPEG mode. • When shooting in orange on...

User Guide
Page 89
... to [On] (GP.149). Aperture values for wide angle shooting: 2.5 to 9.1 Aperture values for the set aperture value is set, the camera automatically sets the optimal shutter speed. In this case, select a higher aperture value (closing the aperture) allows you to capture an image with a Set Aperture Value (A: Aperture Priority Mode) Setting...
... to [On] (GP.149). Aperture values for wide angle shooting: 2.5 to 9.1 Aperture values for the set aperture value is set, the camera automatically sets the optimal shutter speed. In this case, select a higher aperture value (closing the aperture) allows you to capture an image with a Set Aperture Value (A: Aperture Priority Mode) Setting...

User Guide
Page 93
...the appropriate exposure). Therefore, the time until image recording is complete is assigned to 1 or more seconds, the camera shake correction function cannot be used. In this case, camera shake may occur. When the shutter speed is activated regardless of the exposure value indicator). Hold the... camera steady with two hands or use a tripod when shooting. • While shooting with a slow shutter speed, the picture ...
...the appropriate exposure). Therefore, the time until image recording is complete is assigned to 1 or more seconds, the camera shake correction function cannot be used. In this case, camera shake may occur. When the shutter speed is activated regardless of the exposure value indicator). Hold the... camera steady with two hands or use a tripod when shooting. • While shooting with a slow shutter speed, the picture ...

User Guide
Page 99
... correction, are not clearly visible • When it so that the entire portion of the subject is visible on the picture display. • The camera may fail to recognize the subject in the DNG file. 97 No skew is recorded. Up to the target area by pressing the $ button. &#...8226; To cancel skew correction, press the ! Caution When [Skew Correct Mode] is selected, note the following cases: • When the image is out of focus • When four edges of remaining shots is less than two, you cancel skew correction, the original...
... correction, are not clearly visible • When it so that the entire portion of the subject is visible on the picture display. • The camera may fail to recognize the subject in the DNG file. 97 No skew is recorded. Up to the target area by pressing the $ button. &#...8226; To cancel skew correction, press the ! Caution When [Skew Correct Mode] is selected, note the following cases: • When the image is out of focus • When four edges of remaining shots is less than two, you cancel skew correction, the original...

User Guide
Page 127
... the flash mode is set to select [Man. Note The value set at people who are driving, etc. 125 Setting the Flash Amount in some cases. Caution The flash amount is not adjusted automatically when the flash mode is set to select the desired setting. Flash Amount) You can be enabled...
... the flash mode is set to select [Man. Note The value set at people who are driving, etc. 125 Setting the Flash Amount in some cases. Caution The flash amount is not adjusted automatically when the flash mode is set to select the desired setting. Flash Amount) You can be enabled...

User Guide
Page 135
Note • When noise reduction is set to [Off], the noise reduction symbol will not be diminished in some cases depending on the screen. As a result, image definition may be displayed 1 when playing back images for which noise reduction was not carried out. In addition, ...
Note • When noise reduction is set to [Off], the noise reduction symbol will not be diminished in some cases depending on the screen. As a result, image definition may be displayed 1 when playing back images for which noise reduction was not carried out. In addition, ...

User Guide
Page 137
...set to the shooting menu setting may become depleted during scene mode. Various Shooting Functions Caution The interval shooting setting is cleared when the camera is turned off. • The time until the next picture can be longer than the set for interval shooting. However, the ...or the AC adapter 1 (sold separately) is recommended. • If you press the shutter release button during interval shooting, the camera shoots as usual. In this case, the shooting interval becomes longer than the time set time. • Interval is not available during movie shooting. Use of a ...
...set to the shooting menu setting may become depleted during scene mode. Various Shooting Functions Caution The interval shooting setting is cleared when the camera is turned off. • The time until the next picture can be longer than the set for interval shooting. However, the ...or the AC adapter 1 (sold separately) is recommended. • If you press the shutter release button during interval shooting, the camera shoots as usual. In this case, the shooting interval becomes longer than the time set time. • Interval is not available during movie shooting. Use of a ...

User Guide
Page 140
...). lever. This section explains easy ways to change the exposure, you can be specified in a spotlight. Normally, if your picture. In this case, set the exposure setting. • You can also press the shutter release button to change the shading setting with the correct exposure. 1 In... the following cases, or when you intentionally want to take a photo of a subject in the range from -2.0 EV to select the brightness level for your...
...). lever. This section explains easy ways to change the exposure, you can be specified in a spotlight. Normally, if your picture. In this case, set the exposure setting. • You can also press the shutter release button to change the shading setting with the correct exposure. 1 In... the following cases, or when you intentionally want to take a photo of a subject in the range from -2.0 EV to select the brightness level for your...

User Guide
Page 141
Various Shooting Functions 4 Press the ADJ. lever or the MENU/OK button. • The setting appears on the screen. 139 In that case, the [!AE] symbol appears on the screen. Caution 1 • This function is not available in manual exposure mode. • When shooting in particularly bright places, you may not be able to correct the exposure level.
Various Shooting Functions 4 Press the ADJ. lever or the MENU/OK button. • The setting appears on the screen. 139 In that case, the [!AE] symbol appears on the screen. Caution 1 • This function is not available in manual exposure mode. • When shooting in particularly bright places, you may not be able to correct the exposure level.

User Guide
Page 143
Various Shooting Functions 4 Press the ADJ. In this case, add something white to [Text Mode]. In this case, switch to [Auto] to shoot with the flash, the white balance may not be corrected (GP.144). Note The color tone set to the subject. &#...
Various Shooting Functions 4 Press the ADJ. In this case, add something white to [Text Mode]. In this case, switch to [Auto] to shoot with the flash, the white balance may not be corrected (GP.144). Note The color tone set to the subject. &#...

User Guide
Page 147
...; In scene mode, this function is only available when [Movie] is selected. • Depending on the subject, there may be no correction effect in some cases. • The correction value may differ with [White Balance Compensation] in the playback menu. (GP.173) Note The color tone of a shot still image can...
...; In scene mode, this function is only available when [Movie] is selected. • Depending on the subject, there may be no correction effect in some cases. • The correction value may differ with [White Balance Compensation] in the playback menu. (GP.173) Note The color tone of a shot still image can...

User Guide
Page 149
... 100 400 • When the ISO sensitivity is set to [Auto] are shown in some cases (when using the flash, etc.). 147 Various Shooting Functions Note • Images shot with a higher sensitivity may appear grainy. • The camera can reduce image noise depending on the ISO sensitivity. (GP.132) • The ISO...
... 100 400 • When the ISO sensitivity is set to [Auto] are shown in some cases (when using the flash, etc.). 147 Various Shooting Functions Note • Images shot with a higher sensitivity may appear grainy. • The camera can reduce image noise depending on the ISO sensitivity. (GP.132) • The ISO...

User Guide
Page 151
Shift] to select [On]. 5 Press the MENU/OK button. Shift] is set to [On], in aperture priority mode, the camera will only display when the mode dial is set to select [Auto Aper. Note Auto Aper. Various Shooting Functions Automatically Changing the Aperture Value... the correct exposure can be overexposed and the [!AE] symbol will appear when shooting in Aperture Priority Mode (Auto Aper. buttons to [On]. In this case, select a higher aperture 1 value (closing the aperture), or set aperture value, the image may be obtained. (GP.87) 1 Turn the mode dial to A. 2 ...
Shift] to select [On]. 5 Press the MENU/OK button. Shift] is set to [On], in aperture priority mode, the camera will only display when the mode dial is set to select [Auto Aper. Note Auto Aper. Various Shooting Functions Automatically Changing the Aperture Value... the correct exposure can be overexposed and the [!AE] symbol will appear when shooting in Aperture Priority Mode (Auto Aper. buttons to [On]. In this case, select a higher aperture 1 value (closing the aperture), or set aperture value, the image may be obtained. (GP.87) 1 Turn the mode dial to A. 2 ...

User Guide
Page 187
... differ from what is explained here. lever or the DISP. 6 Press the MENU/OK button. • The setup menu disappears and the camera is pressed at this case, press the MENU/OK button again to return to the shooting or playback screen. • Pressing the # button in Step 6 confirms the... setting and the display returns to menu item selection. 5 185 Changing Camera Settings Changing the display Press the # button to select a tab on the...
... differ from what is explained here. lever or the DISP. 6 Press the MENU/OK button. • The setup menu disappears and the camera is pressed at this case, press the MENU/OK button again to return to the shooting or playback screen. • Pressing the # button in Step 6 confirms the... setting and the display returns to menu item selection. 5 185 Changing Camera Settings Changing the display Press the # button to select a tab on the...