
User Guide
Page 1
...information on how to customize the camera settings, print pictures, and use . The rechargeable battery needs to turn on the bottom face of this section when you are using the camera for GX200 and GX200 VF KIT. This section provides a basic overview of purchase. The battery is not charged at the ...time of how to be charged before use the camera with an LCD...
...information on how to customize the camera settings, print pictures, and use . The rechargeable battery needs to turn on the bottom face of this section when you are using the camera for GX200 and GX200 VF KIT. This section provides a basic overview of purchase. The battery is not charged at the ...time of how to be charged before use the camera with an LCD...

User Guide
Page 3
This symbol indicates matters that may lead to property. Do not attempt to pierce, hit, compress, drop, or subject the battery to disassemble, repair or alter the equipment yourself. This symbol indicates matters that may lead to imminent risk of this instruction manual and on the .... Do not put it into water or the sea or allow it to a fire or inside a car, or abandon it. Do not use it , use a battery that must be combined with other severe impact or force. Danger Do not attempt to any other symbols to indicate that may lead to ensure...
This symbol indicates matters that may lead to property. Do not attempt to pierce, hit, compress, drop, or subject the battery to disassemble, repair or alter the equipment yourself. This symbol indicates matters that may lead to imminent risk of this instruction manual and on the .... Do not put it into water or the sea or allow it to a fire or inside a car, or abandon it. Do not use it , use a battery that must be combined with other severe impact or force. Danger Do not attempt to any other symbols to indicate that may lead to ensure...

User Guide
Page 4
...when disconnecting a power cord. • Do not cover equipment while charging. Remove the battery as soon as ballpoint pens, necklaces, coins, hairpins, etc. • Do not put the battery into the camera. Contact the nearest service center at your eyes with clean water for at least 15 ...earliest convenience. Discontinue use or during use of the equipment immediately if it away from the camera or battery charger immediately and keep it is harmful to human beings. Remove the battery and memory card as soon as smoke or unusual odors being emitted. Discontinue use of multi...
...when disconnecting a power cord. • Do not cover equipment while charging. Remove the battery as soon as ballpoint pens, necklaces, coins, hairpins, etc. • Do not put the battery into the camera. Contact the nearest service center at your eyes with clean water for at least 15 ...earliest convenience. Discontinue use or during use of the equipment immediately if it away from the camera or battery charger immediately and keep it is harmful to human beings. Remove the battery and memory card as soon as smoke or unusual odors being emitted. Discontinue use of multi...
User Guide
Page 5
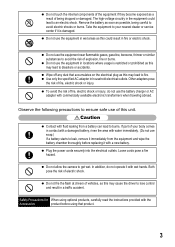
...electric shock. Do not touch the internal components of the equipment if they become exposed as a result of this unit. Do not use the battery charger or AC adapter with commercially available electronic transformers when traveling abroad. Wipe off any dust that product. 3 Caution Contact with wet hands.... shock or injury. Use only the specified AC adapter in fire or electric shock. Loose cords pose a fire hazard. Do not allow the camera to avoid electric shocks or burns. Other adapters pose the risk of vehicles, as this could lead to fire. If part of fire, electric...
...electric shock. Do not touch the internal components of the equipment if they become exposed as a result of this unit. Do not use the battery charger or AC adapter with commercially available electronic transformers when traveling abroad. Wipe off any dust that product. 3 Caution Contact with wet hands.... shock or injury. Use only the specified AC adapter in fire or electric shock. Loose cords pose a fire hazard. Do not allow the camera to avoid electric shocks or burns. Other adapters pose the risk of vehicles, as this could lead to fire. If part of fire, electric...

User Guide
Page 9
...AAA alkaline batteries, AAA Oxyride batteries, and AAA nickelmetal hydride batteries. Compatibility with AAA batteries eliminates concerns about the batteries running out while you're traveling (P.32) In addition to the supplied large-capacity rechargeable battery for long periods of shooting and playback, the camera is also.../Fn2 button. Direct printing without using still images, video clips, audio, and music files. This eliminates concerns about the batteries running out while you to view, organize, and perform simple editing (supporting DNG file format) of shot images. Easily ...
...AAA alkaline batteries, AAA Oxyride batteries, and AAA nickelmetal hydride batteries. Compatibility with AAA batteries eliminates concerns about the batteries running out while you're traveling (P.32) In addition to the supplied large-capacity rechargeable battery for long periods of shooting and playback, the camera is also.../Fn2 button. Direct printing without using still images, video clips, audio, and music files. This eliminates concerns about the batteries running out while you to view, organize, and perform simple editing (supporting DNG file format) of shot images. Easily ...

User Guide
Page 10
Packing List 16 Optional Accessories 19 Camera System and Accessories 22 Names of Parts 23 How to Use the Mode Dial 25 How to Use the Up-down Dial and ADJ. Lever 26 Picture Display 28 Getting Ready 32 About the Battery 32 SD Memory Card (available in stores 34 Charging the ...Rechargeable Battery 36 Loading the Battery and SD Memory Card 37 Turning the Power On/Off 39 Setting the Language 41 Setting the Date and Time 42 Basic Shooting 43 Holding the Camera 43 Shooting 45 Using the Zoom Function 48 Shooting Close-Ups...
Packing List 16 Optional Accessories 19 Camera System and Accessories 22 Names of Parts 23 How to Use the Mode Dial 25 How to Use the Up-down Dial and ADJ. Lever 26 Picture Display 28 Getting Ready 32 About the Battery 32 SD Memory Card (available in stores 34 Charging the ...Rechargeable Battery 36 Loading the Battery and SD Memory Card 37 Turning the Power On/Off 39 Setting the Language 41 Setting the Date and Time 42 Basic Shooting 43 Holding the Camera 43 Shooting 45 Using the Zoom Function 48 Shooting Close-Ups...

User Guide
Page 18
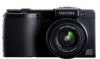
Warranty 16 GX200 Rechargeable Battery The serial number of the camera is provided on a TV. Handstrap USB Cable (mini-B type) Used to connect the camera to view your images on the bottom face of items included may differ. Battery Charger Hot Shoe Cover Included with the camera. Packing List Open the package and make sure all the items are using the camera for the first time, read this section. Lens Cap Lens Cap Strap AV Cable Used to a computer or direct printcompatible printer. If you are included. * The actual appearance of the camera.
Warranty 16 GX200 Rechargeable Battery The serial number of the camera is provided on a TV. Handstrap USB Cable (mini-B type) Used to connect the camera to view your images on the bottom face of items included may differ. Battery Charger Hot Shoe Cover Included with the camera. Packing List Open the package and make sure all the items are using the camera for the first time, read this section. Lens Cap Lens Cap Strap AV Cable Used to a computer or direct printcompatible printer. If you are included. * The actual appearance of the camera.

User Guide
Page 21
... playback or when transferring images to the user guide. LCD Viewfinder (VF-1) LCD viewfinder attaches to the camera. The LCD viewfinder (VF-1) is included in the GX200 VF KIT. Rechargeable Battery (DB-60) Wide Conversion Lens (DW-6) Battery Charger (BJ-6) Tele Conversion Lens (TC-1) Cable Switch (CA-1) Hood & Adapter (HA-2) Self Retaining Lens Cap...
... playback or when transferring images to the user guide. LCD Viewfinder (VF-1) LCD viewfinder attaches to the camera. The LCD viewfinder (VF-1) is included in the GX200 VF KIT. Rechargeable Battery (DB-60) Wide Conversion Lens (DW-6) Battery Charger (BJ-6) Tele Conversion Lens (TC-1) Cable Switch (CA-1) Hood & Adapter (HA-2) Self Retaining Lens Cap...

User Guide
Page 24
... USB terminal. Cable Switch (CA-1) Rechargeable Battery (DB-60) (supplied) Battery Charger (BJ-6) (supplied) AC Adapter (AC-4c) Optional accessories Commercially available * The LCD viewfinder (VF-1) is included in the GX200 VF KIT. Remove the ring cap before attaching. Camera System and Accessories If you are using the camera for the first time, read this...
... USB terminal. Cable Switch (CA-1) Rechargeable Battery (DB-60) (supplied) Battery Charger (BJ-6) (supplied) AC Adapter (AC-4c) Optional accessories Commercially available * The LCD viewfinder (VF-1) is included in the GX200 VF KIT. Remove the ring cap before attaching. Camera System and Accessories If you are using the camera for the first time, read this...

User Guide
Page 26
Rear View 2 5 14 6 VF/LCD ADJ. 7 8 Fn2 1 18 34 9 10 If you are using the camera for the first time, read this section. 16 17 19 20 21 15 13 12 11 Item Name 1 Picture Display 2 Auto Focus/Flash Lamp 3 AV ... (Function 2) Button 14 6 (Playback) Button 15 D (Delete)/t (Self-timer) Button 16 Terminal Cover 17 Speaker 18 Power (DC input) Cable Cover 19 Release Lever 20 Battery/Card Cover 24 21 Tripod Screw Hole Refer to P.28 P.39, 46, 51 P.175 P.178, 229, 230, 233 P.64 P.72 P.48, 58 P.48, 57 P.51...
Rear View 2 5 14 6 VF/LCD ADJ. 7 8 Fn2 1 18 34 9 10 If you are using the camera for the first time, read this section. 16 17 19 20 21 15 13 12 11 Item Name 1 Picture Display 2 Auto Focus/Flash Lamp 3 AV ... (Function 2) Button 14 6 (Playback) Button 15 D (Delete)/t (Self-timer) Button 16 Terminal Cover 17 Speaker 18 Power (DC input) Cable Cover 19 Release Lever 20 Battery/Card Cover 24 21 Tripod Screw Hole Refer to P.28 P.39, 46, 51 P.175 P.178, 229, 230, 233 P.64 P.72 P.48, 58 P.48, 57 P.51...

User Guide
Page 31
...Histogram P.70 14 Date Imprint P.136 15 Distortion Correction P.123 16 Noise Reduction P.132 17 Camera Shake Correction P.137 18 Flash Exposure Compensation/ Manual Flash Amount P.124, 125 19 Digital Zoom Magnification P.48 20 Zoom Bar P.48 Item Name 21 White Balance Mode/ White Balance ...Compensation 22 Exposure Metering Mode 23 Auto Bracket 24 Image Settings 25 Exposure Compensation 26 ISO Setting 27 Conversion Lens Type 28 Battery Symbol 29 Level Indicator 30 Camera Shake...
...Histogram P.70 14 Date Imprint P.136 15 Distortion Correction P.123 16 Noise Reduction P.132 17 Camera Shake Correction P.137 18 Flash Exposure Compensation/ Manual Flash Amount P.124, 125 19 Digital Zoom Magnification P.48 20 Zoom Bar P.48 Item Name 21 White Balance Mode/ White Balance ...Compensation 22 Exposure Metering Mode 23 Auto Bracket 24 Image Settings 25 Exposure Compensation 26 ISO Setting 27 Conversion Lens Type 28 Battery Symbol 29 Level Indicator 30 Camera Shake...

User Guide
Page 32
...P.158 9 Image Size 2 DPOF P.161 10 File No. 3 Mode Types - 11 Battery Symbol 4 Playback Data Source P.56 12 Date at Shooting 5 Number of Playback Files - 6 Total Number of operational instructions or the camera's status while in use. 30 Note • The [White Bal. If you of ...7 Setting at Shooting - (Recording) 13 Recording Time or Lapsed Time 14 Indicator 8 Picture Quality P.105 Refer to inform you are using the camera for [White Balance Compensation] will not be displayed during playback. • The picture display may display messages to P.105 P.31 P.215 - ...
...P.158 9 Image Size 2 DPOF P.161 10 File No. 3 Mode Types - 11 Battery Symbol 4 Playback Data Source P.56 12 Date at Shooting 5 Number of Playback Files - 6 Total Number of operational instructions or the camera's status while in use. 30 Note • The [White Bal. If you of ...7 Setting at Shooting - (Recording) 13 Recording Time or Lapsed Time 14 Indicator 8 Picture Quality P.105 Refer to inform you are using the camera for [White Balance Compensation] will not be displayed during playback. • The picture display may display messages to P.105 P.31 P.215 - ...

User Guide
Page 33
... can continue to use the camera. 31 Green The battery level begins to indicate the battery level. This does not indicate a malfunction and you are using the camera for the first time, read this section. Recharge the battery or exchange with new batteries is depleted. The battery level is sufficiently charged. Battery Level Indication A battery symbol appears at the...
... can continue to use the camera. 31 Green The battery level begins to indicate the battery level. This does not indicate a malfunction and you are using the camera for the first time, read this section. Recharge the battery or exchange with new batteries is depleted. The battery level is sufficiently charged. Battery Level Indication A battery symbol appears at the...

User Guide
Page 34
..., in a low-temperature environment, the storage capacity of batteries. • AAA Alkaline Batteries (available in stores) These batteries are easily obtainable. The rechargeable battery needs to be used longer in a digital camera than AAA alkaline batteries. • AAA Nickel-metal Hydride Batteries (available in stores) These are not rechargeable batteries, but they can be charged before use. About the...
..., in a low-temperature environment, the storage capacity of batteries. • AAA Alkaline Batteries (available in stores) These batteries are easily obtainable. The rechargeable battery needs to be used longer in a digital camera than AAA alkaline batteries. • AAA Nickel-metal Hydride Batteries (available in stores) These are not rechargeable batteries, but they can be charged before use. About the...

User Guide
Page 35
... to use . In addition, the life of an alkaline battery becomes shorter at low temperatures. • Other batteries, such as manganese dry cell and Ni-Cd batteries, cannot be taken when using the camera for a long period of time. • When using AAA alkaline batteries is for setting and playback, the shooting time (the number...
... to use . In addition, the life of an alkaline battery becomes shorter at low temperatures. • Other batteries, such as manganese dry cell and Ni-Cd batteries, cannot be taken when using the camera for a long period of time. • When using AAA alkaline batteries is for setting and playback, the shooting time (the number...

User Guide
Page 38
... Charging started Charging complete The battery charger terminal may be soiled or the battery charger/battery may be charged before use. Rechargeable battery charging time 36 DB-60 About...battery.) • Depending on the battery charger. • The battery label should face up. The battery is not charged at the time of purchase. 1 Insert the battery into an outlet. • Use the battery...Unplug the power cable from the power outlet. Charging the Rechargeable Battery The rechargeable battery needs to recharge the battery. • Charging starts, and the charger lamp indicates the ...
... Charging started Charging complete The battery charger terminal may be soiled or the battery charger/battery may be charged before use. Rechargeable battery charging time 36 DB-60 About...battery.) • Depending on the battery charger. • The battery label should face up. The battery is not charged at the time of purchase. 1 Insert the battery into an outlet. • Use the battery...Unplug the power cable from the power outlet. Charging the Rechargeable Battery The rechargeable battery needs to recharge the battery. • Charging starts, and the charger lamp indicates the ...

User Guide
Page 39
If you are using the camera for the first time, read this camera. If the camera is already turned on, make sure it in place. 1 2 37 Logo side • Press the latch with the battery and insert the battery all the way in the opposite direction of "OPEN" to lock it is turned off before ...loading the battery and card. 1 Slide the...
If you are using the camera for the first time, read this camera. If the camera is already turned on, make sure it in place. 1 2 37 Logo side • Press the latch with the battery and insert the battery all the way in the opposite direction of "OPEN" to lock it is turned off before ...loading the battery and card. 1 Slide the...

User Guide
Page 40
...first time, read this section. Store the removed batteries in the direction shown. Removing the Rechargeable Battery Slide the release lever toward "OPEN" to open the battery/card cover, and then remove the batteries. If you are using the camera for a long period of time. Removing the...SD memory card and gently release to drop the batteries when removing them from the camera. Pull the card out of the camera. Pull the battery out of the camera. Loading the Specified Dry Cell Batteries (Available in Stores) Insert the batteries in a dry cool place. 38 Be careful ...
...first time, read this section. Store the removed batteries in the direction shown. Removing the Rechargeable Battery Slide the release lever toward "OPEN" to open the battery/card cover, and then remove the batteries. If you are using the camera for a long period of time. Removing the...SD memory card and gently release to drop the batteries when removing them from the camera. Pull the card out of the camera. Pull the battery out of the camera. Loading the Specified Dry Cell Batteries (Available in Stores) Insert the batteries in a dry cool place. 38 Be careful ...

User Guide
Page 44
If you are using the camera for the first time, the date/time setting screen appears. 1 Press the !"#$ buttons to set the year, ...Date 2008 01 01 Time 00 00 Format Y/M/D hh:mm 2008/01/01 00:00 Cancel Ok Note • If the battery is set date and time can be changed later. (GP.215) • The date and time can cancel the setting... by pressing the DISP. These settings must be made again. • To retain the date and time settings, load a battery with adequate remaining power for more than one week, the date and time settings will be inserted into images. (GP.136)...
If you are using the camera for the first time, the date/time setting screen appears. 1 Press the !"#$ buttons to set the year, ...Date 2008 01 01 Time 00 00 Format Y/M/D hh:mm 2008/01/01 00:00 Cancel Ok Note • If the battery is set date and time can be changed later. (GP.215) • The date and time can cancel the setting... by pressing the DISP. These settings must be made again. • To retain the date and time settings, load a battery with adequate remaining power for more than one week, the date and time settings will be inserted into images. (GP.136)...

User Guide
Page 54
Note When you are using the camera for the first time, read this section. 1 Select the timing at the upper left of the screen. • If you select [Manual Flash], the flash ... flash cover. 3 Press the F button to [Manual Flash]). • You cannot use the internal flash when using AAA alkaline batteries, Oxyride batteries, or nickel-metal hydride batteries, the picture display turns off and the camera is ready to shoot. Once the flash is charged, the lamp turns off when the flash is charging. •...
Note When you are using the camera for the first time, read this section. 1 Select the timing at the upper left of the screen. • If you select [Manual Flash], the flash ... flash cover. 3 Press the F button to [Manual Flash]). • You cannot use the internal flash when using AAA alkaline batteries, Oxyride batteries, or nickel-metal hydride batteries, the picture display turns off and the camera is ready to shoot. Once the flash is charged, the lamp turns off when the flash is charging. •...