
User Guide
Page 6
...your computer and display and edit them on your computer. For more information on your GX200/GX200 VF KIT. To copy the User Guide onto your hard disk, copy the PDF file from the camera to your computer. North America (U.S.) Europe UK, Germany, France and Spain: Other...following two manuals are included with the Irodio Photo & Video Studio software that allows you to install the provided software on Irodio Photo & Video Studio, contact the Customer Support Center below. The camera is provided with your computer. * The "Camera User Guide" (English edition) is available in the ...
...your computer and display and edit them on your computer. For more information on your GX200/GX200 VF KIT. To copy the User Guide onto your hard disk, copy the PDF file from the camera to your computer. North America (U.S.) Europe UK, Germany, France and Spain: Other...following two manuals are included with the Irodio Photo & Video Studio software that allows you to install the provided software on Irodio Photo & Video Studio, contact the Customer Support Center below. The camera is provided with your computer. * The "Camera User Guide" (English edition) is available in the ...

User Guide
Page 9
...my settings mode (P.99) You can customize three groups of shooting and playback, the camera is assigned to either of a computer (P.177) A direct print-compatible printer can be connected to the camera with those registered settings. This allows for browsing, viewing, and editing still images ...and AAA nickelmetal hydride batteries. Direct printing without using still images, video clips, audio, and music files. You can also print reports. 7 Irodio Photo & Video Studio software for easy printing without the use the video editor function to the Fn1/Fn2 button. You can also assign ...
...my settings mode (P.99) You can customize three groups of shooting and playback, the camera is assigned to either of a computer (P.177) A direct print-compatible printer can be connected to the camera with those registered settings. This allows for browsing, viewing, and editing still images ...and AAA nickelmetal hydride batteries. Direct printing without using still images, video clips, audio, and music files. You can also print reports. 7 Irodio Photo & Video Studio software for easy printing without the use the video editor function to the Fn1/Fn2 button. You can also assign ...
User Guide
Page 14
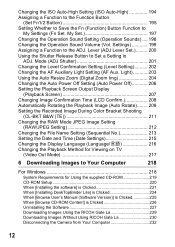
... is Clicked 226 Uninstalling the Software 227 Downloading Images Using the RICOH Gate La 229 Downloading Images Without Using RICOH Gate La 230 Disconnecting the Camera from Your Computer 232 12 Light 203 Using the Auto Resize Zoom (Digital Zoom Img 204 Changing the Auto Power Off Setting (Auto Power...No 213 Setting the Date and Time (Date Settings 215 Changing the Display Language (Language/N 216 Changing the Playback Method for Viewing on TV (Video Out Mode 217 6 Downloading Images to the ADJ. Changing the ISO Auto-High Setting (ISO Auto-High 194 Assigning a Function to the ...
... is Clicked 226 Uninstalling the Software 227 Downloading Images Using the RICOH Gate La 229 Downloading Images Without Using RICOH Gate La 230 Disconnecting the Camera from Your Computer 232 12 Light 203 Using the Auto Resize Zoom (Digital Zoom Img 204 Changing the Auto Power Off Setting (Auto Power...No 213 Setting the Date and Time (Date Settings 215 Changing the Display Language (Language/N 216 Changing the Playback Method for Viewing on TV (Video Out Mode 217 6 Downloading Images to the ADJ. Changing the ISO Auto-High Setting (ISO Auto-High 194 Assigning a Function to the ...

User Guide
Page 43
...in this section. Ok Note For how to the date/time setting (for the first time, read this guide. 41 If you are using the camera for printing the date and time on your photos). Setting the Language When the power is turned on for the first time after purchase. •.... • To skip language setting, press the MENU/OK button. • When the MENU/OK button is pressed, the language setting is cancelled and the video signal format-setting screen appears. 2 Press the !"#$ buttons to set , and the date/time setting screen appears. However, be sure to select a language. 3 ...
...in this section. Ok Note For how to the date/time setting (for the first time, read this guide. 41 If you are using the camera for printing the date and time on your photos). Setting the Language When the power is turned on for the first time after purchase. •.... • To skip language setting, press the MENU/OK button. • When the MENU/OK button is pressed, the language setting is cancelled and the video signal format-setting screen appears. 2 Press the !"#$ buttons to set , and the date/time setting screen appears. However, be sure to select a language. 3 ...

User Guide
Page 108
...data is better than in RAW mode. When shooting in a small file. The raw data loaded from the camera's sensor is processed and compressed by the camera. However, you to use the Irodio Photo & Video Studio to edit the image while retaining the high quality at the same time. Please see the restrictions... in the internal memory or SD memory card 1 depends on the [Pic Quality/Size] setting. (GP.248) • There are not processed by the camera and then saved as the DNG file. • [Image Settings] settings on the shooting menu apply only to the JPEG file recorded at the same...
...data is better than in RAW mode. When shooting in a small file. The raw data loaded from the camera's sensor is processed and compressed by the camera. However, you to use the Irodio Photo & Video Studio to edit the image while retaining the high quality at the same time. Please see the restrictions... in the internal memory or SD memory card 1 depends on the [Pic Quality/Size] setting. (GP.248) • There are not processed by the camera and then saved as the DNG file. • [Image Settings] settings on the shooting menu apply only to the JPEG file recorded at the same...

User Guide
Page 177
... a television, follow the steps below. 1 Securely connect the AV cable Video input terminal (yellow) to the Video In terminal on the camera. 5 Set the television to Video mode. (Set the input to Video) • For details, see the documentation that came with your camera to the video input terminal (yellow). To use your television for viewing, connect...
... a television, follow the steps below. 1 Securely connect the AV cable Video input terminal (yellow) to the Video In terminal on the camera. 5 Set the television to Video mode. (Set the input to Video) • For details, see the documentation that came with your camera to the video input terminal (yellow). To use your television for viewing, connect...

User Guide
Page 178
... connected. • When using the AV cable, do not move the camera with television equipment and other audiovisual equipment. Note 3 • You can connect the AV cable to the Video In terminal on your camera to PAL format before connecting. (GP.217) The default setting varies depending... on where you have shot to a video recorder. • Your camera is connected to uses PAL format (used in Europe and elsewhere...
... connected. • When using the AV cable, do not move the camera with television equipment and other audiovisual equipment. Note 3 • You can connect the AV cable to the Video In terminal on your camera to PAL format before connecting. (GP.217) The default setting varies depending... on where you have shot to a video recorder. • Your camera is connected to uses PAL format (used in Europe and elsewhere...

User Guide
Page 186
... menu (or the playback menu) appears. 2 Press the $ button. • The setup menu appears. • In scene mode, press the ! Changing Camera Settings 184 The menu items are displayed. 5 Press the !" buttons to select the [MODE] tab, and then press the $ button twice. button 5 once...confirm the setting and return to [On], Off P.213 P.215 , English, Deutsch, Français, Italian, P.216 Español, , , , Video Out Mode * NTSC, PAL P.217 * The default setting varies depending on five screens. 3 Press the !" button is confirmed when you "Press the ...
... menu (or the playback menu) appears. 2 Press the $ button. • The setup menu appears. • In scene mode, press the ! Changing Camera Settings 184 The menu items are displayed. 5 Press the !" buttons to select the [MODE] tab, and then press the $ button twice. button 5 once...confirm the setting and return to [On], Off P.213 P.215 , English, Deutsch, Français, Italian, P.216 Español, , , , Video Out Mode * NTSC, PAL P.217 * The default setting varies depending on five screens. 3 Press the !" button is confirmed when you "Press the ...

User Guide
Page 219
... connect to PAL format before connecting. If the equipment you purchased the camera. Note This camera is set to NTSC video format (used in Europe and elsewhere), then switch your camera. (GP.175) Your camera is not compatible with television equipment and other countries/regions) for use...TV System. buttons to select [Video Out Mode] and press the $ button. 3 Press the !" Changing Camera Settings 217 The default setting varies depending on a television screen by connecting your camera to a television with the AV cable that came with your camera to uses PAL format (used ...
... connect to PAL format before connecting. If the equipment you purchased the camera. Note This camera is set to NTSC video format (used in Europe and elsewhere), then switch your camera. (GP.175) Your camera is not compatible with television equipment and other countries/regions) for use...TV System. buttons to select [Video Out Mode] and press the $ button. 3 Press the !" Changing Camera Settings 217 The default setting varies depending on a television screen by connecting your camera to a television with the AV cable that came with your camera to uses PAL format (used ...

User Guide
Page 223
... • Do not install the software when the camera is connected to your computer with a previous model, a message stating that the old software must be installed: Software RICOH Gate La Irodio Photo & Video Studio USB Driver WIA Driver Description Downloads images collectively ...to your computer. Note The camera is provided with Irodio Photo & Video Studio software that allows you to display and edit images...
... • Do not install the software when the camera is connected to your computer with a previous model, a message stating that the old software must be installed: Software RICOH Gate La Irodio Photo & Video Studio USB Driver WIA Driver Description Downloads images collectively ...to your computer. Note The camera is provided with Irodio Photo & Video Studio software that allows you to display and edit images...

User Guide
Page 225
..., it may take some time until the next screen is displayed. • When installation of Irodio Photo & Video Studio is completed, a dialog box appears, indicating that all software applications have been installed. 7 Click [Finish...Select Program Folder] screen appears. 6 Confirm the destination location and then click [Next]. • The Irodio Photo & Video Studio installer starts. Depending on the screen. Note You can remove (uninstall) the software. (GP.227) 223 Downloading ... your computer, a Windows security warning message appears. 9 Click [Unblock] for RICOH Gate La for DSC.
..., it may take some time until the next screen is displayed. • When installation of Irodio Photo & Video Studio is completed, a dialog box appears, indicating that all software applications have been installed. 7 Click [Finish...Select Program Folder] screen appears. 6 Confirm the destination location and then click [Next]. • The Irodio Photo & Video Studio installer starts. Depending on the screen. Note You can remove (uninstall) the software. (GP.227) 223 Downloading ... your computer, a Windows security warning message appears. 9 Click [Unblock] for RICOH Gate La for DSC.

User Guide
Page 228
... with a USB cable. • For Windows Vista, Windows XP or Windows 2000, administrator privileges are listed. 226 Caution Do not install the software when the camera is connected to your computer, and insert the supplied CD-ROM into the CD-ROM drive. The CD-ROM contains not only the software installed.... If the computer is required to install the software Note For details about Acrobat Reader, see Help for Acrobat Reader. • To install Irodio Photo & Video Studio alone, double-click "Irodio Photo & Video Studio.exe" in the Irodio Photo...
... with a USB cable. • For Windows Vista, Windows XP or Windows 2000, administrator privileges are listed. 226 Caution Do not install the software when the camera is connected to your computer, and insert the supplied CD-ROM into the CD-ROM drive. The CD-ROM contains not only the software installed.... If the computer is required to install the software Note For details about Acrobat Reader, see Help for Acrobat Reader. • To install Irodio Photo & Video Studio alone, double-click "Irodio Photo & Video Studio.exe" in the Irodio Photo...

User Guide
Page 229
...] button. 5 Confirm file deletion and click [OK]. • The [Shared File Detected] dialog box appears. 6 Select the [Don't display this case, uninstall both Irodio Photo & Video Studio and the DeskTopBinder Lite and then uninstall either one . In this message again.] check box, and then click [Yes]. • The uninstallation process begins... in Windows XP). 4 Select [Caplio Software] (select [Caplio Software S] if you install both [Caplio Software] and [Caplio Software S] and then install only the required one , camera connection to the computer may fail.
...] button. 5 Confirm file deletion and click [OK]. • The [Shared File Detected] dialog box appears. 6 Select the [Don't display this case, uninstall both Irodio Photo & Video Studio and the DeskTopBinder Lite and then uninstall either one . In this message again.] check box, and then click [Yes]. • The uninstallation process begins... in Windows XP). 4 Select [Caplio Software] (select [Caplio Software S] if you install both [Caplio Software] and [Caplio Software S] and then install only the required one , camera connection to the computer may fail.

User Guide
Page 230
Downloading Images to Your Computer Irodio Photo & Video Studio 1 Click [Start] on the Windows task bar. 2 Select [Settings]-[Control Panel] ([Control Panel] for XP/Vista). 3 Double-click the [Add/Remove Programs] icon (or the [Add or Remove Programs] icon in Windows XP). 4 Select [Irodio Photo & Video Studio] and then click [Change/Remove]. 5 Confirm file deletion and click [OK]. • The uninstallation process begins. When it is finished, close the displayed window. 6 Restart your computer. 6 228
Downloading Images to Your Computer Irodio Photo & Video Studio 1 Click [Start] on the Windows task bar. 2 Select [Settings]-[Control Panel] ([Control Panel] for XP/Vista). 3 Double-click the [Add/Remove Programs] icon (or the [Add or Remove Programs] icon in Windows XP). 4 Select [Irodio Photo & Video Studio] and then click [Change/Remove]. 5 Confirm file deletion and click [OK]. • The uninstallation process begins. When it is finished, close the displayed window. 6 Restart your computer. 6 228

User Guide
Page 239
...connected. P.35 The contact surface of flash. P.175 Nothing displays in playback mode. LCD viewfinder. battery. Press the POWER button to The camera does not shoot even if you press the shutter release button. Load a new card, or delete P.60 unwanted files. Unlock the card. Turn... used at extreme high or - - Display has been switched to the Press the VF/LCD button to the picture display. The VIDEO/AV cable is locked. P.36 P.32 P.250 The camera is not fully Fully attach the LCD viewfinder. - Press the 6 (Playback) button P.55 to turn P.39 the...
...connected. P.35 The contact surface of flash. P.175 Nothing displays in playback mode. LCD viewfinder. battery. Press the POWER button to The camera does not shoot even if you press the shutter release button. Load a new card, or delete P.60 unwanted files. Unlock the card. Turn... used at extreme high or - - Display has been switched to the Press the VF/LCD button to the picture display. The VIDEO/AV cable is locked. P.36 P.32 P.250 The camera is not fully Fully attach the LCD viewfinder. - Press the 6 (Playback) button P.55 to turn P.39 the...

User Guide
Page 242
... viewfinder. memory card is not level. You shot the image while moving . Playback/Deleting Problem Cause Cannot play back, or the The camera is not in the middle or while the level sound was not recorded normally. There may be an SD memory card with the SD ... [Playback Screen] to [LCD]. card that was sounding. card that was formatted P.186 appear. Problem The level indicator is not connected properly. The VIDEO/AV cable is not displayed. The display is loaded, or Load a card with this device. 7 this device. You played back an SD memory ...
... viewfinder. memory card is not level. You shot the image while moving . Playback/Deleting Problem Cause Cannot play back, or the The camera is not in the middle or while the level sound was not recorded normally. There may be an SD memory card with the SD ... [Playback Screen] to [LCD]. card that was sounding. card that was formatted P.186 appear. Problem The level indicator is not connected properly. The VIDEO/AV cable is not displayed. The display is loaded, or Load a card with this device. 7 this device. You played back an SD memory ...

User Guide
Page 244
P.37 memory card. Battery is turned Use [Vol. Press the POWER button to turn the camera on The [Video Out Mode] setting is Set it P.37 again. Reconnect the AC adapter P.250 cable properly, if using AAA alkaline batteries or AAA oxyride batteries, replace ... volume is exhausted. P.217 The AV cable is incorrect. Connect the AV cable properly. P.175 The TV is set to turn P.39 the camera off . P.36 P.32 P.250 Camera malfunction. Make the settings again. volume to the correct format. 7 the TV. When using . P.215 The set date disappeared. P.215 Auto power ...
P.37 memory card. Battery is turned Use [Vol. Press the POWER button to turn the camera on The [Video Out Mode] setting is Set it P.37 again. Reconnect the AC adapter P.250 cable properly, if using AAA alkaline batteries or AAA oxyride batteries, replace ... volume is exhausted. P.217 The AV cable is incorrect. Connect the AV cable properly. P.175 The TV is set to turn P.39 the camera off . P.36 P.32 P.250 Camera malfunction. Make the settings again. volume to the correct format. 7 the TV. When using . P.215 The set date disappeared. P.215 Auto power ...
User Guide
Page 248
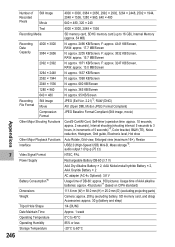
...batteries: approx. 45 pictures*7 (based on CIPA standard) 111.6 mm (W) × 58.0 mm (H) × 25.0 mm (D) (excluding projecting parts) Camera: approx. 208 g (excluding battery, SD memory card, and strap) Accessories: approx. 30 g (battery and strap) 1/4-20UNC Approx. 1 week 0°... × 480 Recording Still Image File Format Movie Compression Format Other Major Shooting Functions Other Major Playback Functions Interface Video Signal Format Power Supply Battery Consumption*6 Dimensions Weight Tripod Hole Shape Date Maintain Time Operating Temperature Operating Humidity Storage Temperature...
...batteries: approx. 45 pictures*7 (based on CIPA standard) 111.6 mm (W) × 58.0 mm (H) × 25.0 mm (D) (excluding projecting parts) Camera: approx. 208 g (excluding battery, SD memory card, and strap) Accessories: approx. 30 g (battery and strap) 1/4-20UNC Approx. 1 week 0°... × 480 Recording Still Image File Format Movie Compression Format Other Major Shooting Functions Other Major Playback Functions Interface Video Signal Format Power Supply Battery Consumption*6 Dimensions Weight Tripod Hole Shape Date Maintain Time Operating Temperature Operating Humidity Storage Temperature...

User Guide
Page 256
O Off Operation Sounds O All Vol. Cmp ADJ Lever Set. 2 O Wht. Bal. Light O On Digital Zoom Img O Normal Auto Power Off O 1 Min. Playback Screen O LCD LCD Confirm. O 0.5 Sec. O : setting is saved × : setting is reset Type Function Default ...Set Fn1 Button O AF/MF Set Fn2 Button O AE Lock Fn Set. Settings O (Medium) ADJ Lever Set. 1 O Expo. Reg. O On Date Settings Language/N Video Out Mode OO* O* * The default setting varies depending on where you purchased the camera. Auto Rotate O On CL-BKT B&W (TE) O On 7 RAW/JPEG Setting O Fine Sequential No.
O Off Operation Sounds O All Vol. Cmp ADJ Lever Set. 2 O Wht. Bal. Light O On Digital Zoom Img O Normal Auto Power Off O 1 Min. Playback Screen O LCD LCD Confirm. O 0.5 Sec. O : setting is saved × : setting is reset Type Function Default ...Set Fn1 Button O AF/MF Set Fn2 Button O AE Lock Fn Set. Settings O (Medium) ADJ Lever Set. 1 O Expo. Reg. O On Date Settings Language/N Video Out Mode OO* O* * The default setting varies depending on where you purchased the camera. Auto Rotate O On CL-BKT B&W (TE) O On 7 RAW/JPEG Setting O Fine Sequential No.

User Guide
Page 257
... Playback is compatible with both NTSC and PAL television formats. Please use electrical transformers. This camera is possible on a plug adapter suitable for wall outlets in your camera to the local video format. 7 255 Should the product fail or malfunction while you go abroad, set your ... shaped wall outlet/plug, please consult your travel to travel agent on televisions (or monitors) equipped with a video input terminal. When you are using. Appendices Using Your Camera Abroad AC Adapter (Model AC-4c), Battery Charger (Model BJ-6) This AC adapter and the battery charger can...
... Playback is compatible with both NTSC and PAL television formats. Please use electrical transformers. This camera is possible on a plug adapter suitable for wall outlets in your camera to the local video format. 7 255 Should the product fail or malfunction while you go abroad, set your ... shaped wall outlet/plug, please consult your travel to travel agent on televisions (or monitors) equipped with a video input terminal. When you are using. Appendices Using Your Camera Abroad AC Adapter (Model AC-4c), Battery Charger (Model BJ-6) This AC adapter and the battery charger can...
