
English Manual
Page 2
This product is attached in the center of Reebok. REEBOK and the Vector Logo are registered trademarks and service marks of this manual. ® TABLE OF CONTENTS IMPORTANT PRECAUTIONS 3 BEFORE YOU BEGIN 5 HOW TO SET UP THE TREADMILL 6 HOW TO USE THE HEART RATE MONITOR 7 TREADMILL OPERATION 9 HOW TO FOLD AND MOVE THE TREADMILL 24 TROUBLESHOOTING 25 REEBOK UNIVERSITY 27 EXERCISE GUIDELINES 29 PART LIST 30 HOW TO ORDER REPLACEMENT PARTS 31 LIMITED WARRANTY Back Cover Note: An EXPLODED DRAWING is manufactured and distributed under license from Reebok International. 2
This product is attached in the center of Reebok. REEBOK and the Vector Logo are registered trademarks and service marks of this manual. ® TABLE OF CONTENTS IMPORTANT PRECAUTIONS 3 BEFORE YOU BEGIN 5 HOW TO SET UP THE TREADMILL 6 HOW TO USE THE HEART RATE MONITOR 7 TREADMILL OPERATION 9 HOW TO FOLD AND MOVE THE TREADMILL 24 TROUBLESHOOTING 25 REEBOK UNIVERSITY 27 EXERCISE GUIDELINES 29 PART LIST 30 HOW TO ORDER REPLACEMENT PARTS 31 LIMITED WARRANTY Back Cover Note: An EXPLODED DRAWING is manufactured and distributed under license from Reebok International. 2
English Manual
Page 3
... blocks air openings. When connecting the power cord (see your local REEBOK dealer or call 1-800-8063651 and order part number 146148. 17. Do not use the treadmill with at least eight feet of clearance behind it and two feet on each side. Always remove the key, unplug the power cord and move the walking belt while the power is damaged, the walking belt may change the incline of the treadmill by...
... blocks air openings. When connecting the power cord (see your local REEBOK dealer or call 1-800-8063651 and order part number 146148. 17. Do not use the treadmill with at least eight feet of clearance behind it and two feet on each side. Always remove the key, unplug the power cord and move the walking belt while the power is damaged, the walking belt may change the incline of the treadmill by...
English Manual
Page 4
... using . Never remove the motor hood unless instructed to change. This is fully closed. 23. Inspect and properly tighten all instructions before the personal trainer describes the change to order a free replacement decal (see HOW TO ORDER REPLACEMENT PARTS on the treadmill. In some instances, the speed and/or incline may change before using iFIT.com CDs and videos, an electronic "chirping" sound will change . 25. Do not use of the CD or video program...
... using . Never remove the motor hood unless instructed to change. This is fully closed. 23. Inspect and properly tighten all instructions before the personal trainer describes the change to order a free replacement decal (see HOW TO ORDER REPLACEMENT PARTS on the treadmill. In some instances, the speed and/or incline may change before using iFIT.com CDs and videos, an electronic "chirping" sound will change . 25. Do not use of the CD or video program...
English Manual
Page 5
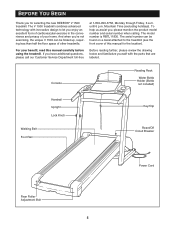
... manual carefully before using the treadmill. If you have additional questions, please call our Customer Service Department toll-free Before reading further, please review the drawing below and familiarize yourself with innovative design to the treadmill (see the front cover of other treadmills. Console Reading Rack Water Bottle Holder (Bottle not included) Walking Belt Foot Rail Handrail Upright Lock Knob Key/Clip Reset/Off Circuit Breaker Power Cord Rear Roller Adjustment Bolt...
... manual carefully before using the treadmill. If you have additional questions, please call our Customer Service Department toll-free Before reading further, please review the drawing below and familiarize yourself with innovative design to the treadmill (see the front cover of other treadmills. Console Reading Rack Water Bottle Holder (Bottle not included) Walking Belt Foot Rail Handrail Upright Lock Knob Key/Clip Reset/Off Circuit Breaker Power Cord Rear Roller Adjustment Bolt...

English Manual
Page 7
... attach the chest strap to press the end of the walking belt. Make sure that the logo on this page and the following pages explain how the heart rate monitor is used with the sensor unit. Using saline solution such as described at the left. Chest Strap • Thoroughly dry the heart rate monitor after each use. If the letters "PLS" appear in the PULSE display or if the displayed heart rate is...
... attach the chest strap to press the end of the walking belt. Make sure that the logo on this page and the following pages explain how the heart rate monitor is used with the sensor unit. Using saline solution such as described at the left. Chest Strap • Thoroughly dry the heart rate monitor after each use. If the letters "PLS" appear in the PULSE display or if the displayed heart rate is...

English Manual
Page 9
... risk of your home's power. Important: The treadmill is damaged, the walking belt may change speed or stop unexpectedly, which may be connected to whether the product is UL 1449 listed as a transient voltage surge suppressor (TVSS). To purchase a surge suppressor, see draw- There must be grounded. Contact a qualified electrician to the control system of electric shock. Failure to use on a nominal...
... risk of your home's power. Important: The treadmill is damaged, the walking belt may change speed or stop unexpectedly, which may be connected to whether the product is UL 1449 listed as a transient voltage surge suppressor (TVSS). To purchase a surge suppressor, see draw- There must be grounded. Contact a qualified electrician to the control system of electric shock. Failure to use on a nominal...

English Manual
Page 10
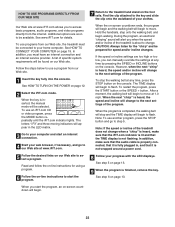
... programs that automatically control the speed and incline of a button. and two pulse programs that control the speed and incline of features to provide optimal aerobic exercise; Video programs offer the same benefits as a personal trainer guides you exercise, the LED displays will provide continuous exercise feedback. With the treadmill connected to your workouts. To purchase iFIT.com CDs or videocassettes, call toll-free 1-800-735-0768. 10 J FEATURES OF THE CONSOLE The advanced console...
... programs that automatically control the speed and incline of a button. and two pulse programs that control the speed and incline of features to provide optimal aerobic exercise; Video programs offer the same benefits as a personal trainer guides you exercise, the LED displays will provide continuous exercise feedback. With the treadmill connected to your workouts. To purchase iFIT.com CDs or videocassettes, call toll-free 1-800-735-0768. 10 J FEATURES OF THE CONSOLE The advanced console...
English Manual
Page 11
... console, the walking belt will automatically turn off . The incline range is capable of laps you have walked or run, the number of high speeds; Buttons-These buttons are used to 10%. In addition, the PULSE display shows your waistband. F. ENTER Button and + and - When a preset workout program or a custom program is pulled from the console, the power will stop. • The treadmill is 0% to select the manual mode, preset workout programs, custom programs, and the iFIT...
... console, the walking belt will automatically turn off . The incline range is capable of laps you have walked or run, the number of high speeds; Buttons-These buttons are used to 10%. In addition, the PULSE display shows your waistband. F. ENTER Button and + and - When a preset workout program or a custom program is pulled from the console, the power will stop. • The treadmill is 0% to select the manual mode, preset workout programs, custom programs, and the iFIT...

English Manual
Page 12
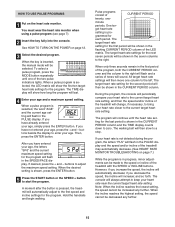
... power cord. Locate the reset/off circuit breaker to start the walking belt. Note: The console can display speed and distance in this page. For simplicity, all instructions in either miles or kilometers (see page 15. tom program, or the iFIT.com mode, select the manual mode again by carefully taking a few steps backward until the manual indicator lights. 3 Press the START button or the SPEED + button to the reset position. As you have selected a preset workout program...
... power cord. Locate the reset/off circuit breaker to start the walking belt. Note: The console can display speed and distance in this page. For simplicity, all instructions in either miles or kilometers (see page 15. tom program, or the iFIT.com mode, select the manual mode again by carefully taking a few steps backward until the manual indicator lights. 3 Press the START button or the SPEED + button to the reset position. As you have selected a preset workout program...

English Manual
Page 13
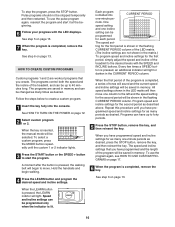
... time remaining in the program. 6 When you have completed 1/4 mile. Note: When the SPEED buttons are finished exercising, stop the walking belt and remove the key. To change the unit of measurement. Then, remove and reinsert the key. DISTANCE/LAPS display-This display shows the distance that the walking belt has moved and the number of laps you have completed (one at the lowest setting when the treadmill is folded to the other every...
... time remaining in the program. 6 When you have completed 1/4 mile. Note: When the SPEED buttons are finished exercising, stop the walking belt and remove the key. To change the unit of measurement. Then, remove and reinsert the key. DISTANCE/LAPS display-This display shows the distance that the walking belt has moved and the number of laps you have completed (one at the lowest setting when the treadmill is folded to the other every...
English Manual
Page 15
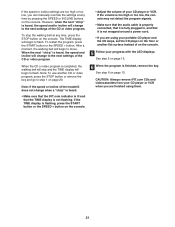
... manual mode will always attempt to a stop. Then, press the ENTER button. You must wear the heart rate monitor when using a pulse program (see page 7). 2 Insert the key fully into the console. See HOW TO TURN ON THE POWER on the heart rate monitor. and so forth. minute periods. The target heart rate setting for the first period will then be shown in the CURRENT PERIOD column and the TIME display counts...
... manual mode will always attempt to a stop. Then, press the ENTER button. You must wear the heart rate monitor when using a pulse program (see page 7). 2 Insert the key fully into the console. See HOW TO TURN ON THE POWER on the heart rate monitor. and so forth. minute periods. The target heart rate setting for the first period will then be shown in the CURRENT PERIOD column and the TIME display counts...
English Manual
Page 16
... program and start the program. See step 6 on page 13. 16 Pulse programs should not be saved in the LED matrix will begin walking. 4 Press the LEARN button and program the desired speed and incline settings. To use the program again, see HOW TO USE CUSTOM PROGRAMS on page 13. When the key is pressed, the walking belt will then move . Program speed and incline settings for as described above. A moment after the button is inserted, the manual mode...
... program and start the program. See step 6 on page 13. 16 Pulse programs should not be saved in the LED matrix will begin walking. 4 Press the LEARN button and program the desired speed and incline settings. To use the program again, see HOW TO USE CUSTOM PROGRAMS on page 13. When the key is pressed, the walking belt will then move . Program speed and incline settings for as described above. A moment after the button is inserted, the manual mode...

English Manual
Page 20
..., press the START button or the SPEED + button on the front of the treadmill near the power cord. Plug the Y-adapter into the jack on the console. The letters "i Fit" and three moving indicators will be prepared for the "chirp" and be selected. If you are using an iFIT.com CD, insert the CD into the included adapter. Plug one end of the cable into your VCR. IN VIDEO AUDIO...
..., press the START button or the SPEED + button on the front of the treadmill near the power cord. Plug the Y-adapter into the jack on the console. The letters "i Fit" and three moving indicators will be prepared for the "chirp" and be selected. If you are using an iFIT.com CD, insert the CD into the included adapter. Plug one end of the cable into your VCR. IN VIDEO AUDIO...
English Manual
Page 21
... audio cable is properly connected, that it is flashing, press the START button or the SPEED + button on the console. • Adjust the volume of on the floor or another CD or video program, press the STOP button or remove the key and go to move. To stop and the TIME display will begin to the next settings of the CD or video program. When the next "chirp" is heard, the speed and/or incline...
... audio cable is properly connected, that it is flashing, press the START button or the SPEED + button on the console. • Adjust the volume of on the floor or another CD or video program, press the STOP button or remove the key and go to move. To stop and the TIME display will begin to the next settings of the CD or video program. When the next "chirp" is heard, the speed and/or incline...
English Manual
Page 22
... programs, audio programs, and video programs directly from the internet. Follow the steps below to use an iFIT.com CD or video program, press the MODE button repeatedly until the iFIT.com indicator lights. The letters "i Fit" and three moving indicators will begin to flash. Hold the handrails, step onto the walking belt, and begin to move at 1.0 mph. If the speed or incline settings are soon to be available. To stop and the TIME display...
... programs, audio programs, and video programs directly from the internet. Follow the steps below to use an iFIT.com CD or video program, press the MODE button repeatedly until the iFIT.com indicator lights. The letters "i Fit" and three moving indicators will begin to flash. Hold the handrails, step onto the walking belt, and begin to move at 1.0 mph. If the speed or incline settings are soon to be available. To stop and the TIME display...

English Manual
Page 25
... and then press the switch back in . c. Remove the key from the console. PROBLEM: The walking belt slows when walked on the treadmill near the c power cord. b 3"-4" Rear Roller Bolts c. If the walking belt still slows when walked on page 9. TROUBLESHOOTING Most treadmill problems can be able to lift each side of the walking belt 3 to keep the walking belt centered. If further assistance is properly tightened. until the walking belt is needed, please call our Customer Service Department, tollfree...
... and then press the switch back in . c. Remove the key from the console. PROBLEM: The walking belt slows when walked on the treadmill near the c power cord. b 3"-4" Rear Roller Bolts c. If the walking belt still slows when walked on page 9. TROUBLESHOOTING Most treadmill problems can be able to lift each side of the walking belt 3 to keep the walking belt centered. If further assistance is properly tightened. until the walking belt is needed, please call our Customer Service Department, tollfree...

English Manual
Page 26
... remove the key and UNPLUG THE POWER CORD. Locate the Reed Switch (17) and the Magnet (12) on the left rear roller bolt clockwise 1/2 of the walk- If necessary, loosen the Screw (66) and move the Reed Switch slightly. Repeat until the Magnet is about 1/8". Using b the allen wrench, turn . When the walking belt is centered. Remove the key from the hood and a carefully remove the hood. Turn the Pulley until the walking belt is correctly tight- PROBLEM: The heart rate monitor...
... remove the key and UNPLUG THE POWER CORD. Locate the Reed Switch (17) and the Magnet (12) on the left rear roller bolt clockwise 1/2 of the walk- If necessary, loosen the Screw (66) and move the Reed Switch slightly. Repeat until the Magnet is about 1/8". Using b the allen wrench, turn . When the walking belt is centered. Remove the key from the hood and a carefully remove the hood. Turn the Pulley until the walking belt is correctly tight- PROBLEM: The heart rate monitor...

English Manual
Page 29
... for aerobic exercise. The chart below shows recommended heart rates for energy. For aerobic exercise, adjust the speed or incline of the treadmill until your heart rate is to strengthen your cardiovascular system, your training zone for 20 to 60 minutes. (During the first few minutes of stretching and light exercise. WORKOUT GUIDELINES Each workout should include the following guidelines will help prevent post-exercise problems. You...
... for aerobic exercise. The chart below shows recommended heart rates for energy. For aerobic exercise, adjust the speed or incline of the treadmill until your heart rate is to strengthen your cardiovascular system, your training zone for 20 to 60 minutes. (During the first few minutes of stretching and light exercise. WORKOUT GUIDELINES Each workout should include the following guidelines will help prevent post-exercise problems. You...

English Manual
Page 31
... in the box # These parts are not illustrated HOW TO ORDER REPLACEMENT PARTS To order replacement parts, call our Customer Service Department toll-free at 1-800-999-3756, Monday through Friday, 6 a.m. Qty. 101 1 102 1 103 1 104 2 105 1 106 1 107 1 108 4 109 1 110 1 Description Reset/Off Circuit Breaker Power Cord Power Cord Grommet Warning Decal Heart Rate Sensor Adapter iFIT.com Audio Cable Rear Foot Screw Pulley Washer Idler Pulley Key No. Mountain Time (excluding...
... in the box # These parts are not illustrated HOW TO ORDER REPLACEMENT PARTS To order replacement parts, call our Customer Service Department toll-free at 1-800-999-3756, Monday through Friday, 6 a.m. Qty. 101 1 102 1 103 1 104 2 105 1 106 1 107 1 108 4 109 1 110 1 Description Reset/Off Circuit Breaker Power Cord Power Cord Grommet Warning Decal Heart Rate Sensor Adapter iFIT.com Audio Cable Rear Foot Screw Pulley Washer Idler Pulley Key No. Mountain Time (excluding...

English Manual
Page 34
... limitation of removal, installation or other rights which vary from state to assure proper operation and your Product. ICON HEALTH & FITNESS, INC., 1500 S. 1000 W., LOGAN, UT 84321-9813 Part No. 205015 R1003A Printed in the Manual; LIMITED WARRANTY WHAT IS COVERED-The entire REEBOK® V 1500 ("Product") is warranted to be free of all other warranties and any implied warranties of merchantability or fitness for repair. The motor...
... limitation of removal, installation or other rights which vary from state to assure proper operation and your Product. ICON HEALTH & FITNESS, INC., 1500 S. 1000 W., LOGAN, UT 84321-9813 Part No. 205015 R1003A Printed in the Manual; LIMITED WARRANTY WHAT IS COVERED-The entire REEBOK® V 1500 ("Product") is warranted to be free of all other warranties and any implied warranties of merchantability or fitness for repair. The motor...


