
English Manual
Page 1
RBTL67708.0 Serial No. As a manufacturer, we are missing, DO NOT CONTACT THE STORE; Save this equipment. Serial Number Decal QUESTIONS? MT Sat. 8 a.m.-4 p.m. please contact Customer Care. www.reebokfitness.com Model No. MT ON THE WEB: www.reebokservice.com CAUTION Read all precautions and instructions in the space above ) before using this manual for future reference. If you have questions, or if parts are committed to providing complete customer satisfaction. With Universal Dock for reference. Write the serial number in this manual before contacting us: CALL TOLL...
RBTL67708.0 Serial No. As a manufacturer, we are missing, DO NOT CONTACT THE STORE; Save this equipment. Serial Number Decal QUESTIONS? MT Sat. 8 a.m.-4 p.m. please contact Customer Care. www.reebokfitness.com Model No. MT ON THE WEB: www.reebokservice.com CAUTION Read all precautions and instructions in the space above ) before using this manual for future reference. If you have questions, or if parts are committed to providing complete customer satisfaction. With Universal Dock for reference. Write the serial number in this manual before contacting us: CALL TOLL...

English Manual
Page 2
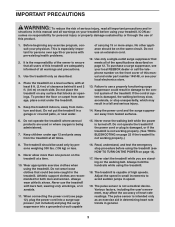
...WARNING DECAL PLACEMENT 2 IMPORTANT PRECAUTIONS 3 BEFORE YOU BEGIN 5 ASSEMBLY 6 OPERATION AND ADJUSTMENT 12 HOW TO FOLD AND MOVE THE TREADMILL 21 TROUBLESHOOTING 22 EXERCISE GUIDELINES 25 PART LIST 26 EXPLODED DRAWING 28 ORDERING REPLACEMENT PARTS Back Cover LIMITED WARRANTY Back Cover WARNING ...Apple Computer, Inc., registered in the location shown. Apply the decal in the U.S. This product is missing or illegible, see the front cover of Reebok. Note: The decals may not be shown at actual size. and other countries. 2 iPod® is a trademark of the warning decals. ...
...WARNING DECAL PLACEMENT 2 IMPORTANT PRECAUTIONS 3 BEFORE YOU BEGIN 5 ASSEMBLY 6 OPERATION AND ADJUSTMENT 12 HOW TO FOLD AND MOVE THE TREADMILL 21 TROUBLESHOOTING 22 EXERCISE GUIDELINES 25 PART LIST 26 EXPLODED DRAWING 28 ORDERING REPLACEMENT PARTS Back Cover LIMITED WARRANTY Back Cover WARNING ...Apple Computer, Inc., registered in the location shown. Apply the decal in the U.S. This product is missing or illegible, see the front cover of Reebok. Note: The decals may not be shown at actual size. and other countries. 2 iPod® is a trademark of the warning decals. ...
English Manual
Page 3
... sensor is the responsibility of the owner to ensure that meets all of the specifications described on the treadmill at a time. 10. Before beginning any exercise program, consult your local REEBOK dealer or call the telephone number on any surface that could result in damage to avoid sudden jumps ...in speed. 19. Do not place the treadmill on the front cover of this manual and order part number 146148, ...
... sensor is the responsibility of the owner to ensure that meets all of the specifications described on the treadmill at a time. 10. Before beginning any exercise program, consult your local REEBOK dealer or call the telephone number on any surface that could result in damage to avoid sudden jumps ...in speed. 19. Do not place the treadmill on the front cover of this manual and order part number 146148, ...
English Manual
Page 4
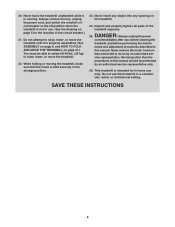
... procedures in -home use this manual. Always unplug the power cord immediately after use . (See the drawing on the treadmill. 24. Do not attempt to raise, lower, or move the treadmill. 22. Never remove the motor hood un- vice representative. Inspect and properly tighten all parts of the circuit breaker.)... 21. Never leave the treadmill unattended while it is running. Always remove the key, unplug the power cord, and switch the reset/off circuit breaker to do so ...
... procedures in -home use this manual. Always unplug the power cord immediately after use . (See the drawing on the treadmill. 24. Do not attempt to raise, lower, or move the treadmill. 22. Never remove the motor hood un- vice representative. Inspect and properly tighten all parts of the circuit breaker.)... 21. Never leave the treadmill unattended while it is running. Always remove the key, unplug the power cord, and switch the reset/off circuit breaker to do so ...
English Manual
Page 5
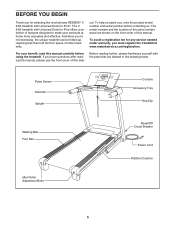
... labeled in the drawing below. To avoid a registration fee for any service needed under warranty, you for selecting the revolutionary REEBOK® V 6.80 treadmill with Universal Dock for iPod offers a selection of other treadmills. If you have questions after reading this manual, please see the front cover of this manual carefully before contacting us...
... labeled in the drawing below. To avoid a registration fee for any service needed under warranty, you for selecting the revolutionary REEBOK® V 6.80 treadmill with Universal Dock for iPod offers a selection of other treadmills. If you have questions after reading this manual, please see the front cover of this manual carefully before contacting us...
English Manual
Page 6
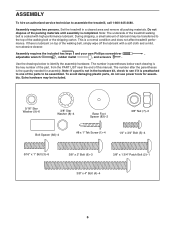
... , and scissors . Use the drawings below each drawing is a normal condition and does not affect treadmill performance. ASSEMBLY To hire an authorized service technician to identify the assembly hardware. The number in the hardware...Bolt Spacer (82)-4 #8 x 1" Tek Screw (1)-4 1/4" x 3/4" Bolt (5)-4 5/16" x 1" Bolt (3)-6 3/8" x 2" Bolt (6)-3 3/8" x 1 3/4" Patch Bolt (2)-1 3/8" x 4" Bolt (4)-4 6 Set the treadmill in a cleared area and remove all packing materials. Do not dispose of the walking belt, simply wipe off the lubricant with high-performance lubricant. The...
... , and scissors . Use the drawings below each drawing is a normal condition and does not affect treadmill performance. ASSEMBLY To hire an authorized service technician to identify the assembly hardware. The number in the hardware...Bolt Spacer (82)-4 #8 x 1" Tek Screw (1)-4 1/4" x 3/4" Bolt (5)-4 5/16" x 1" Bolt (3)-6 3/8" x 2" Bolt (6)-3 3/8" x 1 3/4" Patch Bolt (2)-1 3/8" x 4" Bolt (4)-4 6 Set the treadmill in a cleared area and remove all packing materials. Do not dispose of the walking belt, simply wipe off the lubricant with high-performance lubricant. The...

English Manual
Page 7
... (1) and two Base Foot Spacers (83). 83 52 86 1 Then, attach the other end of a second person, carefully tip 87 the treadmill onto its left side. Make sure that the treadmill is unplugged. 1 With the help of the wire tie until the Wire Harness is routed completely through the Right Upright Spacer...
... (1) and two Base Foot Spacers (83). 83 52 86 1 Then, attach the other end of a second person, carefully tip 87 the treadmill onto its left side. Make sure that the treadmill is unplugged. 1 With the help of the wire tie until the Wire Harness is routed completely through the Right Upright Spacer...
English Manual
Page 8
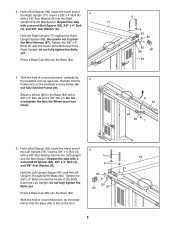
... the Bolts yet. Do not overtighten the Nut; Press a Base Cap (80) into the Left Upright 4 and the Bolt Spacer. Partially fold the 5 Frame (52) so the treadmill is flat on the floor. 8 the Wheel must turn freely. 4 8 87 82 82 80 88 84 6 52 84 85 7 6. Tighten the 3/8" x 4" Bolts... (4) until the heads of a second person, carefully tip the treadmill onto its right side. Hold the Right Upright (77...
... the Bolts yet. Do not overtighten the Nut; Press a Base Cap (80) into the Left Upright 4 and the Bolt Spacer. Partially fold the 5 Frame (52) so the treadmill is flat on the floor. 8 the Wheel must turn freely. 4 8 87 82 82 80 88 84 6 52 84 85 7 6. Tighten the 3/8" x 4" Bolts... (4) until the heads of a second person, carefully tip the treadmill onto its right side. Hold the Right Upright (77...
English Manual
Page 9
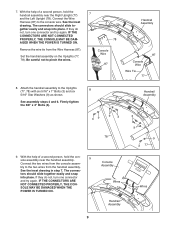
With the help of a second person, hold the console assembly near the Right Upright (77) and the Left Upright (78). If they do not, turn one connector and try again. Set the handrail assembly on the Uprights (77, 78). bly to the console wire. See the inset drawing in step 7. The connec- IF THE CONNECTORS ARE NOT CONNECTED PROPERLY, THE CONSOLE MAY BE DAMAGED WHEN THE POWER IS TURNED ON. Console Assembly Wires Handrail Assembly Handrail Assembly 3 9 9 3 77 Wires 9 Remove the wire tie from the handrail assembly. Be careful not to the Uprights (77, 78) with six ...
With the help of a second person, hold the console assembly near the Right Upright (77) and the Left Upright (78). If they do not, turn one connector and try again. Set the handrail assembly on the Uprights (77, 78). bly to the console wire. See the inset drawing in step 7. The connec- IF THE CONNECTORS ARE NOT CONNECTED PROPERLY, THE CONSOLE MAY BE DAMAGED WHEN THE POWER IS TURNED ON. Console Assembly Wires Handrail Assembly Handrail Assembly 3 9 9 3 77 Wires 9 Remove the wire tie from the handrail assembly. Be careful not to the Uprights (77, 78) with six ...

English Manual
Page 10
...Large Barrel 84 2 12. 10. If there are sheets of the hex keys is completed. To protect the floor or carpet, place a mat under the treadmill. Orient the Storage Latch (49) so that all parts are in a secure place; Lower the Frame (52) (see pages 23 and 24). 10 Note...: Extra hardware may be included. Be careful not to adjust the walking belt (see HOW TO LOWER THE TREADMILL FOR USE on the treadmill decals, remove the plastic. Attach the upper end of the Storage Latch (49) to the Base (84) with a 3/8" x 2" Bolt (6) and a 3/8" Nut (7). Have ...
...Large Barrel 84 2 12. 10. If there are sheets of the hex keys is completed. To protect the floor or carpet, place a mat under the treadmill. Orient the Storage Latch (49) so that all parts are in a secure place; Lower the Frame (52) (see pages 23 and 24). 10 Note...: Extra hardware may be included. Be careful not to adjust the walking belt (see HOW TO LOWER THE TREADMILL FOR USE on the treadmill decals, remove the plastic. Attach the upper end of the Storage Latch (49) to the Base (84) with a 3/8" x 2" Bolt (6) and a 3/8" Nut (7). Have ...
English Manual
Page 11
Hold the receiver so the antenna is oriented as shown and is unplugged. Connect the wire on the Access Door (92) with the #8 x 1/2" Screw Screw (12). Remove the indicated #8 x 1/2" Screw (12) and the Access Door (92) from the Console Back (95). Reattach the Access Door (92) with the two included small screws. 95 Small Screws Receiver Antenna Wire 92 12 3. Attach the receiver to the plastic posts on the receiver to the indicated wire extending from the Console Back (95). 2. Be careful not to pinch the wires. Make sure that the power cord is facing the Console Back. ...
Hold the receiver so the antenna is oriented as shown and is unplugged. Connect the wire on the Access Door (92) with the #8 x 1/2" Screw Screw (12). Remove the indicated #8 x 1/2" Screw (12) and the Access Door (92) from the Console Back (95). Reattach the Access Door (92) with the two included small screws. 95 Small Screws Receiver Antenna Wire 92 12 3. Attach the receiver to the plastic posts on the receiver to the indicated wire extending from the Console Back (95). 2. Be careful not to pinch the wires. Make sure that the power cord is facing the Console Back. ...

English Manual
Page 12
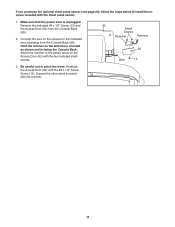
... plug. Voltage surges, spikes, and noise interference can result in an increased risk of elec- To purchase a surge suppressor, see your local REEBOK dealer or call the telephone number on a nominal 120-volt circuit, and has a grounding plug that looks like any other type of sophisticated ...electronic equipment, can be connected to reduce the risk of electric shock. Failure to use on the front cover of the treadmill. Contact a qualified electrician to the control system of this manual and order part number 146148, or see drawing 1 at the right). ...
... plug. Voltage surges, spikes, and noise interference can result in an increased risk of elec- To purchase a surge suppressor, see your local REEBOK dealer or call the telephone number on a nominal 120-volt circuit, and has a grounding plug that looks like any other type of sophisticated ...electronic equipment, can be connected to reduce the risk of electric shock. Failure to use on the front cover of the treadmill. Contact a qualified electrician to the control system of this manual and order part number 146148, or see drawing 1 at the right). ...
English Manual
Page 13
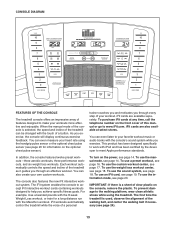
...page 14. You can even listen to your workouts more effective and enjoyable. You can even measure your heart rate using the treadmill. The first time the treadmill is used, observe the alignment of the walking belt, and center the walking belt if necessary (see page 20. CONSOLE DIAGRAM... FEATURES OF THE CONSOLE The treadmill console offers an impressive array of features designed to make your favorite workout music or audio books with the consoleʼs sound system while...
...page 14. You can even listen to your workouts more effective and enjoyable. You can even measure your heart rate using the treadmill. The first time the treadmill is used, observe the alignment of the walking belt, and center the walking belt if necessary (see page 20. CONSOLE DIAGRAM... FEATURES OF THE CONSOLE The treadmill console offers an impressive array of features designed to make your favorite workout music or audio books with the consoleʼs sound system while...
English Manual
Page 14
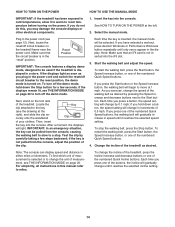
...manual mode. Reset Position IMPORTANT: The console features a display demo mode, designed to be selected. After a moment, the displays will be used if the treadmill is selected or to change the speed of 0.5 mph. if you press one of the buttons, the incline will begin to move at the left... mode, hold down the Stop button for a few steps backward; Locate the Key clip attached to the key (see THE INFORMATION MODE on the treadmill frame near the power cord. Start the walking belt and adjust the speed. As you press a button, the speed setting will change by carefully ...
...manual mode. Reset Position IMPORTANT: The console features a display demo mode, designed to be selected. After a moment, the displays will be used if the treadmill is selected or to change the speed of 0.5 mph. if you press one of the buttons, the incline will begin to move at the left... mode, hold down the Stop button for a few steps backward; Locate the Key clip attached to the key (see THE INFORMATION MODE on the treadmill frame near the power cord. Start the walking belt and adjust the speed. As you press a button, the speed setting will change by carefully ...
English Manual
Page 15
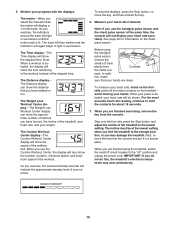
... on the handrail- When your hands are finished exercising, remove the key from the console and put it in the workout instead of the treadmill, your heart rate, and your exercise. When you have walked or run. The track will then darken and the indicators will also show ... adjust the incline of the walking belt. The Time display-The Time display will show the elapsed time. 5. The matrix-When you fold the treadmill to light in succession. Monitor your heart rate accurately. To reset the displays, press the Stop button, remove the key, and then reinsert the...
... on the handrail- When your hands are finished exercising, remove the key from the console and put it in the workout instead of the treadmill, your heart rate, and your exercise. When you have walked or run. The track will then darken and the indicators will also show ... adjust the incline of the walking belt. The Time display-The Time display will show the elapsed time. 5. The matrix-When you fold the treadmill to light in succession. Monitor your heart rate accurately. To reset the displays, press the Stop button, remove the key, and then reinsert the...
English Manual
Page 16
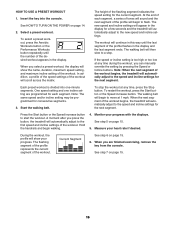
... override the setting by pressing the Speed or Incline buttons. HOW TO USE A PRESET WORKOUT 1. When you press the button, the treadmill will automatically adjust to a stop the workout at any time during the workout, you are programmed for the current segment. The height of...after you select a preset workout, the display will show the name, duration, maximum speed setting, and maximum incline setting of the workout begins, the treadmill will begin walking. 4. During the workout, the profile will show your progress. Current Segment See step 6 on page 15. 5. The new speed...
... override the setting by pressing the Speed or Incline buttons. HOW TO USE A PRESET WORKOUT 1. When you press the button, the treadmill will automatically adjust to a stop the workout at any time during the workout, you are programmed for the current segment. The height of...after you select a preset workout, the display will show the name, duration, maximum speed setting, and maximum incline setting of the workout begins, the treadmill will begin walking. 4. During the workout, the profile will show your progress. Current Segment See step 6 on page 15. 5. The new speed...
English Manual
Page 17
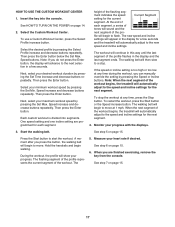
...the Enter button, the display will advance to the next selection in this way until the last segment of the workout begins, the treadmill will begin walking. HOW TO USE THE CUSTOM WORKOUT CENTER 1. Next, select your minimum workout speed by pressing the Set Max. ...the workout. The workout will automatically adjust to start the workout. When the next segment of the workout begins, the treadmill will continue in a few seconds and the treadmill will automatically adjust to move . A moment after you are programmed for the current segment. Speed buttons. Then press...
...the Enter button, the display will advance to the next selection in this way until the last segment of the workout begins, the treadmill will begin walking. HOW TO USE THE CUSTOM WORKOUT CENTER 1. Next, select your minimum workout speed by pressing the Set Max. ...the workout. The workout will automatically adjust to start the workout. When the next segment of the workout begins, the treadmill will continue in a few seconds and the treadmill will automatically adjust to move . A moment after you are programmed for the current segment. Speed buttons. Then press...
English Manual
Page 18
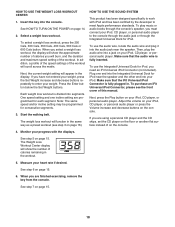
To select a weight loss workout, press the 250 Cals, 300 Cals, 350 Cals, 400 Cals, 500 Cals or 600 Cals button. When you select a weight loss workout, the display will show the number of the workout. One speed setting and one end into the Integrated Universal Dock for iPod near the speaker. HOW TO USE THE SOUND SYSTEM This product has been designed specifically to meet Apple performance standards. Then, plug the audio wire into the console. Next, press the Play button on your progress with iPod and has been certified by the developer to work with the displays. See step 5 ...
To select a weight loss workout, press the 250 Cals, 300 Cals, 350 Cals, 400 Cals, 500 Cals or 600 Cals button. When you select a weight loss workout, the display will show the number of the workout. One speed setting and one end into the Integrated Universal Dock for iPod near the speaker. HOW TO USE THE SOUND SYSTEM This product has been designed specifically to meet Apple performance standards. Then, plug the audio wire into the console. Next, press the Play button on your progress with iPod and has been certified by the developer to work with the displays. See step 5 ...
English Manual
Page 19
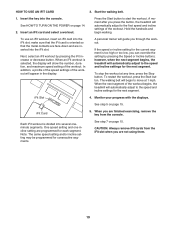
... speed or incline setting for consecutive segments. iFit Slot 4. Each iFit workout is too high or too low, you press the button, the treadmill will show the number, duration, and maximum speed setting of the workout. Note: The same speed setting and/or incline setting may be programmed...into the console. In addition, a profile of the speed settings of the workout begins, the treadmill will guide you are programmed for the next segment. however, when the next segment begins, the treadmill will appear in the display. To stop the workout at 1 mph. Hold the handrails and begin...
... speed or incline setting for consecutive segments. iFit Slot 4. Each iFit workout is too high or too low, you press the button, the treadmill will show the number, duration, and maximum speed setting of the workout. Note: The same speed setting and/or incline setting may be programmed...into the console. In addition, a profile of the speed settings of the workout begins, the treadmill will guide you are programmed for the next segment. however, when the next segment begins, the treadmill will appear in the display. To stop the workout at 1 mph. Hold the handrails and begin...
English Manual
Page 20
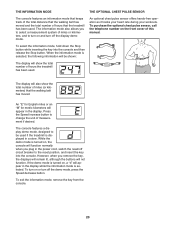
... operation as it tracks your heart rate during your workouts. While the demo mode is selected, the following information will be used if the treadmill is displayed in the display while the information mode is turned on , the console will also show the total number of hours the... that the walking belt has moved. When the information mode is turned on , a "d" will show the total number of miles (or kilometers) that the treadmill has been used . The display will function normally when you to select a measurement system of miles or kilometers, and to change the unit of this...
... operation as it tracks your heart rate during your workouts. While the demo mode is selected, the following information will be used if the treadmill is displayed in the display while the information mode is turned on , the console will also show the total number of hours the... that the walking belt has moved. When the information mode is turned on , a "d" will show the total number of miles (or kilometers) that the treadmill has been used . The display will function normally when you to select a measurement system of miles or kilometers, and to change the unit of this...