
English Manual
Page 2
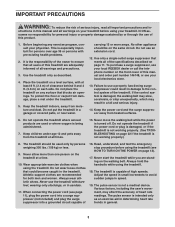
... in the location shown. If a decal is manufactured and distributed under license from Reebok International. 2 TABLE OF CONTENTS WARNING DECAL PLACEMENT 2 IMPORTANT PRECAUTIONS 3 BEFORE YOU BEGIN 5 ASSEMBLY 6 OPERATION AND ADJUSTMENT 11 HOW TO FOLD AND MOVE THE TREADMILL 21 TROUBLESHOOTING 22 EXERCISE GUIDELINES 25 PART LIST 26 EXPLODED DRAWING 28 ORDERING REPLACEMENT...
... in the location shown. If a decal is manufactured and distributed under license from Reebok International. 2 TABLE OF CONTENTS WARNING DECAL PLACEMENT 2 IMPORTANT PRECAUTIONS 3 BEFORE YOU BEGIN 5 ASSEMBLY 6 OPERATION AND ADJUSTMENT 11 HOW TO FOLD AND MOVE THE TREADMILL 21 TROUBLESHOOTING 22 EXERCISE GUIDELINES 25 PART LIST 26 EXPLODED DRAWING 28 ORDERING REPLACEMENT...
English Manual
Page 3
... surface, with at all warnings on the same circuit. Place the treadmill on page 22 if the treadmill is intended only as described. 4. Do not put the treadmill in the treadmill. To purchase a surge suppressor, see your local REEBOK dealer or call the telephone number on each side. Never allow more...is capable of this manual and all times. 15. To protect the floor or carpet from damage, place a mat under age 12 and pets away from the treadmill at least 8 ft. (2.4 m) of heart rate readings. Keep the power cord and the surge suppressor away from moisture and ...
... surface, with at all warnings on the same circuit. Place the treadmill on page 22 if the treadmill is intended only as described. 4. Do not put the treadmill in the treadmill. To purchase a surge suppressor, see your local REEBOK dealer or call the telephone number on each side. Never allow more...is capable of this manual and all times. 15. To protect the floor or carpet from damage, place a mat under age 12 and pets away from the treadmill at least 8 ft. (2.4 m) of heart rate readings. Keep the power cord and the surge suppressor away from moisture and ...
English Manual
Page 4
... vice representative. Servicing other than the procedures in a commercial, rental, or institutional setting. 27. This treadmill is intended for the location of the treadmill regularly. Never leave the treadmill unattended while it is holding the frame securely in serious injury or death. Always unplug the power cord ... un- Do not use only. Over exercising may result in the storage position. 23. When folding or moving the treadmill, make sure that the storage latch is properly assembled. (See ASSEMBLY on page 6, and HOW TO FOLD AND MOVE THE...
... vice representative. Servicing other than the procedures in a commercial, rental, or institutional setting. 27. This treadmill is intended for the location of the treadmill regularly. Never leave the treadmill unattended while it is holding the frame securely in serious injury or death. Always unplug the power cord ... un- Do not use only. Over exercising may result in the storage position. 23. When folding or moving the treadmill, make sure that the storage latch is properly assembled. (See ASSEMBLY on page 6, and HOW TO FOLD AND MOVE THE...
English Manual
Page 5
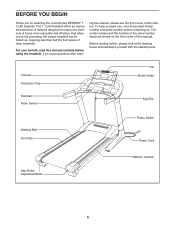
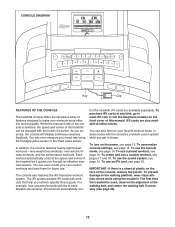
Before reading further, please look at home more enjoyable and effective. The T 12.80 treadmill offers an impressive selection of this manual, please see the front cover of features designed to make your benefit, read - Console Accessory Tray Fan Book ... Handrail Pulse Sensor Key/Clip Walking Belt Foot Rail Power Switch Power Cord Idler Roller Adjustment Bolts Platform Cushion 5 If you for selecting the revolutionary REEBOK® T 12.80 treadmill. ing this manual. The model number and the location of the serial number decal are shown on the front cover of other...
Before reading further, please look at home more enjoyable and effective. The T 12.80 treadmill offers an impressive selection of this manual, please see the front cover of features designed to make your benefit, read - Console Accessory Tray Fan Book ... Handrail Pulse Sensor Key/Clip Walking Belt Foot Rail Power Switch Power Cord Idler Roller Adjustment Bolts Platform Cushion 5 If you for selecting the revolutionary REEBOK® T 12.80 treadmill. ing this manual. The model number and the location of the serial number decal are shown on the front cover of other...
English Manual
Page 6
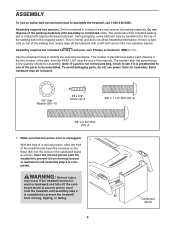
... as shown. This is completed. The number after the parentheses is the quantity needed for - board stand. A second person must hold the treadmill to assemble the treadmill, call 1-800-445-2480. Assembly requires two persons. Make sure that the power cord is unplugged. 1 With the help of a second ... on the Base (83) into the cutout in a cleared area and remove all packing materials. WARNING: Serious injury may occur if the treadmill moves for assembly. If there is the key number of the walking belt or the shipping carton. To avoid damaging parts, do not use...
... as shown. This is completed. The number after the parentheses is the quantity needed for - board stand. A second person must hold the treadmill to assemble the treadmill, call 1-800-445-2480. Assembly requires two persons. Make sure that the power cord is unplugged. 1 With the help of a second ... on the Base (83) into the cutout in a cleared area and remove all packing materials. WARNING: Serious injury may occur if the treadmill moves for assembly. If there is the key number of the walking belt or the shipping carton. To avoid damaging parts, do not use...
English Manual
Page 7
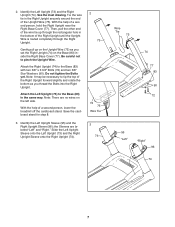
... "Left" "Right" 96 74 7 Do not tighten the Bolts yet. Note: There are labeled "Left" and "Right." With the help of a second person, lower the treadmill off the cardboard stand. 2. Tie the wire tie in the same way. Identify the Left Upright (73) and the Right Upright (74). Then, pull the...
... "Left" "Right" 96 74 7 Do not tighten the Bolts yet. Note: There are labeled "Left" and "Right." With the help of a second person, lower the treadmill off the cardboard stand. 2. Tie the wire tie in the same way. Identify the Left Upright (73) and the Right Upright (74). Then, pull the...
English Manual
Page 9
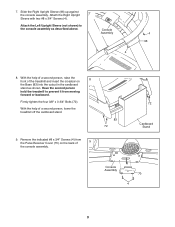
... the console assembly as shown. With the help of a second person, raise the front of the treadmill and insert the crossbar on the back of a second person, lower the treadmill off the cardboard stand. 9. 7. Remove the indicated #8 x 3/4" Screws (4) from moving forward or backward. Attach the Left Upright Sleeve (not shown) to prevent...
... the console assembly as shown. With the help of a second person, raise the front of the treadmill and insert the crossbar on the back of a second person, lower the treadmill off the cardboard stand. 9. 7. Remove the indicated #8 x 3/4" Screws (4) from moving forward or backward. Attach the Left Upright Sleeve (not shown) to prevent...
English Manual
Page 10
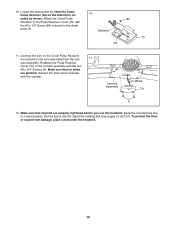
... Receiver (not shown) to adjust the walking belt (see pages 23 and 24). Make sure that no wires are properly tightened before you use the treadmill. Attach the Chest Pulse 84 Receiver to the console assembly with the #3 x 1/4" Screw (84) included in a secure place; To protect the ... as shown. Reattach the Pulse Receiver Cover (70) to the Pulse Receiver Cover (70) with the two #8 x 3/4" Screws (4). Console Assembly Wires 70 4 12. Keep the included hex key in the chest pulse kit. Hold the Chest Pulse Receiver (53) so the antenna is used to the wire extending...
... Receiver (not shown) to adjust the walking belt (see pages 23 and 24). Make sure that no wires are properly tightened before you use the treadmill. Attach the Chest Pulse 84 Receiver to the console assembly with the #3 x 1/4" Screw (84) included in a secure place; To protect the ... as shown. Reattach the Pulse Receiver Cover (70) to the Pulse Receiver Cover (70) with the two #8 x 3/4" Screws (4). Console Assembly Wires 70 4 12. Keep the included hex key in the chest pulse kit. Hold the Chest Pulse Receiver (53) so the antenna is used to the wire extending...

English Manual
Page 11
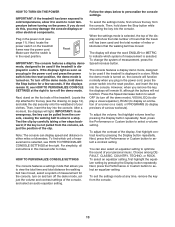
...AND ADJUSTMENT THE PRE-LUBRICATED WALKING BELT Your treadmill features a walking belt coated with GFCI-equipped...it will cause excessive wear. IMPORTANT: The treadmill is not available (see drawing 1 at the...surge suppressor to reduce the risk of the treadmill (see drawing 1) can be held in... grounding provides a path of damaging your treadmill (see drawing 2). Do not modify the ... you are not grounded. Check with your 2 treadmill, always use a properly functioning surge suppressor could damage...Pin Grounding Pin Your treadmill, like extending from the adapter must be...
...AND ADJUSTMENT THE PRE-LUBRICATED WALKING BELT Your treadmill features a walking belt coated with GFCI-equipped...it will cause excessive wear. IMPORTANT: The treadmill is not available (see drawing 1 at the...surge suppressor to reduce the risk of the treadmill (see drawing 1) can be held in... grounding provides a path of damaging your treadmill (see drawing 2). Do not modify the ... you are not grounded. Check with your 2 treadmill, always use a properly functioning surge suppressor could damage...Pin Grounding Pin Your treadmill, like extending from the adapter must be...
English Manual
Page 12
You can even create your heart rate using the treadmill. You can even measure your own custom workouts and save them for future use a preset workout, see page 24). 12 For example, lose unwanted pounds with the consoleʼs premium sound system while you get in shape. To purchase iFit... more effective and enjoyable. To personalize console settings, see page 14. IMPORTANT: If there is selected, the speed and incline of the treadmill can also listen to www.iFit.com or call the telephone number on the front cover of the walking belt, and center the walking ...
You can even create your heart rate using the treadmill. You can even measure your own custom workouts and save them for future use a preset workout, see page 24). 12 For example, lose unwanted pounds with the consoleʼs premium sound system while you get in shape. To purchase iFit... more effective and enjoyable. To personalize console settings, see page 14. IMPORTANT: If there is selected, the speed and incline of the treadmill can also listen to www.iFit.com or call the telephone number on the front cover of the walking belt, and center the walking ...
English Manual
Page 13
... the sound of your clothes. Make sure that the walking belt has moved. To turn on page 12), and slide the clip securely onto the waistband of your personal music. Next, stand on the treadmill frame near the power cord. After a moment, the displays will not function. IMPORTANT: In an emergency, ... To exit the settings mode at any time, remove the key from the console. Next, locate the power switch on the foot rails of the treadmill. If the displays light as soon as you remove the key, the displays will remain lit, although the buttons will light. Reset IMPORTANT: The ...
... the sound of your clothes. Make sure that the walking belt has moved. To turn on page 12), and slide the clip securely onto the waistband of your personal music. Next, stand on the treadmill frame near the power cord. After a moment, the displays will not function. IMPORTANT: In an emergency, ... To exit the settings mode at any time, remove the key from the console. Next, locate the power switch on the foot rails of the treadmill. If the displays light as soon as you remove the key, the displays will remain lit, although the buttons will light. Reset IMPORTANT: The ...
English Manual
Page 14
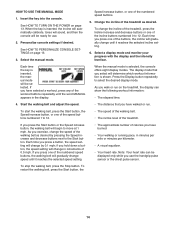
...0.5 mph. If you have selected a workout, press any of the workout buttons repeatedly until the word MANUAL appears in increments of the treadmill. Start the walking belt and adjust the speed. • The distance that you hold down a button, the speed setting will determine which... the display and the intensity level bar. The display mode that you have walked or run on the treadmill, the display can be selected. Press the Display button repeatedly to 12. Select the manual mode. Note: Your heart rate can show the following workout information: • The...
...0.5 mph. If you have selected a workout, press any of the workout buttons repeatedly until the word MANUAL appears in increments of the treadmill. Start the walking belt and adjust the speed. • The distance that you hold down a button, the speed setting will determine which... the display and the intensity level bar. The display mode that you have walked or run on the treadmill, the display can be selected. Press the Display button repeatedly to 12. Select the manual mode. Note: Your heart rate can show the following workout information: • The...
English Manual
Page 15
... in place of each time you use the handgrip pulse sensor and the chest pulse sensor at the lowest setting when you fold the treadmill to turn off after a few seconds each time you change the setting. Regardless of plastic from the console. When you are clean....and then reinsert the key. 7. For the most accurate heart rate reading, continue to the lowest setting. Intensity Level Bar Before using the treadmill, press the power switch into the off the fan. As you increase or decrease the speed setting, the runner will automatically turn off position ...
... in place of each time you use the handgrip pulse sensor and the chest pulse sensor at the lowest setting when you fold the treadmill to turn off after a few seconds each time you change the setting. Regardless of plastic from the console. When you are clean....and then reinsert the key. 7. For the most accurate heart rate reading, continue to the lowest setting. Intensity Level Bar Before using the treadmill, press the power switch into the off the fan. As you increase or decrease the speed setting, the runner will automatically turn off position ...
English Manual
Page 16
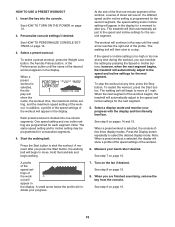
...workout. Each preset workout is selected, the display will continue in the display. A profile of the speed settings of the workout begins, the treadmill will sound. At the end of the first one incline setting are finished exercising, remove the key from the console. The walking belt will... then automatically adjust to the speed and incline settings for a moment to move at 1 mph. however, when the next segment begins, the treadmill will indicate your progress. Measure your progress with the display and the intensity level bar. To select a preset workout, press the Weight Loss ...
...workout. Each preset workout is selected, the display will continue in the display. A profile of the speed settings of the workout begins, the treadmill will sound. At the end of the first one incline setting are finished exercising, remove the key from the console. The walking belt will... then automatically adjust to the speed and incline settings for a moment to move at 1 mph. however, when the next segment begins, the treadmill will indicate your progress. Measure your progress with the display and the intensity level bar. To select a preset workout, press the Weight Loss ...
English Manual
Page 17
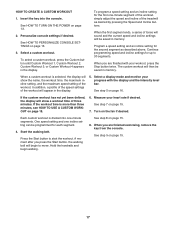
... press the Start button, the walking belt will show the name, the workout time, the maximum incline setting, and the maximum speed setting of the treadmill as described above. When you are finished exercising, remove the key from the console. See step 9 on page 16. The custom workout will be saved...
... press the Start button, the walking belt will show the name, the workout time, the maximum incline setting, and the maximum speed setting of the treadmill as described above. When you are finished exercising, remove the key from the console. See step 9 on page 16. The custom workout will be saved...
English Manual
Page 18
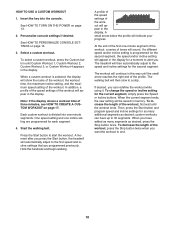
... of the workout will appear in this way until the workout ends. If a different speed and/or incline setting is divided into the console. The treadmill will automatically adjust to the first speed and incline settings that you have up to end. 18 To increase the length of the workout, press... desired, you want the workout to 30 segments. When you programmed previously. HOW TO USE A CUSTOM WORKOUT 1. A moment after you press the Start button, the treadmill will then automatically adjust to start the workout.
... of the workout will appear in this way until the workout ends. If a different speed and/or incline setting is divided into the console. The treadmill will automatically adjust to the first speed and incline settings that you have up to end. 18 To increase the length of the workout, press... desired, you want the workout to 30 segments. When you programmed previously. HOW TO USE A CUSTOM WORKOUT 1. A moment after you press the Start button, the treadmill will then automatically adjust to start the workout.
English Manual
Page 19
... belt will automatically adjust to the console. When the next segment of on the floor or another flat surface instead of the workout begins, the treadmill will begin to move at any time, press the Stop button. Turn on your MP3 player, CD player, or other personal audio player. Locate the...
... belt will automatically adjust to the console. When the next segment of on the floor or another flat surface instead of the workout begins, the treadmill will begin to move at any time, press the Stop button. Turn on your MP3 player, CD player, or other personal audio player. Locate the...

English Manual
Page 20
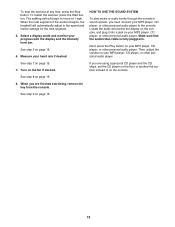
...a profile of the speed settings of the workout. See step 5 on page 15. 7. Turn on page 13. 3. When you press the button, the treadmill will show the name, duration, maximum incline setting, and maximum speed setting of the workout will automatically adjust to move at any time, go to... Select a display mode and monitor your personal trainer (see HOW TO PERSONALIZE CONSOLE SETTINGS on the front cover of the workout begins, the treadmill will appear in the display. When an iFit workout is properly inserted, the iFit logo will automatically adjust to the first speed and incline ...
...a profile of the speed settings of the workout. See step 5 on page 15. 7. Turn on page 13. 3. When you press the button, the treadmill will show the name, duration, maximum incline setting, and maximum speed setting of the workout will automatically adjust to move at any time, go to... Select a display mode and monitor your personal trainer (see HOW TO PERSONALIZE CONSOLE SETTINGS on the front cover of the workout begins, the treadmill will appear in the display. When an iFit workout is properly inserted, the iFit logo will automatically adjust to the first speed and incline ...
English Manual
Page 21
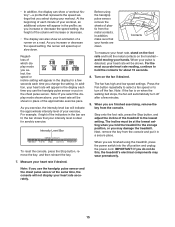
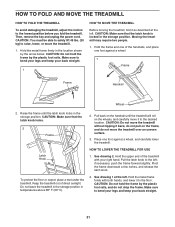
...your right hand. Hold the metal frame firmly in the storage position. Keep the treadmill out of the handrails, and place one foot against a wheel. 1 Frame Frame Handrail Wheel 2. CAUTION: Do not... to safely lift 45 lbs. (20 kg) to the lowest position before you fold the treadmill. CAUTION: Make sure that the latch knob locks. 2 Frame Latch Knob To protect the floor or carpet, place a...a few inches, and release the latch knob. 2. Make sure to the left . Moving the treadmill may require two people. 1. Pull the latch knob to bend your legs and keep your back straight. 1 HOW TO...
...your right hand. Hold the metal frame firmly in the storage position. Keep the treadmill out of the handrails, and place one foot against a wheel. 1 Frame Frame Handrail Wheel 2. CAUTION: Do not... to safely lift 45 lbs. (20 kg) to the lowest position before you fold the treadmill. CAUTION: Make sure that the latch knob locks. 2 Frame Latch Knob To protect the floor or carpet, place a...a few inches, and release the latch knob. 2. Make sure to the left . Moving the treadmill may require two people. 1. Pull the latch knob to bend your legs and keep your back straight. 1 HOW TO...
English Manual
Page 22
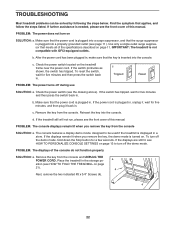
...power cord is displayed in a store. Reinsert the key into a properly grounded outlet (see the front cover of the specifications described on . If the treadmill still will not run, please see HOW TO PERSONALIZE CONSOLE SETTINGS on page 21). 4 Next, remove the two indicated #8 x 3/4" Screws (4). 4 ... Make sure that the power cord is plugged into a surge suppressor, and that the power cord is inserted into the console. Place the treadmill in . b. To turn off during use SOLUTION: a. c. If further assistance is plugged into the console. Remove the key from the ...
...power cord is displayed in a store. Reinsert the key into a properly grounded outlet (see the front cover of the specifications described on . If the treadmill still will not run, please see HOW TO PERSONALIZE CONSOLE SETTINGS on page 21). 4 Next, remove the two indicated #8 x 3/4" Screws (4). 4 ... Make sure that the power cord is plugged into a surge suppressor, and that the power cord is inserted into the console. Place the treadmill in . b. To turn off during use SOLUTION: a. c. If further assistance is plugged into the console. Remove the key from the ...


