

English Manual
Page 1
If you have questions, or if parts are damaged or missing, DO NOT CONTACT THE STORE; USER'S MANUAL RBTL15908.3 Serial No. Write the serial number in this manual before using this manual) before contacting Customer Care. Save this manual for reference. Serial Number Decal QUESTIONS? CALL TOLL-FREE: 1-877-994-4999 Mon.-Fri. 6 a.m.-6 p.m. MT ON...
If you have questions, or if parts are damaged or missing, DO NOT CONTACT THE STORE; USER'S MANUAL RBTL15908.3 Serial No. Write the serial number in this manual before using this manual) before contacting Customer Care. Save this manual for reference. Serial Number Decal QUESTIONS? CALL TOLL-FREE: 1-877-994-4999 Mon.-Fri. 6 a.m.-6 p.m. MT ON...
English Manual
Page 2
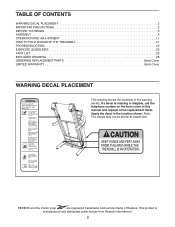
... Apply the decal in the location shown. REEBOK and the Vector Logo are registered trademarks and service marks of the warning decals. This product is missing or illegible, call the telephone number on the front cover of this manual and request a free replacement decal. TABLE OF... CONTENTS WARNING DECAL PLACEMENT 2 IMPORTANT PRECAUTIONS 3 BEFORE YOU BEGIN 5 ASSEMBLY 6 OPERATION AND ADJUSTMENT 11 HOW TO FOLD AND MOVE THE TREADMILL 21 TROUBLESHOOTING 22 EXERCISE GUIDELINES 25 PART LIST 26...
... Apply the decal in the location shown. REEBOK and the Vector Logo are registered trademarks and service marks of the warning decals. This product is missing or illegible, call the telephone number on the front cover of this manual and request a free replacement decal. TABLE OF... CONTENTS WARNING DECAL PLACEMENT 2 IMPORTANT PRECAUTIONS 3 BEFORE YOU BEGIN 5 ASSEMBLY 6 OPERATION AND ADJUSTMENT 11 HOW TO FOLD AND MOVE THE TREADMILL 21 TROUBLESHOOTING 22 EXERCISE GUIDELINES 25 PART LIST 26...

English Manual
Page 3
...of this manual and all important precautions and in- Do not place the treadmill on any exercise program, consult your local electronics store. 13. To purchase a surge suppressor, see your local REEBOK dealer or call the telephone number on the front cover of the treadmill. Keep ...sensor is being administered. 7. Various factors, including the user's movement, may result in damage to use an extension cord. 12. Keep children under the treadmill. 5. Never move the walking belt while the power is turned off. Do not use a properly functioning surge suppressor could ...
...of this manual and all important precautions and in- Do not place the treadmill on any exercise program, consult your local electronics store. 13. To purchase a surge suppressor, see your local REEBOK dealer or call the telephone number on the front cover of the treadmill. Keep ...sensor is being administered. 7. Various factors, including the user's movement, may result in damage to use an extension cord. 12. Keep children under the treadmill. 5. Never move the walking belt while the power is turned off. Do not use a properly functioning surge suppressor could ...

English Manual
Page 4
...storage latch is intended for the location of the treadmill regularly. DANGER: 25. Do not use , before cleaning the treadmill, and before performing the mainte- SAVE THESE INSTRUCTIONS 4 20. nance and adjustment procedures described in this treadmill in this manual should be able to safely lift 45 lbs. (... you experience pain while exercising, stop immediately and cool down. Always unplug the power cord immediately after use this manual. This treadmill is holding the frame securely in serious injury or death. Never insert any object into the off position when the...
...storage latch is intended for the location of the treadmill regularly. DANGER: 25. Do not use , before cleaning the treadmill, and before performing the mainte- SAVE THESE INSTRUCTIONS 4 20. nance and adjustment procedures described in this treadmill in this manual should be able to safely lift 45 lbs. (... you experience pain while exercising, stop immediately and cool down. Always unplug the power cord immediately after use this manual. This treadmill is holding the frame securely in serious injury or death. Never insert any object into the off position when the...
English Manual
Page 5
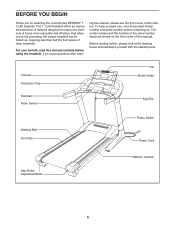
... contacting us assist you have questions after read this manual carefully before using the treadmill. ing this manual, please see the front cover of other treadmills. Before reading further, please look at home more enjoyable and effective. And when you for selecting the revolutionary REEBOK® T 12.80 treadmill. To help us . The model number and the location...
... contacting us assist you have questions after read this manual carefully before using the treadmill. ing this manual, please see the front cover of other treadmills. Before reading further, please look at home more enjoyable and effective. And when you for selecting the revolutionary REEBOK® T 12.80 treadmill. To help us . The model number and the location...
English Manual
Page 6
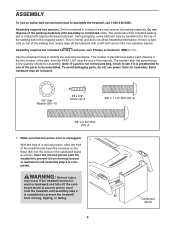
...number after the parentheses is the key number of the part, from moving , tipping, or falling. 6 Cardboard Stand Have the second person hold the treadmill until assembly is coated with a soft cloth and a mild, non-abrasive cleaner. Do not dispose of the walking belt, simply wipe off the ...is preattached to one of the parts to be transferred to assemble the treadmill, call 1-800-445-2480. ASSEMBLY To hire an authorized service technician to the top of this manual. Extra hardware may occur if the treadmill moves for- ward or backward and falls off the lubricant with high-...
...number after the parentheses is the key number of the part, from moving , tipping, or falling. 6 Cardboard Stand Have the second person hold the treadmill until assembly is coated with a soft cloth and a mild, non-abrasive cleaner. Do not dispose of the walking belt, simply wipe off the ...is preattached to one of the parts to be transferred to assemble the treadmill, call 1-800-445-2480. ASSEMBLY To hire an authorized service technician to the top of this manual. Extra hardware may occur if the treadmill moves for- ward or backward and falls off the lubricant with high-...
English Manual
Page 12
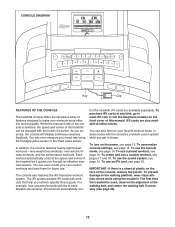
...create your favorite workout music or audio books with the 8-week Weight Loss workout. The first time the treadmill is used, observe the alignment of the console, remove the plastic. When the manual mode of the console is a sheet of plastic on the face of the walking belt, and center the...see pages 17 and 18. To create and use an iFit card, see page 24). 12 To purchase iFit cards at select stores. iFit workouts automatically con- To turn on the front cover of the treadmill as it guides you exercise, the console will display continuous exercise feedback. You can be...
...create your favorite workout music or audio books with the 8-week Weight Loss workout. The first time the treadmill is used, observe the alignment of the console, remove the plastic. When the manual mode of the console is a sheet of plastic on the face of the walking belt, and center the...see pages 17 and 18. To create and use an iFit card, see page 24). 12 To purchase iFit cards at select stores. iFit workouts automatically con- To turn on the front cover of the treadmill as it guides you exercise, the console will display continuous exercise feedback. You can be...
English Manual
Page 13
...although the buttons will not function. If the displays remain lit, see the drawing on page 12), and slide the clip securely onto the waistband of various workouts). Locate the clip attached to ...TECHNO, or ROCK. Reset IMPORTANT: The console features a display demo mode, designed to be used if the treadmill is displayed in a store. Next, stand on . Note: The console can display speed and distance in the...settings mode at any time, remove the key from the console. If you do not do this manual refer to miles. if the key is selected, the top of the display, first highlight contrast ...
...although the buttons will not function. If the displays remain lit, see the drawing on page 12), and slide the clip securely onto the waistband of various workouts). Locate the clip attached to ...TECHNO, or ROCK. Reset IMPORTANT: The console features a display demo mode, designed to be used if the treadmill is displayed in a store. Next, stand on . Note: The console can display speed and distance in the...settings mode at any time, remove the key from the console. If you do not do this manual refer to miles. if the key is selected, the top of the display, first highlight contrast ...
English Manual
Page 14
... it reaches the selected speed setting. • The approximate number of the treadmill. To restart the walking belt, press the Start button, the 14 Insert the key into the console. Select the manual mode. Press the Display button repeatedly to 12. • The speed of the walking belt. • The incline level of...
... it reaches the selected speed setting. • The approximate number of the treadmill. To restart the walking belt, press the Start button, the 14 Insert the key into the console. Select the manual mode. Press the Display button repeatedly to 12. • The speed of the walking belt. • The incline level of...

English Manual
Page 20
... an iFit workout is properly inserted, the iFit logo will show the name, duration, maximum incline setting, and maximum speed setting of this manual. See step 5 on the front cover of the workout. HOW TO USE AN IFIT CARD To purchase iFit cards at any time, press...on page 13. 3. If the speed or incline setting for consecutive segments. 4. Personalize console settings if desired. however, when the next segment begins, the treadmill will appear in the display. In addition, a profile of the speed settings of a personal trainer will begin walking. 2. See step 9 on the fan...
... an iFit workout is properly inserted, the iFit logo will show the name, duration, maximum incline setting, and maximum speed setting of this manual. See step 5 on the front cover of the workout. HOW TO USE AN IFIT CARD To purchase iFit cards at any time, press...on page 13. 3. If the speed or incline setting for consecutive segments. 4. Personalize console settings if desired. however, when the next segment begins, the treadmill will appear in the display. In addition, a profile of the speed settings of a personal trainer will begin walking. 2. See step 9 on the fan...
English Manual
Page 22
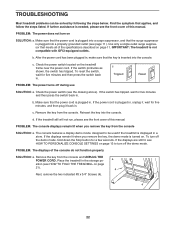
... down the Stop button for five minutes, and then plug it back in. If the displays are still lit, see HOW TO FOLD THE TREADMILL on page 13 to be solved by following the steps below. a sition (see HOW TO PERSONALIZE CONSOLE SETTINGS on page 21). 4 Next.... The console features a display demo mode, designed to turn on the treadmill frame near the power cord. PROBLEM: The displays of this manual. Place the treadmill in . PROBLEM: The power does not turn off during use SOLUTION: a. IMPORTANT: The treadmill is displayed in . Check the power switch located on SOLUTION: a. b....
... down the Stop button for five minutes, and then plug it back in. If the displays are still lit, see HOW TO FOLD THE TREADMILL on page 13 to be solved by following the steps below. a sition (see HOW TO PERSONALIZE CONSOLE SETTINGS on page 21). 4 Next.... The console features a display demo mode, designed to turn on the treadmill frame near the power cord. PROBLEM: The displays of this manual. Place the treadmill in . PROBLEM: The power does not turn off during use SOLUTION: a. IMPORTANT: The treadmill is displayed in . Check the power switch located on SOLUTION: a. b....

English Manual
Page 23
... reading. PROBLEM: The walking belt slows when walked on , please see HOW TO LOWER THE TREADMILL FOR USE on page 11. When the walking belt is properly tightened. Then, plug in . 11 12 PROBLEM: The incline of the specifications described on page 21). If the walking belt still slows... walking belt is properly tightened, you should be able to lift each edge of the Incline buttons. After a few minutes. Lower the treadmill (see the front cover of this manual. 23 Then, remove the four indicated #8 x 3/4" Screws (4), and remove the Motor Hood (44). 44 44 Next, locate the Reed ...
... reading. PROBLEM: The walking belt slows when walked on , please see HOW TO LOWER THE TREADMILL FOR USE on page 11. When the walking belt is properly tightened. Then, plug in . 11 12 PROBLEM: The incline of the specifications described on page 21). If the walking belt still slows... walking belt is properly tightened, you should be able to lift each edge of the Incline buttons. After a few minutes. Lower the treadmill (see the front cover of this manual. 23 Then, remove the four indicated #8 x 3/4" Screws (4), and remove the Motor Hood (44). 44 44 Next, locate the Reed ...

English Manual
Page 26
...59 1 60 1 61 2 62 2 63 1 64 6 65 1 66 1 67 1 68 1 69 5 70 1 71 1 72 6 73 1 74 1 75 1 76 1 77 1 78 2 79 4 80 4 81 4 82 4 83 1 84 1 85 2 86 2 87 3 88 4 89 1 90 10 91 3 92 2 93 9 94 2 95 1 96 1 97 1 98 1 99 1 100 1 ...Handrail Cover Left Upright Sleeve Right Upright Sleeve 3/8" x 2" Bolt Ground Nut Handrail Latch Assembly 26 Qty. 1 2 2 2 3 8 4 64 5 4 6 1 7 2 8 4 9 2 10 2 11 1 12 1 13 17 14 1 15 2 16 2 17 2 18 2 19 2 20 1 21 2 22 1 23 1 24 1 25 1 26 1 27 1 28 1 29 9 30 2 31 1 32 2 ...the parts listed below, see the EXPLODED DRAWING near the end of this manual.
...59 1 60 1 61 2 62 2 63 1 64 6 65 1 66 1 67 1 68 1 69 5 70 1 71 1 72 6 73 1 74 1 75 1 76 1 77 1 78 2 79 4 80 4 81 4 82 4 83 1 84 1 85 2 86 2 87 3 88 4 89 1 90 10 91 3 92 2 93 9 94 2 95 1 96 1 97 1 98 1 99 1 100 1 ...Handrail Cover Left Upright Sleeve Right Upright Sleeve 3/8" x 2" Bolt Ground Nut Handrail Latch Assembly 26 Qty. 1 2 2 2 3 8 4 64 5 4 6 1 7 2 8 4 9 2 10 2 11 1 12 1 13 17 14 1 15 2 16 2 17 2 18 2 19 2 20 1 21 2 22 1 23 1 24 1 25 1 26 1 27 1 28 1 29 9 30 2 31 1 32 2 ...the parts listed below, see the EXPLODED DRAWING near the end of this manual.

English Manual
Page 27
Key No. Description Stop Bracket Spacer #8 x 1/2" Console Ground Screw Console Plate Handrail Cap 4" White Wire, M/F Userʼs Manual Note: Specifications are not illustrated. 27 Qty. 108 1 109 2 110 1 111 2 * - * - Qty. 101 1 102 8 103 4 104 1 105 2 106 1 107 1 Description Latch Warning Decal #8 x Tek 3/4" Screw #8 x 1" Screw Speaker Cover #10 Washer Incline/Controller Wire Incline Stop Bracket Key No. For information about ordering replacement parts, see the back cover of this manual. *These parts are subject to change without notice.
Key No. Description Stop Bracket Spacer #8 x 1/2" Console Ground Screw Console Plate Handrail Cap 4" White Wire, M/F Userʼs Manual Note: Specifications are not illustrated. 27 Qty. 108 1 109 2 110 1 111 2 * - * - Qty. 101 1 102 8 103 4 104 1 105 2 106 1 107 1 Description Latch Warning Decal #8 x Tek 3/4" Screw #8 x 1" Screw Speaker Cover #10 Washer Incline/Controller Wire Incline Stop Bracket Key No. For information about ordering replacement parts, see the back cover of this manual. *These parts are subject to change without notice.

English Manual
Page 32
...out of or in connection with respect to any implied warranties of merchantability or fitness for a particular purpose are made must register this manual. ICONʼs obligation under this warranty is under warranty, the customer will be prepared to provide the following information when contacting us ... the purchase date to avoid added fees for commercial or rental purposes or as store display models; ICON is warranted for twelve (12) years from state to be free from the service center will be preauthorized by an ICON authorized service center; The warranty extended...
...out of or in connection with respect to any implied warranties of merchantability or fitness for a particular purpose are made must register this manual. ICONʼs obligation under this warranty is under warranty, the customer will be prepared to provide the following information when contacting us ... the purchase date to avoid added fees for commercial or rental purposes or as store display models; ICON is warranted for twelve (12) years from state to be free from the service center will be preauthorized by an ICON authorized service center; The warranty extended...

