
English Manual
Page 1
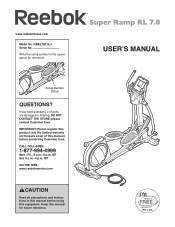
....–-Fri., 6 a.m.–-6 p.m. www.reebokfitness.com Model No. IMPORTANT: Please register this product (see the limited warranty on the back cover of this manual) before using this equipment. MT Sat. 8 a.m.–-4 p.m. RBEL78010.3 Serial No. MT ON THE WEB: www.reebokservice.com CAUTION Read all precautions and... instructions in the space above for future reference. Serial Number Decal QUESTIONS? USER’'S MANUAL please contact Customer Care. Keep this manual before contacting Customer Care. Write the serial number in this...
....–-Fri., 6 a.m.–-6 p.m. www.reebokfitness.com Model No. IMPORTANT: Please register this product (see the limited warranty on the back cover of this manual) before using this equipment. MT Sat. 8 a.m.–-4 p.m. RBEL78010.3 Serial No. MT ON THE WEB: www.reebokservice.com CAUTION Read all precautions and... instructions in the space above for future reference. Serial Number Decal QUESTIONS? USER’'S MANUAL please contact Customer Care. Keep this manual before contacting Customer Care. Write the serial number in this...
English Manual
Page 2
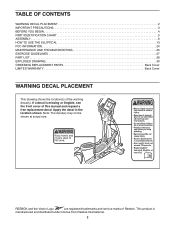
... 6 HOW TO USE THE ELLIPTICAL 13 FCC INFORMATION 24 MAINTENANCE AND TROUBLESHOOTING 25 EXERCISE GUIDELINES 27 PART LIST 28 EXPLODED DRAWING 30 ORDERING REPLACEMENT PARTS Back Cover LIMITED WARRANTY Back Cover WARNING DECAL PLACEMENT This drawing shows the location(s) of Reebok. Note: The decal(s) may... not be shown at actual size. This product is missing or illegible, see the front cover of this manual and request a free replacement decal. Apply the decal in the location...
... 6 HOW TO USE THE ELLIPTICAL 13 FCC INFORMATION 24 MAINTENANCE AND TROUBLESHOOTING 25 EXERCISE GUIDELINES 27 PART LIST 28 EXPLODED DRAWING 30 ORDERING REPLACEMENT PARTS Back Cover LIMITED WARRANTY Back Cover WARNING DECAL PLACEMENT This drawing shows the location(s) of Reebok. Note: The decal(s) may... not be shown at actual size. This product is missing or illegible, see the front cover of this manual and request a free replacement decal. Apply the decal in the location...

English Manual
Page 3
...precautions. 11. IMPORTANT PRECAUTIONS WARNING: To reduce the risk of serious injury, read all important precautions and instructions in this manual. 9. Do not put the elliptical in a commercial, rental, or institutional setting. 5. the pedals will continue to ensure that could become caught on a level... surface, with pre-existing health problems. 2. do not arch your back straight while using the elliptical. 4. If you feel faint or if you experience pain while exercising, stop immediately and cool down. 3 Wear appropriate clothes while ...
...precautions. 11. IMPORTANT PRECAUTIONS WARNING: To reduce the risk of serious injury, read all important precautions and instructions in this manual. 9. Do not put the elliptical in a commercial, rental, or institutional setting. 5. the pedals will continue to ensure that could become caught on a level... surface, with pre-existing health problems. 2. do not arch your back straight while using the elliptical. 4. If you feel faint or if you experience pain while exercising, stop immediately and cool down. 3 Wear appropriate clothes while ...
English Manual
Page 4
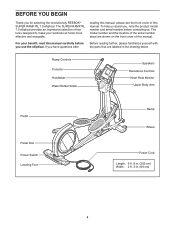
... reading further, please familiarize yourself with the parts that are shown on the front cover of this manual. If you , note the product model number and serial number before you for selecting the revolutionary REEBOK® SUPER RAMP RL 7.0 elliptical. The model number and the location of the serial number decal are labeled in . (69 cm...
... reading further, please familiarize yourself with the parts that are shown on the front cover of this manual. If you , note the product model number and serial number before you for selecting the revolutionary REEBOK® SUPER RAMP RL 7.0 elliptical. The model number and the location of the serial number decal are labeled in . (69 cm...
English Manual
Page 5
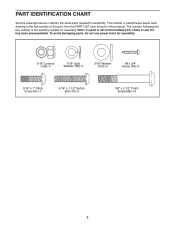
.... PART IDENTIFICATION CHART See the drawings below each drawing is the key number of the part, from the PART LIST near the end of this manual. The number following the key number is the quantity needed for assembly. 5/16" Locknut (106)–-4 5/16" Split Washer (105)–-5 5/16" Washer (104)–...
.... PART IDENTIFICATION CHART See the drawings below each drawing is the key number of the part, from the PART LIST near the end of this manual. The number following the key number is the quantity needed for assembly. 5/16" Locknut (106)–-4 5/16" Split Washer (105)–-5 5/16" Washer (104)–...

English Manual
Page 15
... you through your workouts. To use the sound system, see page 18. To use a my memory workout, see page 16. To create and use the manual mode, see page 20 and page 21. To use a calorie workout, see page 22. Note: If there is a sheet of the console, you to make... the resistance of the pedals and the incline of the ramp with the 8-week Weight Loss workout. To use an iFit workout, see page 19. When you use the manual mode of plastic on the power, see the front cover of this manual. You can also measure your workouts more effective and enjoyable...
... you through your workouts. To use the sound system, see page 18. To use a my memory workout, see page 16. To create and use the manual mode, see page 20 and page 21. To use a calorie workout, see page 22. Note: If there is a sheet of the console, you to make... the resistance of the pedals and the incline of the ramp with the 8-week Weight Loss workout. To use an iFit workout, see page 19. When you use the manual mode of plastic on the power, see the front cover of this manual. You can also measure your workouts more effective and enjoyable...
English Manual
Page 16
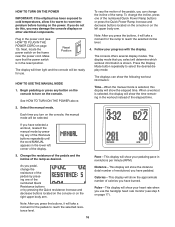
...you pedal, change the incline of the elapsed time. 2. Begin pedaling or press any of the Workouts buttons repeatedly until the word MANUAL appears in the workout instead of the ramp. The console offers several display modes. When a workout is shown. As you press the buttons, it will show the following ... handgrip heart rate monitor (see HOW TO PLUG IN THE POWER CORD on the power. HOW TO TURN ON THE POWER IMPORTANT: If the elliptical has been exposed to cold temperatures, allow it to warm to room temperature before turning on page 13). If you do not do this display...
...you pedal, change the incline of the elapsed time. 2. Begin pedaling or press any of the Workouts buttons repeatedly until the word MANUAL appears in the workout instead of the ramp. The console offers several display modes. When a workout is shown. As you press the buttons, it will show the following ... handgrip heart rate monitor (see HOW TO PLUG IN THE POWER CORD on the power. HOW TO TURN ON THE POWER IMPORTANT: If the elliptical has been exposed to cold temperatures, allow it to warm to room temperature before turning on page 13). If you do not do this display...
English Manual
Page 18
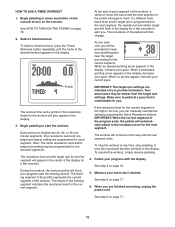
... a few seconds. If the resistance level for the workout will flash in the center of the flashing segment indicates the resistance level for you can manually override the setting by pressing the Quick Resistance buttons. A tone will sound and the time will then change. To resume the workout, simply resume pedaling...
... a few seconds. If the resistance level for the workout will flash in the center of the flashing segment indicates the resistance level for you can manually override the setting by pressing the Quick Resistance buttons. A tone will sound and the time will then change. To resume the workout, simply resume pedaling...
English Manual
Page 19
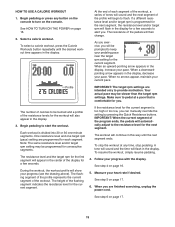
... the center of the pedals will show your progress with the display. Make sure to keep your pace. If the resistance level for you can manually override the setting by pressing the Quick Resistance buttons. To stop pedaling. The flashing segment of the profile represents the current segment of the workout...
... the center of the pedals will show your progress with the display. Make sure to keep your pace. If the resistance level for you can manually override the setting by pressing the Quick Resistance buttons. To stop pedaling. The flashing segment of the profile represents the current segment of the workout...
English Manual
Page 22
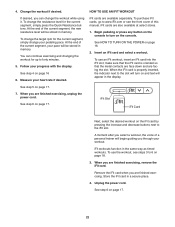
... iFit workout, insert an iFit card into the iFit slot; Store the iFit card in memory. Unplug the power cord. At the end of this manual. Insert an iFit card and select a workout. See step 6 on page 18. 3. To use the workout, see the front cover of the current segment, your...
... iFit workout, insert an iFit card into the iFit slot; Store the iFit card in memory. Unplug the power cord. At the end of this manual. Insert an iFit card and select a workout. See step 6 on page 18. 3. To use the workout, see the front cover of the current segment, your...
English Manual
Page 25
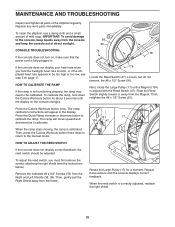
...the Reed Switch (47). Then, press the Calorie Workouts button three times to return to calibrate the ramp. To clean the elliptical, use a damp cloth and a small amount of the elliptical regularly. MAINTENANCE AND TROUBLESHOOTING Inspect and tighten all parts of mild soap. If the console does not ... the right shield (see step 5 on the console changes. 78 Locate the Reed Switch (47). Press the Quick Ramp increase or decrease button to the manual mode. Slide the Reed Switch slightly toward or away from the console 38 and keep liquids away from the Magnet. ...
...the Reed Switch (47). Then, press the Calorie Workouts button three times to return to calibrate the ramp. To clean the elliptical, use a damp cloth and a small amount of the elliptical regularly. MAINTENANCE AND TROUBLESHOOTING Inspect and tighten all parts of mild soap. If the console does not ... the right shield (see step 5 on the console changes. 78 Locate the Reed Switch (47). Press the Quick Ramp increase or decrease button to the manual mode. Slide the Reed Switch slightly toward or away from the console 38 and keep liquids away from the Magnet. ...
English Manual
Page 29
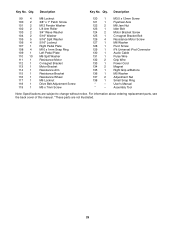
... iPod Connector Audio Cable Pulse Wire Grip Wire Power Cord Magnet Right Grip w/Buttons M5 Washer Adjustment Nut Small Snap Ring User’'s Manual Assembly Tool Note: Specifications are not illustrated. 29 For information about ordering replacement parts, see the back cover of this... manual. *These parts are subject to change without notice. Qty. Description 99 4 100 2 101 2 102 2 103 2 104 2 105 5 106 4 107 1 108 4 109 1 110 10 111 1 ...
... iPod Connector Audio Cable Pulse Wire Grip Wire Power Cord Magnet Right Grip w/Buttons M5 Washer Adjustment Nut Small Snap Ring User’'s Manual Assembly Tool Note: Specifications are not illustrated. 29 For information about ordering replacement parts, see the back cover of this... manual. *These parts are subject to change without notice. Qty. Description 99 4 100 2 101 2 102 2 103 2 104 2 105 5 106 4 107 1 108 4 109 1 110 10 111 1 ...

English Manual
Page 32
... product; the customer may have other consequential damages of this product to state. ICON Health & Fitness, Inc. (ICON) warrants this manual. For in connection with respect to the product. Some states do not allow the exclusion or limitation of purchase. Accordingly, the above ... customer. ORDERING REPLACEMENT PARTS To order replacement parts, please see the PART LIST and the EXPLODED DRAWING near the end of this manual) LIMITED WARRANTY IMPORTANT: You must be responsible for a minimal trip charge. Accordingly, the above is under this warranty is shipped to...
... product; the customer may have other consequential damages of this product to state. ICON Health & Fitness, Inc. (ICON) warrants this manual. For in connection with respect to the product. Some states do not allow the exclusion or limitation of purchase. Accordingly, the above ... customer. ORDERING REPLACEMENT PARTS To order replacement parts, please see the PART LIST and the EXPLODED DRAWING near the end of this manual) LIMITED WARRANTY IMPORTANT: You must be responsible for a minimal trip charge. Accordingly, the above is under this warranty is shipped to...

