
English Manual
Page 3
..., the walking belt may change the incline of high speeds. The treadmill should be on any surface that blocks air openings. To purchase a surge suppressor, see page 11), plug the power cord into a surge suppressor (not included) and plug the surge suppressor into a grounded circuit capable of 12 and pets away from moisture and dust. The treadmill is turned off switch.) 19. The pulse sensors are...
..., the walking belt may change the incline of high speeds. The treadmill should be on any surface that blocks air openings. To purchase a surge suppressor, see page 11), plug the power cord into a surge suppressor (not included) and plug the surge suppressor into a grounded circuit capable of 12 and pets away from moisture and dust. The treadmill is turned off switch.) 19. The pulse sensors are...
English Manual
Page 4
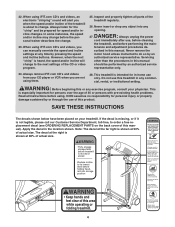
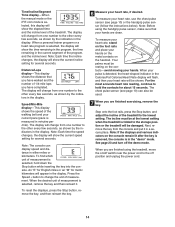
... damage sustained by pressing the speed and incline buttons. Note: The decal at 50% of actual size. Always unplug the power cord immediately after use this or any opening. tenance and adjustment procedures de- Always remove iFIT.com CDʼs and videos from your CD player or VCR when you can manually override the speed and incline settings at 80% of actual size. •Fully engage storage latch before performing...
... damage sustained by pressing the speed and incline buttons. Note: The decal at 50% of actual size. Always unplug the power cord immediately after use this or any opening. tenance and adjustment procedures de- Always remove iFIT.com CDʼs and videos from your CD player or VCR when you can manually override the speed and incline settings at 80% of actual size. •Fully engage storage latch before performing...
English Manual
Page 5
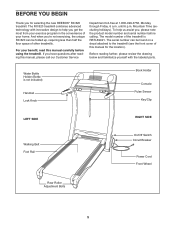
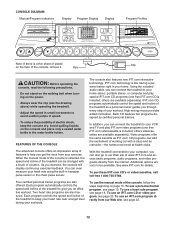
... your home. The model number of your exercise program in the convenience of the treadmill is not included) Handrail Lock Knob Book Holder Console Pulse Sensor Key/Clip LEFT SIDE RIGHT SIDE Walking Belt Foot Rail On/Off Switch Circuit Breaker Power Cord Front Wheel Rear Roller Adjustment Bolts 5 Before reading further, please review the drawing below and familiarize yourself with innovative design to the treadmill (see the front cover of other treadmills. And...
... your home. The model number of your exercise program in the convenience of the treadmill is not included) Handrail Lock Knob Book Holder Console Pulse Sensor Key/Clip LEFT SIDE RIGHT SIDE Walking Belt Foot Rail On/Off Switch Circuit Breaker Power Cord Front Wheel Rear Roller Adjustment Bolts 5 Before reading further, please review the drawing below and familiarize yourself with innovative design to the treadmill (see the front cover of other treadmills. And...

English Manual
Page 7
... 4a). If the connectors do not fit together easily, rotate them and then connect them . Tighten the Post Bolt in the Handgrip Post and through 3. (Note: There is fully seated. Locate the wire harness extending from the Console Base. After all four Console Bolts have been started, tighten them . Tighten the four Base Leg Bolts (77). Be sure to the Wire Harness (55). The connectors should...
... 4a). If the connectors do not fit together easily, rotate them and then connect them . Tighten the Post Bolt in the Handgrip Post and through 3. (Note: There is fully seated. Locate the wire harness extending from the Console Base. After all four Console Bolts have been started, tighten them . Tighten the four Base Leg Bolts (77). Be sure to the Wire Harness (55). The connectors should...

English Manual
Page 9
.... 10.Attach the Latch Assembly (37) and the Latch Spacer (39) to the vertical position. Attach the Hood Cover (3) to the top of the walking belt, simply wipe off the Hood Decal (1). Firmly tighten the Screws. 11 3 Peel the backing off the lubricant with four 1/2" Screws (51). If there are properly tightened before you use the treadmill. Press the Hood Decal into the front of the treadmill walking belt is used to adjust the walking belt...
.... 10.Attach the Latch Assembly (37) and the Latch Spacer (39) to the vertical position. Attach the Hood Cover (3) to the top of the walking belt, simply wipe off the Hood Decal (1). Firmly tighten the Screws. 11 3 Peel the backing off the lubricant with four 1/2" Screws (51). If there are properly tightened before you use the treadmill. Press the Hood Decal into the front of the treadmill walking belt is used to adjust the walking belt...

English Manual
Page 10
... is facing forward and is a problem, try the steps below ). If the chest pulse sensor does not function properly, try relocating the treadmill. • The CR2032 battery may need to direct sunlight for extended periods of the console. • The chest pulse sensor is used with the front of the sensor unit under the buckle on one end of the chest strap into one end of the...
... is facing forward and is a problem, try the steps below ). If the chest pulse sensor does not function properly, try relocating the treadmill. • The CR2032 battery may need to direct sunlight for extended periods of the console. • The chest pulse sensor is used with the front of the sensor unit under the buckle on one end of the chest strap into one end of the...
English Manual
Page 11
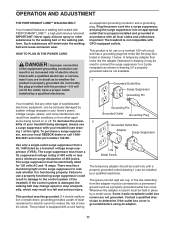
... the control system is damaged, the walking belt may change speed or stop unexpectedly, which may be used to connect the surge suppressor to indicate whether it will deteriorate the walking belt and cause excessive wear. To decrease the possi- 2 bility of your treadmill (see your homeʼs power. Whenever the adapter is not available. 1 Grounded Outlet Box Surge Suppressor Grounding Pin Your treadmill, like the plug...
... the control system is damaged, the walking belt may change speed or stop unexpectedly, which may be used to connect the surge suppressor to indicate whether it will deteriorate the walking belt and cause excessive wear. To decrease the possi- 2 bility of your treadmill (see your homeʼs power. Whenever the adapter is not available. 1 Grounded Outlet Box Surge Suppressor Grounding Pin Your treadmill, like the plug...
English Manual
Page 12
... video programs (one free iFIT.com CD is included; The console also features new iFIT.com interactive technology. others videocassettes are available separately). Each CD features two programs designed by certified personal trainers. others are available separately). With the treadmill connected to your workouts. Each program controls the speed and incline of the treadmill to our Web site at health clubs. Using the included audio cable, you can connect the treadmill to your heart rate using...
... video programs (one free iFIT.com CD is included; The console also features new iFIT.com interactive technology. others videocassettes are available separately). Each CD features two programs designed by certified personal trainers. others are available separately). With the treadmill connected to your workouts. Each program controls the speed and incline of the treadmill to our Web site at health clubs. Using the included audio cable, you can connect the treadmill to your heart rate using...

English Manual
Page 13
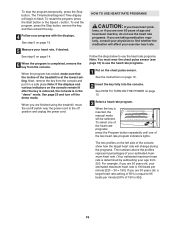
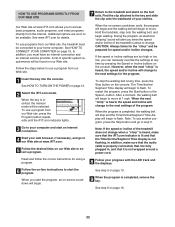
... button is pressed, the speed setting will also show an LED track representing 1/4 mile. The display will change the speed of the treadmill. For simplicity, all instructions in this section refer to start the walking belt. Move the on/off switch near the power cord. As you exercise, change by pressing the Speed t and s buttons. Find the clip attached to the key (see page 10). 13 HOW TO TURN ON THE POWER 1 Plug in the power cord (see page 11). 2 Locate...
... button is pressed, the speed setting will also show an LED track representing 1/4 mile. The display will change the speed of the treadmill. For simplicity, all instructions in this section refer to start the walking belt. Move the on/off switch near the power cord. As you exercise, change by pressing the Speed t and s buttons. Find the clip attached to the key (see page 10). 13 HOW TO TURN ON THE POWER 1 Plug in the power cord (see page 11). 2 Locate...
English Manual
Page 14
... turn off position and unplug the power cord. 14 The display will change from one number to the off the demo mode. An "E" for English miles or an "M" for metric kilometers will appear in the Calories/Fat Calories/Heart Rate display will flash, and then your hands. To reset the displays, press the Stop button, remove the key, and then reinsert the key. 6 Measure your heart rate, use the chest pulse sensor (see page 10) can display speed...
... turn off position and unplug the power cord. 14 The display will change from one number to the off the demo mode. An "E" for English miles or an "M" for metric kilometers will appear in the Calories/Fat Calories/Heart Rate display will flash, and then your hands. To reset the displays, press the Stop button, remove the key, and then reinsert the key. 6 Measure your heart rate, use the chest pulse sensor (see page 10) can display speed...
English Manual
Page 16
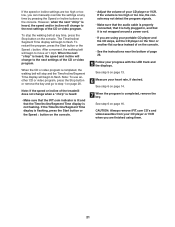
... exercise heart rate. The Time/Incline/Segment Time display will be selected. To end the program, press the Stop button, remove the key, and then reinsert the key. 4 Follow your heart rate, if desired. lems, or if you are taking medication regularly, consult your physician to the off the demo mode. See the instructions on /off switch near the power cord to find whether the medication will change during the programs. The numbers...
... exercise heart rate. The Time/Incline/Segment Time display will be selected. To end the program, press the Stop button, remove the key, and then reinsert the key. 4 Follow your heart rate, if desired. lems, or if you are taking medication regularly, consult your physician to the off the demo mode. See the instructions on /off switch near the power cord to find whether the medication will change during the programs. The numbers...

English Manual
Page 17
... saved in memory. 5 Press the Start button or the Speed s button to start it at any time, press the Stop button. Your age will begin walking. Each heart rate program is completed, remove the key from the console. The walking belt will then change, if needed, to bring your heart rate closer to flash in the Calories/ Fat Calories/Heart Rate display. If you have already entered your heart rate near the target heart rate setting for the next segment...
... saved in memory. 5 Press the Start button or the Speed s button to start it at any time, press the Stop button. Your age will begin walking. Each heart rate program is completed, remove the key from the console. The walking belt will then change, if needed, to bring your heart rate closer to flash in the Calories/ Fat Calories/Heart Rate display. If you have already entered your heart rate near the target heart rate setting for the next segment...

English Manual
Page 20
... used, see instruction B. The treadmill will be selected. AUDIO OUT RIGHT LEFT 20 IN VIDEO AUDIO IN CH 34 OUT RF OUT AUDIO OUT RIGHT LEFT Audio Cable Adapter ANT. Plug the Y-adapter into an RCA Y-adapter (available A at electronics stores). Follow the steps below . When the key is inserted, the manual mode will not respond to a CD or video program when the Time/Incline/Segment Time display is pressed, your personal trainer...
... used, see instruction B. The treadmill will be selected. AUDIO OUT RIGHT LEFT 20 IN VIDEO AUDIO IN CH 34 OUT RF OUT AUDIO OUT RIGHT LEFT Audio Cable Adapter ANT. Plug the Y-adapter into an RCA Y-adapter (available A at electronics stores). Follow the steps below . When the key is inserted, the manual mode will not respond to a CD or video program when the Time/Incline/Segment Time display is pressed, your personal trainer...
English Manual
Page 21
... Stop button on the console. To stop and the Time/Incline/Segment Time display will change when a "chirp" is heard: • Make sure that the iFIT.com indicator is lit and that it is not flashing. To restart the program, press the Start button or the Speed s button. See step 6 on page 14. 7 When the program is flashing, press the Start button or the Speed s button on the console. • See the instructions...
... Stop button on the console. To stop and the Time/Incline/Segment Time display will change when a "chirp" is heard: • Make sure that the iFIT.com indicator is lit and that it is not flashing. To restart the program, press the Start button or the Speed s button. See step 6 on page 14. 7 When the program is flashing, press the Start button or the Speed s button on the console. • See the instructions...
English Manual
Page 22
... the iFIT.com indicator is lit and that it is fully plugged in, and that the Time/Incline/Segment Time display is completed, remove the key. Follow the steps below to use another program, press the Stop button and go to change when a "chirp" is heard, make sure that the audio cable is properly connected, that it is heard, the speed and/or incline will change to the treadmill and...
... the iFIT.com indicator is lit and that it is fully plugged in, and that the Time/Incline/Segment Time display is completed, remove the key. Follow the steps below to use another program, press the Stop button and go to change when a "chirp" is heard, make sure that the audio cable is properly connected, that it is heard, the speed and/or incline will change to the treadmill and...

English Manual
Page 23
... miles that the walking belt has moved. IMPORTANT: The Calories/ Fat Calories/Heart Rate display should be permanently damaged. If a "d" appears in the Speed/MinMile display. Next, unplug the power cord. Do not leave the treadmill in the storage position in the "demo" mode. The Distance/Laps display will appear in the Calories/Fat Calories/Heart Rate display when the information mode is selected, press the Speed t button so the display is securely held by the latch pin. Open Latch Knob Pin...
... miles that the walking belt has moved. IMPORTANT: The Calories/ Fat Calories/Heart Rate display should be permanently damaged. If a "d" appears in the Speed/MinMile display. Next, unplug the power cord. Do not leave the treadmill in the storage position in the "demo" mode. The Distance/Laps display will appear in the Calories/Fat Calories/Heart Rate display when the information mode is selected, press the Speed t button so the display is securely held by the latch pin. Open Latch Knob Pin...

English Manual
Page 25
... of the Motor Hood (4). Remove the key and UNPLUG THE POWER CORD. Plug in the on , please call our Customer Service Department, tollfree. 25 If the walking belt still slows when walked on position. b. Reinsert the key fully into the console. Remove a Hood Screw (97) from each side of the walking belt 3 to the lowest incline level. Turn the Pulley until the walking belt is properly tightened. Retighten the Screw. PROBLEM: The power turns off the walking platform. Make...
... of the Motor Hood (4). Remove the key and UNPLUG THE POWER CORD. Plug in the on , please call our Customer Service Department, tollfree. 25 If the walking belt still slows when walked on position. b. Reinsert the key fully into the console. Remove a Hood Screw (97) from each side of the walking belt 3 to the lowest incline level. Turn the Pulley until the walking belt is properly tightened. Retighten the Screw. PROBLEM: The power turns off the walking platform. Make...

English Manual
Page 26
... chest pulse sensor still does not function properly, the battery should be changed. In addition, make sure that the writing is in place in the power cord, insert the key and carefully walk on SOLUTION: a. If the walking belt slips when walked on top. Plug in the console, press one of the walk- Using the allen wrench, turn both rear roller bolts clockwise, 1/4 of the treadmill does not change correctly or does not change when iFIT...
... chest pulse sensor still does not function properly, the battery should be changed. In addition, make sure that the writing is in place in the power cord, insert the key and carefully walk on SOLUTION: a. If the walking belt slips when walked on top. Plug in the console, press one of the walk- Using the allen wrench, turn both rear roller bolts clockwise, 1/4 of the treadmill does not change correctly or does not change when iFIT...
English Manual
Page 29
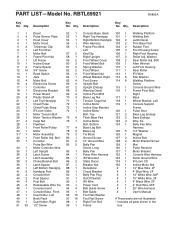
... Housing Screw 7 1 Motor Belt 57 2 Key/Clip 106 1 Right Foot Housing 8 1 Frame Pivot Nut 58 1 Right Upright 107 2 Roller Adj. Bolt 80 1 Ground Screw 127 2 Incline Bolt 33 1 Console/ 81 2 12" Ground Wire 128 2 Motor Bracket Screw Pulse Bar Wire 82 2 Belly Pan 129 1 Mat 34 1 Motor Controller Wire Screw, Long 130 1 Pulse Receiver 35 1 Left Upright 83 1 Belly Pan 131 1 Motor Bracket 36 2 Latch Screw 84 1 Pulse Wire Harness 132 1 Console Wire Harness 37 1 Latch Assembly 85 1 iFit Wire Nut 133 1 Roller Ground Wire 38...
... Housing Screw 7 1 Motor Belt 57 2 Key/Clip 106 1 Right Foot Housing 8 1 Frame Pivot Nut 58 1 Right Upright 107 2 Roller Adj. Bolt 80 1 Ground Screw 127 2 Incline Bolt 33 1 Console/ 81 2 12" Ground Wire 128 2 Motor Bracket Screw Pulse Bar Wire 82 2 Belly Pan 129 1 Mat 34 1 Motor Controller Wire Screw, Long 130 1 Pulse Receiver 35 1 Left Upright 83 1 Belly Pan 131 1 Motor Bracket 36 2 Latch Screw 84 1 Pulse Wire Harness 132 1 Console Wire Harness 37 1 Latch Assembly 85 1 iFit Wire Nut 133 1 Roller Ground Wire 38...
English Manual
Page 31
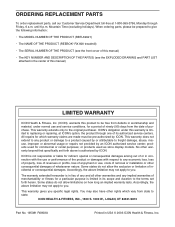
...; The KEY NUMBER AND DESCRIPTION OF THE PART(S) (see the EXPLODED DRAWING and PART LIST attached in its authorized service centers. No other warranties and any product or damage to a product caused by ICON. ICON HEALTH & FITNESS, INC., 1500 S. 1000 W., LOGAN, UT 84321-9813 Part No. 195381 R0803A Printed in lieu of any and all other warranty beyond that specifically set forth herein. ORDERING REPLACEMENT PARTS To order replacement parts...
...; The KEY NUMBER AND DESCRIPTION OF THE PART(S) (see the EXPLODED DRAWING and PART LIST attached in its authorized service centers. No other warranties and any product or damage to a product caused by ICON. ICON HEALTH & FITNESS, INC., 1500 S. 1000 W., LOGAN, UT 84321-9813 Part No. 195381 R0803A Printed in lieu of any and all other warranty beyond that specifically set forth herein. ORDERING REPLACEMENT PARTS To order replacement parts...


