
User Manual
Page 2
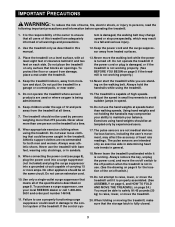
® TABLE OF CONTENTS IMPORTANT PRECAUTIONS 3 BEFORE YOU BEGIN 5 ASSEMBLY 6 HOW TO USE THE CHEST PULSE SENSOR 7 TREADMILL OPERATION 8 HOW TO FOLD AND MOVE THE TREADMILL 24 TROUBLESHOOTING 25 REEBOK UNIVERSITY 27 EXERCISE GUIDELINES 29 PART LIST 30 HOW TO ORDER REPLACEMENT PARTS 31 LIMITED WARRANTY Back Cover Note: An EXPLODED DRAWING is manufactured and distributed under license from Reebok International. 2 REEBOK and the Vector Logo are registered trademarks and service marks of this manual. This product is attached in the center of Reebok.
® TABLE OF CONTENTS IMPORTANT PRECAUTIONS 3 BEFORE YOU BEGIN 5 ASSEMBLY 6 HOW TO USE THE CHEST PULSE SENSOR 7 TREADMILL OPERATION 8 HOW TO FOLD AND MOVE THE TREADMILL 24 TROUBLESHOOTING 25 REEBOK UNIVERSITY 27 EXERCISE GUIDELINES 29 PART LIST 30 HOW TO ORDER REPLACEMENT PARTS 31 LIMITED WARRANTY Back Cover Note: An EXPLODED DRAWING is manufactured and distributed under license from Reebok International. 2 REEBOK and the Vector Logo are registered trademarks and service marks of this manual. This product is attached in the center of Reebok.
User Manual
Page 3
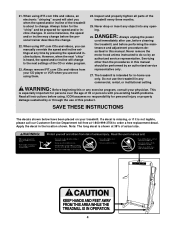
... in speed. 6. The pulse sensors are adequately informed of heart rate readings. It is not working properly.) 4. Do not wear loose clothing that could result in sandals. 9. Never use . (See the drawing on page 8. Using hand weights and not holding the handrails may affect the accuracy of all times. 7. Do not put the treadmill in the treadmill. Always remove the key, unplug the power cord, and move...
... in speed. 6. The pulse sensors are adequately informed of heart rate readings. It is not working properly.) 4. Do not wear loose clothing that could result in sandals. 9. Never use . (See the drawing on page 8. Using hand weights and not holding the handrails may affect the accuracy of all times. 7. Do not put the treadmill in the treadmill. Always remove the key, unplug the power cord, and move...
User Manual
Page 4
...-existing health problems. Read all parts of actual size. 4 scribed in the location shown. Inspect and properly tighten all instructions before the personal trainer describes the change to order a free replacement decal. This is intended for speed and/or incline changes. In some instances, the speed and/or incline may change before using iFIT.com CDs and videos, an electronic "chirping" sound will alert you can manually override the speed and incline settings at...
...-existing health problems. Read all parts of actual size. 4 scribed in the location shown. Inspect and properly tighten all instructions before the personal trainer describes the change to order a free replacement decal. This is intended for speed and/or incline changes. In some instances, the speed and/or incline may change before using iFIT.com CDs and videos, an electronic "chirping" sound will alert you can manually override the speed and incline settings at...
User Manual
Page 5
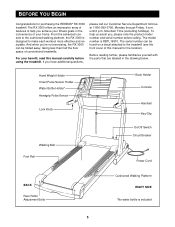
... the treadmill (see the front cover of conventional treadmills. Hand Weight Holder Chest Pulse Sensor Holder Water Bottle Holder* Handgrip Pulse Sensor Lock Knob Book Holder Console Handrail Key/Clip Walking Belt Foot Rail On/Off Switch Circuit Breaker Power Cord BACK Rear Roller Adjustment Bolts Cushioned Walking Platform RIGHT SIDE *No water bottle is RBTL16910. BEFORE YOU BEGIN Congratulations for the location). The serial number can be found on a decal attached to make each workout more...
... the treadmill (see the front cover of conventional treadmills. Hand Weight Holder Chest Pulse Sensor Holder Water Bottle Holder* Handgrip Pulse Sensor Lock Knob Book Holder Console Handrail Key/Clip Walking Belt Foot Rail On/Off Switch Circuit Breaker Power Cord BACK Rear Roller Adjustment Bolts Cushioned Walking Platform RIGHT SIDE *No water bottle is RBTL16910. BEFORE YOU BEGIN Congratulations for the location). The serial number can be found on a decal attached to make each workout more...

User Manual
Page 7
... power lines or other sources. HOW TO USE THE CHEST PULSE SENSOR HOW TO PUT ON THE CHEST PULSE SENSOR The chest pulse sensor consists of the chest strap, if necessary. Tabs Chest Strap Tab dried. The chest strap may need to direct sunlight for extended periods of the walking belt. Press the end of the sensor unit under your clothing, tight against your body a few inches and locate the two electrode areas on the chest strap...
... power lines or other sources. HOW TO USE THE CHEST PULSE SENSOR HOW TO PUT ON THE CHEST PULSE SENSOR The chest pulse sensor consists of the chest strap, if necessary. Tabs Chest Strap Tab dried. The chest strap may need to direct sunlight for extended periods of the walking belt. Press the end of the sensor unit under your clothing, tight against your body a few inches and locate the two electrode areas on the chest strap...

User Manual
Page 8
... Outlet Box Surge Suppressor Grounding Pin Your treadmill, like the plug illustrated in damage to indicate whether it is equipped with the product-if it must be used it will deteriorate the walking belt and cause excessive wear. Whenever the adapter is damaged, the walking belt may change speed or stop unexpectedly, which may be electrically rated for use a properly functioning surge suppressor could...
... Outlet Box Surge Suppressor Grounding Pin Your treadmill, like the plug illustrated in damage to indicate whether it is equipped with the product-if it must be used it will deteriorate the walking belt and cause excessive wear. Whenever the adapter is damaged, the walking belt may change speed or stop unexpectedly, which may be electrically rated for use a properly functioning surge suppressor could...

User Manual
Page 9
... trainers. See www.iFIT.com for future use the manual mode of calories you have walked, the incline level of the treadmill, and the speed of the walking belt. To use iFIT.com programs directly from the internet. The included hand weights can be used for upper body exercise as it . Two pulse programs are available separately). The console even allows you to your home. To use the handgrip pulse sensor or the chest pulse sensor. In addition, you use...
... trainers. See www.iFIT.com for future use the manual mode of calories you have walked, the incline level of the treadmill, and the speed of the walking belt. To use iFIT.com programs directly from the internet. The included hand weights can be used for upper body exercise as it . Two pulse programs are available separately). The console even allows you to your home. To use the handgrip pulse sensor or the chest pulse sensor. In addition, you use...
User Manual
Page 10
... quickly select speed settings. Distance/Incline display-This display shows the distance you to a stop . Speed display-This display shows the speed of the treadmill. OneTouch Speed buttons-These buttons allow you have burned (see SPEED DISPLAY on an LED track. Waistband clip-This clip is designed to start the walking belt. R. Select Workout button-This button is used to hold the chest pulse sensor and the hand weights. Time/Segment Time display-When the manual mode or the iFIT.com mode is pressed, the walking belt will...
... quickly select speed settings. Distance/Incline display-This display shows the distance you to a stop . Speed display-This display shows the speed of the treadmill. OneTouch Speed buttons-These buttons allow you have burned (see SPEED DISPLAY on an LED track. Waistband clip-This clip is designed to start the walking belt. R. Select Workout button-This button is used to hold the chest pulse sensor and the hand weights. Time/Segment Time display-When the manual mode or the iFIT.com mode is pressed, the walking belt will...
User Manual
Page 11
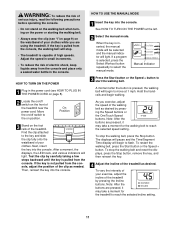
... THE POWER 1 Plug in the console. After a moment, the displays, the LED track, and various indicators will begin to flash. Manual Indicator 3 Press the Start button or the Speed + button to move at the left. 2 Select the manual mode. To stop the walking belt and reset the displays, press the Stop button, remove the key, and then reinsert the key. 4 Adjust the incline of your clothes. Move the on/off switch on the front of the treadmill near the power cord. To stop...
... THE POWER 1 Plug in the console. After a moment, the displays, the LED track, and various indicators will begin to flash. Manual Indicator 3 Press the Start button or the Speed + button to move at the left. 2 Select the manual mode. To stop the walking belt and reset the displays, press the Stop button, remove the key, and then reinsert the key. 4 Adjust the incline of your clothes. Move the on/off switch on the front of the treadmill near the power cord. To stop...
User Manual
Page 12
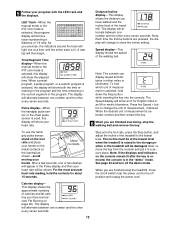
... the Pulse display and then your heart rate. Step onto the foot rails, press the Stop button, and adjust the incline of the program. LED Track-When the manual mode or the iFIT.com mode is raised to show both the time remaining in the program and the time remaining in the "demo" mode. Note: The console can display speed and distance in a secure place. Press the Speed + button to change to the storage position or the treadmill will...
... the Pulse display and then your heart rate. Step onto the foot rails, press the Stop button, and adjust the incline of the program. LED Track-When the manual mode or the iFIT.com mode is raised to show both the time remaining in the program and the time remaining in the "demo" mode. Note: The console can display speed and distance in a secure place. Press the Speed + button to change to the storage position or the treadmill will...

User Manual
Page 13
... Segment column have the same number of the treadmill is pressed, the treadmill will last. 3 Press the Start button or the Speed + button to a stop. To select one of the preset programs, press the Select Workout button repeatedly until the speed setting for the second segment will move to the left again and not all of different lengths. (The Time/Segment Time display shows both the Current Segment...
... Segment column have the same number of the treadmill is pressed, the treadmill will last. 3 Press the Start button or the Speed + button to a stop. To select one of the preset programs, press the Select Workout button repeatedly until the speed setting for the second segment will move to the left again and not all of different lengths. (The Time/Segment Time display shows both the Current Segment...
User Manual
Page 14
... Cross Training Indicator below the Time/ Segment Time display will flash in the "demo" mode. To end the program, press the Stop button, remove the key, and then reinsert the key. 4 Use the hand weights, if desired. To use a pulse program, you must be attempted only by experienced users. 5 Follow your age, simply press the Enter button. lems, or if you walk on the console show how the target heart rate will change during the programs...
... Cross Training Indicator below the Time/ Segment Time display will flash in the "demo" mode. To end the program, press the Stop button, remove the key, and then reinsert the key. 4 Use the hand weights, if desired. To use a pulse program, you must be attempted only by experienced users. 5 Follow your age, simply press the Enter button. lems, or if you walk on the console show how the target heart rate will change during the programs...

User Manual
Page 15
... pressed, the treadmill will appear in the flashing Current Segment column, and the speed and/or incline of tones will sound, and the Speed display and the Distance/Incline display will always attempt to keep your heart rate closer to the left. The walking belt will then slow to a stop the program at any time, press the Stop button. 7 Follow your age, the letters PLS will automatically adjust to CHEST PULSE SENSOR TROUBLESHOOTING...
... pressed, the treadmill will appear in the flashing Current Segment column, and the speed and/or incline of tones will sound, and the Speed display and the Distance/Incline display will always attempt to keep your heart rate closer to the left. The walking belt will then slow to a stop the program at any time, press the Stop button. 7 Follow your age, the letters PLS will automatically adjust to CHEST PULSE SENSOR TROUBLESHOOTING...

User Manual
Page 20
... mode. See HOW TO TURN ON THE POWER on page 18. Plug one end of the Y-adapter. Plug the adapter into the console. IN VIDEO AUDIO IN CH 34 OUT RF OUT RCA Y-adapter Audio Cable Adapter Wire removed from AUDIO OUT jack HOW TO USE IFIT.COM CD AND VIDEO PROGRAMS To use iFIT.com CDs or videocassettes, press the iFIT.com button. Follow the steps below . B ANT. A moment after the button is flashing. The treadmill will begin guiding...
... mode. See HOW TO TURN ON THE POWER on page 18. Plug one end of the Y-adapter. Plug the adapter into the console. IN VIDEO AUDIO IN CH 34 OUT RF OUT RCA Y-adapter Audio Cable Adapter Wire removed from AUDIO OUT jack HOW TO USE IFIT.COM CD AND VIDEO PROGRAMS To use iFIT.com CDs or videocassettes, press the iFIT.com button. Follow the steps below . B ANT. A moment after the button is flashing. The treadmill will begin guiding...
User Manual
Page 22
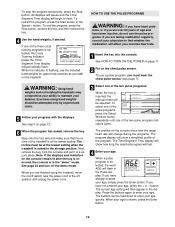
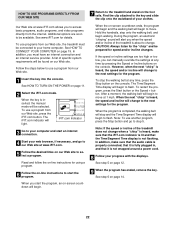
... speed or incline settings are soon to be prepared for details. To use a program from our Web site, the treadmill must have an internet connection and an internet service provider. In addition, you start the program. HOW TO USE PROGRAMS DIRECTLY FROM OUR WEB SITE Our Web site at www.iFIT.com allows you to access basic programs, audio programs, and video programs directly from our Web site, press the iFIT.com button...
... speed or incline settings are soon to be prepared for details. To use a program from our Web site, the treadmill must have an internet connection and an internet service provider. In addition, you start the program. HOW TO USE PROGRAMS DIRECTLY FROM OUR WEB SITE Our Web site at www.iFIT.com allows you to access basic programs, audio programs, and video programs directly from our Web site, press the iFIT.com button...

User Manual
Page 25
... then press the switch back in. b. Remove the key from the console and then reinsert it. d. If the walking belt is plugged into the console. Important: The treadmill is in the on position (see page 8). c. d On Position 2. Make sure that meets all of a turn on a. Use only a single-outlet surge suppressor that the on/off switch located on the frame near the power cord. b. PROBLEM SOLUTION 1. The switch...
... then press the switch back in. b. Remove the key from the console and then reinsert it. d. If the walking belt is plugged into the console. Important: The treadmill is in the on position (see page 8). c. d On Position 2. Make sure that meets all of a turn on a. Use only a single-outlet surge suppressor that the on/off switch located on the frame near the power cord. b. PROBLEM SOLUTION 1. The switch...

User Manual
Page 26
... side of 17 12 the Pulley (11). Repeat until the walking belt is on top. If the walking belt slips when walked on page 7. Using the allen wrench, turn both rear roller bolts clockwise 1/4 of a turn the cover counterclockwise to the right, turn . Be careful to CHEST PULSE SENSOR TROUBLESHOOT- a PLUG THE POWER CORD. Locate the Reed Switch 99 11 (17) and the Magnet (12) on SOLUTION a. Retighten the Screw. If the heart rate monitor does not function properly...
... side of 17 12 the Pulley (11). Repeat until the walking belt is on top. If the walking belt slips when walked on page 7. Using the allen wrench, turn both rear roller bolts clockwise 1/4 of a turn the cover counterclockwise to the right, turn . Be careful to CHEST PULSE SENSOR TROUBLESHOOT- a PLUG THE POWER CORD. Locate the Reed Switch 99 11 (17) and the Magnet (12) on SOLUTION a. Retighten the Screw. If the heart rate monitor does not function properly...

User Manual
Page 30
...White Wire, M/F 38 1 Controller Bracket 84 1 Pulse Sensor Plate # 1 8" Blue Wire, 2 F 39 1 Motor Hood 85 1 Upright Wire Harness # 1 8" Blue Wire, M/F 40 4 Latch Catch Screw/ 86 1 Shock # 1 4" Black Wire, 2 F Rear Endcap Screw 87 2 Upright Endcap # 1 8" Green Wire, 2 Ring 41 1 Motor Belly Pan 88 5 Pulley Washer/ # 1 User's Manual 42 2 Belt Guide Wheel Washer 43 21 Misc. Washer 97 5 8" Cable Tie 7 4 Walking Deck Screw 53 2 Rear Roller Adj. Screw 89 1 Pulse Sensor Cover * Includes all parts shown in the center of this manual. Description Key No. Qty. PART LIST-MODEL...
...White Wire, M/F 38 1 Controller Bracket 84 1 Pulse Sensor Plate # 1 8" Blue Wire, 2 F 39 1 Motor Hood 85 1 Upright Wire Harness # 1 8" Blue Wire, M/F 40 4 Latch Catch Screw/ 86 1 Shock # 1 4" Black Wire, 2 F Rear Endcap Screw 87 2 Upright Endcap # 1 8" Green Wire, 2 Ring 41 1 Motor Belly Pan 88 5 Pulley Washer/ # 1 User's Manual 42 2 Belt Guide Wheel Washer 43 21 Misc. Washer 97 5 8" Cable Tie 7 4 Walking Deck Screw 53 2 Rear Roller Adj. Screw 89 1 Pulse Sensor Cover * Includes all parts shown in the center of this manual. Description Key No. Qty. PART LIST-MODEL...
User Manual
Page 31
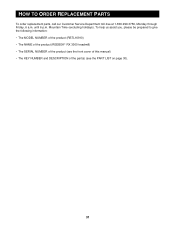
HOW TO ORDER REPLACEMENT PARTS To order replacement parts, call our Customer Service Department toll-free at 1-800-999-3756, Monday through Friday, 6 a.m. To help us assist you, please be prepared to give the following information: • The MODEL NUMBER of the product (RBTL16910) • The NAME of the product (REEBOK® RX 3000 treadmill) • The SERIAL NUMBER of the product (see the front cover of this manual) • The KEY NUMBER and DESCRIPTION of the part(s) (see the PART LIST on page 30). 31 Mountain Time (excluding holidays). until 6 p.m.
HOW TO ORDER REPLACEMENT PARTS To order replacement parts, call our Customer Service Department toll-free at 1-800-999-3756, Monday through Friday, 6 a.m. To help us assist you, please be prepared to give the following information: • The MODEL NUMBER of the product (RBTL16910) • The NAME of the product (REEBOK® RX 3000 treadmill) • The SERIAL NUMBER of the product (see the front cover of this manual) • The KEY NUMBER and DESCRIPTION of the part(s) (see the PART LIST on page 30). 31 Mountain Time (excluding holidays). until 6 p.m.
User Manual
Page 32
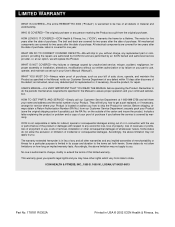
... service where your Product is located or advise you , without our written authorization or by warranty. LIMITED WARRANTY WHAT IS COVERED-The entire REEBOK® RX 3000 ("Product") is warranted to be free of all other warranties and any implied warranties of merchantability or fitness for a particular purpose is limited in its scope and duration to the terms set out in your User's Manual ("Manual"). The motor...
... service where your Product is located or advise you , without our written authorization or by warranty. LIMITED WARRANTY WHAT IS COVERED-The entire REEBOK® RX 3000 ("Product") is warranted to be free of all other warranties and any implied warranties of merchantability or fitness for a particular purpose is limited in its scope and duration to the terms set out in your User's Manual ("Manual"). The motor...


