

User Manual
Page 1
RBTL14910 Serial No. TO AVOID UNNECESSARY DELAYS, PLEASE CALL DIRECT TO OUR TOLL-FREE CUSTOMER HOT LINE. The trained technicians on our customer hot line will guarantee complete satisfaction through direct assistance from our factory. MST CAUTION Read all precautions and instructions in the space above for future reference. Model No. Save this equipment. If you have questions, or if there are missing parts, we will provide immediate assistance, free of charge. CUSTOMER HOT LINE: 1-800-999-3756 Mon.-Fri., 6 a.m.- 6 p.m. Visit our website at www.reebokhomefitness.com &#...
RBTL14910 Serial No. TO AVOID UNNECESSARY DELAYS, PLEASE CALL DIRECT TO OUR TOLL-FREE CUSTOMER HOT LINE. The trained technicians on our customer hot line will guarantee complete satisfaction through direct assistance from our factory. MST CAUTION Read all precautions and instructions in the space above for future reference. Model No. Save this equipment. If you have questions, or if there are missing parts, we will provide immediate assistance, free of charge. CUSTOMER HOT LINE: 1-800-999-3756 Mon.-Fri., 6 a.m.- 6 p.m. Visit our website at www.reebokhomefitness.com &#...

User Manual
Page 2
REEBOK and the Vector Logo are registered trademarks and service marks of this manual. This product is attached in the center of Reebok. ® TABLE OF CONTENTS IMPORTANT PRECAUTIONS 3 BEFORE YOU BEGIN 5 ASSEMBLY 6 TREADMILL OPERATION 7 HOW TO FOLD AND MOVE THE TREADMILL 23 TROUBLE-SHOOTING 24 REEBOK UNIVERSITY 26 EXERCISE GUIDELINES 28 PART LIST 30 HOW TO ORDER REPLACEMENT PARTS 31 LIMITED WARRANTY Back Cover Note: An EXPLODED DRAWING is manufactured and distributed under license from Reebok International. 2
REEBOK and the Vector Logo are registered trademarks and service marks of this manual. This product is attached in the center of Reebok. ® TABLE OF CONTENTS IMPORTANT PRECAUTIONS 3 BEFORE YOU BEGIN 5 ASSEMBLY 6 TREADMILL OPERATION 7 HOW TO FOLD AND MOVE THE TREADMILL 23 TROUBLE-SHOOTING 24 REEBOK UNIVERSITY 26 EXERCISE GUIDELINES 28 PART LIST 30 HOW TO ORDER REPLACEMENT PARTS 31 LIMITED WARRANTY Back Cover Note: An EXPLODED DRAWING is manufactured and distributed under license from Reebok International. 2
User Manual
Page 3
... may affect the accuracy of heart rate readings. The treadmill should not be able to safely lift 45 pounds (20 kg) to maintain your local REEBOK dealer or call 1-800-8063651 and order part number 146148. 11. Wear appropriate exercise clothing when using the treadmill. 15. If the control sys- 13...
... may affect the accuracy of heart rate readings. The treadmill should not be able to safely lift 45 pounds (20 kg) to maintain your local REEBOK dealer or call 1-800-8063651 and order part number 146148. 11. Wear appropriate exercise clothing when using the treadmill. 15. If the control sys- 13...
User Manual
Page 4
21. Always listen for the "chirp" and be performed by or through the use the treadmill in any exercise program, consult your physician. However, when the next "chirp" is intended for personal injury or property damage sustained by an authorized service representative only. 27. Never remove the motor hood unless instructed to change. If a decal is missing, or if it is about to do so by pressing the speed and incline buttons. The treadmill is heard, the speed and/or incline will alert you when the speed and/or incline of the treadmill every three months. 25. ...
21. Always listen for the "chirp" and be performed by or through the use the treadmill in any exercise program, consult your physician. However, when the next "chirp" is intended for personal injury or property damage sustained by an authorized service representative only. 27. Never remove the motor hood unless instructed to change. If a decal is missing, or if it is about to do so by pressing the speed and incline buttons. The treadmill is heard, the speed and/or incline will alert you when the speed and/or incline of the treadmill every three months. 25. ...
User Manual
Page 5
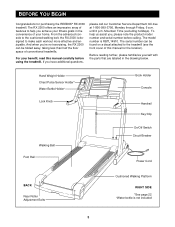
... cushioned walking belt, the RX 2000 is designed to help us assist you achieve your home. For your benefit, read this manual for purchasing the REEBOK® RX 2000 treadmill. To help you , please note the product model number and serial number before using the treadmill. Hand Weight Holder Chest Pulse...
... cushioned walking belt, the RX 2000 is designed to help us assist you achieve your home. For your benefit, read this manual for purchasing the REEBOK® RX 2000 treadmill. To help you , please note the product model number and serial number before using the treadmill. Hand Weight Holder Chest Pulse...
User Manual
Page 6
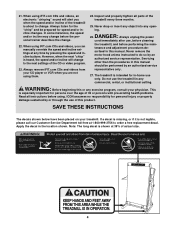
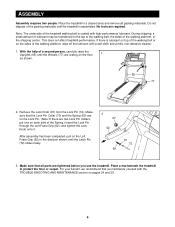
Place the treadmill in the direction shown until the Latch Pin (72) slides freely. 2 67 62 70 72 69 3. During shipping, a small amount of the walking belt or on the Left Foam Grip (62) in a cleared area and remove all parts are resting on pages 24 and 25. 6 If there is lubricant on top of lubricant may be transferred to protect the floor or carpet. Remove the Lock Knob (67) from the Lock Pin (72). Make sure that you use the treadmill. Place a mat beneath the treadmill to the top of the walking belt, the sides of the packing materials until the Wheels (77) are tightened ...
Place the treadmill in the direction shown until the Latch Pin (72) slides freely. 2 67 62 70 72 69 3. During shipping, a small amount of the walking belt or on the Left Foam Grip (62) in a cleared area and remove all parts are resting on pages 24 and 25. 6 If there is lubricant on top of lubricant may be transferred to protect the floor or carpet. Remove the Lock Knob (67) from the Lock Pin (72). Make sure that you use the treadmill. Place a mat beneath the treadmill to the top of the walking belt, the sides of the packing materials until the Wheels (77) are tightened ...
User Manual
Page 7
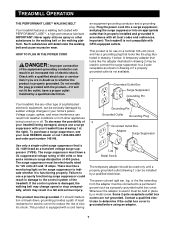
... Use only a single-outlet surge suppressor that is damaged, the walking belt may change speed or stop unexpectedly, which may be held in your local REEBOK dealer or call 1-800-806-3651 and order part number 146148. If it will deteriorate the walking belt and cause excessive wear. This product is...
... Use only a single-outlet surge suppressor that is damaged, the walking belt may change speed or stop unexpectedly, which may be held in your local REEBOK dealer or call 1-800-806-3651 and order part number 146148. If it will deteriorate the walking belt and cause excessive wear. This product is...
User Manual
Page 8
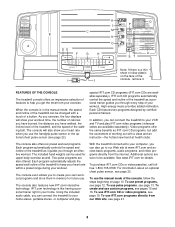
K Q L P C M B N R O A DE F G H U ST Note: If there is a thin sheet of clear plastic on page 10. As you exercise, the four displays will also show your heart rate when you can also go to our Web site at health clubs. To use custom programs, see page 12. To create and use preset programs, see pages 15 and 16. The console will show your workout time, the number of calories you have walked, the incline level of the treadmill, and the speed of the I J console, remove it. The included hand weights can be changed with a class and an instructor-the ...
K Q L P C M B N R O A DE F G H U ST Note: If there is a thin sheet of clear plastic on page 10. As you exercise, the four displays will also show your heart rate when you can also go to our Web site at health clubs. To use custom programs, see page 12. To create and use preset programs, see pages 15 and 16. The console will show your workout time, the number of calories you have walked, the incline level of the treadmill, and the speed of the I J console, remove it. The included hand weights can be changed with a class and an instructor-the ...
User Manual
Page 9
DESCRIPTION OF THE CONSOLE Refer to the drawing on page 8 to show the incline setting. Water bottle holder-This convenient holder keeps your water bottle handy during your heart rate. Each time a button is used to hold the included hand weights. When the handgrip pulse sensor is pressed, the incline will periodically flash. N. Note: Each time the Incline buttons are pressed, the display will change by 0.1 mph; E. if a button is designed to start the walking belt. OneTouch Speed buttons-These buttons allow you have burned. K. Cross Training indicator-...
DESCRIPTION OF THE CONSOLE Refer to the drawing on page 8 to show the incline setting. Water bottle holder-This convenient holder keeps your water bottle handy during your heart rate. Each time a button is used to hold the included hand weights. When the handgrip pulse sensor is pressed, the incline will periodically flash. N. Note: Each time the Incline buttons are pressed, the display will change by 0.1 mph; E. if a button is designed to start the walking belt. OneTouch Speed buttons-These buttons allow you have burned. K. Cross Training indicator-...
User Manual
Page 10
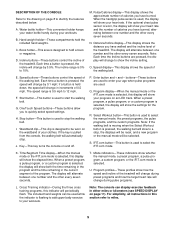
Move the on/off switch on the front of the treadmill near the power cord. After a moment, the displays, the LED track, and various indicators will stop. • The treadmill is capable of high speeds. If a program is not pulled from the console, the walking belt will light. During the first few steps backward until the key is pulled from the console, adjust the position of the clip as needed. Test the clip by carefully taking a few minutes that you use the treadmill, inspect the alignment of the walking belt, and align the walking belt if necessary (see page 25). 4 ...
Move the on/off switch on the front of the treadmill near the power cord. After a moment, the displays, the LED track, and various indicators will stop. • The treadmill is capable of high speeds. If a program is not pulled from the console, the walking belt will light. During the first few steps backward until the key is pulled from the console, adjust the position of the clip as needed. Test the clip by carefully taking a few minutes that you use the treadmill, inspect the alignment of the walking belt, and align the walking belt if necessary (see page 25). 4 ...
User Manual
Page 11
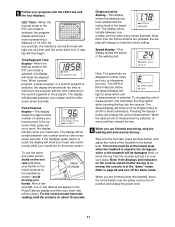
5 Follow your hands. The display will alternate between one at the lowest level when the treadmill is selected, remove and then reinsert the key. 6 When you are pressed, the display will change to show an E for English miles or an M for about 15 seconds. Note: Each time the Incline buttons are finished exercising, stop the walking belt and remove the key. The Speed display will show your heart rate continuously while your hands are finished using the treadmill, move the on/off position and unplug the power cord. 11 The incline must be damaged. Note: If the displays and ...
5 Follow your hands. The display will alternate between one at the lowest level when the treadmill is selected, remove and then reinsert the key. 6 When you are pressed, the display will change to show an E for English miles or an M for about 15 seconds. Note: Each time the Incline buttons are finished exercising, stop the walking belt and remove the key. The Speed display will show your heart rate continuously while your hands are finished using the treadmill, move the on/off position and unplug the power cord. 11 The incline must be damaged. Note: If the displays and ...
User Manual
Page 12
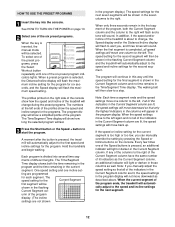
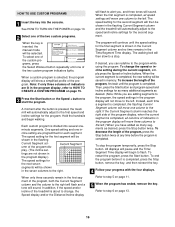
When a preset program is about to change during the preset programs. The numbers at the left ends of the program display. (The incline settings are lit, the speed settings in those columns as described above. ting are lit, the speed settings will move back up. In addition, if the speed and/or incline of the treadmill is selected, the Distance/Incline display will flash the maximum incline setting for the program for the second segment. The speed setting for the Current Segment first segment will be shown in the Current Segment column are programmed for the next seven...
When a preset program is about to change during the preset programs. The numbers at the left ends of the program display. (The incline settings are lit, the speed settings in those columns as described above. ting are lit, the speed settings will move back up. In addition, if the speed and/or incline of the treadmill is selected, the Distance/Incline display will flash the maximum incline setting for the program for the second segment. The speed setting for the Current Segment first segment will be shown in the Current Segment column are programmed for the next seven...
User Manual
Page 13
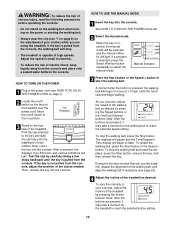
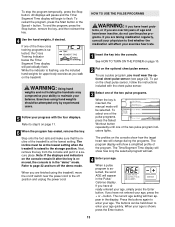
WARNING: Using hand weights and not holding the handrails may compromise your ability to maintain your age. Refer to page 22 and turn off the demo mode. Refer to step 5 on /off position and unplug the power cord. To put it in the Pulse/ Calories display. To select one of the pulse programs, press the Select Workout button repeatedly until one of the two pulse program indicators lights. The Time/Segment Time display will show a simplified profile of the two pulse programs. When the key is inserted, the manual mode will be attempted only by experienced users. 5 Follow your ...
WARNING: Using hand weights and not holding the handrails may compromise your ability to maintain your age. Refer to page 22 and turn off the demo mode. Refer to step 5 on /off position and unplug the power cord. To put it in the Pulse/ Calories display. To select one of the pulse programs, press the Select Workout button repeatedly until one of the two pulse program indicators lights. The Time/Segment Time display will show a simplified profile of the two pulse programs. When the key is inserted, the manual mode will be attempted only by experienced users. 5 Follow your ...
User Manual
Page 14
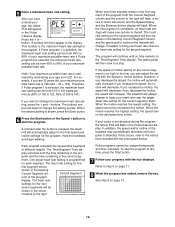
button. A number will continue until your pulse is estimated by subtracting your progress with the chest pulse sensor. Note: Your maximum possible heart rate is detected. If you have entered your pulse is the maximum heart rate setting for the first segment will be increased any further. When the desired setting is selected, the maximum heart rate setting can be held down to a stop the program at any time, press the Stop button. 7 Follow your age from 65% to the right will flash, a series of tones will sound, and the Speed display and the Distance/Incline display will ...
button. A number will continue until your pulse is estimated by subtracting your progress with the chest pulse sensor. Note: Your maximum possible heart rate is detected. If you have entered your pulse is the maximum heart rate setting for the first segment will be increased any further. When the desired setting is selected, the maximum heart rate setting can be held down to a stop the program at any time, press the Stop button. 7 Follow your age from 65% to the right will flash, a series of tones will sound, and the Speed display and the Distance/Incline display will ...
User Manual
Page 15
A moment after the button is completed all columns of indicators in the program display will move three columns to the left , and the speed setting for as many segments as described above. Current Segment umn of indicators are not shown in memory. 4 Follow your progress with your workout, press the Stop button twice. If the Current Segment column reaches the right side of the program display, when the current segment is pressed, the walking belt will be lit in the flashing Current Segment col- gram is completed, the current speed setting and the current incline ...
A moment after the button is completed all columns of indicators in the program display will move three columns to the left , and the speed setting for as many segments as described above. Current Segment umn of indicators are not shown in memory. 4 Follow your progress with your workout, press the Stop button twice. If the Current Segment column reaches the right side of the program display, when the current segment is pressed, the walking belt will be lit in the flashing Current Segment col- gram is completed, the current speed setting and the current incline ...
User Manual
Page 16
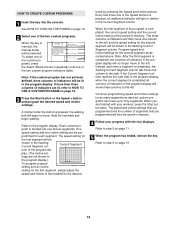
To select one of the custom programs, press the Select Workout button repeatedly until one in the flashing Current Segment column of indicators are not shown in the program display.) The speed settings for the final segment is completed. Hold the handrails and begin to alert you have added as many additional segments as desired, press the Stop button twice. minute segments. When the first segment is completed, the new setting will be shown in - The program will continue until the program is shown in the Current Segment column and no time remains in the flashing ...
To select one of the custom programs, press the Select Workout button repeatedly until one in the flashing Current Segment column of indicators are not shown in the program display.) The speed settings for the final segment is completed. Hold the handrails and begin to alert you have added as many additional segments as desired, press the Stop button twice. minute segments. When the first segment is completed, the new setting will be shown in - The program will continue until the program is shown in the Current Segment column and no time remains in the flashing ...
User Manual
Page 17
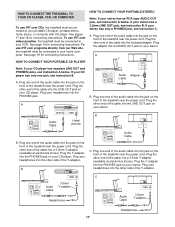
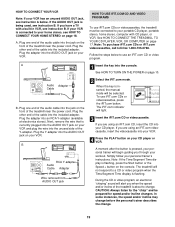
HOW TO CONNECT THE TREADMILL TO YOUR CD PLAYER, VCR, OR COMPUTER To use iFIT.com CDs, the treadmill must be connected to your stereo has a 3.5mm LINE OUT jack, see instruction B. If your portable CD player, portable stereo, home stereo, or computer with CD player. Plug the other end of the treadmill near the power cord. Plug one end of the audio cable into the jack on the front of the cable into the PHONES jack on the front of the cable into the included adapter. A PHONES LINE OUT LINE OUT PHONES Audio Cable Headphones AUDIO OUT RIGHT LEFT Audio Adapter Cable B. B LINE ...
HOW TO CONNECT THE TREADMILL TO YOUR CD PLAYER, VCR, OR COMPUTER To use iFIT.com CDs, the treadmill must be connected to your stereo has a 3.5mm LINE OUT jack, see instruction B. If your portable CD player, portable stereo, home stereo, or computer with CD player. Plug the other end of the treadmill near the power cord. Plug one end of the audio cable into the jack on the front of the cable into the PHONES jack on the front of the cable into the included adapter. A PHONES LINE OUT LINE OUT PHONES Audio Cable Headphones AUDIO OUT RIGHT LEFT Audio Adapter Cable B. B LINE ...
User Manual
Page 18
HOW TO CONNECT YOUR HOME STEREO HOW TO CONNECT YOUR COMPUTER Note: If your computer has a 3.5mm LINE OUT jack, see instruction A. Note: If your stereo has an unused LINE OUT jack, see instruction A below. Plug the other end of the Y-adapter. Next, remove the wire that is being used, see instruction B. Plug the Y-adapter into the LINE OUT jack on your computer. If the LINE OUT jack is currently plugged into the PHONES jack on your stereo. A. Plug the adapter into the included adapter. Plug the other end of the treadmill near the power cord. Plug one end ...
HOW TO CONNECT YOUR HOME STEREO HOW TO CONNECT YOUR COMPUTER Note: If your computer has a 3.5mm LINE OUT jack, see instruction A. Note: If your stereo has an unused LINE OUT jack, see instruction A below. Plug the other end of the Y-adapter. Next, remove the wire that is being used, see instruction B. Plug the Y-adapter into the LINE OUT jack on your computer. If the LINE OUT jack is currently plugged into the PHONES jack on your stereo. A. Plug the adapter into the included adapter. Plug the other end of the treadmill near the power cord. Plug one end ...
User Manual
Page 19
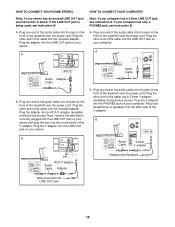
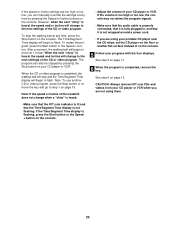
HOW TO CONNECT YOUR VCR Note: If your CD player. If the AUDIO OUT jack is being used, see instruction B. A ANT. Plug the adapter into the included adapter. B ANT. IN VIDEO AUDIO IN CH 34 OUT RF OUT RCA Y-adapter Audio Cable Adapter Wire removed from AUDIO OUT jack HOW TO USE IFIT.COM CD AND VIDEO PROGRAMS To use iFIT.com CDs or videocassettes, the treadmill must be selected. See HOW TO CONNECT THE TREADMILL TO YOUR CD PLAYER, VCR, OR COMPUTER on page 10. 2 Select the iFIT.com mode. Note: To purchase iFIT.com CDs or iFIT.com videocassettes, call toll-free 1-800-735-0768. ...
HOW TO CONNECT YOUR VCR Note: If your CD player. If the AUDIO OUT jack is being used, see instruction B. A ANT. Plug the adapter into the included adapter. B ANT. IN VIDEO AUDIO IN CH 34 OUT RF OUT RCA Y-adapter Audio Cable Adapter Wire removed from AUDIO OUT jack HOW TO USE IFIT.COM CD AND VIDEO PROGRAMS To use iFIT.com CDs or videocassettes, the treadmill must be selected. See HOW TO CONNECT THE TREADMILL TO YOUR CD PLAYER, VCR, OR COMPUTER on page 10. 2 Select the iFIT.com mode. Note: To purchase iFIT.com CDs or iFIT.com videocassettes, call toll-free 1-800-735-0768. ...
User Manual
Page 20
If the speed or incline settings are too high or too low, you can also be stopped by pressing the Speed or Incline buttons on the console. To stop and the Time/Segment Time display will change when a "chirp" is heard: • Make sure that the iFIT.com indicator is lit and that it is heard, the speed and incline will begin to step 1 on your CD player or VCR when you are not using your portable CD player and the CD skips, set the CD player on the console. • Adjust the volume of your progress with the four displays. After a moment, the walking belt will begin to ...
If the speed or incline settings are too high or too low, you can also be stopped by pressing the Speed or Incline buttons on the console. To stop and the Time/Segment Time display will change when a "chirp" is heard: • Make sure that the iFIT.com indicator is lit and that it is heard, the speed and incline will begin to step 1 on your CD player or VCR when you are not using your portable CD player and the CD skips, set the CD player on the console. • Adjust the volume of your progress with the four displays. After a moment, the walking belt will begin to ...