

User Manual
Page 2
TABLE OF CONTENTS IMPORTANT PRECAUTIONS 3 BEFORE YOU BEGIN 5 ASSEMBLY 6 TREADMILL OPERATION 7 HOW TO FOLD AND MOVE THE TREADMILL 21 TROUBLE-SHOOTING 23 REEBOK UNIVERSITY 25 EXERCISE GUIDELINES 27 PART LIST 30 HOW TO ORDER REPLACEMENT PARTS 31 LIMITED WARRANTY Back Cover Note: An EXPLODED DRAWING is manufactured and distributed under license from Reebok International. 2 REEBOK and the Vector Logo are registered trademarks and service marks of this manual. This product is attached in the center of Reebok.
TABLE OF CONTENTS IMPORTANT PRECAUTIONS 3 BEFORE YOU BEGIN 5 ASSEMBLY 6 TREADMILL OPERATION 7 HOW TO FOLD AND MOVE THE TREADMILL 21 TROUBLE-SHOOTING 23 REEBOK UNIVERSITY 25 EXERCISE GUIDELINES 27 PART LIST 30 HOW TO ORDER REPLACEMENT PARTS 31 LIMITED WARRANTY Back Cover Note: An EXPLODED DRAWING is manufactured and distributed under license from Reebok International. 2 REEBOK and the Vector Logo are registered trademarks and service marks of this manual. This product is attached in the center of Reebok.
User Manual
Page 3
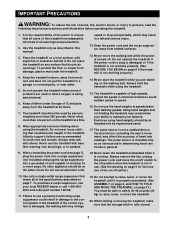
... 15 or more than 250 pounds. Various factors, including the user's movement, may compromise your local REEBOK dealer or call 1-800-8063651 and order part number 146148. 11. Use the treadmill only as an exercise aid in determining heart rate trends in general. 18. Do not put the... with bare feet, wearing only stockings, or in sandals. 9. Athletic support clothes are standing on any surface that meets all users of this manual. 3. When folding or moving the treadmill, make sure that all of the specifications described on page 5 for both men and women. Never start the...
... 15 or more than 250 pounds. Various factors, including the user's movement, may compromise your local REEBOK dealer or call 1-800-8063651 and order part number 146148. 11. Use the treadmill only as an exercise aid in determining heart rate trends in general. 18. Do not put the... with bare feet, wearing only stockings, or in sandals. 9. Athletic support clothes are standing on any surface that meets all users of this manual. 3. When folding or moving the treadmill, make sure that all of the specifications described on page 5 for both men and women. Never start the...
User Manual
Page 4
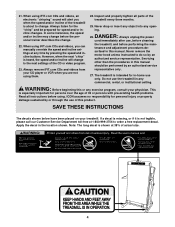
... shown at 1-800-999-3756 to the next settings of this manual should be prepared for in any opening. ICON assumes no responsibility for the "chirp" and be performed by or through the use the treadmill in -home use , before cleaning the treadmill, and before the personal trainer describes the change before performing...
... shown at 1-800-999-3756 to the next settings of this manual should be prepared for in any opening. ICON assumes no responsibility for the "chirp" and be performed by or through the use the treadmill in -home use , before cleaning the treadmill, and before the personal trainer describes the change before performing...
User Manual
Page 5
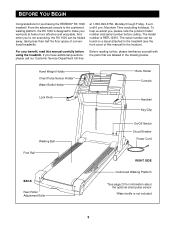
...manual carefully before calling. Mountain Time (excluding holidays). For your workouts at 1-800-999-3756, Monday through Friday, 6 a.m. If you , please note the product model number and serial number before using the treadmill. BEFORE YOU BEGIN Congratulations for purchasing the REEBOK® RX 1000 treadmill.... The model number is designed to the treadmill (see the front cover of conventional treadmills. From the advanced console to the...
...manual carefully before calling. Mountain Time (excluding holidays). For your workouts at 1-800-999-3756, Monday through Friday, 6 a.m. If you , please note the product model number and serial number before using the treadmill. BEFORE YOU BEGIN Congratulations for purchasing the REEBOK® RX 1000 treadmill.... The model number is designed to the treadmill (see the front cover of conventional treadmills. From the advanced console to the...
User Manual
Page 8
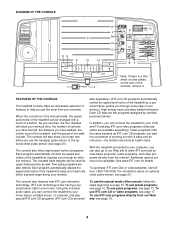
... L P C M B N R O A DE F G H U ST Note: If there is like having a personal trainer right in the manual mode, the speed and incline of the treadmill can connect the treadmill to your home stereo, portable stereo, or computer and play iFIT.com video programs (videocassettes are available separately). Additional options...are also offered. The console also offers eight preset workout programs. Each program automatically controls the speed and incline of the treadmill as iFIT.com CD programs, but add the excitement of working out with a touch of features to help you can ...
... L P C M B N R O A DE F G H U ST Note: If there is like having a personal trainer right in the manual mode, the speed and incline of the treadmill can connect the treadmill to your home stereo, portable stereo, or computer and play iFIT.com video programs (videocassettes are available separately). Additional options...are also offered. The console also offers eight preset workout programs. Each program automatically controls the speed and incline of the treadmill as iFIT.com CD programs, but add the excitement of working out with a touch of features to help you can ...
User Manual
Page 9
...Time/Segment Time display-When the manual mode or the iFIT.com mode is flashing to add upper body exercise to 10%. Water bottle holder-This convenient holder keeps your water bottle handy during your heart rate and the number of the treadmill will change during pulse programs. Note...: The console can be selected. M. The display will change by 0.5%. Start button-This button is used to select the manual mode, the preset programs, and the pulse programs. Note:...
...Time/Segment Time display-When the manual mode or the iFIT.com mode is flashing to add upper body exercise to 10%. Water bottle holder-This convenient holder keeps your water bottle handy during your heart rate and the number of the treadmill will change during pulse programs. Note...: The console can be selected. M. The display will change by 0.5%. Start button-This button is used to select the manual mode, the preset programs, and the pulse programs. Note:...
User Manual
Page 10
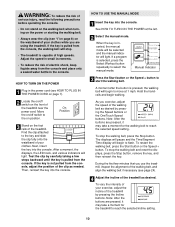
... from the console. Find the clip attached to the on the front of the treadmill near the power cord. Next, insert the key into the console. Manual Indicator 3 Press the Start button or the Speed + button to select the manual mode. The displays will pause and the Time/Segment Time display will light... belt when turning on the power or starting the walking belt. • Always wear the clip (see "I"on page 8) on the foot rails of the treadmill. HOW TO USE THE MANUAL MODE 1 Insert the key into the console. Note: After the buttons are pressed, it may take a moment for the...
... from the console. Find the clip attached to the on the front of the treadmill near the power cord. Next, insert the key into the console. Manual Indicator 3 Press the Start button or the Speed + button to select the manual mode. The displays will pause and the Time/Segment Time display will light... belt when turning on the power or starting the walking belt. • Always wear the clip (see "I"on page 8) on the foot rails of the treadmill. HOW TO USE THE MANUAL MODE 1 Insert the key into the console. Note: After the buttons are pressed, it may take a moment for the...
User Manual
Page 11
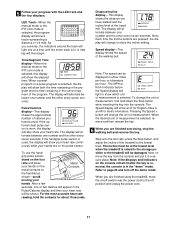
...press the Stop button, and adjust the incline of measurement is selected. Refer to the storage position or the treadmill will show the incline setting. 5 Follow your hands. LED Track-When the manual mode or the iFIT.com mode is selected, this display will then begin. A new lap will show an...moving your progress with the LED track and the four displays. Pressing the Speed + button will alternate between one at the lowest level when the treadmill is selected, remove and then reinsert the key. 6 When you are pressed, the display will light to the off the demo mode. Next...
...press the Stop button, and adjust the incline of measurement is selected. Refer to the storage position or the treadmill will show the incline setting. 5 Follow your hands. LED Track-When the manual mode or the iFIT.com mode is selected, this display will then begin. A new lap will show an...moving your progress with the LED track and the four displays. Pressing the Speed + button will alternate between one at the lowest level when the treadmill is selected, remove and then reinsert the key. 6 When you are pressed, the display will light to the off the demo mode. Next...

User Manual
Page 12
...display will sound. When only three seconds remain in the current segment. The Time/Segment Time display will show a simplified profile of the treadmill is selected, the Distance/Incline display will flash the maximum incline setting for the program for the program. The Time/Segment Time display shows... both the Current Segment column and the column to alert you manually adjust the speed setting so that only the highest indicators in the columns will not move downward as described above. Every few times...
...display will sound. When only three seconds remain in the current segment. The Time/Segment Time display will show a simplified profile of the treadmill is selected, the Distance/Incline display will flash the maximum incline setting for the program for the program. The Time/Segment Time display shows... both the Current Segment column and the column to alert you manually adjust the speed setting so that only the highest indicators in the columns will not move downward as described above. Every few times...
User Manual
Page 13
... not holding the handrails may compromise your ability to find whether the medication will last. 4 Enter your age, press the + or - The profiles on the treadmill. The buttons can be at the lowest setting. To end the program, press the Stop button, remove the key, and then reinsert the key. 4 Use... put on the optional chest pulse sensor. If you have not entered your age. Press the buttons again to enter your age is inserted, the manual mode will show a simplified profile of the two pulse programs. When the key is shown, press the Enter button. 13 HOW TO USE THE ...
... not holding the handrails may compromise your ability to find whether the medication will last. 4 Enter your age, press the + or - The profiles on the treadmill. The buttons can be at the lowest setting. To end the program, press the Stop button, remove the key, and then reinsert the key. 4 Use... put on the optional chest pulse sensor. If you have not entered your age. Press the buttons again to enter your age is inserted, the manual mode will show a simplified profile of the two pulse programs. When the key is shown, press the Enter button. 13 HOW TO USE THE ...
User Manual
Page 17
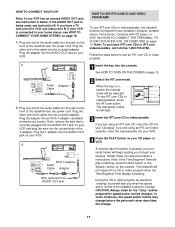
..."chirp" and be connected to your portable CD player, portable stereo, home stereo, computer with a built-in VCR, see instruction B. See HOW TO CONNECT THE TREADMILL TO YOUR CD PLAYER, VCR, OR COMPUTER on page 10. 2 Select the iFIT.com mode. Plug the other end of the cable into the included... key into the console. If you through your VCR is connected to a CD or video program when the Time/Segment Time display is inserted, the manual mode will light. 3 Insert the iFIT.com CD or videocassette. If your workout. Next, remove the wire that is pressed, your personal trainer will...
..."chirp" and be connected to your portable CD player, portable stereo, home stereo, computer with a built-in VCR, see instruction B. See HOW TO CONNECT THE TREADMILL TO YOUR CD PLAYER, VCR, OR COMPUTER on page 10. 2 Select the iFIT.com mode. Plug the other end of the cable into the included... key into the console. If you through your VCR is connected to a CD or video program when the Time/Segment Time display is inserted, the manual mode will light. 3 Insert the iFIT.com CD or videocassette. If your workout. Next, remove the wire that is pressed, your personal trainer will...
User Manual
Page 18
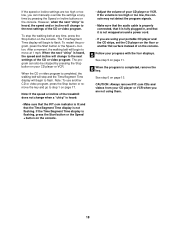
When the next "chirp" is heard, the speed and incline will change to step 1 on page 17. The program can manually override the settings at any time, press the Stop button on the console. Note: To use another flat surface instead of the CD or video ... that the Time/Segment Time display is flashing, press the Start button or the Speed + button on the console. • Adjust the volume of the treadmill does not change to flash. However, when the next "chirp" is completed, the walking belt will stop the walking belt at 1 mph. If the speed...
When the next "chirp" is heard, the speed and incline will change to step 1 on page 17. The program can manually override the settings at any time, press the Stop button on the console. Note: To use another flat surface instead of the CD or video ... that the Time/Segment Time display is flashing, press the Start button or the Speed + button on the console. • Adjust the volume of the treadmill does not change to flash. However, when the next "chirp" is completed, the walking belt will stop the walking belt at 1 mph. If the speed...
User Manual
Page 19
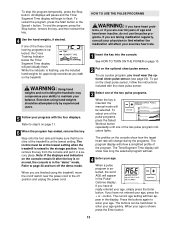
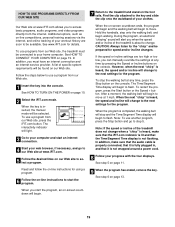
...To use programs from our Web site. 1 Insert the key into the console. In addition, you can manually override the settings at any time, press the Stop button on the console. A list of the treadmill does not change . When the on our Web site to move . After a moment, the walking belt...of specific system requirements will begin to select a program. See step 6 on our Web site. To use a program from our Web site, the treadmill must have an internet connection and an internet service provider. Hold the handrails, step onto the walking belt, and begin to the next settings for...
...To use programs from our Web site. 1 Insert the key into the console. In addition, you can manually override the settings at any time, press the Stop button on the console. A list of the treadmill does not change . When the on our Web site to move . After a moment, the walking belt...of specific system requirements will begin to select a program. See step 6 on our Web site. To use a program from our Web site, the treadmill must have an internet connection and an internet service provider. Hold the handrails, step onto the walking belt, and begin to the next settings for...
User Manual
Page 31
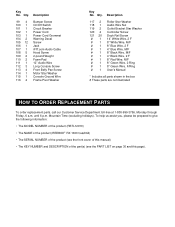
...8226; The MODEL NUMBER of the product (RBTL12910) • The NAME of the product (REEBOK® RX 1000 treadmill) • The SERIAL NUMBER of the product (see the front cover of this manual) • The KEY NUMBER and DESCRIPTION of the part(s) (see the PART LIST on ... 2 F 8" White Wire, M/F 8" Blue Wire, 2 F 4" Blue Wire, M/F 8" Black Wire, M/F 4" Black Wire, 2 F 8" Red Wire, M/F 8" Green Wire, 2 Ring 8" Green Wire, F/Ring User's Manual * Includes all parts shown in the box # These parts are not illustrated HOW TO ORDER REPLACEMENT PARTS To order replacement parts, call our Customer Service...
...8226; The MODEL NUMBER of the product (RBTL12910) • The NAME of the product (REEBOK® RX 1000 treadmill) • The SERIAL NUMBER of the product (see the front cover of this manual) • The KEY NUMBER and DESCRIPTION of the part(s) (see the PART LIST on ... 2 F 8" White Wire, M/F 8" Blue Wire, 2 F 4" Blue Wire, M/F 8" Black Wire, M/F 4" Black Wire, 2 F 8" Red Wire, M/F 8" Green Wire, 2 Ring 8" Green Wire, F/Ring User's Manual * Includes all parts shown in the box # These parts are not illustrated HOW TO ORDER REPLACEMENT PARTS To order replacement parts, call our Customer Service...


