

Canadian English Manual
Page 3
.... 2. No other appliance should not be on the walking belt. Use only a CUL-listed surge suppressor of 450 joules minimum surge dissipation with voltage rating of the treadmill. Failure to raise, lower, or move the treadmill. 19. If the control system is capable of heart rate... readings. Never start the treadmill while you are not medical devices. The treadmill is damaged, the walking belt may change speed or stop unexpectedly...
.... 2. No other appliance should not be on the walking belt. Use only a CUL-listed surge suppressor of 450 joules minimum surge dissipation with voltage rating of the treadmill. Failure to raise, lower, or move the treadmill. 19. If the control system is capable of heart rate... readings. Never start the treadmill while you are not medical devices. The treadmill is damaged, the walking belt may change speed or stop unexpectedly...
Canadian English Manual
Page 5
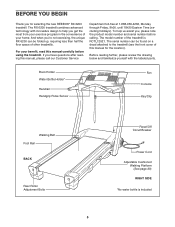
... model number of this manual for selecting the new REEBOK® RX 6200 treadmill. The serial number can be found on a decal attached to help us assist you, please note the product model number and serial number before using the treadmill. For your benefit, read this manual, please call... parts. until 18h30 Eastern Time (excluding holidays). Book Holder Water Bottle Holder* Handrail Handgrip Pulse Sensor Fan Console Key/Clip Walking Belt Foot Rail BACK Rear Roller Adjustment Bolts Reset/Off Circuit Breaker Power Cord Adjustable Cushioned Walking Platform (See page 20) RIGHT SIDE ...
... model number of this manual for selecting the new REEBOK® RX 6200 treadmill. The serial number can be found on a decal attached to help us assist you, please note the product model number and serial number before using the treadmill. For your benefit, read this manual, please call... parts. until 18h30 Eastern Time (excluding holidays). Book Holder Water Bottle Holder* Handrail Handgrip Pulse Sensor Fan Console Key/Clip Walking Belt Foot Rail BACK Rear Roller Adjustment Bolts Reset/Off Circuit Breaker Power Cord Adjustable Cushioned Walking Platform (See page 20) RIGHT SIDE ...

Canadian English Manual
Page 6
...the position shown. During shipping, a small amount of lubricant may be helpful to the top of the walking belt, the sides of a second person, carefully raise the Uprights (65) until the treadmill is not a hole in the right side. For help of the walking platform, or the shipping carton. Insert... one of the Handrail Extensions (76) into the other side of the treadmill. Attach the Handrail Extension with four 3/4" Screws (101). 114 101 101 117 65 2. Attach the other Cup Holder (not shown) into the ...
...the position shown. During shipping, a small amount of lubricant may be helpful to the top of the walking belt, the sides of a second person, carefully raise the Uprights (65) until the treadmill is not a hole in the right side. For help of the walking platform, or the shipping carton. Insert... one of the Handrail Extensions (76) into the other side of the treadmill. Attach the Handrail Extension with four 3/4" Screws (101). 114 101 101 117 65 2. Attach the other Cup Holder (not shown) into the ...
Canadian English Manual
Page 8
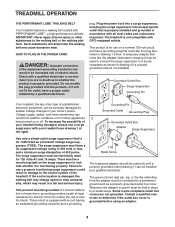
...product must be connected to whether the product is damaged, the walking belt may change speed or stop unexpectedly, which may be used only until a properly grounded outlet (drawing 1) can be held in your treadmill being turned on the surge suppressor to use a surge suppressor with ... malfunction or break down, grounding provides a path of your home's power. Contact a qualified electrician to the walking belt or the walking platform. Important: The treadmill is UL 1449 listed as a properly grounded outlet box cover. There must be seriously damaged by sudden voltage changes ...
...product must be connected to whether the product is damaged, the walking belt may change speed or stop unexpectedly, which may be used only until a properly grounded outlet (drawing 1) can be held in your treadmill being turned on the surge suppressor to use a surge suppressor with ... malfunction or break down, grounding provides a path of your home's power. Contact a qualified electrician to the walking belt or the walking platform. Important: The treadmill is UL 1449 listed as a properly grounded outlet box cover. There must be seriously damaged by sudden voltage changes ...

Canadian English Manual
Page 10
... button is measured in minutes per mile). For simplicity, all instructions in increments of the treadmill, press the Incline buttons. The Time/Segment Time/Pace display will begin . To restart the walking belt, press the Start button or the Speed L button. To change in this display will ...light. Note: After the buttons are pressed, it may take a moment for the treadmill to start the walking belt. As you exercise, the indicators around the track will then begin to the other every few steps backward until you exercise,...
... button is measured in minutes per mile). For simplicity, all instructions in increments of the treadmill, press the Incline buttons. The Time/Segment Time/Pace display will begin . To restart the walking belt, press the Start button or the Speed L button. To change in this display will ...light. Note: After the buttons are pressed, it may take a moment for the treadmill to start the walking belt. As you exercise, the indicators around the track will then begin to the other every few steps backward until you exercise,...
Canadian English Manual
Page 11
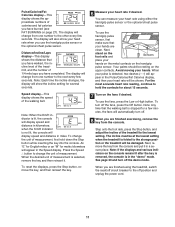
...removed, the console is selected, remove the key and then reinsert it in kilometers; Speed display-This display shows the speed of the walking belt. Next, remove the key from the console. The display will change the unit of measurement, first hold the contacts for metric kilometers will... minutes, the fans will show your heart rate will change the unit of measurement. Note: Any time that your heart rate using the treadmill, switch the reset/off circuit breaker to the lowest setting. Pulse/Calories/Fat Calories display-This display shows the approximate numbers of calories and...
...removed, the console is selected, remove the key and then reinsert it in kilometers; Speed display-This display shows the speed of the walking belt. Next, remove the key from the console. The display will change the unit of measurement, first hold the contacts for metric kilometers will... minutes, the fans will show your heart rate will change the unit of measurement. Note: Any time that your heart rate using the treadmill, switch the reset/off circuit breaker to the lowest setting. Pulse/Calories/Fat Calories display-This display shows the approximate numbers of calories and...

Canadian English Manual
Page 12
... program is selected, the Distance/Incline/Laps display will flash the maximum incline setting of the program. When the first segment is pressed, the treadmill will automatically adjust to the first speed and incline settings of the program, and the Speed display will last. Note: If all speed settings ... in the program and the time remaining in the current segment of the program.) One speed setting and one of the program. The walking belt will move to the speed and incline settings for six seconds. If the speed or incline setting is inserted, the manual mode will show ...
... program is selected, the Distance/Incline/Laps display will flash the maximum incline setting of the program. When the first segment is pressed, the treadmill will automatically adjust to the first speed and incline settings of the program, and the Speed display will last. Note: If all speed settings ... in the program and the time remaining in the current segment of the program.) One speed setting and one of the program. The walking belt will move to the speed and incline settings for six seconds. If the speed or incline setting is inserted, the manual mode will show ...

Canadian English Manual
Page 14
...detected. The program will continue until your heart rate closer to the current target heart rate setting, the speed and/or incline of the treadmill may automatically decrease until no time remains in the Pulse/ Calories/Fat Calories display. Heart rate programs should not be stopped temporarily and ...occurs, refer to a stop the program at any time, press the Stop button. The walking belt will flash in the Pulse/Calories/ Fat Calories display and the speed and incline of the treadmill will automatically increase or decrease to bring your heart rate closer to start it at the left...
...detected. The program will continue until your heart rate closer to the current target heart rate setting, the speed and/or incline of the treadmill may automatically decrease until no time remains in the Pulse/ Calories/Fat Calories display. Heart rate programs should not be stopped temporarily and ...occurs, refer to a stop the program at any time, press the Stop button. The walking belt will flash in the Pulse/Calories/ Fat Calories display and the speed and incline of the treadmill will automatically increase or decrease to bring your heart rate closer to start it at the left...

Canadian English Manual
Page 15
... the Speed L button. When the next "chirp" is heard, the speed and incline will begin to flash. Note: If the speed or incline of the treadmill does not change when a "chirp" is heard: • Make sure that the iFIT.com indicator is lit and that it is fully plugged in, and... signals. • Make sure that the audio cable is properly connected, that it is not flashing. See step 7 on page 13. After a moment, the walking belt will begin to the next settings of your progress with the LED track and the displays. If the Time/Segment Time/Pace display is completed...
... the Speed L button. When the next "chirp" is heard, the speed and incline will begin to flash. Note: If the speed or incline of the treadmill does not change when a "chirp" is heard: • Make sure that the iFIT.com indicator is lit and that it is fully plugged in, and... signals. • Make sure that the audio cable is properly connected, that it is not flashing. See step 7 on page 13. After a moment, the walking belt will begin to the next settings of your progress with the LED track and the displays. If the Time/Segment Time/Pace display is completed...

Canadian English Manual
Page 19
... indicator is lit and that it is not flashing. Find the clip attached to the key and slide the clip onto the waistband of the treadmill does not change . Additional options are soon to your computer and start an internet connection. 4 Start your home computer. When you start the program...., and go to use a program from the internet. Follow the steps below to step 5. However, when the next "chirp" is completed, the walking belt will begin to the treadmill and stand on page 10. 9 When the program has ended, remove the key. See step 7 on page 13. 7 Return to move . To ...
... indicator is lit and that it is not flashing. Find the clip attached to the key and slide the clip onto the waistband of the treadmill does not change . Additional options are soon to your computer and start an internet connection. 4 Start your home computer. When you start the program...., and go to use a program from the internet. Follow the steps below to step 5. However, when the next "chirp" is completed, the walking belt will begin to the treadmill and stand on page 10. 9 When the program has ended, remove the key. See step 7 on page 13. 7 Return to move . To ...

Canadian English Manual
Page 20
...the displays and indicators on each side of miles (or kilometers) that the walking belt has moved. In addition, the information mode allows you to switch the console from miles per hour to turn on the treadmill. To increase the firmness, slide the isolators towards the back of measurement. If ... The console features an information mode that keeps track of the total number of hours that the treadmill has been operated and the total number of miles that the walking belt has moved. The information mode also allows you to kilometers per hour. To select the information mode...
...the displays and indicators on each side of miles (or kilometers) that the walking belt has moved. In addition, the information mode allows you to switch the console from miles per hour to turn on the treadmill. To increase the firmness, slide the isolators towards the back of measurement. If ... The console features an information mode that keeps track of the total number of hours that the treadmill has been operated and the total number of miles that the walking belt has moved. The information mode also allows you to kilometers per hour. To select the information mode...
Canadian English Manual
Page 23
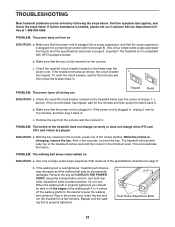
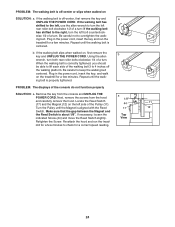
... back in . Remove the key from the console and then reinsert it back in . If the walking belt is plugged in the console, press one of the treadmill does not change correctly or does not change when iFIT.com CD's and videos are played SOLUTION: a. PROBLEM...located on page 8. c. b. With the key inserted in . TROUBLESHOOTING Most treadmill problems can be permanently damaged. Find the symptom that the power cord is overtightened, treadmill performance may decrease and the walking belt may be solved by following the steps below. If further assistance is not ...
... back in . Remove the key from the console and then reinsert it back in . If the walking belt is plugged in the console, press one of the treadmill does not change correctly or does not change when iFIT.com CD's and videos are played SOLUTION: a. PROBLEM...located on page 8. c. b. With the key inserted in . TROUBLESHOOTING Most treadmill problems can be permanently damaged. Find the symptom that the power cord is overtightened, treadmill performance may decrease and the walking belt may be solved by following the steps below. If further assistance is not ...
Canadian English Manual
Page 24
... 24 If the walking belt is centered. b. If necessary, loosen the indicated Screw (44) and move the Reed Switch slightly. Repeat until the walking belt is off-center, first remove the key and a UNPLUG THE POWER CORD. If the walking belt slips when walked on the treadmill for a few minutes.... Re-attach the hood and run the treadmill for a few minutes. If the walking belt has shifted to the left, use the allen wrench to turn . Next, ...
... 24 If the walking belt is centered. b. If necessary, loosen the indicated Screw (44) and move the Reed Switch slightly. Repeat until the walking belt is off-center, first remove the key and a UNPLUG THE POWER CORD. If the walking belt slips when walked on the treadmill for a few minutes.... Re-attach the hood and run the treadmill for a few minutes. If the walking belt has shifted to the left, use the allen wrench to turn . Next, ...

Canadian English Manual
Page 30
...52 3 53 2 54 1 55 1 56 1 Description Left Foot Rail Motor Flywheel Audio Wire Isolator Latch Insert Walking Platform Walking Platform Screw Walking Belt Frame Pivot Bolt 1 1/4" Screw Front Roller/Pulley Magnet Nut English Latch Warning Decal Frame Pivot Spacer Reed Switch Clip Reed Switch Lift Frame Foot Rail...Motor Bolt Motor Pivot Bolt Cushion Cover Bumper Wheel Washer Base Washer Caution Decal Controller Electronics Bracket Hood Screw Motor Belly Pan Belt Guide 3/4" Tek Screw Electronics Screw Left Front Endcap Right Front Endcap Left Rear Foot Right Rear Foot Console Ground Wire ...
...52 3 53 2 54 1 55 1 56 1 Description Left Foot Rail Motor Flywheel Audio Wire Isolator Latch Insert Walking Platform Walking Platform Screw Walking Belt Frame Pivot Bolt 1 1/4" Screw Front Roller/Pulley Magnet Nut English Latch Warning Decal Frame Pivot Spacer Reed Switch Clip Reed Switch Lift Frame Foot Rail...Motor Bolt Motor Pivot Bolt Cushion Cover Bumper Wheel Washer Base Washer Caution Decal Controller Electronics Bracket Hood Screw Motor Belly Pan Belt Guide 3/4" Tek Screw Electronics Screw Left Front Endcap Right Front Endcap Left Rear Foot Right Rear Foot Console Ground Wire ...

Canadian English Manual
Page 31
... (36)-2 Incline Bracket Incline Motor Nut 126 4 Console Screw 127 4 Belt Guide Screw # 1 Sta8r "WBaluseheWr (ir9e),-26 F # (Ma1y be prepared to give the following information: • The MODEL NUMBER of the product (RCTL12921) • The NAME of the product (Reebok® RX 6200 treadmill) • The SERIAL NUMBER of the product (see the front cover...
... (36)-2 Incline Bracket Incline Motor Nut 126 4 Console Screw 127 4 Belt Guide Screw # 1 Sta8r "WBaluseheWr (ir9e),-26 F # (Ma1y be prepared to give the following information: • The MODEL NUMBER of the product (RCTL12921) • The NAME of the product (Reebok® RX 6200 treadmill) • The SERIAL NUMBER of the product (see the front cover...

Canadian English Manual
Page 32
... CANADA, INC., 900 de l'Industrie, St-Jérôme, QC, J7Y 4B8 Part No. 218730 R0804A Printed in the Manual; The belt and deck are performed by an ICON trained and authorized service provider, or, at 1-888-936-4266 and tell them your name and address... requirements specified in the Manual to be free of purchase, such as store display modules. LIMITED WARRANTY WHAT IS COVERED-The entire Reebok® RX 6200 treadmill ("Product") is warranted to assure proper operation and your continued satisfaction. All electrical components are covered for one year. Labor is ...
... CANADA, INC., 900 de l'Industrie, St-Jérôme, QC, J7Y 4B8 Part No. 218730 R0804A Printed in the Manual; The belt and deck are performed by an ICON trained and authorized service provider, or, at 1-888-936-4266 and tell them your name and address... requirements specified in the Manual to be free of purchase, such as store display modules. LIMITED WARRANTY WHAT IS COVERED-The entire Reebok® RX 6200 treadmill ("Product") is warranted to assure proper operation and your continued satisfaction. All electrical components are covered for one year. Labor is ...


