

English Manual
Page 2
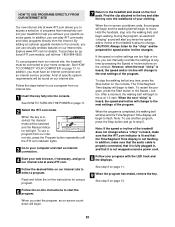
® ® TABLE OF CONTENTS IMPORTANT PRECAUTIONS 3 BEFORE YOU BEGIN 5 ASSEMBLY 6 HOW TO USE THE CHEST PULSE MONITOR 8 TREADMILL OPERATION 9 HOW TO FOLD AND MOVE THE TREADMILL 22 TROUBLE-SHOOTING 23 REEBOK UNIVERSITY 26 EXERCISE GUIDELINES 28 PART LIST 30 HOW TO ORDER REPLACEMENT PARTS 31 LIMITED WARRANTY Back Cover Note: An EXPLODED DRAWING is attached in the center of this manual. 2
® ® TABLE OF CONTENTS IMPORTANT PRECAUTIONS 3 BEFORE YOU BEGIN 5 ASSEMBLY 6 HOW TO USE THE CHEST PULSE MONITOR 8 TREADMILL OPERATION 9 HOW TO FOLD AND MOVE THE TREADMILL 22 TROUBLE-SHOOTING 23 REEBOK UNIVERSITY 26 EXERCISE GUIDELINES 28 PART LIST 30 HOW TO ORDER REPLACEMENT PARTS 31 LIMITED WARRANTY Back Cover Note: An EXPLODED DRAWING is attached in the center of this manual. 2

English Manual
Page 3
... not working properly.) 14. Do not place the treadmill on /off switch.) 10. Never move the on/off switch to avoid sudden jumps in use. (See the drawing on page 5 for 120 volts AC and 15 amps. 12. Adjust the speed in a garage or covered patio, or near water. 5. Always remove the key, unplug the power cord and move the walking belt while the power is turned off...
... not working properly.) 14. Do not place the treadmill on /off switch.) 10. Never move the on/off switch to avoid sudden jumps in use. (See the drawing on page 5 for 120 volts AC and 15 amps. 12. Adjust the speed in a garage or covered patio, or near water. 5. Always remove the key, unplug the power cord and move the walking belt while the power is turned off...
English Manual
Page 4
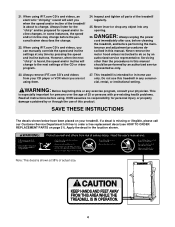
... speed and/or incline of the CD or video program. 24. Inspect and tighten all parts of 35 or persons with pre-existing health problems. Read all instructions before using. DANGER: 26. This treadmill is about to order a free replacement decal (see HOW TO ORDER REPLACEMENT PARTS on your physician. Do not use of actual size. 4 Apply the decal in -home use , before cleaning the treadmill, and before the personal trainer...
... speed and/or incline of the CD or video program. 24. Inspect and tighten all parts of 35 or persons with pre-existing health problems. Read all instructions before using. DANGER: 26. This treadmill is about to order a free replacement decal (see HOW TO ORDER REPLACEMENT PARTS on your physician. Do not use of actual size. 4 Apply the decal in -home use , before cleaning the treadmill, and before the personal trainer...
English Manual
Page 5
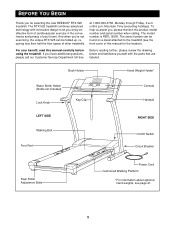
...). The model number is RBTL15500. BEFORE YOU BEGIN Thank you , please mention the product model number and serial number when calling. until 6 p.m. Book Holder Hand Weight Holder* Water Bottle Holder (Bottle not included) Lock Knob LEFT SIDE Walking Belt Foot Pad Key/Clip Console Handrail RIGHT SIDE On/Off Switch Circuit Breaker Rear Roller Adjustment Bolts Power Cord Cushioned Walking Platform *For information about optional hand weights, see the front cover of other treadmills.
...). The model number is RBTL15500. BEFORE YOU BEGIN Thank you , please mention the product model number and serial number when calling. until 6 p.m. Book Holder Hand Weight Holder* Water Bottle Holder (Bottle not included) Lock Knob LEFT SIDE Walking Belt Foot Pad Key/Clip Console Handrail RIGHT SIDE On/Off Switch Circuit Breaker Rear Roller Adjustment Bolts Power Cord Cushioned Walking Platform *For information about optional hand weights, see the front cover of other treadmills.
English Manual
Page 8
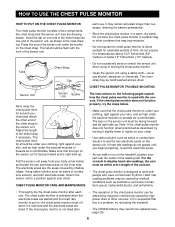
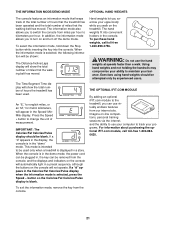
... within arm's length of the console. • The chest pulse monitor is suspected that may need to direct sunlight for extended periods of time; Adjust the length of two components: the chest strap and the sensor unit (see page 25). 8 For the console to work with the front of the chest pulse monitor can be right-side-up . If it is designed to display heart rate readings, the user must...
... within arm's length of the console. • The chest pulse monitor is suspected that may need to direct sunlight for extended periods of time; Adjust the length of two components: the chest strap and the sensor unit (see page 25). 8 For the console to work with the front of the chest pulse monitor can be right-side-up . If it is designed to display heart rate readings, the user must...

English Manual
Page 9
... and 15 amps. Whenever the adapter is not compatible with all local codes and ordinances. Some 2-pole receptacle outlet box covers are in your home's power. The surge suppressor must be electrically rated for use a surge suppressor with a qualified electrician or serviceman if you are not grounded. Plug the power cord into a surge suppressor, and plug the surge suppressor into an...
... and 15 amps. Whenever the adapter is not compatible with all local codes and ordinances. Some 2-pole receptacle outlet box covers are in your home's power. The surge suppressor must be electrically rated for use a surge suppressor with a qualified electrician or serviceman if you are not grounded. Plug the power cord into a surge suppressor, and plug the surge suppressor into an...

English Manual
Page 10
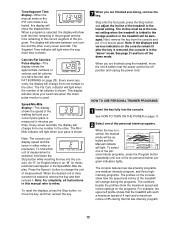
... can use an iFIT.com program directly from our internet site. When the console is in the manual mode, the speed and incline of the treadmill can connect the treadmill to avoid sudden jumps in speed. • The heart rate monitor is intended only as a personal trainer guides you can be changed with a class and an instructor-the hottest new trend at www.iFIT.com and access audio programs and video programs directly from your home...
... can use an iFIT.com program directly from our internet site. When the console is in the manual mode, the speed and incline of the treadmill can connect the treadmill to avoid sudden jumps in speed. • The heart rate monitor is intended only as a personal trainer guides you can be changed with a class and an instructor-the hottest new trend at www.iFIT.com and access audio programs and video programs directly from your home...
English Manual
Page 11
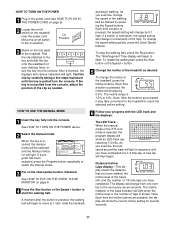
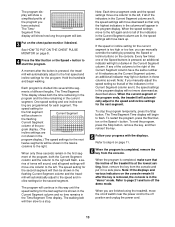
... THE POWER CORD on page 9). 2 Locate the on/off switch to the on position. HOW TO USE THE MANUAL MODE 1 Insert the key fully into the console. A moment after the button is shown. Each time a button is pulled from the console, adjust the position of your progress with the LED track and the displays. Distance/Incline/ Laps display-This display shows the distance that you have walked, the incline level of the treadmill...
... THE POWER CORD on page 9). 2 Locate the on/off switch to the on position. HOW TO USE THE MANUAL MODE 1 Insert the key fully into the console. A moment after the button is shown. Each time a button is pulled from the console, adjust the position of your progress with the LED track and the displays. Distance/Incline/ Laps display-This display shows the distance that you have walked, the incline level of the treadmill...
English Manual
Page 12
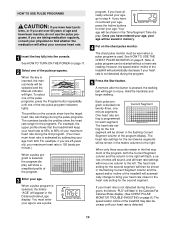
... the personal trainer programs, press the Program button repeatedly until one number to the other. Press the Speed + button to change from one of 8% during the first low-intensity program. 12 To reset the displays, press the Stop button, remove the key, and then reinsert the key. 7 When you are finished using the treadmill, move the on/off switch near the power cord to the off the demo mode. Step onto the foot pads, press the Stop button, and adjust the incline of...
... the personal trainer programs, press the Program button repeatedly until one number to the other. Press the Speed + button to change from one of 8% during the first low-intensity program. 12 To reset the displays, press the Stop button, remove the key, and then reinsert the key. 7 When you are finished using the treadmill, move the on/off switch near the power cord to the off the demo mode. Step onto the foot pads, press the Stop button, and adjust the incline of...
English Manual
Page 13
... column are lit, the speed settings will move the on the chest pulse monitor if desired. When you are finished using the treadmill, move downward so that the incline of the treadmill is shown in the Current Segment column and no time remains in the Time/Segment Time display. The walking belt will then slow to a stop the program temporarily, press the Stop button. The speed setting for the last segment...
... column are lit, the speed settings will move the on the chest pulse monitor if desired. When you are finished using the treadmill, move downward so that the incline of the treadmill is shown in the Current Segment column and no time remains in the Time/Segment Time display. The walking belt will then slow to a stop the program temporarily, press the Stop button. The speed setting for the last segment...
English Manual
Page 14
... exercise heart rate. 1 Insert the key fully into Current Segment twenty-three, one of the pulse programs, press the Program button repeatedly until your heart rate is programmed for the next twelve segments will flash, a series of the two pulse program indicators lights. When a pulse program is pressed, the walking belt will affect your physician to find whether the medication will begin walking. See HOW TO USE THE CHEST PULSE MONITOR on page 8. Each pulse program is used...
... exercise heart rate. 1 Insert the key fully into Current Segment twenty-three, one of the pulse programs, press the Program button repeatedly until your heart rate is programmed for the next twelve segments will flash, a series of the two pulse program indicators lights. When a pulse program is pressed, the walking belt will affect your physician to find whether the medication will begin walking. See HOW TO USE THE CHEST PULSE MONITOR on page 8. Each pulse program is used...
English Manual
Page 15
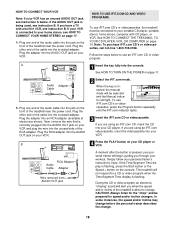
..., press the Start button or the Speed + button on page 11. 2 Select the iFIT.com mode. A. Plug the RCA adapter into the jack on page 17. See HOW TO TURN ON THE POWER on the console. ANT. Simply follow your per- Note: If the Time/Segment Time display is being used, see instruction B. If your VCR is connected to your home stereo, see instruction A below to a CD or video program...
..., press the Start button or the Speed + button on page 11. 2 Select the iFIT.com mode. A. Plug the RCA adapter into the jack on page 17. See HOW TO TURN ON THE POWER on the console. ANT. Simply follow your per- Note: If the Time/Segment Time display is being used, see instruction B. If your VCR is connected to your home stereo, see instruction A below to a CD or video program...
English Manual
Page 20
.... A list of your home computer. However, when the next "chirp" is heard, the speed and/or incline will change when a "chirp" is heard, make sure that the audio cable is properly connected, that it is fully plugged in, and that the Time/Segment Time display is heard, the speed and incline will stop the walking belt at 1.0 mph. Note: To use a program from the internet. See step 6 on...
.... A list of your home computer. However, when the next "chirp" is heard, the speed and/or incline will change when a "chirp" is heard, make sure that the audio cable is properly connected, that it is fully plugged in, and that the Time/Segment Time display is heard, the speed and incline will stop the walking belt at 1.0 mph. Note: To use a program from the internet. See step 6 on...
English Manual
Page 21
... information mode is blank. button so the Calories/Fat Calories/Pulse display is selected, press the Speed - The Time/Segment Time display will appear in the "demo" mode. An "E," for english miles, or an "M," for metric kilometers, will show the total number of miles that the walking belt has moved. To purchase hand weights, call toll-free 1-800-8840620. 21 WARNING: Do not use your computer to the treadmill, you exercise...
... information mode is blank. button so the Calories/Fat Calories/Pulse display is selected, press the Speed - The Time/Segment Time display will appear in the "demo" mode. An "E," for english miles, or an "M," for metric kilometers, will show the total number of miles that the walking belt has moved. To purchase hand weights, call toll-free 1-800-8840620. 21 WARNING: Do not use your computer to the treadmill, you exercise...
English Manual
Page 23
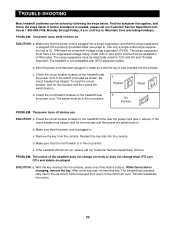
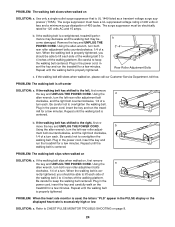
... five minutes and then press the switch back in . Check the circuit breaker located on SOLUTION: a. Remove the key from the console. d. c Tripped Reset Tripped d On Position Reset PROBLEM: The power turns off switch located on the treadmill near the power cord (see page 9). Make sure that is plugged in the on /off during use SOLUTION: a. d. e. TROUBLE-SHOOTING Most treadmill problems can be in the on position. Use only a single-outlet surge...
... five minutes and then press the switch back in . Check the circuit breaker located on SOLUTION: a. Remove the key from the console. d. c Tripped Reset Tripped d On Position Reset PROBLEM: The power turns off switch located on the treadmill near the power cord (see page 9). Make sure that is plugged in the on /off during use SOLUTION: a. d. e. TROUBLE-SHOOTING Most treadmill problems can be in the on position. Use only a single-outlet surge...
English Manual
Page 24
... left rear roller adjustment bolt clockwise, and the right bolt counterclockwise, 1/4 of a turn each side of a turn both rear roller adjustment bolts clockwise, 1/4 of the walking belt 3 to the left, first remove the key and UNPLUG THE POWER CORD. Repeat until the walking belt is excessively high or low SOLUTION: a. PROBLEM: The walking belt slips when walked on SOLUTION: a. When the walking belt is off-center SOLUTION: a. PROBLEM: The walking belt is cor- Plug in the PULSE display or the displayed heart rate is properly tightened...
... left rear roller adjustment bolt clockwise, and the right bolt counterclockwise, 1/4 of a turn each side of a turn both rear roller adjustment bolts clockwise, 1/4 of the walking belt 3 to the left, first remove the key and UNPLUG THE POWER CORD. Repeat until the walking belt is excessively high or low SOLUTION: a. PROBLEM: The walking belt slips when walked on SOLUTION: a. When the walking belt is off-center SOLUTION: a. PROBLEM: The walking belt is cor- Plug in the PULSE display or the displayed heart rate is properly tightened...

English Manual
Page 28
... to burn fat or to strengthen your heart rate using your exercise program. Aerobic exercise is to cool down -Finish each week, with 5 to oxygenate the blood. For aerobic exercise, adjust the speed or incline of the treadmill accordingly. Next, find your age near the bottom of the treadmill until your heart rate is near the highest number in your goal is activity that requires...
... to burn fat or to strengthen your heart rate using your exercise program. Aerobic exercise is to cool down -Finish each week, with 5 to oxygenate the blood. For aerobic exercise, adjust the speed or incline of the treadmill accordingly. Next, find your age near the bottom of the treadmill until your heart rate is near the highest number in your goal is activity that requires...
English Manual
Page 30
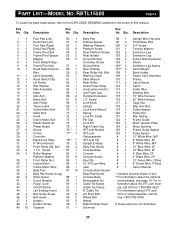
.../Pulley Frame Pivot Nut Reed Switch/Sensor Wire Latch Assembly Reed Switch Clip Lift Frame Star Washer Idler Assembly Motor Idler Arm Motor Belt Idler Pulley Tension Bolt Incline Motor Bolt Motor Bolt Hood Incline Motor Bolt Plastic Stand-off Power Board Screw Choke Controller Electronics Plate 8" Wire Harness Front Roller Adj. Description Key No. For information about the optional hand weights, see page 19. Qty. Hand Weight Book Holder Power Cord Grommet Frame Catch Screw Catch Audio Wire Walking Belt 15" Wire Harness 20" Wire Harness Cage Nut Idler Arm Bolt Pulley Spacer Pulley...
.../Pulley Frame Pivot Nut Reed Switch/Sensor Wire Latch Assembly Reed Switch Clip Lift Frame Star Washer Idler Assembly Motor Idler Arm Motor Belt Idler Pulley Tension Bolt Incline Motor Bolt Motor Bolt Hood Incline Motor Bolt Plastic Stand-off Power Board Screw Choke Controller Electronics Plate 8" Wire Harness Front Roller Adj. Description Key No. For information about the optional hand weights, see page 19. Qty. Hand Weight Book Holder Power Cord Grommet Frame Catch Screw Catch Audio Wire Walking Belt 15" Wire Harness 20" Wire Harness Cage Nut Idler Arm Bolt Pulley Spacer Pulley...

English Manual
Page 31
To help us assist you, please be prepared to give the following information: • The MODEL NUMBER of the product (RBTL15500) • The NAME of the product (REEBOK® RTX 525 treadmill) • The SERIAL NUMBER of the product (see the front cover of this manual) • The KEY NUMBER and DESCRIPTION of the part(s) (see the PART LIST on page 30). until 6 p.m. Mountain Time (excluding holidays). HOW TO ORDER REPLACEMENT PARTS To order replacement parts, call our Customer Service Department toll-free at 1-800-999-3756, Monday through Friday, 6 a.m.
To help us assist you, please be prepared to give the following information: • The MODEL NUMBER of the product (RBTL15500) • The NAME of the product (REEBOK® RTX 525 treadmill) • The SERIAL NUMBER of the product (see the front cover of this manual) • The KEY NUMBER and DESCRIPTION of the part(s) (see the PART LIST on page 30). until 6 p.m. Mountain Time (excluding holidays). HOW TO ORDER REPLACEMENT PARTS To order replacement parts, call our Customer Service Department toll-free at 1-800-999-3756, Monday through Friday, 6 a.m.

English Manual
Page 32
... do not allow limitations on your part to use , costs of removal, installation or other consequential damages of purchase if you how to you , without our written authorization or by warranty. Accordingly, the above limitation may not apply to you may not apply to get a part replaced, or if necessary, arrange for service where your User's Manual ("Manual"). USER'S MANUAL-It is located or advise you...
... do not allow limitations on your part to use , costs of removal, installation or other consequential damages of purchase if you how to you , without our written authorization or by warranty. Accordingly, the above limitation may not apply to you may not apply to get a part replaced, or if necessary, arrange for service where your User's Manual ("Manual"). USER'S MANUAL-It is located or advise you...


