
Uk Manual
Page 1
.... Serial Number Decal CUSTOMER INFORMATION If you have any questions regarding assembly, use, or maintenance of your treadmill, please contact our Customer Service Department at the numbers or addresses below: Call us: +44(0)207 4 REEBOK (733265) Fax us: +44(0)207 816 3308 Email us: Send us your questions and comments via e-mail...
.... Serial Number Decal CUSTOMER INFORMATION If you have any questions regarding assembly, use, or maintenance of your treadmill, please contact our Customer Service Department at the numbers or addresses below: Call us: +44(0)207 4 REEBOK (733265) Fax us: +44(0)207 816 3308 Email us: Send us your questions and comments via e-mail...

Uk Manual
Page 2
REEBOK and the Vector Logo are registered trademarks and service marks of this manual. This product is attached in the centre of Reebok. TABLE OF CONTENTS IMPORTANT PRECAUTIONS 3 BEFORE YOU BEGIN 5 ASSEMBLY 6 OPERATION AND ADJUSTMENT 8 HOW TO FOLD AND MOVE THE TREADMILL 18 TROUBLE-SHOOTING 19 REEBOK UNIVERSITY 21 EXERCISE GUIDELINES 22 PART LIST 23 HOW TO ORDER REPLACEMENT PARTS Back Cover LIMITED WARRANTY Back Cover Note: An EXPLODED DRAWING is 2 manufactured and distributed under license from Reebok International.
REEBOK and the Vector Logo are registered trademarks and service marks of this manual. This product is attached in the centre of Reebok. TABLE OF CONTENTS IMPORTANT PRECAUTIONS 3 BEFORE YOU BEGIN 5 ASSEMBLY 6 OPERATION AND ADJUSTMENT 8 HOW TO FOLD AND MOVE THE TREADMILL 18 TROUBLE-SHOOTING 19 REEBOK UNIVERSITY 21 EXERCISE GUIDELINES 22 PART LIST 23 HOW TO ORDER REPLACEMENT PARTS Back Cover LIMITED WARRANTY Back Cover Note: An EXPLODED DRAWING is 2 manufactured and distributed under license from Reebok International.

Uk Manual
Page 3
... drop or insert any object into an earthed circuit. When choosing a location for both men and women. The treadmill should be used by placing objects under the treadmill. 21. Athletic support clothes are standing on page 8), plug the power cord into any surface that all times....it . Do not wear loose clothing that the location and position permit access to the fuse carrier. Never start the treadmill whilst you need an extension cord, use the treadmill with 2 m (8 ft.) of clearance behind it is turned off switch.) 19. Various factors, including the user...
... drop or insert any object into an earthed circuit. When choosing a location for both men and women. The treadmill should be used by placing objects under the treadmill. 21. Athletic support clothes are standing on page 8), plug the power cord into any surface that all times....it . Do not wear loose clothing that the location and position permit access to the fuse carrier. Never start the treadmill whilst you need an extension cord, use the treadmill with 2 m (8 ft.) of clearance behind it is turned off switch.) 19. Various factors, including the user...

Uk Manual
Page 4
...authorised service representative only. 28. Servicing other than the pro- cedures in this manual should be prepared for persons over the age of the treadmill is about to the next settings of this man- Make sure that you when the speed and/or incline of 35 or persons with ...you can manually override the speed and incline settings by or through the use of the CD or video program. 26. REEBOK assumes no responsibility for in - This treadmill is especially important for speed and/or incline changes. SAVE THESE INSTRUCTIONS The decals shown have been placed on the decals before...
...authorised service representative only. 28. Servicing other than the pro- cedures in this manual should be prepared for persons over the age of the treadmill is about to the next settings of this man- Make sure that you when the speed and/or incline of 35 or persons with ...you can manually override the speed and incline settings by or through the use of the CD or video program. 26. REEBOK assumes no responsibility for in - This treadmill is especially important for speed and/or incline changes. SAVE THESE INSTRUCTIONS The decals shown have been placed on the decals before...
Uk Manual
Page 5
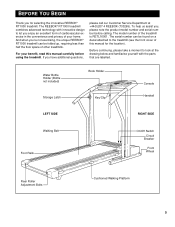
...you for the location). Before continuing, please take a moment to the treadmill (see the front cover of other treadmills. For your home. The model number of your benefit, read this manual for selecting the innovative REEBOK® RT1000 treadmill. BEFORE YOU BEGIN Thank you have additional questions, please call our Customer ... with innovative design to let you enjoy an excellent form of cardiovascular exercise in the convenience and privacy of the treadmill is RETL16001. The REEBOK® RT1000 treadmill combines advanced technology with the parts that are labelled.
...you for the location). Before continuing, please take a moment to the treadmill (see the front cover of other treadmills. For your home. The model number of your benefit, read this manual for selecting the innovative REEBOK® RT1000 treadmill. BEFORE YOU BEGIN Thank you have additional questions, please call our Customer ... with innovative design to let you enjoy an excellent form of cardiovascular exercise in the convenience and privacy of the treadmill is RETL16001. The REEBOK® RT1000 treadmill combines advanced technology with the parts that are labelled.
Uk Manual
Page 6
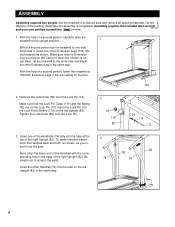
...people. Next, align the lower end of the Handrail with the corre- 82 82 sponding hole in the base of a second person, carefully raise the 1 treadmill to the other side and attach the other Handrail (74) into the tube at the top of the Handrails (74) fully into the tube on... the same way. 6 Insert one of the packing materials until assembly is on top. Next, tip the treadmill to the upright position. With the help of a second person, lower the treadmill so that the Extension Leg is turned so the Caution Decal (not shown) is completed. Make sure that both Extension...
...people. Next, align the lower end of the Handrail with the corre- 82 82 sponding hole in the base of a second person, carefully raise the 1 treadmill to the other side and attach the other Handrail (74) into the tube at the top of the Handrails (74) fully into the tube on... the same way. 6 Insert one of the packing materials until assembly is on top. Next, tip the treadmill to the upright position. With the help of a second person, lower the treadmill so that the Extension Leg is turned so the Caution Decal (not shown) is completed. Make sure that both Extension...
Uk Manual
Page 7
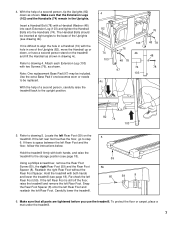
... Leg (103) and tighten the Handrail Bolts into the Handrails (74). Re-check the left Rear Foot. If the left Rear Foot (59) on the treadmill and lift the Handrail as shown in one becomes worn or needs to be inserted at right angles to the base of a second person, carefully... raise the treadmill back to the storage position (see page 18). 59 Using a phillips screwdriver, remove the Rear Foot Screw (60), the right Rear Foot (59) and the...
... Leg (103) and tighten the Handrail Bolts into the Handrails (74). Re-check the left Rear Foot. If the left Rear Foot (59) on the treadmill and lift the Handrail as shown in one becomes worn or needs to be inserted at right angles to the base of a second person, carefully... raise the treadmill back to the storage position (see page 18). 59 Using a phillips screwdriver, remove the Rear Foot Screw (60), the right Rear Foot (59) and the...
Uk Manual
Page 8
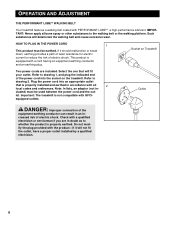
...an appropriate outlet that will not fit the outlet, have a proper outlet installed by a qualified electrician. 8 Socket on the treadmill. Do not modify the plug provided with GFCI- Such substances will deteriorate the walking belt and cause excessive wear. HOW TO PLUG..., an adaptor (not in an increased risk of electric shock. Important: The treadmill is equipped with PERFORMANT LUBETM, a high-performance lubricant. OPERATION AND ADJUSTMENT THE PERFORMANT LUBETM WALKING BELT Your treadmill features a walking belt coated with a cord having an equipment-earthing conductor and ...
...an appropriate outlet that will not fit the outlet, have a proper outlet installed by a qualified electrician. 8 Socket on the treadmill. Do not modify the plug provided with GFCI- Such substances will deteriorate the walking belt and cause excessive wear. HOW TO PLUG..., an adaptor (not in an increased risk of electric shock. Important: The treadmill is equipped with PERFORMANT LUBETM, a high-performance lubricant. OPERATION AND ADJUSTMENT THE PERFORMANT LUBETM WALKING BELT Your treadmill features a walking belt coated with a cord having an equipment-earthing conductor and ...

Uk Manual
Page 9
... Incline Display LED Track Displays Mode Button Pulse Sensor Speed Buttons Incline Start/Stop Clip Buttons Button Key FEATURES OF THE CONSOLE The treadmill console offers an impressive selection of features to help you exercise, the console will provide continuous exercise feedback. As you get the ... personal trainers. In addition, you can be changed with a class and an instructor-the hottest new trend at +44 (0) 207 4 REEBOK (733265). The console also features new iFIT.com interactive technology. Video programs offer the same benefits as a personal trainer guides you can connect ...
... Incline Display LED Track Displays Mode Button Pulse Sensor Speed Buttons Incline Start/Stop Clip Buttons Button Key FEATURES OF THE CONSOLE The treadmill console offers an impressive selection of features to help you exercise, the console will provide continuous exercise feedback. As you get the ... personal trainers. In addition, you can be changed with a class and an instructor-the hottest new trend at +44 (0) 207 4 REEBOK (733265). The console also features new iFIT.com interactive technology. Video programs offer the same benefits as a personal trainer guides you can connect ...
Uk Manual
Page 10
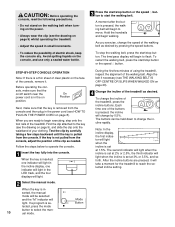
...is pulled from the console, adjust the position of the clip as desired by pressing the speed buttons. • To reduce the possibility of the treadmill. If a program is pressed, the incline will begin walking. The time/pace display will light. On Position Next, make sure that the key ... below to move. A moment after the button is not pulled from the console. When the key is in the incline display, one of the treadmill, press the incline buttons. When the key is inserted, one indicator will light in - Note: In the incline display, the first indicator will light...
...is pulled from the console, adjust the position of the clip as desired by pressing the speed buttons. • To reduce the possibility of the treadmill. If a program is pressed, the incline will begin walking. The time/pace display will light. On Position Next, make sure that the key ... below to move. A moment after the button is not pulled from the console. When the key is in the incline display, one of the treadmill, press the incline buttons. When the key is inserted, one indicator will light in - Note: In the incline display, the first indicator will light...
Uk Manual
Page 12
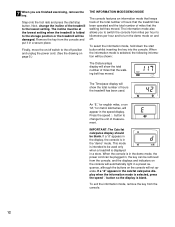
... MODE/DEMO MODE The console features an information mode that keeps track of the total number of hours that the treadmill has been operated and the total number of the treadmill to be damaged. To exit the information mode, remove the key from the console, and the displays and indicators...exercising, remove the key. To select the information mode, hold down the start /stop button. The incline must be at the lowest setting when the treadmill is displayed in the "demo" mode. Press the speed L button to change the incline of miles that the walking belt has moved. Step onto...
... MODE/DEMO MODE The console features an information mode that keeps track of the total number of hours that the treadmill has been operated and the total number of the treadmill to be damaged. To exit the information mode, remove the key from the console, and the displays and indicators...exercising, remove the key. To select the information mode, hold down the start /stop button. The incline must be at the lowest setting when the treadmill is displayed in the "demo" mode. Press the speed L button to change the incline of miles that the walking belt has moved. Step onto...
Uk Manual
Page 13
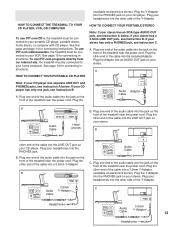
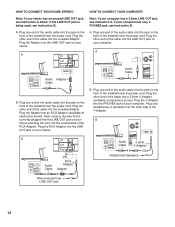
...an AUDIO OUT jack on your stereo has only a PHONES jack, see instruction B. To use iFIT.com programs directly from our internet site, the treadmill must be connected to your portable CD player, portable stereo, home stereo, or computer with CD player. Plug the Adaptor into the jack on the...the cable into the jack on the front of the audio cable into a 3.5mm Y-Adaptor (available at electronics stores). Plug one end of the treadmill near the power cord. See page 14 for connecting instructions. If your stereo. Plug one end of the audio cable into the PHONES jack on...
...an AUDIO OUT jack on your stereo has only a PHONES jack, see instruction B. To use iFIT.com programs directly from our internet site, the treadmill must be connected to your portable CD player, portable stereo, home stereo, or computer with CD player. Plug the Adaptor into the jack on the...the cable into the jack on the front of the audio cable into a 3.5mm Y-Adaptor (available at electronics stores). Plug one end of the treadmill near the power cord. See page 14 for connecting instructions. If your stereo. Plug one end of the audio cable into the PHONES jack on...
Uk Manual
Page 14
...cable into the included Adaptor. B. Plug your computer. Plug the other end of the cable into the included Adaptor. Plug one end of the treadmill near the power cord. If your computer. A LINE OUT Audio Cable Audio Adaptor Cable B. Plug one end of the audio cable into the ... RCA Adaptor. HOW TO CONNECT YOUR HOME STEREO Note: If your computer has a 3.5mm LINE OUT jack, see instruction A. Plug one end of the treadmill near the power cord. Next, remove the wire that is being used, see instruction B. A. B PHONES B CD VCR Amp LINE OUT Audio Cable RCA...
...cable into the included Adaptor. B. Plug your computer. Plug the other end of the cable into the included Adaptor. Plug one end of the treadmill near the power cord. If your computer. A LINE OUT Audio Cable Audio Adaptor Cable B. Plug one end of the audio cable into the ... RCA Adaptor. HOW TO CONNECT YOUR HOME STEREO Note: If your computer has a 3.5mm LINE OUT jack, see instruction A. Plug one end of the treadmill near the power cord. Next, remove the wire that is being used, see instruction B. A. B PHONES B CD VCR Amp LINE OUT Audio Cable RCA...
Uk Manual
Page 15
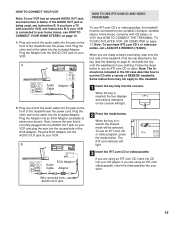
...the power cord. Plug the Adaptor into the included Adaptor. Plug the other end of the treadmill near the power cord. Note: To purchase iFIT.com CD's or videocassettes, call +44(0)207 4 REEBOK (733265). Follow the steps below . If your VCR is inserted, the four displays and various... is connected to the key (see instruction B. If you are using an iFIT.com videocassette, insert the videocassette into the unused side of REEBOK treadmills. A ANT. Plug the Adaptor into the console. Find the clip attached to your home stereo, see HOW TO CONNECT YOUR HOME STEREO ...
...the power cord. Plug the Adaptor into the included Adaptor. Plug the other end of the treadmill near the power cord. Note: To purchase iFIT.com CD's or videocassettes, call +44(0)207 4 REEBOK (733265). Follow the steps below . If your VCR is inserted, the four displays and various... is connected to the key (see instruction B. If you are using an iFIT.com videocassette, insert the videocassette into the unused side of REEBOK treadmills. A ANT. Plug the Adaptor into the console. Find the clip attached to your home stereo, see HOW TO CONNECT YOUR HOME STEREO ...
Uk Manual
Page 16
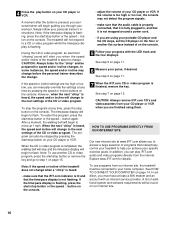
..., press the start /stop button or the speed L button again. CAUTION: Always remove iFIT.com CD's and videocassettes from the internet. The treadmill will not respond to a CD or video program whilst the time/pace display is heard, the speed and/or incline will be stopped by pressing... speed or incline buttons on the console. Explore www.iFIT.com for speed and/or incline changes. Note: If the speed or incline of the treadmill does not change to flash. In addition, you must be prepared for details. See step 5 on page 11. 6 Measure your personal trainer's instructions...
..., press the start /stop button or the speed L button again. CAUTION: Always remove iFIT.com CD's and videocassettes from the internet. The treadmill will not respond to a CD or video program whilst the time/pace display is heard, the speed and/or incline will be stopped by pressing... speed or incline buttons on the console. Explore www.iFIT.com for speed and/or incline changes. Note: If the speed or incline of the treadmill does not change to flash. In addition, you must be prepared for details. See step 5 on page 11. 6 Measure your personal trainer's instructions...
Uk Manual
Page 17
...and various indicators on the console will alert you start an internet connection. 4 Start your clothing. However, when the next "chirp" is about to the treadmill and stand on our internet site to flash. Note: If the speed or incline of the program. When you when the speed and/or incline... incline changes. 17 When the on-screen countdown ends, the program will begin and the walking belt will begin to the next settings of the treadmill does not change to move at any time by pressing the speed or incline buttons on -line instructions to move . Note: To use a program...
...and various indicators on the console will alert you start an internet connection. 4 Start your clothing. However, when the next "chirp" is about to the treadmill and stand on our internet site to flash. Note: If the speed or incline of the program. When you when the speed and/or incline... incline changes. 17 When the on-screen countdown ends, the program will begin and the walking belt will begin to the next settings of the treadmill does not change to move at any time by pressing the speed or incline buttons on -line instructions to move . Note: To use a program...
Uk Manual
Page 18
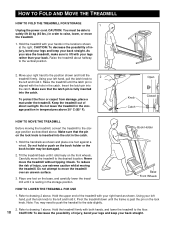
...wheels. Insert the latch pin into the catch. To protect the floor or carpet from damage, place a mat under the treadmill. Keep the treadmill out of the treadmill with your left hand, pull the lock knob to lift with the hole in temperatures above . Place one foot against ...floor. 18 CAUTION: To decrease the possibility of injury, use extreme caution whilst moving the treadmill, convert the treadmill to move the treadmill to the side slightly. 2. Never move the treadmill. 1. Pivot the treadmill down until the latch pin is inserted into the slot in order to raise, lower, ...
...wheels. Insert the latch pin into the catch. To protect the floor or carpet from damage, place a mat under the treadmill. Keep the treadmill out of the treadmill with your left hand, pull the lock knob to lift with the hole in temperatures above . Place one foot against ...floor. 18 CAUTION: To decrease the possibility of injury, use extreme caution whilst moving the treadmill, convert the treadmill to move the treadmill to the side slightly. 2. Never move the treadmill. 1. Pivot the treadmill down until the latch pin is inserted into the slot in order to raise, lower, ...
Uk Manual
Page 19
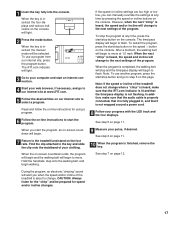
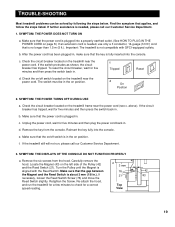
... plugged in. b. To reset the circuit breaker, wait for five minutes and then press the switch back in. Check the circuit breaker located on the treadmill frame near the power cord. Reinsert the key fully into the console. SYMPTOM: THE POWER DOES NOT TURN ON a. b. f. If 21 43 necessary, ...sure that applies, and follow the steps listed. Make sure that the power cord is fully inserted into the console. If the treadmill still will not run the treadmill for a few minutes to check for five minutes and then plug the power cord back in. Remove the six screws from the...
... plugged in. b. To reset the circuit breaker, wait for five minutes and then press the switch back in. Check the circuit breaker located on the treadmill frame near the power cord. Reinsert the key fully into the console. SYMPTOM: THE POWER DOES NOT TURN ON a. b. f. If 21 43 necessary, ...sure that applies, and follow the steps listed. Make sure that the power cord is fully inserted into the console. If the treadmill still will not run the treadmill for a few minutes to check for five minutes and then plug the power cord back in. Remove the six screws from the...
Uk Manual
Page 20
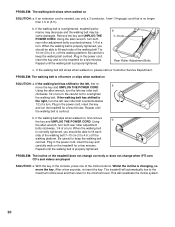
... the incline system. 20 If the walking belt has shifted to keep the walking belt centred. Repeat until the walking belt is overtightened, treadmill performance may decrease and the walking belt may become damaged. After a few minutes. Be careful not to keep the walking belt centred. ...cm (3 to the right, turn . Using the allen wrench, turn . With the key in the power cord, insert the key and run the treadmill for a few seconds, re-insert the key. This will automatically rise to the maximum incline level and then return to lift each side of a turn...
... the incline system. 20 If the walking belt has shifted to keep the walking belt centred. Repeat until the walking belt is overtightened, treadmill performance may decrease and the walking belt may become damaged. After a few minutes. Be careful not to keep the walking belt centred. ...cm (3 to the right, turn . Using the allen wrench, turn . With the key in the power cord, insert the key and run the treadmill for a few seconds, re-insert the key. This will automatically rise to the maximum incline level and then return to lift each side of a turn...
Uk Manual
Page 22
...each week, with preexisting health problems. The pulse sensor is near the lowest number in your training zone for prolonged periods of the treadmill. The sensor is activity that requires large amounts of your heart rate during exercise, use stored fat calories for exercise. EXERCISE INTENSITY ... measure your everyday life. 22 WORKOUT GUIDELINES Each workout should include the following guidelines will help you may affect the accuracy of the treadmill until your heart rate is not a medical device. The key to success is too high or too low, adjust the speed or...
...each week, with preexisting health problems. The pulse sensor is near the lowest number in your training zone for prolonged periods of the treadmill. The sensor is activity that requires large amounts of your heart rate during exercise, use stored fat calories for exercise. EXERCISE INTENSITY ... measure your everyday life. 22 WORKOUT GUIDELINES Each workout should include the following guidelines will help you may affect the accuracy of the treadmill until your heart rate is not a medical device. The key to success is too high or too low, adjust the speed or...


