
English Manual
Page 2
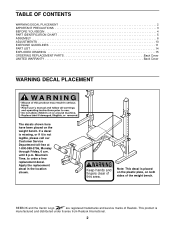
.... 2 Note: This decal is placed on the plastic plate, on the weight bench. Apply the replacement decal in the location shown. Mountain Time, to order a free replacement decal. Keep hands and fingers clear of Reebok. REEBOK and the Vector Logo are registered trademarks and service marks of this area. This product is not legible... 15 ORDERING REPLACEMENT PARTS Back Cover LIMITED WARRANTY Back Cover WARNING DECAL PLACEMENT The decals shown here have been placed on both sides of the weight bench.
.... 2 Note: This decal is placed on the plastic plate, on the weight bench. Apply the replacement decal in the location shown. Mountain Time, to order a free replacement decal. Keep hands and fingers clear of Reebok. REEBOK and the Vector Logo are registered trademarks and service marks of this area. This product is not legible... 15 ORDERING REPLACEMENT PARTS Back Cover LIMITED WARRANTY Back Cover WARNING DECAL PLACEMENT The decals shown here have been placed on both sides of the weight bench.
English Manual
Page 3
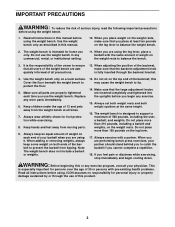
... any exercise program, consult your physician. When adding or removing weights, always keep an equal amount of weight on the leg lever. 17. Note: The weight bench does not include a barbell or weights. 13. The weight bench is the responsibility of the owner to support a maximum of ... or property damage sustained by or through the backrest bracket. 4. When you place weight on the weight rests to balance the weight bench. 2. ICON assumes no responsibility for home use the weight bench. IMPORTANT PRECAUTIONS WARNING: To reduce the risk of serious injury, read the following...
... any exercise program, consult your physician. When adding or removing weights, always keep an equal amount of weight on the leg lever. 17. Note: The weight bench does not include a barbell or weights. 13. The weight bench is the responsibility of the owner to support a maximum of ... or property damage sustained by or through the backrest bracket. 4. When you place weight on the weight rests to balance the weight bench. 2. ICON assumes no responsibility for home use the weight bench. IMPORTANT PRECAUTIONS WARNING: To reduce the risk of serious injury, read the following...
English Manual
Page 4
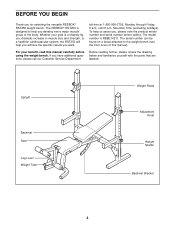
...found on a decal attached to help you , please note the product model number and serial number before using the weight bench. Upright Backrest Seat Leg Lever Weight Tube Weight Rests Adjustment Knob Weight Spotter Backrest Bracket 4 until 6 p.m. For your goal is a shapely figure, dramatic increase in muscle size and strength... Department Before reading further, please review the drawing below and familiarize yourself with the parts that are labeled. The REEBOK® RST250 is RBBE14211. BEFORE YOU BEGIN Thank you for selecting the versatile REEBOK® RST250 weight bench.
...found on a decal attached to help you , please note the product model number and serial number before using the weight bench. Upright Backrest Seat Leg Lever Weight Tube Weight Rests Adjustment Knob Weight Spotter Backrest Bracket 4 until 6 p.m. For your goal is a shapely figure, dramatic increase in muscle size and strength... Department Before reading further, please review the drawing below and familiarize yourself with the parts that are labeled. The REEBOK® RST250 is RBBE14211. BEFORE YOU BEGIN Thank you for selecting the versatile REEBOK® RST250 weight bench.
English Manual
Page 6
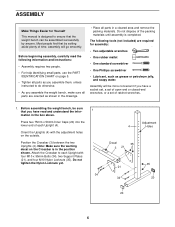
... Locknuts yet. 34 Adjustment 4 Holes Decal 35 3 21 35 21 34 20 20 6 Before assembling the weight bench, be sure 1 that you assemble the weight bench, make sure all parts as you have read the following tools (not included) are oriented as grease or petroleum...a socket set, a set of open-end or closed-end wrenches, or a set of ratchet wrenches. 1. Most people find that the weight bench can be more convenient if you assemble them, unless instructed to each Upright (4). The following information and instructions: • Assembly requires two people...
... Locknuts yet. 34 Adjustment 4 Holes Decal 35 3 21 35 21 34 20 20 6 Before assembling the weight bench, be sure 1 that you assemble the weight bench, make sure all parts as you have read the following tools (not included) are oriented as grease or petroleum...a socket set, a set of open-end or closed-end wrenches, or a set of ratchet wrenches. 1. Most people find that the weight bench can be more convenient if you assemble them, unless instructed to each Upright (4). The following information and instructions: • Assembly requires two people...

English Manual
Page 9
... over the left Upright (4). Turn the Knob clockwise until it will be explained in the Left Weight Spotter (11) out as far as it is tight. The use the weight bench. Screw a Large Adjustment Knob (18) into the top and bot- 11 tom of the Seat to the Seat Frame with the right... Upright (not shown). Press Square Bushings (16) into the Weight Rest and the Weight Spotter. Repeat this step with an M6 Washer...
... over the left Upright (4). Turn the Knob clockwise until it will be explained in the Left Weight Spotter (11) out as far as it is tight. The use the weight bench. Screw a Large Adjustment Knob (18) into the top and bot- 11 tom of the Seat to the Seat Frame with the right... Upright (not shown). Press Square Bushings (16) into the Weight Rest and the Weight Spotter. Repeat this step with an M6 Washer...
English Manual
Page 10
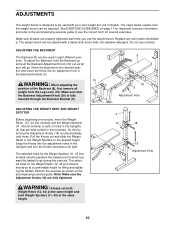
... it will go during the exercise. ADJUSTMENTS The weight bench is fully inserted through the Backrest Bracket (9). 8 30 9 Adjustment Hole ADJUSTING THE WEIGHT REST AND WEIGHT SPOTTER Before beginning an exercise, move the Weight Rests (12, 44 [not shown]) and the Weight Spotters (11, 45 [not shown]) to go...) are best suited for that are fully tightened. Do not use the weight bench. The steps below explain how the weight bench can be at the same height. 4 12 18 18 Adjustment Hole 11 10 The weight bench can be used with a damp cloth and a mild, non-abrasive detergent...
... it will go during the exercise. ADJUSTMENTS The weight bench is fully inserted through the Backrest Bracket (9). 8 30 9 Adjustment Hole ADJUSTING THE WEIGHT REST AND WEIGHT SPOTTER Before beginning an exercise, move the Weight Rests (12, 44 [not shown]) and the Weight Spotters (11, 45 [not shown]) to go...) are best suited for that are fully tightened. Do not use the weight bench. The steps below explain how the weight bench can be at the same height. 4 12 18 18 Adjustment Hole 11 10 The weight bench can be used with a damp cloth and a mild, non-abrasive detergent...
English Manual
Page 16
... must be prepared to give the following information when calling: • The MODEL NUMBER of the product (RBBE14211) • The NAME of the product (REEBOK® RST250 weight bench) • The SERIAL NUMBER of its authorized service centers. No other warranty beyond that specifically set forth herein. Accordingly, the above limitation may not...
... must be prepared to give the following information when calling: • The MODEL NUMBER of the product (RBBE14211) • The NAME of the product (REEBOK® RST250 weight bench) • The SERIAL NUMBER of its authorized service centers. No other warranty beyond that specifically set forth herein. Accordingly, the above limitation may not...
