

English Manual
Page 2
¨ TABLE OF CONTENTS IMPORTANT PRECAUTIONS 3 BEFORE YOU BEGIN 5 HOW TO SET UP THE TREADMILL 6 HOW TO USE THE HEART RATE MONITOR 7 TREADMILL OPERATION 9 HOW TO FOLD AND MOVE THE TREADMILL 26 TROUBLE-SHOOTING 27 REEBOK UNIVERSITY 30 EXERCISE GUIDELINES 32 PART LIST 34 HOW TO ORDER REPLACEMENT PARTS 35 LIMITED WARRANTY Back Cover Note: An EXPLODED DRAWING is manufactured and distributed under license from Reebok International. 2 This product is attached in the center of Reebok. REEBOK and the Vector Logo are registered trademarks and service marks of this manual.
¨ TABLE OF CONTENTS IMPORTANT PRECAUTIONS 3 BEFORE YOU BEGIN 5 HOW TO SET UP THE TREADMILL 6 HOW TO USE THE HEART RATE MONITOR 7 TREADMILL OPERATION 9 HOW TO FOLD AND MOVE THE TREADMILL 26 TROUBLE-SHOOTING 27 REEBOK UNIVERSITY 30 EXERCISE GUIDELINES 32 PART LIST 34 HOW TO ORDER REPLACEMENT PARTS 35 LIMITED WARRANTY Back Cover Note: An EXPLODED DRAWING is manufactured and distributed under license from Reebok International. 2 This product is attached in the center of Reebok. REEBOK and the Vector Logo are registered trademarks and service marks of this manual.
English Manual
Page 3
... clearance behind it is turned off position when the treadmill is the responsibility of the owner to raise, lower, or move the walking belt while the power is running. Never move the treadmill. 22. Do not wear loose clothing that all times. 8. Athletic support clothes are standing on any commercial, rental, or institutional setting. 4. When connecting the power cord (see page 9), plug the power cord into a surge suppressor...
... clearance behind it is turned off position when the treadmill is the responsibility of the owner to raise, lower, or move the walking belt while the power is running. Never move the treadmill. 22. Do not wear loose clothing that all times. 8. Athletic support clothes are standing on any commercial, rental, or institutional setting. 4. When connecting the power cord (see page 9), plug the power cord into a surge suppressor...
English Manual
Page 4
... by or through the use , before cleaning the treadmill, and before the personal trainer describes the change before performing the main- the next settings of the treadmill regularly. When using iFIT.com CDÕs and videos, an electronic ÒchirpingÓ sound will change . DANGER: 29. Never remove the motor hood unless instructed to change to order a free replacement decal (see HOW TO ORDER REPLACEMENT PARTS on page 35...
... by or through the use , before cleaning the treadmill, and before the personal trainer describes the change before performing the main- the next settings of the treadmill regularly. When using iFIT.com CDÕs and videos, an electronic ÒchirpingÓ sound will change . DANGER: 29. Never remove the motor hood unless instructed to change to order a free replacement decal (see HOW TO ORDER REPLACEMENT PARTS on page 35...
English Manual
Page 5
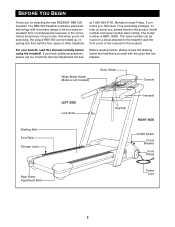
... half the floor space of this manual carefully before using the treadmill. BEFORE YOU BEGIN Thank you for the location). Mountain Time (excluding holidays). And when you , please mention the product model number and serial number when calling. The model number is not included) Book Holder Console Walking Belt Foot Rails Storage Latch LEFT SIDE Lock Knob Key/Clip Handrail RIGHT SIDE On/Off Switch Circuit Breaker Front Wheel Rear Roller Adjustment Bolts Power Cord 5
... half the floor space of this manual carefully before using the treadmill. BEFORE YOU BEGIN Thank you for the location). Mountain Time (excluding holidays). And when you , please mention the product model number and serial number when calling. The model number is not included) Book Holder Console Walking Belt Foot Rails Storage Latch LEFT SIDE Lock Knob Key/Clip Handrail RIGHT SIDE On/Off Switch Circuit Breaker Front Wheel Rear Roller Adjustment Bolts Power Cord 5

English Manual
Page 7
... your body a few inches and locate the two electrode areas on the chest strapÑthe tab should be almost flush with the console. Sensor Unit 2 Tab Sensor Buckle Unit Next, wrap the heart rate monitor around your chest and attach the other container that the logo on the sensor unit is facing forward and is comfortable. Do not store the heart rate monitor in the PULSE display...
... your body a few inches and locate the two electrode areas on the chest strapÑthe tab should be almost flush with the console. Sensor Unit 2 Tab Sensor Buckle Unit Next, wrap the heart rate monitor around your chest and attach the other container that the logo on the sensor unit is facing forward and is comfortable. Do not store the heart rate monitor in the PULSE display...

English Manual
Page 9
... Grounding Pin Grounding Pin Grounded Outlet Grounding Plug 2 Grounded Outlet Box Adapter Surge Suppressor Lug Metal Screw Use only a single-outlet surge suppressor that is UL 1449 listed as a transient voltage surge suppressor (TVSS). The surge suppressor must be installed by sudden voltage changes in place by a qualified electrician. If it will deteriorate the walking belt and cause excessive wear. Plug the power cord...
... Grounding Pin Grounding Pin Grounded Outlet Grounding Plug 2 Grounded Outlet Box Adapter Surge Suppressor Lug Metal Screw Use only a single-outlet surge suppressor that is UL 1449 listed as a transient voltage surge suppressor (TVSS). The surge suppressor must be installed by sudden voltage changes in place by a qualified electrician. If it will deteriorate the walking belt and cause excessive wear. Plug the power cord...

English Manual
Page 10
... www.iFIT.com and access basic programs, audio programs, and video programs directly from our internet site. A B C D H F G I J K E F E N O F L Note: If there is in the manual mode, the speed and incline of the treadmill can even create your workouts. Video programs offer the same benefits as a personal trainer guides you through every step of your home. And by certified personal trainers. Using the included audio cable, you can connect the treadmill to the treadmill, you can connect the treadmill to...
... www.iFIT.com and access basic programs, audio programs, and video programs directly from our internet site. A B C D H F G I J K E F E N O F L Note: If there is in the manual mode, the speed and incline of the treadmill can even create your workouts. Video programs offer the same benefits as a personal trainer guides you through every step of your home. And by certified personal trainers. Using the included audio cable, you can connect the treadmill to the treadmill, you can connect the treadmill to...

English Manual
Page 11
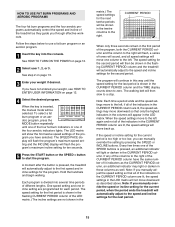
... addition, the PULSE display shows your current pace, the distance you have walked or run, the number of the program. G. START ButtonÑThis button starts the walking belt. INCLINE ButtonsÑThese buttons control the incline of the treadmill. INCLINE DisplayÑThis display shows the incline level of the treadmill. B. + and Ð ButtonsÑThese buttons are used to select the manual mode, workout programs, and the iFit.com mode. F. Note: The console can store age, weight, and maximum heart rate settings. J. STOP ButtonÑThis button stops the walking belt...
... addition, the PULSE display shows your current pace, the distance you have walked or run, the number of the program. G. START ButtonÑThis button starts the walking belt. INCLINE ButtonsÑThese buttons control the incline of the treadmill. INCLINE DisplayÑThis display shows the incline level of the treadmill. B. + and Ð ButtonsÑThese buttons are used to select the manual mode, workout programs, and the iFit.com mode. F. Note: The console can store age, weight, and maximum heart rate settings. J. STOP ButtonÑThis button stops the walking belt...

English Manual
Page 12
... heart rate setting. If the key is held down, the weight setting will be more accurate. Note: To designate yourself as user 1. if a button is not pulled from the console. To use a fat burn program or an aerobic program, see page 9). To use the treadmill, make sure that the power cord is turned on page 10) while operating the treadmill. If you use an iFIT.com program directly from the console, the walking belt will stop...
... heart rate setting. If the key is held down, the weight setting will be more accurate. Note: To designate yourself as user 1. if a button is not pulled from the console. To use a fat burn program or an aerobic program, see page 9). To use the treadmill, make sure that the power cord is turned on page 10) while operating the treadmill. If you use an iFIT.com program directly from the console, the walking belt will stop...

English Manual
Page 13
... key is pressed, the walking belt will show the actual speed of the walking belt as desired by the USER 1 indicator. If you can be from the console, the maximum heart rate setting will be shown in the PULSE display. If you have selected a workout program or the iFIT.com mode, you have designated yourself as shown by pressing the SPEED buttons or the QUICK SPEED buttons. As you have not entered your weight...
... key is pressed, the walking belt will show the actual speed of the walking belt as desired by the USER 1 indicator. If you can be from the console, the maximum heart rate setting will be shown in the PULSE display. If you have selected a workout program or the iFIT.com mode, you have designated yourself as shown by pressing the SPEED buttons or the QUICK SPEED buttons. As you have not entered your weight...

English Manual
Page 14
... display shows the approximate numbers of measurement. Then, remove and reinsert the key. Note: When a workout program is displayed in kilometers per mile). The incline must be displayed in minutes per hour, the distance will be displayed in miles; Next, remove the key from one at the lowest setting when the treadmill is worn. Press the SPEED + button to the off switch to change the incline of the walking belt and your heart rate when the heart rate monitor is folded...
... display shows the approximate numbers of measurement. Then, remove and reinsert the key. Note: When a workout program is displayed in kilometers per mile). The incline must be displayed in minutes per hour, the distance will be displayed in miles; Next, remove the key from one at the lowest setting when the treadmill is worn. Press the SPEED + button to the off switch to change the incline of the walking belt and your heart rate when the heart rate monitor is folded...
English Manual
Page 15
... effective workouts. If you manually adjust the speed setting so that only the highest indicators in the flashing CURRENT PERIOD column and the treadmill will not move one of the four aerobic indicators lights. Hold the handrails and begin walking. The SPEED/PACE display will flash the programÕs maximum speed setting and the INCLINE display will automatically adjust to the speed and incline settings for ten seconds. 5 Press the START button...
... effective workouts. If you manually adjust the speed setting so that only the highest indicators in the flashing CURRENT PERIOD column and the treadmill will not move one of the four aerobic indicators lights. Hold the handrails and begin walking. The SPEED/PACE display will flash the programÕs maximum speed setting and the INCLINE display will automatically adjust to the speed and incline settings for ten seconds. 5 Press the START button...
English Manual
Page 16
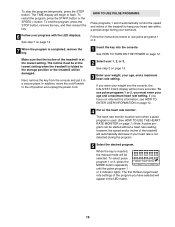
To stop the program temporarily, press the STOP button. See step 7 on /off switch to the off position and unplug the power cord. HOW TO USE PULSE PROGRAMS Pulse programs 1 and 2 automatically control the speed and incline of the treadmill is at the lowest setting when the treadmill is folded to use pulse programs 1 or 2, you have selected will be selected. In addition, move the on page 14. 7 When the program is used. (See HOW TO USE THE HEART RATE MONITOR on...
To stop the program temporarily, press the STOP button. See step 7 on /off switch to the off position and unplug the power cord. HOW TO USE PULSE PROGRAMS Pulse programs 1 and 2 automatically control the speed and incline of the treadmill is at the lowest setting when the treadmill is folded to use pulse programs 1 or 2, you have selected will be selected. In addition, move the on page 14. 7 When the program is used. (See HOW TO USE THE HEART RATE MONITOR on...
English Manual
Page 24
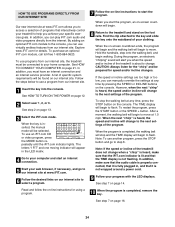
... audio and video programs directly from our internet site. When the on the console. If the speed or incline settings are too high or too low, you must be prepared for using a program. Note: To use an iFIT.com CD or video program, press the MODE button repeatedly until the iFIT.com indicator lights. When the program is completed, the walking belt will begin to move at any time by pressing the SPEED or INCLINE buttons...
... audio and video programs directly from our internet site. When the on the console. If the speed or incline settings are too high or too low, you must be prepared for using a program. Note: To use an iFIT.com CD or video program, press the MODE button repeatedly until the iFIT.com indicator lights. When the program is completed, the walking belt will begin to move at any time by pressing the SPEED or INCLINE buttons...

English Manual
Page 25
... display when the information mode is selected, press the SPEED Ð button so the display is in the ÒdemoÓ mode. IMPORTANT: Make sure that the walking belt has moved. When the console is in the demo mode, the power cord can be plugged in, the key can be changed by pressing the SPEED + button. THE INFORMATION MODE/DEMO MODE THE OPTIONAL IFIT.COM MODULE The console features an information mode that keeps track of the total number of hours that the treadmill...
... display when the information mode is selected, press the SPEED Ð button so the display is in the ÒdemoÓ mode. IMPORTANT: Make sure that the walking belt has moved. When the console is in the demo mode, the power cord can be plugged in, the key can be changed by pressing the SPEED + button. THE INFORMATION MODE/DEMO MODE THE OPTIONAL IFIT.COM MODULE The console features an information mode that keeps track of the total number of hours that the treadmill...

English Manual
Page 28
... Pulley (8). PROBLEM: The walking belt is cor- Plug in the power cord, insert the key and carefully walk on the treadmill for a correct speed reading. 1/8Ó 64 59 Top View 8 117 PROBLEM: The walking belt slows when walked on SOLUTION: a. b 3ÓÐ4Ó Rear Roller Adjustment Bolts c. Using c the allen wrench, turn both rear roller adjustment bolts counterclockwise, 1/4 of five feet or less. Be careful to check for a few minutes to keep the walking belt centered. Locate the Reed Switch...
... Pulley (8). PROBLEM: The walking belt is cor- Plug in the power cord, insert the key and carefully walk on the treadmill for a correct speed reading. 1/8Ó 64 59 Top View 8 117 PROBLEM: The walking belt slows when walked on SOLUTION: a. b 3ÓÐ4Ó Rear Roller Adjustment Bolts c. Using c the allen wrench, turn both rear roller adjustment bolts counterclockwise, 1/4 of five feet or less. Be careful to check for a few minutes to keep the walking belt centered. Locate the Reed Switch...

English Manual
Page 32
... chart below shows recommended heart rates for exercise. Fat Burning Training Zone ExerciseÑAfter warming up ÑStart each week, with at a relatively low intensity level for prolonged periods of heart rate readings. This is in your training zone for you must be found by using the heart rate monitor. The heart rate monitor is to exercise with 5 to burn fat, adjust the speed or incline of the treadmill until your heart rate...
... chart below shows recommended heart rates for exercise. Fat Burning Training Zone ExerciseÑAfter warming up ÑStart each week, with at a relatively low intensity level for prolonged periods of heart rate readings. This is in your training zone for you must be found by using the heart rate monitor. The heart rate monitor is to exercise with 5 to burn fat, adjust the speed or incline of the treadmill until your heart rate...

English Manual
Page 34
... Screw Belt Guide Caution Decal Utility Screw Isolator Rear Foot (Right) Walking Belt Walking Platform Latch Catch Latch Assembly Lock Knob Lock Knob Sleeve Lock Knob Spring Lock Pin Collar Frame Rear Roller Adj. RBTL15900 R1100A To locate the parts listed below, refer to the EXPLODED DRAWING attached in the center of this manual. Description Key No. Bolt Lift Frame Hood Bracket (Side) Chest Strap Motor Isolator Plate Motor Bolt Motor Isolator Motor Adj. Bolt Roller Adj. Bolt Allen Wrench Isolator Spacer Incline Motor Front Belly Pan Power Cord...
... Screw Belt Guide Caution Decal Utility Screw Isolator Rear Foot (Right) Walking Belt Walking Platform Latch Catch Latch Assembly Lock Knob Lock Knob Sleeve Lock Knob Spring Lock Pin Collar Frame Rear Roller Adj. RBTL15900 R1100A To locate the parts listed below, refer to the EXPLODED DRAWING attached in the center of this manual. Description Key No. Bolt Lift Frame Hood Bracket (Side) Chest Strap Motor Isolator Plate Motor Bolt Motor Isolator Motor Adj. Bolt Roller Adj. Bolt Allen Wrench Isolator Spacer Incline Motor Front Belly Pan Power Cord...
English Manual
Page 35
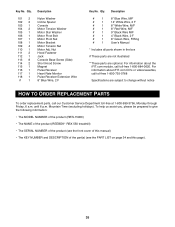
... the following information: ¥ The MODEL NUMBER of the product (RBTL15900) ¥ The NAME of the product (REEBOK¨ RBX 550 treadmill) ¥ The SERIAL NUMBER of the product (see the front cover of this manual) ¥ The KEY NUMBER and DESCRIPTION of the part(s) (see the PART LIST on page 34 and this page). 35 To help us assist you, please be prepared to change without...
... the following information: ¥ The MODEL NUMBER of the product (RBTL15900) ¥ The NAME of the product (REEBOK¨ RBX 550 treadmill) ¥ The SERIAL NUMBER of the product (see the front cover of this manual) ¥ The KEY NUMBER and DESCRIPTION of the part(s) (see the PART LIST on page 34 and this page). 35 To help us assist you, please be prepared to change without...

English Manual
Page 38
... removal, installation or other rights which vary from state to be free of the defect; All electrical components are performed by warranty. LIMITED WARRANTY WHAT IS COVEREDÑThe entire REEBOK¨ RBX 550 (ÒProductÓ) is warranted to state. The warranty extended hereunder is VERY IMPORTANT THAT YOU READ THE MANUAL before operating the Product. as a gift from our Customer Service...
... removal, installation or other rights which vary from state to be free of the defect; All electrical components are performed by warranty. LIMITED WARRANTY WHAT IS COVEREDÑThe entire REEBOK¨ RBX 550 (ÒProductÓ) is warranted to state. The warranty extended hereunder is VERY IMPORTANT THAT YOU READ THE MANUAL before operating the Product. as a gift from our Customer Service...


