
English Manual
Page 3
... damage sustained by persons weighing more than 300 lbs. (136 kg). 10. To protect the floor or carpet from moisture and dust. Use the elliptical only as an exercise aid in determining heart rate trends in serious injury or death. The elliptical does not have a freewheel; ICON assumes no responsibility for foot protection...
... damage sustained by persons weighing more than 300 lbs. (136 kg). 10. To protect the floor or carpet from moisture and dust. Use the elliptical only as an exercise aid in determining heart rate trends in serious injury or death. The elliptical does not have a freewheel; ICON assumes no responsibility for foot protection...
English Manual
Page 4
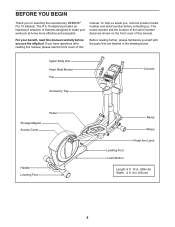
.... BEFORE YOU BEGIN Thank you have questions after reading this manual, please see the front cover of this manual. The R 5.10 elliptical provides an impressive selection of features designed to make your benefit, read this manual carefully before contacting us assist you, note the ...elliptical. To help us . The model number and the location of this Before reading further, please familiarize yourself with the parts that are shown on the front cover of the serial number decal are labeled in . (69 cm) 4 If you for selecting the revolutionary REEBOK® R 5.10 elliptical...
.... BEFORE YOU BEGIN Thank you have questions after reading this manual, please see the front cover of this manual. The R 5.10 elliptical provides an impressive selection of features designed to make your benefit, read this manual carefully before contacting us assist you, note the ...elliptical. To help us . The model number and the location of this Before reading further, please familiarize yourself with the parts that are shown on the front cover of the serial number decal are labeled in . (69 cm) 4 If you for selecting the revolutionary REEBOK® R 5.10 elliptical...
English Manual
Page 10
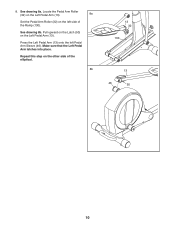
Pull upward on the Latch (50) on the other side of the Ramp (130). 8. Make sure that the Left Pedal Arm latches into place. See drawing 8a. See drawing 8b. Locate the Pedal Arm Roller (32) on the Left Pedal Arm (13). 8a Set the Pedal Arm Roller (32) on the left Pedal Arm Sleeve (46). Press the Left Pedal Arm (13) onto the left side of the elliptical. 8b 13 32 130 13 46 50 10 Repeat this step on the Left Pedal Arm (13).
Pull upward on the Latch (50) on the other side of the Ramp (130). 8. Make sure that the Left Pedal Arm latches into place. See drawing 8a. See drawing 8b. Locate the Pedal Arm Roller (32) on the Left Pedal Arm (13). 8a Set the Pedal Arm Roller (32) on the left Pedal Arm Sleeve (46). Press the Left Pedal Arm (13) onto the left side of the elliptical. 8b 13 32 130 13 46 50 10 Repeat this step on the Left Pedal Arm (13).
English Manual
Page 11
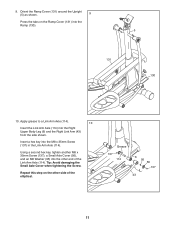
... (131) around the Upright (5) as shown. 9 Press the tabs on the other end of the elliptical. 9. Apply grease to a Link Arm Axle (114). 10 Insert the Link Arm Axle (114) into the Ramp (130). 5 131 130 10. Tip: Avoid damaging the Small Axle Cover when tightening the Screw. Using a second hex key, tighten...
... (131) around the Upright (5) as shown. 9 Press the tabs on the other end of the elliptical. 9. Apply grease to a Link Arm Axle (114). 10 Insert the Link Arm Axle (114) into the Ramp (130). 5 131 130 10. Tip: Avoid damaging the Small Axle Cover when tightening the Screw. Using a second hex key, tighten...


