
English Manual
Page 1
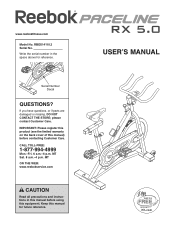
Serial Number Decal QUESTIONS? please contact Customer Care. CALL TOLL-FREE: 1-877-994-4999 Mon.-Fri. 6 a.m.-6 p.m. If you have questions, or if parts are damaged or missing, DO NOT CONTACT THE STORE; MT Sat. 8 a.m.-4 p.m. USERʼS MANUAL Write the serial number in this manual before contacting Customer Care. ...
Serial Number Decal QUESTIONS? please contact Customer Care. CALL TOLL-FREE: 1-877-994-4999 Mon.-Fri. 6 a.m.-6 p.m. If you have questions, or if parts are damaged or missing, DO NOT CONTACT THE STORE; MT Sat. 8 a.m.-4 p.m. USERʼS MANUAL Write the serial number in this manual before contacting Customer Care. ...
English Manual
Page 2
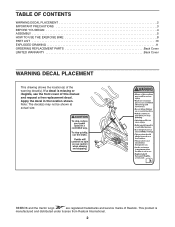
Note: The decal(s) may not be shown at actual size. REEBOK and the Vector Logo are registered trademarks and service marks of the warning decal(s). This product is missing or illegible, see the front ...location shown. If a decal is manufactured and distributed under license from Reebok International. 2 TABLE OF CONTENTS WARNING DECAL PLACEMENT 2 IMPORTANT PRECAUTIONS 3 BEFORE YOU BEGIN 4 ASSEMBLY 5 HOW TO USE THE EXERCISE BIKE 8 PART LIST 10 EXPLODED DRAWING 11 ORDERING REPLACEMENT PARTS Back Cover LIMITED WARRANTY Back Cover WARNING DECAL PLACEMENT This drawing shows ...
Note: The decal(s) may not be shown at actual size. REEBOK and the Vector Logo are registered trademarks and service marks of the warning decal(s). This product is missing or illegible, see the front ...location shown. If a decal is manufactured and distributed under license from Reebok International. 2 TABLE OF CONTENTS WARNING DECAL PLACEMENT 2 IMPORTANT PRECAUTIONS 3 BEFORE YOU BEGIN 4 ASSEMBLY 5 HOW TO USE THE EXERCISE BIKE 8 PART LIST 10 EXPLODED DRAWING 11 ORDERING REPLACEMENT PARTS Back Cover LIMITED WARRANTY Back Cover WARNING DECAL PLACEMENT This drawing shows ...
English Manual
Page 3
... To avoid damaging the brake pads, do not wear loose clothes that could become caught on the exercise bike. Over exercising may result in this manual. 3. Before beginning any worn parts immediately. 8. Wear appropriate clothes while exercising; Reduce your back. 4. Replace any exercise program, consult your ...lever downward. 14. do not lubricate the brake pads. 7. Do not put the exercise bike in a garage or covered patio, or near water. 6. Inspect and properly tighten all parts regularly. When the exercise bike is at all times. 16. Make sure that all users of the exercise...
... To avoid damaging the brake pads, do not wear loose clothes that could become caught on the exercise bike. Over exercising may result in this manual. 3. Before beginning any worn parts immediately. 8. Wear appropriate clothes while exercising; Reduce your back. 4. Replace any exercise program, consult your ...lever downward. 14. do not lubricate the brake pads. 7. Do not put the exercise bike in a garage or covered patio, or near water. 6. Inspect and properly tighten all parts regularly. When the exercise bike is at all times. 16. Make sure that all users of the exercise...

English Manual
Page 4
... yourself with the parts that are shown on the front cover of this manual carefully before contacting us assist you, note the product model number and serial number before you use the exercise bike. Cycling is an effective exercise for selecting the new REEBOK® PACELINE RX 5.0 exercise bike. The model number... us . Resistance Knob Water Bottle Holder Seat Adjustment Knob Pedal/Strap Leveling Foot Handlebar Handle Adjustment Knob Wheel Leveling Foot 4 The PACELINE RX 5.0 exercise bike provides a selection of the serial number decal are labeled in the drawing below.
... yourself with the parts that are shown on the front cover of this manual carefully before contacting us assist you, note the product model number and serial number before you use the exercise bike. Cycling is an effective exercise for selecting the new REEBOK® PACELINE RX 5.0 exercise bike. The model number... us . Resistance Knob Water Bottle Holder Seat Adjustment Knob Pedal/Strap Leveling Foot Handlebar Handle Adjustment Knob Wheel Leveling Foot 4 The PACELINE RX 5.0 exercise bike provides a selection of the serial number decal are labeled in the drawing below.
English Manual
Page 5
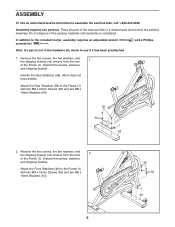
... of the Frame (1). ASSEMBLY To hire an authorized service technician to the included tool(s), assembly requires an adjustable wrench screwdriver . and a Phillips Note: If a part is completed. Attach the Rear Stabilizer (58) to the Frame (1) with two M8 x 16mm Screws (55) and two M8 x 16mm Washers (54). 55... 54 1 49 5 Place all parts of the packing materials until assembly is not in a cleared area and remove the packing materials. Do not dispose of the exercise bike in the hardware kit, check to the Frame (1) with two M8 x 16mm Screws ...
... of the Frame (1). ASSEMBLY To hire an authorized service technician to the included tool(s), assembly requires an adjustable wrench screwdriver . and a Phillips Note: If a part is completed. Attach the Rear Stabilizer (58) to the Frame (1) with two M8 x 16mm Screws (55) and two M8 x 16mm Washers (54). 55... 54 1 49 5 Place all parts of the packing materials until assembly is not in a cleared area and remove the packing materials. Do not dispose of the exercise bike in the hardware kit, check to the Frame (1) with two M8 x 16mm Screws ...
English Manual
Page 7
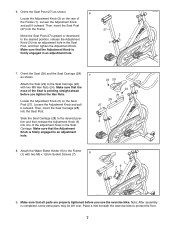
...Frame (1) with two M8 Hex Nuts (24). tion and then release the Adjustment Knob (3) 3 into the Frame. Place a mat beneath the exercise bike to the desired position, release the Adjustment Knob (3) into the Seat Post. 28 27 Slide the Seat Carriage (28) to the desired posi- ...Seat Carriage (28) as shown. 6 Locate the Adjustment Knob (3) on the Seat Post (27). Make sure that all parts are properly tightened before you use the exercise bike. Make sure that the Adjustment Knob is firmly engaged in the Seat Carriage. Attach the Water Bottle Holder (6) to the...
...Frame (1) with two M8 Hex Nuts (24). tion and then release the Adjustment Knob (3) 3 into the Frame. Place a mat beneath the exercise bike to the desired position, release the Adjustment Knob (3) into the Seat Post. 28 27 Slide the Seat Carriage (28) to the desired posi- ...Seat Carriage (28) as shown. 6 Locate the Adjustment Knob (3) on the Seat Post (27). Make sure that all parts are properly tightened before you use the exercise bike. Make sure that the Adjustment Knob is firmly engaged in the Seat Carriage. Attach the Water Bottle Holder (6) to the...

English Manual
Page 9
.... to the desired position, and then release the tabs. Replace any worn parts immediately. HOW TO MAINTAIN THE EXERCISE BIKE Inspect and tighten all parts of mild detergent. Resistance Knob If the exercise bike rocks slightly on your floor during use, turn the resistance knob clockwise; HOW... TO ADJUST THE PEDAL STRAPS HOW TO LEVEL THE EXERCISE BIKE To tighten the pedal ...
.... to the desired position, and then release the tabs. Replace any worn parts immediately. HOW TO MAINTAIN THE EXERCISE BIKE Inspect and tighten all parts of mild detergent. Resistance Knob If the exercise bike rocks slightly on your floor during use, turn the resistance knob clockwise; HOW... TO ADJUST THE PEDAL STRAPS HOW TO LEVEL THE EXERCISE BIKE To tighten the pedal ...

English Manual
Page 10
RBEX14110.2 R1110A Key No. For information about ordering replacement parts, see the back cover of this manual. *These parts are subject to change without notice. Description Flywheel Crank Cap Left Pedal/Strap Left Crank Arm Large Pulley Outer Shield Drive Belt ... x 16mm Screw Wheel M8 Locknut Rear Stabilizer Crank Screw Right Pedal/Strap Crank Hub Assembly Tool Userʼs Manual Note: Specifications are not illustrated. 10 PART LIST Model No. Qty. 33 1 34 2 35 1 36 1 37 1 38 1 39 1 40 1 41 1 42 1 43 6 44 6 45 6 46 2 47 9 48 2 49 1 50 4 51 4 ...
RBEX14110.2 R1110A Key No. For information about ordering replacement parts, see the back cover of this manual. *These parts are subject to change without notice. Description Flywheel Crank Cap Left Pedal/Strap Left Crank Arm Large Pulley Outer Shield Drive Belt ... x 16mm Screw Wheel M8 Locknut Rear Stabilizer Crank Screw Right Pedal/Strap Crank Hub Assembly Tool Userʼs Manual Note: Specifications are not illustrated. 10 PART LIST Model No. Qty. 33 1 34 2 35 1 36 1 37 1 38 1 39 1 40 1 41 1 42 1 43 6 44 6 45 6 46 2 47 9 48 2 49 1 50 4 51 4 ...
English Manual
Page 12
...in lieu of any and all other warranty beyond that vary from the date of whatsoever nature. ORDERING REPLACEMENT PARTS To order replacement parts, please see the PART LIST and the EXPLODED DRAWING near the end of this manual) LIMITED WARRANTY IMPORTANT: You must be preauthorized by...state to the terms set forth above is not responsible or liable for a minimal handling charge. ICON is authorized by ICON. For replacement parts shipped while the product is shipped to a service center, freight charges to the original purchaser. This warranty gives you . Accordingly, the ...
...in lieu of any and all other warranty beyond that vary from the date of whatsoever nature. ORDERING REPLACEMENT PARTS To order replacement parts, please see the PART LIST and the EXPLODED DRAWING near the end of this manual) LIMITED WARRANTY IMPORTANT: You must be preauthorized by...state to the terms set forth above is not responsible or liable for a minimal handling charge. ICON is authorized by ICON. For replacement parts shipped while the product is shipped to a service center, freight charges to the original purchaser. This warranty gives you . Accordingly, the ...


