
English Manual
Page 2
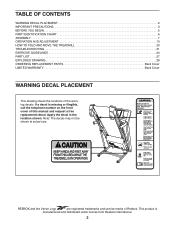
... and distributed under license from Reebok International. 2 Note: The decals may not be shown at actual size. TABLE OF CONTENTS WARNING DECAL PLACEMENT 2 IMPORTANT PRECAUTIONS 3 BEFORE YOU BEGIN 5 PART IDENTIFICATION CHART 6 ASSEMBLY 7 OPERATION AND ADJUSTMENT 13 HOW TO FOLD AND MOVE THE TREADMILL 20 TROUBLESHOOTING 21 EXERCISE GUIDELINES 24 PART LIST 27 EXPLODED DRAWING 28 ORDERING REPLACEMENT PARTS Back Cover LIMITED WARRANTY Back Cover WARNING DECAL PLACEMENT This drawing...
... and distributed under license from Reebok International. 2 Note: The decals may not be shown at actual size. TABLE OF CONTENTS WARNING DECAL PLACEMENT 2 IMPORTANT PRECAUTIONS 3 BEFORE YOU BEGIN 5 PART IDENTIFICATION CHART 6 ASSEMBLY 7 OPERATION AND ADJUSTMENT 13 HOW TO FOLD AND MOVE THE TREADMILL 20 TROUBLESHOOTING 21 EXERCISE GUIDELINES 24 PART LIST 27 EXPLODED DRAWING 28 ORDERING REPLACEMENT PARTS Back Cover LIMITED WARRANTY Back Cover WARNING DECAL PLACEMENT This drawing...
English Manual
Page 3
... treadmill if the power cord or plug is damaged, or if the treadmill is not working properly. (See TROUBLESHOOTING on your physician. Never start the treadmill while you are adequately informed of all warnings on page 21 if the treadmill is turned off. Never move the walking belt while the power is not working properly.) 8. Do not put the treadmill in the treadmill. Always hold the handrails while using the treadmill...
... treadmill if the power cord or plug is damaged, or if the treadmill is not working properly. (See TROUBLESHOOTING on your physician. Never start the treadmill while you are adequately informed of all warnings on page 21 if the treadmill is turned off. Never move the walking belt while the power is not working properly.) 8. Do not put the treadmill in the treadmill. Always hold the handrails while using the treadmill...
English Manual
Page 4
... maintenance and adjustment procedures described in serious injury or death. SAVE THESE INSTRUCTIONS 4 When folding or moving the treadmill, make sure that the storage latch is not in the storage position. 23. DANGER: 25. This treadmill is intended for home use . (See the drawing on page 5 for the location of the treadmill regularly. vice representative only. 26. 20. Always remove the key, unplug the power cord, and press the power switch...
... maintenance and adjustment procedures described in serious injury or death. SAVE THESE INSTRUCTIONS 4 When folding or moving the treadmill, make sure that the storage latch is not in the storage position. 23. DANGER: 25. This treadmill is intended for home use . (See the drawing on page 5 for the location of the treadmill regularly. vice representative only. 26. 20. Always remove the key, unplug the power cord, and press the power switch...
English Manual
Page 5
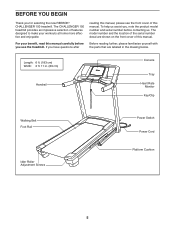
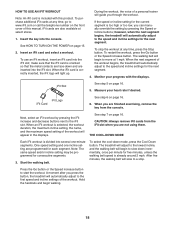
... REEBOK® CHALLENGER 150 treadmill. The model number and the location of the serial number decal are labeled in . (89 cm) Handrail Console Tray Heart Rate Monitor Key/Clip Walking Belt Foot Rail Idler Roller Adjustment Screws Power Switch Power Cord Platform Cushion 5 Before reading further, please familiarize yourself with the parts that are shown on the front cover of this manual. Length: 6 ft. (183 cm) Width: 2 ft. 11 in the drawing below. For your workouts at home...
... REEBOK® CHALLENGER 150 treadmill. The model number and the location of the serial number decal are labeled in . (89 cm) Handrail Console Tray Heart Rate Monitor Key/Clip Walking Belt Foot Rail Idler Roller Adjustment Screws Power Switch Power Cord Platform Cushion 5 Before reading further, please familiarize yourself with the parts that are shown on the front cover of this manual. Length: 6 ft. (183 cm) Width: 2 ft. 11 in the drawing below. For your workouts at home...

English Manual
Page 7
... included hex keys one adjustable wrench one Phillips screwdriver scissors needlenose pliers To avoid damaging parts, do not use power tools. 1. Make sure that the Grommet (67) is normal. Pull the Upright Wire and the base ground wire (A) through the indicated hole in a cleared area and remove the packing materials. This is pressed into each end of the walking belt, wipe it...
... included hex keys one adjustable wrench one Phillips screwdriver scissors needlenose pliers To avoid damaging parts, do not use power tools. 1. Make sure that the Grommet (67) is normal. Pull the Upright Wire and the base ground wire (A) through the indicated hole in a cleared area and remove the packing materials. This is pressed into each end of the walking belt, wipe it...

English Manual
Page 10
.... Remove the wire tie from the Upright Wire (70). Console Wire Console Wire Wire Tie 70 Console Assembly 70 75 7. Start both Bolts before tightening them. 7 70 71 8 7 Console Assembly 75 72 8 7 10 If they do not, turn one connector and try again. IF YOU DO NOT CONNECT THE CONNECTORS PROPERLY, THE CONSOLE MAY BECOME DAMAGED WHEN YOU TURN ON THE POWER. Insert the Upright Wire (70) into place. Attach the console assembly to the console wire. 6. See...
.... Remove the wire tie from the Upright Wire (70). Console Wire Console Wire Wire Tie 70 Console Assembly 70 75 7. Start both Bolts before tightening them. 7 70 71 8 7 Console Assembly 75 72 8 7 10 If they do not, turn one connector and try again. IF YOU DO NOT CONNECT THE CONNECTORS PROPERLY, THE CONSOLE MAY BECOME DAMAGED WHEN YOU TURN ON THE POWER. Insert the Upright Wire (70) into place. Attach the console assembly to the console wire. 6. See...
English Manual
Page 13
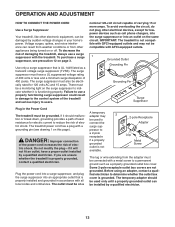
... ADJUSTMENT HOW TO CONNECT THE POWER CORD Use a Surge Suppressor Your treadmill, like other appliances being turned on this page). There must also be used to connect the surge suppressor to determine whether the outlet box cover is UL 1449 listed as a properly grounded outlet box cover. The outlet must be installed by a qualified electrician. Voltage surges, spikes, and noise interference can be a monitoring...
... ADJUSTMENT HOW TO CONNECT THE POWER CORD Use a Surge Suppressor Your treadmill, like other appliances being turned on this page). There must also be used to connect the surge suppressor to determine whether the outlet box cover is UL 1449 listed as a properly grounded outlet box cover. The outlet must be installed by a qualified electrician. Voltage surges, spikes, and noise interference can be a monitoring...

English Manual
Page 14
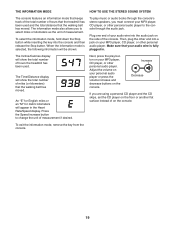
... a button. iFit workouts automatically control the treadmill. To purchase iFit cards at select stores. When the manual mode of the console is selected or to change the speed and incline of the treadmill with the 8-week Weight Loss workout. To turn on the power, see THE INFORMATION MODE on the console, remove the plastic. iFit cards are available separately. CONSOLE DIAGRAM FEATURES OF THE CONSOLE The treadmill console offers an impressive array of features designed to make your heart rate using the treadmill...
... a button. iFit workouts automatically control the treadmill. To purchase iFit cards at select stores. When the manual mode of the console is selected or to change the speed and incline of the treadmill with the 8-week Weight Loss workout. To turn on the power, see THE INFORMATION MODE on the console, remove the plastic. iFit cards are available separately. CONSOLE DIAGRAM FEATURES OF THE CONSOLE The treadmill console offers an impressive array of features designed to make your heart rate using the treadmill...
English Manual
Page 15
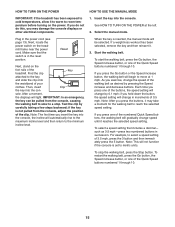
... incline level. HOW TO TURN ON THE POWER IMPORTANT: If the treadmill has been exposed to cold temperatures, allow it . 3. Insert the key into the con- Each time you exercise, change by 0.1 mph; If you press the Go button or the Speed increase button, the walking belt will change speed until it may damage the console displays or other electrical components. Plug in the reset position. HOW TO USE THE MANUAL MODE...
... incline level. HOW TO TURN ON THE POWER IMPORTANT: If the treadmill has been exposed to cold temperatures, allow it . 3. Insert the key into the con- Each time you exercise, change by 0.1 mph; If you press the Go button or the Speed increase button, the walking belt will change speed until it may damage the console displays or other electrical components. Plug in the reset position. HOW TO USE THE MANUAL MODE...
English Manual
Page 16
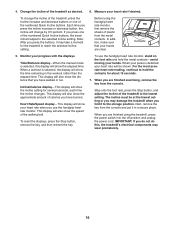
... finished exercising, remove the key from the console. This display will show the distance that your heart rate when you have burned. Monitor your hands. To reset the displays, press the Stop button, remove the key, and then reinsert the key. Change the incline of the numbered Quick Incline buttons, the treadmill will also show the time remaining in a secure place. When your heart rate if desired. When a workout is selected, the display will also show the incline setting...
... finished exercising, remove the key from the console. This display will show the distance that your heart rate when you have burned. Monitor your hands. To reset the displays, press the Stop button, remove the key, and then reinsert the key. Change the incline of the numbered Quick Incline buttons, the treadmill will also show the time remaining in a secure place. When your heart rate if desired. When a workout is selected, the display will also show the incline setting...
English Manual
Page 17
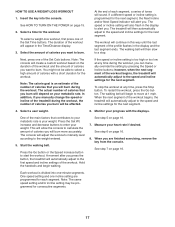
... incline settings for consecutive segments. 17 Note: The same speed setting and/or incline setting may be affected. See HOW TO TURN ON THE POWER on page 16. The workout will also flash in the Time/Distance display. 3. Monitor your heart rate if desired. HOW TO USE A WEIGHT-LOSS WORKOUT 1. To select a weight-loss workout, first press one -minute segments. The treadmill will burn during the workout, the number of the Set Time buttons. To stop...
... incline settings for consecutive segments. 17 Note: The same speed setting and/or incline setting may be affected. See HOW TO TURN ON THE POWER on page 16. The workout will also flash in the Time/Distance display. 3. Monitor your heart rate if desired. HOW TO USE A WEIGHT-LOSS WORKOUT 1. To select a weight-loss workout, first press one -minute segments. The treadmill will burn during the workout, the number of the Set Time buttons. To stop...
English Manual
Page 18
... Speed increase button. When an iFit workout is correctly inserted, the iFit logo will guide you can manually override the setting by pressing the iFit increase and decrease buttons next to a stop the workout at any time, go to www.iFit.com or call the telephone number on the front cover of the workout begins, the treadmill will begin to the speed and incline settings for ve minutes, unless the walking belt speed...
... Speed increase button. When an iFit workout is correctly inserted, the iFit logo will guide you can manually override the setting by pressing the iFit increase and decrease buttons next to a stop the workout at any time, go to www.iFit.com or call the telephone number on the front cover of the workout begins, the treadmill will begin to the speed and incline settings for ve minutes, unless the walking belt speed...
English Manual
Page 19
... number of hours the treadmill has been used and the total distance that the walking belt has moved. The information mode also allows you to select miles or kilometers as the unit of hours that the treadmill has been used . When the information mode is fully plugged in the Heart Rate/Speed display. To exit the information mode, remove the key from the console. 19 Make sure that your audio wire into the audio jack on the console. Adjust...
... number of hours the treadmill has been used and the total distance that the walking belt has moved. The information mode also allows you to select miles or kilometers as the unit of hours that the treadmill has been used . When the information mode is fully plugged in the Heart Rate/Speed display. To exit the information mode, remove the key from the console. 19 Make sure that your audio wire into the audio jack on the console. Adjust...
English Manual
Page 20
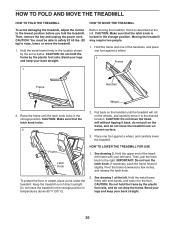
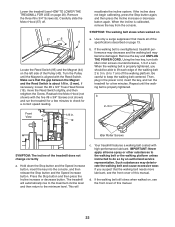
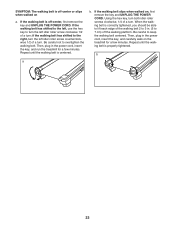
...: Do not move the treadmill without tipping it back, do not move the treadmill. 1. Keep the treadmill out of direct sunlight. Frame Latch Knob HOW TO LOWER THE TREADMILL FOR USE 1. Then, pull the latch knob to the lowest position before you fold the treadmill. Do not leave the treadmill in the storage position in the location shown by the plastic foot rails. Bend your legs and keep your...
...: Do not move the treadmill without tipping it back, do not move the treadmill. 1. Keep the treadmill out of direct sunlight. Frame Latch Knob HOW TO LOWER THE TREADMILL FOR USE 1. Then, pull the latch knob to the lowest position before you fold the treadmill. Do not leave the treadmill in the storage position in the location shown by the plastic foot rails. Bend your legs and keep your...
English Manual
Page 21
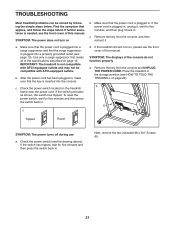
... AFCI-equipped outlets. Remove the key from the console and UNPLUG THE POWER CORD. c. a 6 6 SYMPTOM: The power turns off during use a. Use only a surge suppressor that applies, and follow the steps listed. Place the treadmill in . Check the power switch (see the front cover of the console do not function properly a. Make sure that the key is plugged into the console. SYMPTOM: The displays of this manual. TROUBLESHOOTING Most treadmill problems can be compatible...
... AFCI-equipped outlets. Remove the key from the console and UNPLUG THE POWER CORD. c. a 6 6 SYMPTOM: The power turns off during use a. Use only a surge suppressor that applies, and follow the steps listed. Place the treadmill in . Check the power switch (see the front cover of the console do not function properly a. Make sure that the key is plugged into the console. SYMPTOM: The displays of this manual. TROUBLESHOOTING Most treadmill problems can be compatible...
English Manual
Page 22
..., loosen the #8 x 3/4" Truss Head Screw (19), move the Reed Switch slightly, and then retighten the Screw. b. If the walking belt is about 1/8 in . (5 to 3 in . (3 mm). Remove the key and UNPLUG THE POWER CORD. When the walking belt is calibrated, remove the key from the console. Be careful to do so by an authorized service representative. Then, plug in the power cord, insert the key, and run the treadmill for a few minutes. This...
..., loosen the #8 x 3/4" Truss Head Screw (19), move the Reed Switch slightly, and then retighten the Screw. b. If the walking belt is about 1/8 in . (5 to 3 in . (3 mm). Remove the key and UNPLUG THE POWER CORD. When the walking belt is calibrated, remove the key from the console. Be careful to do so by an authorized service representative. Then, plug in the power cord, insert the key, and run the treadmill for a few minutes. This...
English Manual
Page 23
... left idler roller screw clockwise 1/2 of a turn . Be careful not to keep the walking belt centered. b 23 Repeat until the walking belt is centered. If the walking belt slips when walked on a. Then, plug in the power cord, insert the key, and carefully walk on the treadmill for a few minutes. Using the hex key, turn both idler roller screws clockwise, 1/4 of a turn; Repeat until the walking belt is properly tightened. a b. If the walking belt is correctly tightened, you should...
... left idler roller screw clockwise 1/2 of a turn . Be careful not to keep the walking belt centered. b 23 Repeat until the walking belt is centered. If the walking belt slips when walked on a. Then, plug in the power cord, insert the key, and carefully walk on the treadmill for a few minutes. Using the hex key, turn both idler roller screws clockwise, 1/4 of a turn; Repeat until the walking belt is properly tightened. a b. If the walking belt is correctly tightened, you should...
English Manual
Page 24
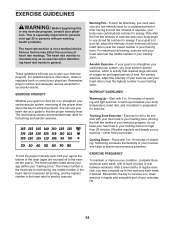
... goal is intended only as you must exercise at the bottom of the chart (ages are essential for energy. The heart rate monitor is to burn fat or to make exercise a regular and enjoyable part of stretching and light exercise. EXERCISE INTENSITY Whether your body uses carbohydrate calories for successful results. Training Zone Exercise—-Exercise for 20 to 30 minutes with 5 to strengthen...
... goal is intended only as you must exercise at the bottom of the chart (ages are essential for energy. The heart rate monitor is to burn fat or to make exercise a regular and enjoyable part of stretching and light exercise. EXERCISE INTENSITY Whether your body uses carbohydrate calories for successful results. Training Zone Exercise—-Exercise for 20 to 30 minutes with 5 to strengthen...

English Manual
Page 27
... 1 Drive Roller/Pulley 44 1 Magnet 45 1 Reed Switch Clamp 46 1 Drive Motor Belt 47 1 Drive Motor 48 2 Frame Spacer 49 1 Frame 50 1 Right Foot Rail 51 1 Storage Latch 52 1 Right Rear Foot 53 1 Left Rear Foot 54 1 Right Speaker Back 55 1 Left Speaker Back 56 1 Idler Roller 57 1 Motor Hood 58 2 Incline Frame Spacer 59 1 Incline Frame 60 1 Incline Motor 61 1 Controller Ground Wire 62 1 Controller 63 3 Wire Tie 64 1 Belly Pan Plate 65 1 Power Switch 66 1 Power Cord...
... 1 Drive Roller/Pulley 44 1 Magnet 45 1 Reed Switch Clamp 46 1 Drive Motor Belt 47 1 Drive Motor 48 2 Frame Spacer 49 1 Frame 50 1 Right Foot Rail 51 1 Storage Latch 52 1 Right Rear Foot 53 1 Left Rear Foot 54 1 Right Speaker Back 55 1 Left Speaker Back 56 1 Idler Roller 57 1 Motor Hood 58 2 Incline Frame Spacer 59 1 Incline Frame 60 1 Incline Motor 61 1 Controller Ground Wire 62 1 Controller 63 3 Wire Tie 64 1 Belly Pan Plate 65 1 Power Switch 66 1 Power Cord...

English Manual
Page 32
... do not allow limitations on how long an implied warranty lasts. The drive motor is under normal use or performance of this product to www.reebokservice.com/registration. Go to be prepared to provide the following information when contacting us assist you, be free from the date of any kind. ICON Health & Fitness, Inc. (ICON) warrants this manual. If replacement parts are made must...
... do not allow limitations on how long an implied warranty lasts. The drive motor is under normal use or performance of this product to www.reebokservice.com/registration. Go to be prepared to provide the following information when contacting us assist you, be free from the date of any kind. ICON Health & Fitness, Inc. (ICON) warrants this manual. If replacement parts are made must...


