

English Manual
Page 1
CUSTOMER CARE For service at any time, go to www.reebokservice.com. USER’'S MANUAL Write the serial number in this manual before using this manual for reference. Or call 1-877-994-4999 Mon.–-Fri. 6 a.m.–-6 p.m. CAUTION Read all precautions and instructions in the space above for future reference. MT ... ACTIVATE YOUR WARRANTY To register your product and activate your warranty today, go to www.reebokservice.com/ registration. Save this equipment. MT Sat. 8 a.m.–-4 p.m. www.reeboktness.com Model No. RBTL99013.0 Serial No.
CUSTOMER CARE For service at any time, go to www.reebokservice.com. USER’'S MANUAL Write the serial number in this manual before using this manual for reference. Or call 1-877-994-4999 Mon.–-Fri. 6 a.m.–-6 p.m. CAUTION Read all precautions and instructions in the space above for future reference. MT ... ACTIVATE YOUR WARRANTY To register your product and activate your warranty today, go to www.reebokservice.com/ registration. Save this equipment. MT Sat. 8 a.m.–-4 p.m. www.reeboktness.com Model No. RBTL99013.0 Serial No.
English Manual
Page 2
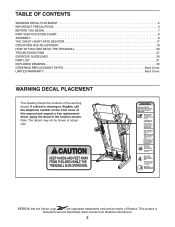
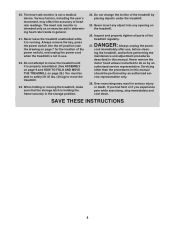
... decals. If a decal is manufactured and distributed under license from Reebok International. 2 Apply the decal in the location shown. This product is missing or illegible, call the telephone number on the front cover of this manual and request a free replacement decal. TABLE OF CONTENTS WARNING DECAL ... 18 HOW TO FOLD AND MOVE THE TREADMILL 26 TROUBLESHOOTING 27 EXERCISE GUIDELINES 30 PART LIST 31 EXPLODED DRAWING 32 ORDERING REPLACEMENT PARTS Back Cover LIMITED WARRANTY Back Cover WARNING DECAL PLACEMENT This drawing shows the locations of Reebok. Note: The decals may not be ...
... decals. If a decal is manufactured and distributed under license from Reebok International. 2 Apply the decal in the location shown. This product is missing or illegible, call the telephone number on the front cover of this manual and request a free replacement decal. TABLE OF CONTENTS WARNING DECAL ... 18 HOW TO FOLD AND MOVE THE TREADMILL 26 TROUBLESHOOTING 27 EXERCISE GUIDELINES 30 PART LIST 31 EXPLODED DRAWING 32 ORDERING REPLACEMENT PARTS Back Cover LIMITED WARRANTY Back Cover WARNING DECAL PLACEMENT This drawing shows the locations of Reebok. Note: The decals may not be ...

English Manual
Page 3
... overloading the circuit, do not plug other electrical devices, except for low-power devices such as described in this manual. 4. Do not use the treadmill with bare feet, wearing only stockings, or in sandals. 14. Use only a surge suppressor that blocks air openings....an appropriate outlet (see page 18). To purchase a surge suppressor, see your local REEBOK dealer, call the telephone number on your treadmill before using your treadmill. Wear appropriate exercise clothes while using the treadmill. 19. Failure to use only. ICON assumes no responsibility for home use a ...
... overloading the circuit, do not plug other electrical devices, except for low-power devices such as described in this manual. 4. Do not use the treadmill with bare feet, wearing only stockings, or in sandals. 14. Use only a surge suppressor that blocks air openings....an appropriate outlet (see page 18). To purchase a surge suppressor, see your local REEBOK dealer, call the telephone number on your treadmill before using your treadmill. Wear appropriate exercise clothes while using the treadmill. 19. Failure to use only. ICON assumes no responsibility for home use a ...
English Manual
Page 4
...not attempt to do so by an authorized ser- Never remove the motor hood unless instructed to move the treadmill. 23. Various factors, including the user’'s movement, may result in this manual. DANGER: 27. Servicing other than the procedures in serious injury or death. vice representative only. 28.... The heart rate monitor is holding the frame securely in this manual should be able to safely lift 45 lbs. (20 kg) to move the treadmill until it is properly assembled. (See ASSEMBLY on page 9 and HOW TO FOLD AND MOVE THE...
...not attempt to do so by an authorized ser- Never remove the motor hood unless instructed to move the treadmill. 23. Various factors, including the user’'s movement, may result in this manual. DANGER: 27. Servicing other than the procedures in serious injury or death. vice representative only. 28.... The heart rate monitor is holding the frame securely in this manual should be able to safely lift 45 lbs. (20 kg) to move the treadmill until it is properly assembled. (See ASSEMBLY on page 9 and HOW TO FOLD AND MOVE THE...
English Manual
Page 7
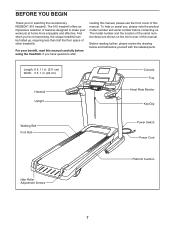
...half the oor space of other treadmills. If you for selecting the revolutionary REEBOK® 910 treadmill. The model number and the location of the serial number decal are shown on the front cover of this manual. The 910 treadmill offers an impressive selection of features designed... to make your benet, read this manual carefully before contacting...
...half the oor space of other treadmills. If you for selecting the revolutionary REEBOK® 910 treadmill. The model number and the location of the serial number decal are shown on the front cover of this manual. The 910 treadmill offers an impressive selection of features designed... to make your benet, read this manual carefully before contacting...
English Manual
Page 8
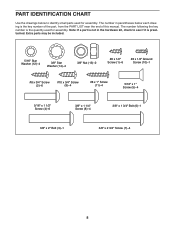
.... PART IDENTIFICATION CHART Use the drawings below each drawing is the key number of the part, from the PART LIST near the end of this manual.
.... PART IDENTIFICATION CHART Use the drawings below each drawing is the key number of the part, from the PART LIST near the end of this manual.
English Manual
Page 9
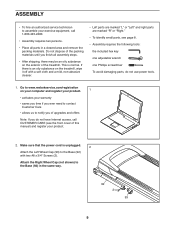
... are marked “"R”" or “"Right.”" •• To identify small parts, see the front cover of the treadmill. If there is an oily substance on the exterior of this manual) and register your product. 2. Attach the Right Wheel Cap (not shown) to the Base (92) in a cleared area and...-2480. •• Assembly requires two persons. •• Place all assembly steps. •• After shipping, there may be an oily substance on the treadmill, wipe it off with two #8 x 3/4" Screws (2). Make sure that the power cord is normal.
... are marked “"R”" or “"Right.”" •• To identify small parts, see the front cover of the treadmill. If there is an oily substance on the exterior of this manual) and register your product. 2. Attach the Right Wheel Cap (not shown) to the Base (92) in a cleared area and...-2480. •• Assembly requires two persons. •• Place all assembly steps. •• After shipping, there may be an oily substance on the treadmill, wipe it off with two #8 x 3/4" Screws (2). Make sure that the power cord is normal.
English Manual
Page 19
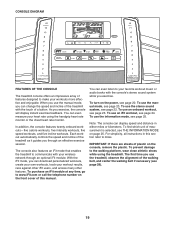
... The console can even listen to communicate with the touch of a button. IMPORTANT: If there are sheets of this manual. Each workout automatically controls the speed and incline of the treadmill as it guides you through an optional iFit module. To use an onboard workout, see page 20. The ... workouts, create your own workouts, track your workouts more effective and enjoyable. With the iFit mode, you use the manual mode, see page 29). 19 To use the treadmill, observe the alignment of the walking belt, and center the walking belt if necessary (see page 20. To use ...
... The console can even listen to communicate with the touch of a button. IMPORTANT: If there are sheets of this manual. Each workout automatically controls the speed and incline of the treadmill as it guides you through an optional iFit module. To use an onboard workout, see page 20. The ... workouts, create your own workouts, track your workouts more effective and enjoyable. With the iFit mode, you use the manual mode, see page 29). 19 To use the treadmill, observe the alignment of the walking belt, and center the walking belt if necessary (see page 20. To use ...
English Manual
Page 20
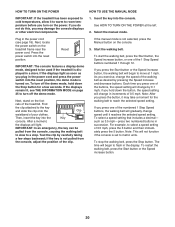
...stop . Insert the key into the Key console. Then, insert the key into the console. if the key is not selected, press the Manual button on the treadmill frame near the power cord. If the displays remain lit, see page 18). if you turn off the demo mode, hold down the Stop... the walking belt, press the Start button or the Speed increase button. 20 HOW TO TURN ON THE POWER HOW TO USE THE MANUAL MODE IMPORTANT: If the treadmill has been exposed to cold temperatures, allow it reaches the selected speed setting. Press the power switch into the reset position, the demo...
...stop . Insert the key into the Key console. Then, insert the key into the console. if the key is not selected, press the Manual button on the treadmill frame near the power cord. If the displays remain lit, see page 18). if you turn off the demo mode, hold down the Stop... the walking belt, press the Start button or the Speed increase button. 20 HOW TO TURN ON THE POWER HOW TO USE THE MANUAL MODE IMPORTANT: If the treadmill has been exposed to cold temperatures, allow it reaches the selected speed setting. Press the power switch into the reset position, the demo...
English Manual
Page 23
...61663;ash in the display. To stop . Measure your progress with the displays. Select an onboard workout. A moment after you and the treadmill will appear in the matrix. Each workout is an estimate of the number of calories you are programmed for consecutive segments. If a differ- ...If the speed or incline setting is programmed for the next segment. 3. HOW TO USE AN ONBOARD WORKOUT 1. In addition, if you manually change the speed or incline of the workout. The ashing segment of the prole represents the current segment of the workout...
...61663;ash in the display. To stop . Measure your progress with the displays. Select an onboard workout. A moment after you and the treadmill will appear in the matrix. Each workout is an estimate of the number of calories you are programmed for consecutive segments. If a differ- ...If the speed or incline setting is programmed for the next segment. 3. HOW TO USE AN ONBOARD WORKOUT 1. In addition, if you manually change the speed or incline of the workout. The ashing segment of the prole represents the current segment of the workout...

English Manual
Page 24
... the next workout in the iFit main screen. To select an iFit workout, press one of the race. 7. Before some workouts, the voice of this manual. Note: If there are nished exercising, remove the key from the console. See step 5 on the fan if desired. The other antenna or transmitter...
... the next workout in the iFit main screen. To select an iFit workout, press one of the race. 7. Before some workouts, the voice of this manual. Note: If there are nished exercising, remove the key from the console. See step 5 on the fan if desired. The other antenna or transmitter...
English Manual
Page 25
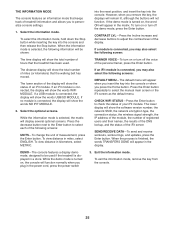
...mode. The distance display will show the words USB/SD MODULE. If an iFit module is connected, the display will show the total number of treadmill information and allows you plug in the display. To view distance in miles, select ENGLISH. If the demo mode is displayed in the matrix. DEMO...—-The console features a display demo mode, designed to select the manual main screen or the iFit screen as the default menu. To select the information mode, hold down the Stop button while inserting the key into...
...mode. The distance display will show the words USB/SD MODULE. If an iFit module is connected, the display will show the total number of treadmill information and allows you plug in the display. To view distance in miles, select ENGLISH. If the demo mode is displayed in the matrix. DEMO...—-The console features a display demo mode, designed to select the manual main screen or the iFit screen as the default menu. To select the information mode, hold down the Stop button while inserting the key into...

English Manual
Page 27
...ve #8 x 3/4" Washer Head Screws (17). b. Find the symptom that meets all of this manual. Use only a surge suppressor that applies, and follow the steps listed. c Tripped Reset c. If the treadmill still will not run, please see page 18). SYMPTOM: The console displays remain lit when you ... the console and UNPLUG THE POWER CORD. SYMPTOM: The displays of this manual. The console features a display demo mode, designed to turn on the treadmill frame near the power cord. TROUBLESHOOTING Most treadmill problems can be solved by following the simple steps below. a 60 17...
...ve #8 x 3/4" Washer Head Screws (17). b. Find the symptom that meets all of this manual. Use only a surge suppressor that applies, and follow the steps listed. c Tripped Reset c. If the treadmill still will not run, please see page 18). SYMPTOM: The console displays remain lit when you ... the console and UNPLUG THE POWER CORD. SYMPTOM: The displays of this manual. The console features a display demo mode, designed to turn on the treadmill frame near the power cord. TROUBLESHOOTING Most treadmill problems can be solved by following the simple steps below. a 60 17...
English Manual
Page 28
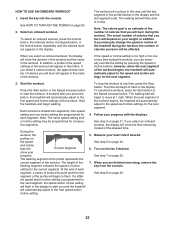
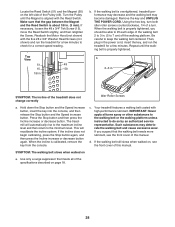
...a surge suppressor that meets all of the specications described on a. Using the hex key, turn both idler roller screws counterclockwise, 1/4 of the treadmill does not change correctly Idler Roller Screws a. b 2–-3 in . c. Press the Stop button and then press the Incline increase or decrease button. ...the left side of the Pulley (49). Locate the Reed Switch (51) and the Magnet (50) on , see the front cover of this manual. The treadmill will recalibrate the incline system. If you should be able to lift each edge of the walking belt 2 to 3 in. (5 to the ...
...a surge suppressor that meets all of the specications described on a. Using the hex key, turn both idler roller screws counterclockwise, 1/4 of the treadmill does not change correctly Idler Roller Screws a. b 2–-3 in . c. Press the Stop button and then press the Incline increase or decrease button. ...the left side of the Pulley (49). Locate the Reed Switch (51) and the Magnet (50) on , see the front cover of this manual. The treadmill will recalibrate the incline system. If you should be able to lift each edge of the walking belt 2 to 3 in. (5 to the ...

English Manual
Page 31
... Right Wheel Cap Wheel Key Clip Console Console Frame Console Ground Wire Console Clamp Left Tray Right Tray Console Base Crossbar Fan Assembly User’'s Manual Note: Specications are not illustrated. 31 PART LIST Model No. Qty. 1 10 2 40 3 1 4 6 5 4 6 1 7 4 8 4 9 4 10 7 11 4 12 4 13 2 14 4 15 29 16 4 17 5 18... Clamp Drive Roller/Pulley Magnet Reed Switch Cable Tie Storage Latch Key No. For information about ordering replacement parts, see the back cover of this manual. *These parts are subject to change without notice.
... Right Wheel Cap Wheel Key Clip Console Console Frame Console Ground Wire Console Clamp Left Tray Right Tray Console Base Crossbar Fan Assembly User’'s Manual Note: Specications are not illustrated. 31 PART LIST Model No. Qty. 1 10 2 40 3 1 4 6 5 4 6 1 7 4 8 4 9 4 10 7 11 4 12 4 13 2 14 4 15 29 16 4 17 5 18... Clamp Drive Roller/Pulley Magnet Reed Switch Cable Tie Storage Latch Key No. For information about ordering replacement parts, see the back cover of this manual. *These parts are subject to change without notice.

English Manual
Page 36
...commercial or rental purposes. ORDERING REPLACEMENT PARTS To order replacement parts, please see the PART LIST and the EXPLODED DRAWING near the end of this manual) LIMITED WARRANTY IMPORTANT: To protect your fitness equipment with the use or performance of the product; To help us : •• the...the USA, if all other consequential damages of any economic loss, loss of property, loss of revenues or prots, loss of this manual. This warranty extends only to and from the date of its authorized service centers. All repairs for a minimal trip charge. This warranty will...
...commercial or rental purposes. ORDERING REPLACEMENT PARTS To order replacement parts, please see the PART LIST and the EXPLODED DRAWING near the end of this manual) LIMITED WARRANTY IMPORTANT: To protect your fitness equipment with the use or performance of the product; To help us : •• the...the USA, if all other consequential damages of any economic loss, loss of property, loss of revenues or prots, loss of this manual. This warranty extends only to and from the date of its authorized service centers. All repairs for a minimal trip charge. This warranty will...

