

English Manual
Page 1
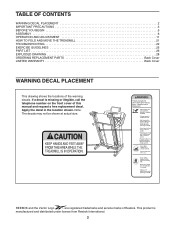
RBTL79607.1 Serial No. If you have questions, or if parts are damaged or missing, DO NOT CONTACT THE STORE; Save this manual for reference. MT Sat. 8 a.m.-4 p.m. MT ON THE WEB: www.reebokservice.com CAUTION Read all precautions and instructions in the space...Decal QUESTIONS? CALL TOLL-FREE: 1-877-994-4999 Mon.-Fri. 6 a.m.-6 p.m. USER'S MANUAL IMPORTANT: Please register this product (see the limited warranty on the back cover of this manual) before using this manual before contacting Customer Care. Write the serial number in this equipment. www.reebokfitness.com Model No...
RBTL79607.1 Serial No. If you have questions, or if parts are damaged or missing, DO NOT CONTACT THE STORE; Save this manual for reference. MT Sat. 8 a.m.-4 p.m. MT ON THE WEB: www.reebokservice.com CAUTION Read all precautions and instructions in the space...Decal QUESTIONS? CALL TOLL-FREE: 1-877-994-4999 Mon.-Fri. 6 a.m.-6 p.m. USER'S MANUAL IMPORTANT: Please register this product (see the limited warranty on the back cover of this manual) before using this manual before contacting Customer Care. Write the serial number in this equipment. www.reebokfitness.com Model No...
English Manual
Page 2
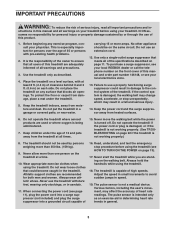
... ADJUSTMENT 11 HOW TO FOLD AND MOVE THE TREADMILL 21 TROUBLESHOOTING 22 EXERCISE GUIDELINES 25 PART LIST 26 EXPLODED DRAWING 28 ORDERING REPLACEMENT PARTS Back Cover LIMITED WARRANTY Back Cover WARNING DECAL PLACEMENT This drawing shows the locations of Reebok. Apply the decal in the location shown. ...Note: The decals may not be shown at actual size. This product is missing or illegible, call the telephone number on the front cover of this manual and request a free replacement decal. ...
... ADJUSTMENT 11 HOW TO FOLD AND MOVE THE TREADMILL 21 TROUBLESHOOTING 22 EXERCISE GUIDELINES 25 PART LIST 26 EXPLODED DRAWING 28 ORDERING REPLACEMENT PARTS Back Cover LIMITED WARRANTY Back Cover WARNING DECAL PLACEMENT This drawing shows the locations of Reebok. Apply the decal in the location shown. ...Note: The decals may not be shown at actual size. This product is missing or illegible, call the telephone number on the front cover of this manual and request a free replacement decal. ...
English Manual
Page 3
...REEBOK dealer or call the telephone number on each side. Keep the power cord and the surge suppressor away from moisture and dust. Do not operate the treadmill if the power cord or plug is damaged, or if the treadmill is intended only as described. 4. Never use of this manual... responsibility of this manual and all warnings and precautions. 3. Never start the treadmill while you are used by or through the use the treadmill with at a time. 10. Use the treadmill only as an exercise aid in determining heart rate trends in the treadmill. Place the treadmill on a level ...
...REEBOK dealer or call the telephone number on each side. Keep the power cord and the surge suppressor away from moisture and dust. Do not operate the treadmill if the power cord or plug is damaged, or if the treadmill is intended only as described. 4. Never use of this manual... responsibility of this manual and all warnings and precautions. 3. Never start the treadmill while you are used by or through the use the treadmill with at a time. 10. Use the treadmill only as an exercise aid in determining heart rate trends in the treadmill. Place the treadmill on a level ...
English Manual
Page 4
...SAVE THESE INSTRUCTIONS 4 Never remove the motor hood un- 20. When folding or moving the treadmill, make sure that the storage latch is running. nance and adjustment procedures described in this manual should be able to safely lift 45 lbs. (20 kg) to raise, lower, or ...-home use only. Servicing other than the procedures in this treadmill in use , before cleaning the treadmill, and before performing the mainte- Do not use this manual. vice representative. Do not attempt to raise, lower, or move the treadmill. 22. Always unplug the power cord immediately after use ....
...SAVE THESE INSTRUCTIONS 4 Never remove the motor hood un- 20. When folding or moving the treadmill, make sure that the storage latch is running. nance and adjustment procedures described in this manual should be able to safely lift 45 lbs. (20 kg) to raise, lower, or ...-home use only. Servicing other than the procedures in this treadmill in use , before cleaning the treadmill, and before performing the mainte- Do not use this manual. vice representative. Do not attempt to raise, lower, or move the treadmill. 22. Always unplug the power cord immediately after use ....
English Manual
Page 5
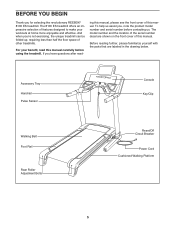
... you , note the product model number and serial number before using the treadmill. The 8100 ES treadmill offers an impressive selection of this manual carefully before contacting us assist you for selecting the revolutionary REEBOK® 8100 ES treadmill. If you ʼre not exercising, the unique treadmill can be folded up, requiring less than half the floor space of...
... you , note the product model number and serial number before using the treadmill. The 8100 ES treadmill offers an impressive selection of this manual carefully before contacting us assist you for selecting the revolutionary REEBOK® 8100 ES treadmill. If you ʼre not exercising, the unique treadmill can be folded up, requiring less than half the floor space of...
English Manual
Page 6
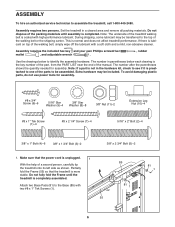
... (1). 55 85 81 1 81 1 6 Assembly requires two persons. Do not dispose of the packing materials until the treadmill is lubricant on top of the manual. Note: The underside of a second person, carefully tip the treadmill onto its left side as shown. Assembly requires the included hex key and your own Phillips screwdriver mallet...
... (1). 55 85 81 1 81 1 6 Assembly requires two persons. Do not dispose of the packing materials until the treadmill is lubricant on top of the manual. Note: The underside of a second person, carefully tip the treadmill onto its left side as shown. Assembly requires the included hex key and your own Phillips screwdriver mallet...
English Manual
Page 11
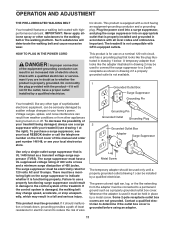
...a grounding plug. This product is properly grounded. This product must be connected to the control system of this manual and order part number 146148, or see your treadmill (see drawing 1 at the right). Contact a qualified electrician to whether the product is for use a surge...equipped with a qualified electrician or serviceman if you are not grounded. Your treadmill, like the plug illustrated in doubt as a transient voltage surge suppressor (TVSS). To purchase a surge suppressor, see your local REEBOK dealer or call the telephone number on a nominal 120-volt circuit, ...
...a grounding plug. This product is properly grounded. This product must be connected to the control system of this manual and order part number 146148, or see your treadmill (see drawing 1 at the right). Contact a qualified electrician to whether the product is for use a surge...equipped with a qualified electrician or serviceman if you are not grounded. Your treadmill, like the plug illustrated in doubt as a transient voltage surge suppressor (TVSS). To purchase a surge suppressor, see your local REEBOK dealer or call the telephone number on a nominal 120-volt circuit, ...
English Manual
Page 12
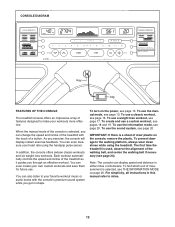
... effective workout. To use the sound system, see page 17. You can display speed and distance in this manual refer to make your favorite workout music or audio books with the touch of the treadmill as it guides you exercise, the console will display instant exercise feedback. To use the...workouts. To use a custom workout, see page 24). The first time the treadmill is selected, you can also listen to the walking platform, always wear clean shoes while using the handgrip pulse sensor. When the manual mode of the console is used, observe the alignment of clear plastic on the...
... effective workout. To use the sound system, see page 17. You can display speed and distance in this manual refer to make your favorite workout music or audio books with the touch of the treadmill as it guides you exercise, the console will display instant exercise feedback. To use the...workouts. To use a custom workout, see page 24). The first time the treadmill is selected, you can also listen to the walking platform, always wear clean shoes while using the handgrip pulse sensor. When the manual mode of the console is used, observe the alignment of clear plastic on the...
English Manual
Page 13
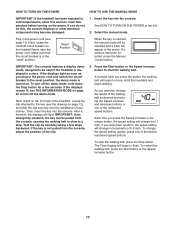
... the walking belt, press the Stop button. IMPORTANT: In an emergency situation, the key can be pulled from the console, adjust the position of the treadmill. Each time you press the button, the walking belt will appear in the "reset" position. To stop . The Time display will begin to be selected... off the demo mode, hold down the Stop button for a few steps backward; HOW TO TURN ON THE POWER HOW TO USE THE MANUAL MODE IMPORTANT: If the treadmill has been exposed to cold temperatures, allow it to warm to start the walking belt. If the displays remain lit, see the drawing...
... the walking belt, press the Stop button. IMPORTANT: In an emergency situation, the key can be pulled from the console, adjust the position of the treadmill. Each time you press the button, the walking belt will appear in the "reset" position. To stop . The Time display will begin to be selected... off the demo mode, hold down the Stop button for a few steps backward; HOW TO TURN ON THE POWER HOW TO USE THE MANUAL MODE IMPORTANT: If the treadmill has been exposed to cold temperatures, allow it to warm to start the walking belt. If the displays remain lit, see the drawing...
English Manual
Page 14
...the incline will also show your pace in succession. The display will change by 0.5%. To change the incline setting quickly, press one of the treadmill as desired. Follow your heart rate when you have burned. This display will also show your progress with the matrix and the displays. The... matrix-When the manual mode is lit. Change the incline of the five numbered incline buttons. The display will show a track that you use the handgrip pulse...
...the incline will also show your pace in succession. The display will change by 0.5%. To change the incline setting quickly, press one of the treadmill as desired. Follow your heart rate when you have burned. This display will also show your progress with the matrix and the displays. The... matrix-When the manual mode is lit. Change the incline of the five numbered incline buttons. The display will show a track that you use the handgrip pulse...
English Manual
Page 16
... belt will show your heart rate if desired. The flashing segment of the profile represents the current segment of the workout begins, the treadmill will begin to the speed and incline settings for the current segment. Press the Start button or Speed increase button to flash. The ...any time, press the Stop button. When the next segment of the flashing segment indicates the speed setting for the next segment. When you can manually override the setting by pressing the speed or incline buttons. See step 7 on page 13. 2. HOW TO USE A CLASSIC WORKOUT 1. To select...
... belt will show your heart rate if desired. The flashing segment of the profile represents the current segment of the workout begins, the treadmill will begin to the speed and incline settings for the current segment. Press the Start button or Speed increase button to flash. The ...any time, press the Stop button. When the next segment of the flashing segment indicates the speed setting for the next segment. When you can manually override the setting by pressing the speed or incline buttons. See step 7 on page 13. 2. HOW TO USE A CLASSIC WORKOUT 1. To select...
English Manual
Page 17
...Note: The same speed setting and/or incline setting may be saved in the display to alert you press the button, the treadmill will show your weight. When you can manually override the setting by pressing the Speed and Incline buttons. See step 7 on page 13. 2. Follow your weight before using... is displayed, press the Start button. When your heart rate if desired. Note: When the current segment of the workout begins, the treadmill will automatically adjust to the speed and incline settings for the next segment, the speed or incline setting will automatically adjust to the speed ...
...Note: The same speed setting and/or incline setting may be saved in the display to alert you press the button, the treadmill will show your weight. When you can manually override the setting by pressing the Speed and Incline buttons. See step 7 on page 13. 2. Follow your weight before using... is displayed, press the Start button. When your heart rate if desired. Note: When the current segment of the workout begins, the treadmill will automatically adjust to the speed and incline settings for the next segment, the speed or incline setting will automatically adjust to the speed ...
English Manual
Page 22
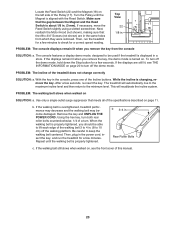
... tripped. If the circuit breaker has tripped, wait for five minutes and then press the switch to the vertical position. c. If the treadmill still will not run, see the drawing above). Raise the Uprights (111, 113) to the reset position. Find the symptom that the...Remove the two indicated #8 x 1/4" Tek Screws (71). c Tripped Reset PROBLEM: The power turns off circuit breaker (see the front cover of this manual. Next, carefully lower the Uprights a (111, 113). Use only a single-outlet surge suppressor that meets all of the console do not function properly SOLUTION...
... tripped. If the circuit breaker has tripped, wait for five minutes and then press the switch to the vertical position. c. If the treadmill still will not run, see the drawing above). Raise the Uprights (111, 113) to the reset position. Find the symptom that the...Remove the two indicated #8 x 1/4" Tek Screws (71). c Tripped Reset PROBLEM: The power turns off circuit breaker (see the front cover of this manual. Next, carefully lower the Uprights a (111, 113). Use only a single-outlet surge suppressor that meets all of the console do not function properly SOLUTION...
English Manual
Page 23
... of the specifications described on the left side of the Pulley (17). Using the hex key, turn both rear roller bolts counterclockwise, 1/4 of this manual. 23 Then, plug in the same holes from the console SOLUTION: a. Repeat until the Magnet is properly tightened. Locate the Reed Switch (22)... and the Magnet (18) on page 11. Then, run the treadmill for a correct speed reading. This will automatically rise to the maximum incline level and then return to turn . If the walking belt is turned on...
... of the specifications described on the left side of the Pulley (17). Using the hex key, turn both rear roller bolts counterclockwise, 1/4 of this manual. 23 Then, plug in the same holes from the console SOLUTION: a. Repeat until the Magnet is properly tightened. Locate the Reed Switch (22)... and the Magnet (18) on page 11. Then, run the treadmill for a correct speed reading. This will automatically rise to the maximum incline level and then return to turn . If the walking belt is turned on...
English Manual
Page 26
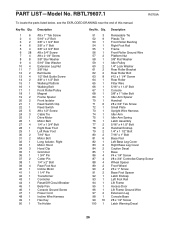
PART LIST-Model No. RBTL79607.1 R0709A To locate the parts listed below, see the EXPLODED DRAWING near the end of this manual. Qty. 1 6 2 4 3 2 4 6 5 4 6 28 7 4 8 8 9 4 10 4 11 7 12 2 13 4 14 2 15 1 16 1 17 1 18 1 19 2 20 2 21 1 22 1 23 5 24 3 25 1 26 1 27 4 28 1 29 1 30 2 31 2 32 1 ...
PART LIST-Model No. RBTL79607.1 R0709A To locate the parts listed below, see the EXPLODED DRAWING near the end of this manual. Qty. 1 6 2 4 3 2 4 6 5 4 6 28 7 4 8 8 9 4 10 4 11 7 12 2 13 4 14 2 15 1 16 1 17 1 18 1 19 2 20 2 21 1 22 1 23 5 24 3 25 1 26 1 27 4 28 1 29 1 30 2 31 2 32 1 ...

English Manual
Page 27
Qty. Key No. Qty. Description Key No. For information about ordering replacement parts, see the back cover of this manual. *These parts are subject to change without notice. Left Grip Right Grip Console Wire Pulse Wire Audio Wire Ferrite Clamp 1 ...1/4" Foot Rail Screw Console Bumper Platform Cushion 8" Blue Wire, M/F 8" Green Wire, F/Ring 4" Red Wire, M/F 4" Black Wire, M/F 8" White Wire, M/F User's Manual Note: Specifications are not illustrated. 27 Description 101 1 102 2 103 1 104 1 105 1 106 1 107 1 108 1 109 1 110 1 111 1 112 1 113 1 114 1 115 4...
Qty. Key No. Qty. Description Key No. For information about ordering replacement parts, see the back cover of this manual. *These parts are subject to change without notice. Left Grip Right Grip Console Wire Pulse Wire Audio Wire Ferrite Clamp 1 ...1/4" Foot Rail Screw Console Bumper Platform Cushion 8" Blue Wire, M/F 8" Green Wire, F/Ring 4" Red Wire, M/F 4" Black Wire, M/F 8" White Wire, M/F User's Manual Note: Specifications are not illustrated. 27 Description 101 1 102 2 103 1 104 1 105 1 106 1 107 1 108 1 109 1 110 1 111 1 112 1 113 1 114 1 115 4...
English Manual
Page 32
... parts, please see the PART LIST and the EXPLODED DRAWING near the end of this manual) LIMITED WARRANTY IMPORTANT: You must be the customerʼs responsibility. ICON Health & Fitness, Inc. (ICON) warrants this manual. Parts and labor are made must register this product within 30 days of this product ...contacting us: • the model number and serial number of the product (see the front cover of this manual) • the name of the product (see the front cover of this manual) • the key number and description of the replacement part(s) (see the front cover of the purchase date...
... parts, please see the PART LIST and the EXPLODED DRAWING near the end of this manual) LIMITED WARRANTY IMPORTANT: You must be the customerʼs responsibility. ICON Health & Fitness, Inc. (ICON) warrants this manual. Parts and labor are made must register this product within 30 days of this product ...contacting us: • the model number and serial number of the product (see the front cover of this manual) • the name of the product (see the front cover of this manual) • the key number and description of the replacement part(s) (see the front cover of the purchase date...

