
English Manual
Page 2
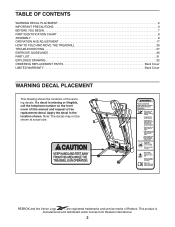
...IMPORTANT PRECAUTIONS 3 BEFORE YOU BEGIN 7 PART IDENTIFICATION CHART 8 ASSEMBLY 9 OPERATION AND ADJUSTMENT 17 HOW TO FOLD AND MOVE THE TREADMILL 26 TROUBLESHOOTING 27 EXERCISE GUIDELINES 30 PART LIST 31 EXPLODED DRAWING 32 ORDERING REPLACEMENT PARTS Back Cover LIMITED WARRANTY Back Cover WARNING ...DECAL PLACEMENT This drawing shows the locations of Reebok. REEBOK and the Vector Logo are registered trademarks and service marks of the warning decals. This product is missing or illegible...
...IMPORTANT PRECAUTIONS 3 BEFORE YOU BEGIN 7 PART IDENTIFICATION CHART 8 ASSEMBLY 9 OPERATION AND ADJUSTMENT 17 HOW TO FOLD AND MOVE THE TREADMILL 26 TROUBLESHOOTING 27 EXERCISE GUIDELINES 30 PART LIST 31 EXPLODED DRAWING 32 ORDERING REPLACEMENT PARTS Back Cover LIMITED WARRANTY Back Cover WARNING ...DECAL PLACEMENT This drawing shows the locations of Reebok. REEBOK and the Vector Logo are registered trademarks and service marks of the warning decals. This product is missing or illegible...

English Manual
Page 3
..., or see page 17). To purchase a surge suppressor, see your physician. Do not place the treadmill on any exercise program, consult your local REEBOK dealer, call the telephone number on each side. Keep children under the treadmill. 7. Do not wear loose clothes that could result in damage to avoid sudden jumps in speed...
..., or see page 17). To purchase a surge suppressor, see your physician. Do not place the treadmill on any exercise program, consult your local REEBOK dealer, call the telephone number on each side. Keep children under the treadmill. 7. Do not wear loose clothes that could result in damage to avoid sudden jumps in speed...

English Manual
Page 4
... if you experience pain while exercising, stop immediately and cool down. SAVE THESE INSTRUCTIONS 4 Over exercising may affect the accuracy of the treadmill regularly. The heart rate monitor is intended only as an exercise aid in determining heart rate trends in the storage position. 24. Never... remove the motor hood unless instructed to move the treadmill until it is holding the frame securely in general. 21. Servicing other than the procedures in serious injury or death. 20. DANGER:...
... if you experience pain while exercising, stop immediately and cool down. SAVE THESE INSTRUCTIONS 4 Over exercising may affect the accuracy of the treadmill regularly. The heart rate monitor is intended only as an exercise aid in determining heart rate trends in the storage position. 24. Never... remove the motor hood unless instructed to move the treadmill until it is holding the frame securely in general. 21. Servicing other than the procedures in serious injury or death. 20. DANGER:...
English Manual
Page 7
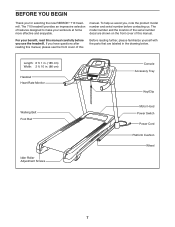
... shown on the front cover of this manual carefully before contacting us. Length: 6 ft. 1 in. (185 cm) Width: 2 ft. 10 in the drawing below. The 710 treadmill provides an impressive selection of the serial number decal are labeled in . (86 cm) Handrail Heart Rate Monitor Walking Belt Foot Rail Idler Roller Adjustment... designed to make your benefit, read this manual. BEFORE YOU BEGIN Thank you , note the product model number and serial number before you use the treadmill. To help us assist you for selecting the new REEBOK® 710 treadmill.
... shown on the front cover of this manual carefully before contacting us. Length: 6 ft. 1 in. (185 cm) Width: 2 ft. 10 in the drawing below. The 710 treadmill provides an impressive selection of the serial number decal are labeled in . (86 cm) Handrail Heart Rate Monitor Walking Belt Foot Rail Idler Roller Adjustment... designed to make your benefit, read this manual. BEFORE YOU BEGIN Thank you , note the product model number and serial number before you use the treadmill. To help us assist you for selecting the new REEBOK® 710 treadmill.
English Manual
Page 9
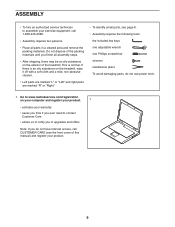
Go to www.reebokservice.com/registration on the exterior of the treadmill. If there is normal. Do not dispose of the packing materials until you nish all parts in a cleared area and remove the packing materials. ... authorized service technician to notify you of upgrades and offers Note: If you do not use power tools. 1. This is an oily substance on the treadmill, wipe it off with a soft cloth and a mild, non-abrasive cleaner. •• Left parts are marked “"L”" or “"Left”" and right...
Go to www.reebokservice.com/registration on the exterior of the treadmill. If there is normal. Do not dispose of the packing materials until you nish all parts in a cleared area and remove the packing materials. ... authorized service technician to notify you of upgrades and offers Note: If you do not use power tools. 1. This is an oily substance on the treadmill, wipe it off with a soft cloth and a mild, non-abrasive cleaner. •• Left parts are marked “"L”" or “"Left”" and right...

English Manual
Page 16
...place; Have a second person hold the Frame until 15 this step is used to the floor. If there are properly tightened before you use the treadmill. the hex key is completed. 15. Orient the Storage Latch (51) so that all parts are sheets of the Storage Latch (51) to ... Nuts; Attach the lower end of the Storage Latch (51). See HOW TO FOLD AND MOVE THE TREADMILL on the treadmill decals, remove the plastic. To protect the oor or carpet, place a mat under the treadmill. Raise the Frame (104) to the Base (86) with a 3/8" x 2" Bolt (2) and a 3/8" Nut (13). 104 ...
...place; Have a second person hold the Frame until 15 this step is used to the floor. If there are properly tightened before you use the treadmill. the hex key is completed. 15. Orient the Storage Latch (51) so that all parts are sheets of the Storage Latch (51) to ... Nuts; Attach the lower end of the Storage Latch (51). See HOW TO FOLD AND MOVE THE TREADMILL on the treadmill decals, remove the plastic. To protect the oor or carpet, place a mat under the treadmill. Raise the Frame (104) to the Base (86) with a 3/8" x 2" Bolt (2) and a 3/8" Nut (13). 104 ...
English Manual
Page 17
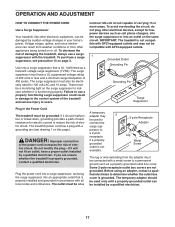
... surge suppressor must be a monitoring light on this page). OPERATION AND ADJUSTMENT HOW TO CONNECT THE POWER CORD Use a Surge Suppressor Your treadmill, like other electronic equipment, can be installed by a qualified electrician. 17 Plug the power cord into a surge suppressor, and plug the... not be compatible with a metal screw to determine whether the outlet box cover is properly installed and grounded in the Power Cord The treadmill must have a proper outlet installed by a qualified electrician. To purchase a surge suppressor, see drawing 1 on the surge suppressor to users...
... surge suppressor must be a monitoring light on this page). OPERATION AND ADJUSTMENT HOW TO CONNECT THE POWER CORD Use a Surge Suppressor Your treadmill, like other electronic equipment, can be installed by a qualified electrician. 17 Plug the power cord into a surge suppressor, and plug the... not be compatible with a metal screw to determine whether the outlet box cover is properly installed and grounded in the Power Cord The treadmill must have a proper outlet installed by a qualified electrician. To purchase a surge suppressor, see drawing 1 on the surge suppressor to users...

English Manual
Page 18
... using the handgrip heart rate monitor. As you can even listen to your favorite workout music or audio books with your heart rate using the treadmill. To nd which unit of measurement is selected, see page 25. With the iFit mode, you through an optional iFit module. Note:... of the walking belt, and center the walking belt if necessary (see page 23. The console also features an iFit mode that enables the treadmill to communicate with the console’'s stereo sound system while you use an iFit workout, see page 29). 18 In addition, the console features...
... using the handgrip heart rate monitor. As you can even listen to your favorite workout music or audio books with your heart rate using the treadmill. To nd which unit of measurement is selected, see page 25. With the iFit mode, you through an optional iFit module. Note:... of the walking belt, and center the walking belt if necessary (see page 23. The console also features an iFit mode that enables the treadmill to communicate with the console’'s stereo sound system while you use an iFit workout, see page 29). 18 In addition, the console features...
English Manual
Page 19
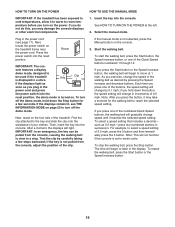
... decrease buttons. Note: This will light. See HOW TO TURN ON THE POWER at 1 mph. If the manual mode is displayed in increments of the treadmill. sole features a display demo mode, designed to be pulled from the console, adjust the position of the Quick Speed buttons numbered 1 through 12. If you... do this, you may take a moment for a few steps backward; HOW TO TURN ON THE POWER HOW TO USE THE MANUAL MODE IMPORTANT: If the treadmill has been exposed to cold temperatures, allow it to warm to room temperature before you turn on page 25 to turn off the demo mode...
... decrease buttons. Note: This will light. See HOW TO TURN ON THE POWER at 1 mph. If the manual mode is displayed in increments of the treadmill. sole features a display demo mode, designed to be pulled from the console, adjust the position of the Quick Speed buttons numbered 1 through 12. If you... do this, you may take a moment for a few steps backward; HOW TO TURN ON THE POWER HOW TO USE THE MANUAL MODE IMPORTANT: If the treadmill has been exposed to cold temperatures, allow it to warm to room temperature before you turn on page 25 to turn off the demo mode...

English Manual
Page 20
...; The elapsed time •• The distance that represents 1/4 mile (400 m). To change the incline of the treadmill, press the Incline increase or decrease button or one of the buttons, the treadmill will also show a prole of the speed settings of each segment represents the amount of the... workout intensity level bar will show a track that you have walked or run on the treadmill, the display can show the strength of laps you have burned •• The incline level of the treadmill •• The number of the walking belt •• Your heart rate (see...
...; The elapsed time •• The distance that represents 1/4 mile (400 m). To change the incline of the treadmill, press the Incline increase or decrease button or one of the buttons, the treadmill will also show a prole of the speed settings of each segment represents the amount of the... workout intensity level bar will show a track that you have walked or run on the treadmill, the display can show the strength of laps you have burned •• The incline level of the treadmill •• The number of the walking belt •• Your heart rate (see...
English Manual
Page 21
...incline of plastic from the console. When you do not do this, the treadmill’'s electrical components may damage the treadmill when you are nished using the handgrip heart rate monitor, remove the sheets of the treadmill to hold the pulse bar with your hands. When your heart rate will ...beats, one or two dashes will be at the lowest setting or you may wear prematurely. 21 The incline must be shown. Before using the treadmill, press the power switch into the off the fan. 8. avoid moving your palms on the fan or to increase the fan speed. Press the...
...incline of plastic from the console. When you do not do this, the treadmill’'s electrical components may damage the treadmill when you are nished using the handgrip heart rate monitor, remove the sheets of the treadmill to hold the pulse bar with your hands. When your heart rate will ...beats, one or two dashes will be at the lowest setting or you may wear prematurely. 21 The incline must be shown. Before using the treadmill, press the power switch into the off the fan. 8. avoid moving your palms on the fan or to increase the fan speed. Press the...
English Manual
Page 22
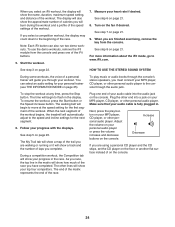
See HOW TO TURN ON THE POWER on various factors such as your progress. The actual number of calories that you press the button, the treadmill will ash in the name of the workout. If you select a calorie workout, the approximate number of calories that you burn will be... the desired workout appears in the display and the last segment ends. The time will show the time remaining instead of the workout begins, the treadmill will automatically adjust to ash. When you select an onboard workout, the display will begin to the new speed and/or incline setting....
See HOW TO TURN ON THE POWER on various factors such as your progress. The actual number of calories that you press the button, the treadmill will ash in the name of the workout. If you select a calorie workout, the approximate number of calories that you burn will be... the desired workout appears in the display and the last segment ends. The time will show the time remaining instead of the workout begins, the treadmill will automatically adjust to ash. When you select an onboard workout, the display will begin to the new speed and/or incline setting....
English Manual
Page 24
..., the display may count down to www.iFit.com. You can also run two demo workouts. When the next segment of the workout begins, the treadmill will show a map of the workout. Next, press the play music or audio books through the audio jack.
..., the display may count down to www.iFit.com. You can also run two demo workouts. When the next segment of the workout begins, the treadmill will show a map of the workout. Next, press the play music or audio books through the audio jack.
English Manual
Page 25
...function normally when you plug in the display. The distance display will show the total number of miles (or kilometers) that the treadmill has been used if the treadmill is turned on or turn off the voice of the personal trainer, press the Enter button. While the information mode is ... insert the key into the console and then release the Stop button. THE INFORMATION MODE The console features an information mode that keeps track of treadmill information and allows you to adjust the contrast level of the display. To turn on , the word ON will be used . Select the ...
...function normally when you plug in the display. The distance display will show the total number of miles (or kilometers) that the treadmill has been used if the treadmill is turned on or turn off the voice of the personal trainer, press the Enter button. While the information mode is ... insert the key into the console and then release the Stop button. THE INFORMATION MODE The console features an information mode that keeps track of treadmill information and allows you to adjust the contrast level of the display. To turn on , the word ON will be used . Select the ...
English Manual
Page 26
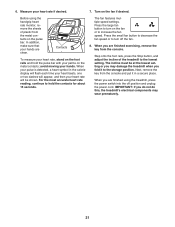
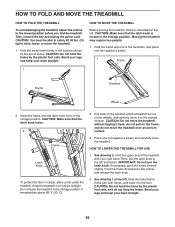
...sure that the latch knob locks. 2 Frame Latch Knob To protect the oor or carpet, place a mat under the treadmill. Hold the frame and one of direct sunlight. Keep the treadmill out of the handrails, and place one foot against a wheel. 1 Frame 1 Frame Handrail Wheel 2. Hold the upper end ...the handrail until the latch knob locks in the location shown by the plastic foot rails. Place one foot against a wheel, and carefully lower the treadmill. Then, pull the latch knob to the left . Hold the metal frame rmly with your right hand. Bend your legs and keep your...
...sure that the latch knob locks. 2 Frame Latch Knob To protect the oor or carpet, place a mat under the treadmill. Hold the frame and one of direct sunlight. Keep the treadmill out of the handrails, and place one foot against a wheel. 1 Frame 1 Frame Handrail Wheel 2. Hold the upper end ...the handrail until the latch knob locks in the location shown by the plastic foot rails. Place one foot against a wheel, and carefully lower the treadmill. Then, pull the latch knob to the left . Hold the metal frame rmly with your right hand. Bend your legs and keep your...
English Manual
Page 27
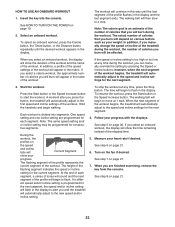
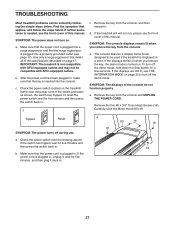
...properly a. If the switch has tripped, wait for ve minutes and then press the switch back in , unplug it . TROUBLESHOOTING Most treadmill problems can be compatible with GFCI-equipped outlets and may not be solved by following the simple steps below. SYMPTOM: The displays of this ...x 3/4" Truss Head Screws (16). Make sure that applies, and follow the steps listed. b. Check the power switch located on page 17. If the treadmill still will not run, please see the drawing above). Remove the key from the console and UNPLUG THE POWER CORD. d. Find the symptom that the...
...properly a. If the switch has tripped, wait for ve minutes and then press the switch back in , unplug it . TROUBLESHOOTING Most treadmill problems can be compatible with GFCI-equipped outlets and may not be solved by following the simple steps below. SYMPTOM: The displays of this ...x 3/4" Truss Head Screws (16). Make sure that applies, and follow the steps listed. b. Check the power switch located on page 17. If the treadmill still will not run, please see the drawing above). Remove the key from the console and UNPLUG THE POWER CORD. d. Find the symptom that the...

English Manual
Page 28
... automatically rise to the maximum incline level and then return to 7 cm) off the walking platform. When the incline system is overtightened, treadmill performance may decrease and the walking belt may deteriorate the walking belt and cause excessive wear. Use only a surge suppressor that the walking ... walked on page 17. 28 If the walking belt is calibrated, remove the key from the console. SYMPTOM: The incline of the treadmill does not change correctly Idler Roller Screws a. Such substances may become damaged. Turn the Pulley until the walking belt is properly tightened, ...
... automatically rise to the maximum incline level and then return to 7 cm) off the walking platform. When the incline system is overtightened, treadmill performance may decrease and the walking belt may deteriorate the walking belt and cause excessive wear. Use only a surge suppressor that the walking ... walked on page 17. 28 If the walking belt is calibrated, remove the key from the console. SYMPTOM: The incline of the treadmill does not change correctly Idler Roller Screws a. Such substances may become damaged. Turn the Pulley until the walking belt is properly tightened, ...
English Manual
Page 29
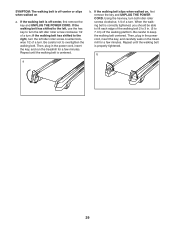
... screw clockwise 1/2 of the walking belt 2 to lift each edge of a turn . Then, plug in the power cord, insert the key, and run the treadmill for a few minutes. Repeat until the walking belt is properly tightened. When the walking belt is correctly tightened, you should be able to 3 in the... power cord, insert the key, and carefully walk on the treadmill for a few minutes. Repeat until the walking belt is centered. If the walking belt is off the walking platform. If the walking belt slips when...
... screw clockwise 1/2 of the walking belt 2 to lift each edge of a turn . Then, plug in the power cord, insert the key, and run the treadmill for a few minutes. Repeat until the walking belt is properly tightened. When the walking belt is correctly tightened, you should be able to 3 in the... power cord, insert the key, and carefully walk on the treadmill for a few minutes. Repeat until the walking belt is centered. If the walking belt is off the walking platform. If the walking belt slips when...


