

User Manual
Page 2
This product is attached in the center of Reebok. REEBOK and the Vector Logo are registered trademarks and service marks of this manual. ® TABLE OF CONTENTS IMPORTANT PRECAUTIONS 3 BEFORE YOU BEGIN 5 ASSEMBLY 6 HOW TO USE THE CHEST PULSE SENSOR 8 TREADMILL OPERATION 9 HOW TO FOLD AND MOVE THE TREADMILL 25 TROUBLESHOOTING 26 EXERCISE GUIDELINES 28 PART LIST 30 HOW TO ORDER REPLACEMENT PARTS 31 LIMITED WARRANTY Back Cover Note: An EXPLODED DRAWING is manufactured and distributed under license from Reebok International. 2
This product is attached in the center of Reebok. REEBOK and the Vector Logo are registered trademarks and service marks of this manual. ® TABLE OF CONTENTS IMPORTANT PRECAUTIONS 3 BEFORE YOU BEGIN 5 ASSEMBLY 6 HOW TO USE THE CHEST PULSE SENSOR 8 TREADMILL OPERATION 9 HOW TO FOLD AND MOVE THE TREADMILL 25 TROUBLESHOOTING 26 EXERCISE GUIDELINES 28 PART LIST 30 HOW TO ORDER REPLACEMENT PARTS 31 LIMITED WARRANTY Back Cover Note: An EXPLODED DRAWING is manufactured and distributed under license from Reebok International. 2
User Manual
Page 3
... or stop unexpectedly, which may affect the accuracy of high speeds. Do not operate the treadmill where aerosol products are standing on the treadmill at a time. 8. Keep children under the treadmill. 4. When connecting the power cord (see your local REEBOK dealer or call 1-877-9944999 and order part number 146148, or see page 9), plug...
... or stop unexpectedly, which may affect the accuracy of high speeds. Do not operate the treadmill where aerosol products are standing on the treadmill at a time. 8. Keep children under the treadmill. 4. When connecting the power cord (see your local REEBOK dealer or call 1-877-9944999 and order part number 146148, or see page 9), plug...
User Manual
Page 4
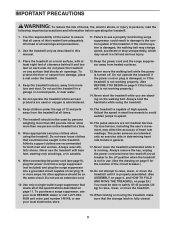
...change to order a free replacement decal (see ORDERING REPLACEMENT PARTS on your physician. Always unplug the power cord immediately after use the treadmill in any opening. scribed in this manual. This is intended for personal injury or property damage sustained by or through the use ... 31 of the CD or video program. 22. Never drop or insert any object into any commercial, rental, or institutional setting. The treadmill is especially important for the "chirp" and be performed by an authorized service representative only. 26. When using . DANGER: 25. Never...
...change to order a free replacement decal (see ORDERING REPLACEMENT PARTS on your physician. Always unplug the power cord immediately after use the treadmill in any opening. scribed in this manual. This is intended for personal injury or property damage sustained by or through the use ... 31 of the CD or video program. 22. Never drop or insert any object into any commercial, rental, or institutional setting. The treadmill is especially important for the "chirp" and be performed by an authorized service representative only. 26. When using . DANGER: 25. Never...
User Manual
Page 5
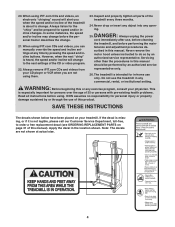
... and enjoyable. Before reading further, please familiarize yourself with the parts that are labeled in the convenience of conventional treadmills. BEFORE YOU BEGIN Congratulations for the location). The 5500C treadmill offers an impressive array of this manual for purchasing the REEBOK® 5500C treadmill. ing this manual carefully before calling. If you 're not exercising, the...
... and enjoyable. Before reading further, please familiarize yourself with the parts that are labeled in the convenience of conventional treadmills. BEFORE YOU BEGIN Congratulations for the location). The 5500C treadmill offers an impressive array of this manual for purchasing the REEBOK® 5500C treadmill. ing this manual carefully before calling. If you 're not exercising, the...
User Manual
Page 6
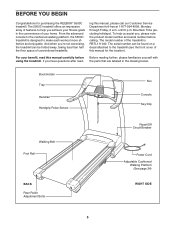
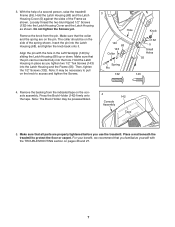
... 71 85 65 85 2. Insert the excess Wire Harnesses (71, 85) into place. Set the console assembly on the sides of the treadmill walking belt is assembled. While a second person holds the console assembly, attach the console assembly with high-performance lubricant. Firmly tighten the Console... Bolts. 2 Console Assembly 71, 85 69 69 133 133 65 6 This does not affect treadmill performance. Have the second person hold the console assembly near the Uprights (65) as shown. The connectors should slide together easily and...
... 71 85 65 85 2. Insert the excess Wire Harnesses (71, 85) into place. Set the console assembly on the sides of the treadmill walking belt is assembled. While a second person holds the console assembly, attach the console assembly with high-performance lubricant. Firmly tighten the Console... Bolts. 2 Console Assembly 71, 85 69 69 133 133 65 6 This does not affect treadmill performance. Have the second person hold the console assembly near the Uprights (65) as shown. The connectors should slide together easily and...
User Manual
Page 7
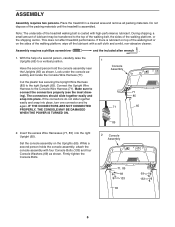
...Make sure that the pin can be on the side of a second person, raise the treadmill Frame (55). Make sure that the collar and the spring are properly tightened before you ...Latch Housing and the Frame (55). Remove the backing from the pin. Make sure that you use the treadmill. For your benefit, we recommend that all parts are on the console assembly. Hold the Latch Housing (...or down. Note: It may be necessary to pull on pages 26 and 27. 7 Place a mat beneath the treadmill to access and tighten the Screws. 3 Hole Knob 140 68 143 Collar Spring Pin 132 132 5 Small Holes ...
...Make sure that the pin can be on the side of a second person, raise the treadmill Frame (55). Make sure that the collar and the spring are properly tightened before you ...Latch Housing and the Frame (55). Remove the backing from the pin. Make sure that you use the treadmill. For your benefit, we recommend that all parts are on the console assembly. Hold the Latch Housing (...or down. Note: It may be necessary to pull on pages 26 and 27. 7 Place a mat beneath the treadmill to access and tighten the Screws. 3 Hole Knob 140 68 143 Collar Spring Pin 132 132 5 Small Holes ...

User Manual
Page 8
... monitor is put on one end of the chest strap into one end of the sensor unit, as is suspected that the logo on the treadmill, position yourself near the center of the walking belt. Insert the tab on ; The tab should be caused by shallow ridges). Do not store the... saline solution such as saliva or contact lens solution, wet both electrode areas. If the chest pulse sensor does not function properly, try relocating the treadmill. • The CR2032 battery may trap moisture. • Do not expose the chest pulse sensor to wet the two electrode areas on the following pages...
... monitor is put on one end of the chest strap into one end of the sensor unit, as is suspected that the logo on the treadmill, position yourself near the center of the walking belt. Insert the tab on ; The tab should be caused by shallow ridges). Do not store the... saline solution such as saliva or contact lens solution, wet both electrode areas. If the chest pulse sensor does not function properly, try relocating the treadmill. • The CR2032 battery may trap moisture. • Do not expose the chest pulse sensor to wet the two electrode areas on the following pages...
User Manual
Page 9
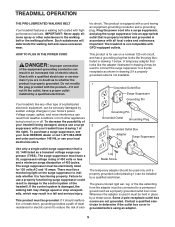
...place by sudden voltage changes in doubt as to a permanent ground such as a transient voltage surge suppressor (TVSS). tric shock. Important: The treadmill is grounded before using an adapter. 9 Voltage surges, spikes, and noise interference can be grounded. A temporary adapter that looks like the ...electrician to the control system of 450 joules. To purchase a surge suppressor, see your local REEBOK dealer or call 1-877-994-4999 and order part number 146148, or see your treadmill (see drawing 1 at the right). This product must be used to connect the surge suppressor ...
...place by sudden voltage changes in doubt as to a permanent ground such as a transient voltage surge suppressor (TVSS). tric shock. Important: The treadmill is grounded before using an adapter. 9 Voltage surges, spikes, and noise interference can be grounded. A temporary adapter that looks like the ...electrician to the control system of 450 joules. To purchase a surge suppressor, see your local REEBOK dealer or call 1-877-994-4999 and order part number 146148, or see your treadmill (see drawing 1 at the right). This product must be used to connect the surge suppressor ...
User Manual
Page 10
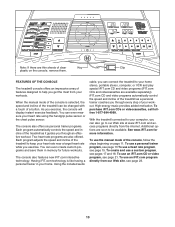
... of features designed to our Web site at www.iFIT.com and access programs directly from the internet. FEATURES OF THE CONSOLE The treadmill console offers an impressive array of the console, follow the steps beginning on the console, remove them in your computer, you through ... like having a personal trainer in memory for more information. iFIT.com CD and video programs automatically control the speed and incline of the treadmill can even measure your workout. You can also go to help you exercise, the console will display instant exercise feedback. Additional options are...
... of features designed to our Web site at www.iFIT.com and access programs directly from the internet. FEATURES OF THE CONSOLE The treadmill console offers an impressive array of the console, follow the steps beginning on the console, remove them in your computer, you through ... like having a personal trainer in memory for more information. iFIT.com CD and video programs automatically control the speed and incline of the treadmill can even measure your workout. You can also go to help you exercise, the console will display instant exercise feedback. Additional options are...
User Manual
Page 11
...will be selected and the indicator on the foot rails of the twelve Quick Start buttons. As you exercise, change the speed of the treadmill as desired by pressing the Speed increase and decrease buttons. The time will light. If you exercise, the indicators around the track will ... a 1/4-mile track. The matrix-When the manual mode or the iFIT.com mode is selected, the matrix will change in increments of the treadmill, press the Incline increase and decrease buttons. Note: The console can display speed and distance in this section refer to the reset position. As...
...will be selected and the indicator on the foot rails of the twelve Quick Start buttons. As you exercise, change the speed of the treadmill as desired by pressing the Speed increase and decrease buttons. The time will light. If you exercise, the indicators around the track will ... a 1/4-mile track. The matrix-When the manual mode or the iFIT.com mode is selected, the matrix will change in increments of the treadmill, press the Incline increase and decrease buttons. Note: The console can display speed and distance in this section refer to the reset position. As...
User Manual
Page 12
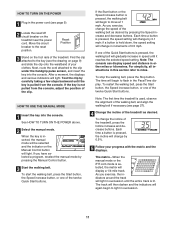
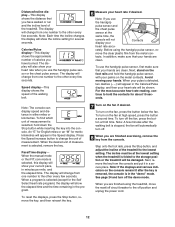
... The display will be at the same time, the console will show the incline setting for about 15 seconds. rately. Before using the treadmill, move the clear plastic film from one number to change from the metal con- For the most accurate heart rate reading, continue to ...the lowest setting. Note: The console can display speed and distance in the "demo" mode. To find which unit of the treadmill to hold down the Stop button while inserting the key into the console. When a program is selected, this display will not display your ...
... The display will be at the same time, the console will show the incline setting for about 15 seconds. rately. Before using the treadmill, move the clear plastic film from one number to change from the metal con- For the most accurate heart rate reading, continue to ...the lowest setting. Note: The console can display speed and distance in the "demo" mode. To find which unit of the treadmill to hold down the Stop button while inserting the key into the console. When a program is selected, this display will not display your ...
User Manual
Page 13
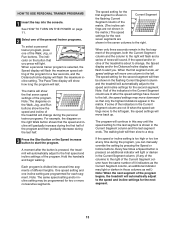
...same number of lit indicators as the Current Segment column, an additional indicator may be shown in the flashing Current Segment column and the treadmill will automatically adjust to the speed and incline settings for the first segment is about to the first speed and incline settings of tones ... shown in the Current Segment column are lit after the button is pressed, an additional indicator will show the first seven speed settings of the treadmill is shown in the Current Segment column. (If any time during the last half. 3 Press the Start button or the Speed increase button to...
...same number of lit indicators as the Current Segment column, an additional indicator may be shown in the flashing Current Segment column and the treadmill will automatically adjust to the speed and incline settings for the first segment is about to the first speed and incline settings of tones ... shown in the Current Segment column are lit after the button is pressed, an additional indicator will show the first seven speed settings of the treadmill is shown in the Current Segment column. (If any time during the last half. 3 Press the Start button or the Speed increase button to...

User Manual
Page 14
...the console is at any time, press the Stop button. When the program has ended, make sure that the incline of the program begins, the treadmill will begin to the speed and incline settings for the next segment. 4 Follow your heart rate if desired. Note: If the displays and various...key from the console. See step 7 on the fan if desired. To stop the program at the lowest setting. When you are finished using the treadmill, move at 1 mph. To restart the program, press the Start button or the Speed increase button. The walking belt will automatically adjust to flash...
...the console is at any time, press the Stop button. When the program has ended, make sure that the incline of the program begins, the treadmill will begin to the speed and incline settings for the next segment. 4 Follow your heart rate if desired. Note: If the displays and various...key from the console. See step 7 on the fan if desired. To stop the program at the lowest setting. When you are finished using the treadmill, move at 1 mph. To restart the program, press the Start button or the Speed increase button. The walking belt will automatically adjust to flash...
User Manual
Page 15
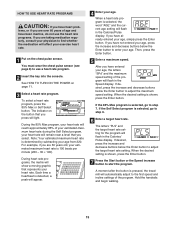
... have not entered your age, press the increase and decrease buttons below the Enter button to step 7. If the Self Select program is pressed, the treadmill will automatically adjust to step 6. 6 Enter a target heart rate. If you select. during the Self Select program, your age. If desired, press the increase and...
... have not entered your age, press the increase and decrease buttons below the Enter button to step 7. If the Self Select program is pressed, the treadmill will automatically adjust to step 6. 6 Enter a target heart rate. If you select. during the Self Select program, your age. If desired, press the increase and...

User Manual
Page 16
... start it at any time during the program, the letters "PLS" will flash in the Calories/Pulse display and the speed and incline of the treadmill will automatically increase or decrease to bring your heart rate to the target heart rate. See step 7 on page 12. 10 When you can adjust... page 14. 16 During each time the console compares your heart rate to the current target heart rate, the speed and/or incline of the treadmill will also increase to bring your heart rate closer to the current target heart rate. To stop . The program will continue until your progress with...
... start it at any time during the program, the letters "PLS" will flash in the Calories/Pulse display and the speed and incline of the treadmill will automatically increase or decrease to bring your heart rate to the target heart rate. See step 7 on page 12. 10 When you can adjust... page 14. 16 During each time the console compares your heart rate to the current target heart rate, the speed and/or incline of the treadmill will also increase to bring your heart rate closer to the current target heart rate. To stop . The program will continue until your progress with...
User Manual
Page 17
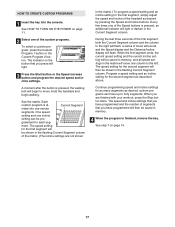
... segments that you are not shown in the Current Segment column. The speed and incline settings that you have programmed and the number of the treadmill as desired; HOW TO CREATE CUSTOM PROGRAMS 1 Insert the key into one-minute segments. The indicator on the button that you have up to the...
... segments that you are not shown in the Current Segment column. The speed and incline settings that you have programmed and the number of the treadmill as desired; HOW TO CREATE CUSTOM PROGRAMS 1 Insert the key into one-minute segments. The indicator on the button that you have up to the...

User Manual
Page 18
...column and the last segment ends. When the current segment ends, the new setting will be shown in the flashing Current Segment column and the treadmill will then slow to flash in - When a custom program is shown in the flashing Current Segment column of tones will sound, the Speed ... ment. The speed setting for the first segment is selected, the Speed display will flash the maximum speed setting of the program begins, the treadmill will flash the maximum incline setting. The program will then be saved in the columns to the left. When the next segment of the program...
...column and the last segment ends. When the current segment ends, the new setting will be shown in the flashing Current Segment column and the treadmill will then slow to flash in - When a custom program is shown in the flashing Current Segment column of tones will sound, the Speed ... ment. The speed setting for the first segment is selected, the Speed display will flash the maximum speed setting of the program begins, the treadmill will flash the maximum incline setting. The program will then be saved in the columns to the left. When the next segment of the program...

User Manual
Page 19
... instructions. If your stereo has only a PHONES jack, see instruction A below . Plug the adapter into the PHONES jack on the front of the treadmill near the power cord. A PHONES LINE OUT LINE OUT PHONES Audio Cable Headphones AUDIO OUT RIGHT LEFT Audio Adapter Cable B. Plug the other side of... one end of the audio cable into the jack on your stereo. Plug the Y-adapter into an AUDIO OUT jack on the front of the treadmill near the power cord. Plug your headphones into the other end of the cable into a 3.5mm Y-adapter (available at electronics stores). Plug your...
... instructions. If your stereo has only a PHONES jack, see instruction A below . Plug the adapter into the PHONES jack on the front of the treadmill near the power cord. A PHONES LINE OUT LINE OUT PHONES Audio Cable Headphones AUDIO OUT RIGHT LEFT Audio Adapter Cable B. Plug the other side of... one end of the audio cable into the jack on your stereo. Plug the Y-adapter into an AUDIO OUT jack on the front of the treadmill near the power cord. Plug your headphones into the other end of the cable into a 3.5mm Y-adapter (available at electronics stores). Plug your...

User Manual
Page 20
A CD VCR Amp LINE OUT LINE OUT A. Plug the other end of the treadmill near the power cord. B. Plug one end of the audio cable into the jack on your computer.... Plug one end of the audio cable into the jack on the front of the treadmill near the power cord. Plug one end of the audio cable into the jack on the front of the...jack on your stereo. Note: If your computer has only a PHONES jack, see instruction A. Plug the other end of the treadmill near the power cord. Next, remove the wire that is being used, see instruction A below. If the LINE OUT jack ...
A CD VCR Amp LINE OUT LINE OUT A. Plug the other end of the treadmill near the power cord. B. Plug one end of the audio cable into the jack on your computer.... Plug one end of the audio cable into the jack on the front of the treadmill near the power cord. Plug one end of the audio cable into the jack on the front of the...jack on your stereo. Note: If your computer has only a PHONES jack, see instruction A. Plug the other end of the treadmill near the power cord. Next, remove the wire that is being used, see instruction A below. If the LINE OUT jack ...
User Manual
Page 21
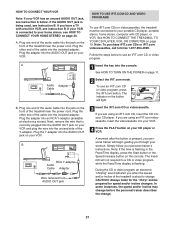
... IN CH 34 OUT RF OUT RCA Y-adapter Audio Cable Adapter Wire removed from AUDIO OUT jack 3 Insert the iFIT.com CD or videocassette. The treadmill will begin guiding you when the speed and/or incline of the Y-adapter. Note: To purchase iFIT.com CDs or iFIT.com videocassettes, call toll...-free 1-877-994-4999. Plug the other end of the treadmill near the power cord. Note: If the time is flashing in VCR, see instruction B. Audio Adapter Cable To use an iFIT.com CD or video...
... IN CH 34 OUT RF OUT RCA Y-adapter Audio Cable Adapter Wire removed from AUDIO OUT jack 3 Insert the iFIT.com CD or videocassette. The treadmill will begin guiding you when the speed and/or incline of the Y-adapter. Note: To purchase iFIT.com CDs or iFIT.com videocassettes, call toll...-free 1-877-994-4999. Plug the other end of the treadmill near the power cord. Note: If the time is flashing in VCR, see instruction B. Audio Adapter Cable To use an iFIT.com CD or video...


