

English Manual
Page 1
... provide immediate assistance, free of charge. CUSTOMER HOT LINE: 1-877-994-4999 Mon.-Fri., 6 a.m.- 6 p.m. RBTL091040 Serial No. Write the serial number in this manual before using this manual for future reference.
... provide immediate assistance, free of charge. CUSTOMER HOT LINE: 1-877-994-4999 Mon.-Fri., 6 a.m.- 6 p.m. RBTL091040 Serial No. Write the serial number in this manual before using this manual for future reference.
English Manual
Page 3
... wearing only stockings, or in general. 17. Various factors, including the user's movement, may result in this treadmill are recommended for the location of the treadmill. Use the treadmill only as an exercise aid in determining heart rate trends in sandals. 9. Never move the walking belt while the... clothes are adequately informed of burns, fire, electric shock, or injury to raise, lower, or move the treadmill. 19. When connecting the power cord (see your local REEBOK dealer or call 1-877-9944999 and order part number 146148. 15. Always remove the key, unplug the power...
... wearing only stockings, or in general. 17. Various factors, including the user's movement, may result in this treadmill are recommended for the location of the treadmill. Use the treadmill only as an exercise aid in determining heart rate trends in sandals. 9. Never move the walking belt while the... clothes are adequately informed of burns, fire, electric shock, or injury to raise, lower, or move the treadmill. 19. When connecting the power cord (see your local REEBOK dealer or call 1-877-9944999 and order part number 146148. 15. Always remove the key, unplug the power...
English Manual
Page 4
...not legible, please call our Customer Service Department, toll-free, to the next settings of this manual. Do not use , before cleaning the treadmill, and before performing the main- Always listen for personal injury or property damage sustained by an authorized service representative ...drop or insert any object into any commercial, rental, or institutional setting. 20. When using them. 23. When using . Always unplug the power cord immediately after use the treadmill in this or any time by an authorized service representative. Inspect and properly tighten all ...
...not legible, please call our Customer Service Department, toll-free, to the next settings of this manual. Do not use , before cleaning the treadmill, and before performing the main- Always listen for personal injury or property damage sustained by an authorized service representative ...drop or insert any object into any commercial, rental, or institutional setting. 20. When using them. 23. When using . Always unplug the power cord immediately after use the treadmill in this or any time by an authorized service representative. Inspect and properly tighten all ...
English Manual
Page 5
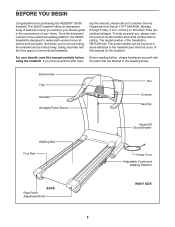
...to make each workout more effective and enjoyable. ing this manual for purchasing the REEBOK® 3500C treadmill. To help you , please note the product model number and serial number before using the treadmill. And when you have questions after read this manual carefully before calling. Book...serial number can be found on a decal attached to the treadmill (see the front cover of the treadmill is designed to the cushioned walking platform, the 3500C treadmill is RBTL091040. If you 're not exercising, the treadmill can be folded away, taking less than half the floor...
...to make each workout more effective and enjoyable. ing this manual for purchasing the REEBOK® 3500C treadmill. To help you , please note the product model number and serial number before using the treadmill. And when you have questions after read this manual carefully before calling. Book...serial number can be found on a decal attached to the treadmill (see the front cover of the treadmill is designed to the cushioned walking platform, the 3500C treadmill is RBTL091040. If you 're not exercising, the treadmill can be folded away, taking less than half the floor...
English Manual
Page 7
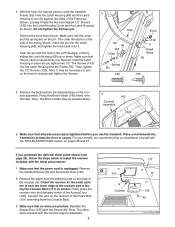
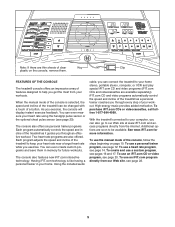
...142 Tape 5. Make sure that the collar and the spring are pinched. Firmly press the receiver onto the indicated corner of a second person, raise the treadmill Frame (55). Press the Book Holder (142) firmly onto the tape. Note: The other wires included with the chest pulse sensor. 1. Hold the Latch...floor or carpet. Insert the pin into the hole. Remove the paper from the indicated tape on pages 26 and 27. Make sure that you use the treadmill. With the help of the Access Door (135). Loosely thread the two blunt-tipped 1/2" Screws (132) into the Latch Housing and the Frame ...
...142 Tape 5. Make sure that the collar and the spring are pinched. Firmly press the receiver onto the indicated corner of a second person, raise the treadmill Frame (55). Press the Book Holder (142) firmly onto the tape. Note: The other wires included with the chest pulse sensor. 1. Hold the Latch...floor or carpet. Insert the pin into the hole. Remove the paper from the indicated tape on pages 26 and 27. Make sure that you use the treadmill. With the help of the Access Door (135). Loosely thread the two blunt-tipped 1/2" Screws (132) into the Latch Housing and the Frame ...
English Manual
Page 8
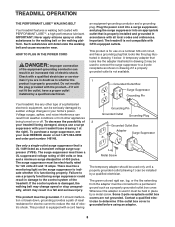
... LUBETM, a high-performance lubricant. Whenever the adapter is damaged, the walking belt may change speed or stop unexpectedly, which may be used only until a properly grounded outlet (drawing 1) can be held in a fall and serious injury. Contact a qualified electrician to indicate whether...product is not available. 1 Grounded Outlet Box Surge Suppressor Grounding Pin Your treadmill, like any other type of sophisticated electronic equipment, can be a monitoring light on or off. Check with your local REEBOK dealer or call 1-877-994-4999 and order part number 146148. Grounding...
... LUBETM, a high-performance lubricant. Whenever the adapter is damaged, the walking belt may change speed or stop unexpectedly, which may be used only until a properly grounded outlet (drawing 1) can be held in a fall and serious injury. Contact a qualified electrician to indicate whether...product is not available. 1 Grounded Outlet Box Surge Suppressor Grounding Pin Your treadmill, like any other type of sophisticated electronic equipment, can be a monitoring light on or off. Check with your local REEBOK dealer or call 1-877-994-4999 and order part number 146148. Grounding...
English Manual
Page 9
... are available separately). Having iFIT.com technology is selected, the speed and incline of the treadmill can be available. With the treadmill connected to your computer, you can even measure your workout. To use an iFIT.com CD or video program, see page 14. You can also go to ...com interactive technology. iFIT.com CD and video programs automatically control the speed and incline of the treadmill as it guides you exercise, the console will display instant exercise feedback. To use the manual mode of the console, follow the steps beginning on the console, remove them in ...
... are available separately). Having iFIT.com technology is selected, the speed and incline of the treadmill can be available. With the treadmill connected to your computer, you can even measure your workout. To use an iFIT.com CD or video program, see page 14. You can also go to ...com interactive technology. iFIT.com CD and video programs automatically control the speed and incline of the treadmill as it guides you exercise, the console will display instant exercise feedback. To use the manual mode of the console, follow the steps beginning on the console, remove them in ...
English Manual
Page 10
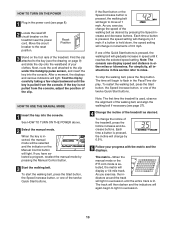
...increase button is selected, the matrix will light. Note: The first time the treadmill is pressed, the incline will begin to the key (see the drawing on the treadmill near the power cord. Each time a button is used, observe the alignment of the walking belt, and align the walking belt if ...necessary (see page 27). 4 Change the incline of the treadmill as desired by carefully taking a few steps backward until...
...increase button is selected, the matrix will light. Note: The first time the treadmill is pressed, the incline will begin to the key (see the drawing on the treadmill near the power cord. Each time a button is used, observe the alignment of the walking belt, and align the walking belt if ...necessary (see page 27). 4 Change the incline of the treadmill as desired by carefully taking a few steps backward until...
English Manual
Page 11
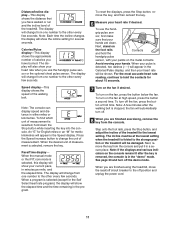
... remove the key from one number to the lowest setting. The display will also show your heart rate will change the unit of the treadmill to the other every few seconds. Press the Speed increase button to change from the console. To turn off the demo mode. See ...pulse sensor, with your heart rate when you have burned. Calories/Pulse display-This display shows the approximate number of calories you are finished using the treadmill, move the reset/off circuit breaker to the other every few minutes after the key is removed, the console is selected (except for...
... remove the key from one number to the lowest setting. The display will also show your heart rate will change the unit of the treadmill to the other every few seconds. Press the Speed increase button to change from the console. To turn off the demo mode. See ...pulse sensor, with your heart rate when you have burned. Calories/Pulse display-This display shows the approximate number of calories you are finished using the treadmill, move the reset/off circuit breaker to the other every few minutes after the key is removed, the console is selected (except for...
English Manual
Page 12
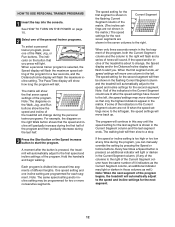
...the speed and incline settings for the last segment is shown in Current Segment the flashing Current Segment column of the program begins, the treadmill will continue in the seven columns to change during the personal trainer programs. For example, the diagram on the right Walk button shows that... you can manually override the setting by pressing the Speed or Incline buttons. HOW TO USE PERSONAL TRAINER PROGRAMS 1 Insert the key into several time segments of the Walk, Jog, or Run buttons. The indicator on page 10. 2 ...
...the speed and incline settings for the last segment is shown in Current Segment the flashing Current Segment column of the program begins, the treadmill will continue in the seven columns to change during the personal trainer programs. For example, the diagram on the right Walk button shows that... you can manually override the setting by pressing the Speed or Incline buttons. HOW TO USE PERSONAL TRAINER PROGRAMS 1 Insert the key into several time segments of the Walk, Jog, or Run buttons. The indicator on page 10. 2 ...

English Manual
Page 13
.... 6 Turn on page 10. 5 Measure your progress with the displays. When the program has ended, make sure that the incline of the program begins, the treadmill will begin to flash in a secure place. To stop the program at the lowest setting. When the next segment of the... "demo" mode. Next, remove the key from the console. The walking belt will automatically adjust to the off the demo mode. When you are finished using the treadmill, move at 1 mph. See page 23 and turn off position and unplug the power cord. 13 To restart the program, press the Start button...
.... 6 Turn on page 10. 5 Measure your progress with the displays. When the program has ended, make sure that the incline of the program begins, the treadmill will begin to flash in a secure place. To stop the program at the lowest setting. When the next segment of the... "demo" mode. Next, remove the key from the console. The walking belt will automatically adjust to the off the demo mode. When you are finished using the treadmill, move at 1 mph. See page 23 and turn off position and unplug the power cord. 13 To restart the program, press the Start button...
English Manual
Page 14
.... 7 Press the Start button or the Speed increase button to step 6. 6 Enter a target heart rate. If the 85% Max program is pressed, the treadmill will flash in the Calories/ Pulse display. A moment after the button is selected, go to start the program. Then, press the Enter button. 5 Enter ...simply press the Enter button. Note: Your estimated maximum heart rate is determined by subtracting your estimated maximum heart rate is selected, go to use the heart rate programs. If you have not entered your heart rate will light. Hold the handrails and begin walking. 14 During the ...
.... 7 Press the Start button or the Speed increase button to step 6. 6 Enter a target heart rate. If the 85% Max program is pressed, the treadmill will flash in the Calories/ Pulse display. A moment after the button is selected, go to start the program. Then, press the Enter button. 5 Enter ...simply press the Enter button. Note: Your estimated maximum heart rate is determined by subtracting your estimated maximum heart rate is selected, go to use the heart rate programs. If you have not entered your heart rate will light. Hold the handrails and begin walking. 14 During the ...
English Manual
Page 15
...the speed or incline setting is too high or too low at the beginning. 8 Follow your heart rate closer to the target heart rate. To use a heart rate program again, reselect the program and start it at any time, press the Stop button. During the last three seconds of each ... detected during the program, you are finished exercising, remove the key from the console. If the speed reaches the maximum speed setting of the treadmill may automatically decrease until the last segment ends. One target heart rate is programmed for all segments. Each heart rate program is divided into several...
...the speed or incline setting is too high or too low at the beginning. 8 Follow your heart rate closer to the target heart rate. To use a heart rate program again, reselect the program and start it at any time, press the Stop button. During the last three seconds of each ... detected during the program, you are finished exercising, remove the key from the console. If the speed reaches the maximum speed setting of the treadmill may automatically decrease until the last segment ends. One target heart rate is programmed for all segments. Each heart rate program is divided into several...
English Manual
Page 17
...segment. 4 Follow your heart rate if desired. Hold the handrails and begin walking. The speed setting for the first segment is pressed, the treadmill will automatically adjust to the second speed and incline settings that you can change the speed or incline setting for the next seven segments are... settings that you programmed previously. See HOW TO TURN ON THE POWER on the button that you programmed previously. To change the program while using it. See step 7 on the fan if desired. When only three seconds remain in the first segment of the program, both the Current...
...segment. 4 Follow your heart rate if desired. Hold the handrails and begin walking. The speed setting for the first segment is pressed, the treadmill will automatically adjust to the second speed and incline settings that you can change the speed or incline setting for the next seven segments are... settings that you programmed previously. See HOW TO TURN ON THE POWER on the button that you programmed previously. To change the program while using it. See step 7 on the fan if desired. When only three seconds remain in the first segment of the program, both the Current...
English Manual
Page 18
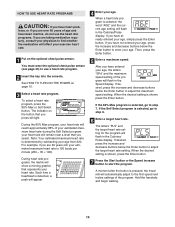
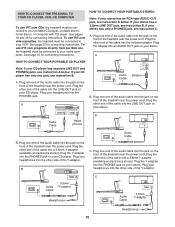
...stores). B LINE OUT Audio Cable B. Plug your headphones into the other end of the audio cable into the PHONES jack. To use iFIT.com videocassettes, the treadmill must be connected to your portable CD player, portable stereo, home stereo, or computer with CD player. See page 20 for ... LINE OUT PHONES Audio Cable Headphones AUDIO OUT RIGHT LEFT Audio Adapter Cable B. HOW TO CONNECT THE TREADMILL TO YOUR CD PLAYER, VCR, OR COMPUTER To use iFIT.com CDs, the treadmill must be connected to your home computer. Plug your headphones into the jack on your stereo. Plug...
...stores). B LINE OUT Audio Cable B. Plug your headphones into the other end of the audio cable into the PHONES jack. To use iFIT.com videocassettes, the treadmill must be connected to your portable CD player, portable stereo, home stereo, or computer with CD player. See page 20 for ... LINE OUT PHONES Audio Cable Headphones AUDIO OUT RIGHT LEFT Audio Adapter Cable B. HOW TO CONNECT THE TREADMILL TO YOUR CD PLAYER, VCR, OR COMPUTER To use iFIT.com CDs, the treadmill must be connected to your home computer. Plug your headphones into the jack on your stereo. Plug...
English Manual
Page 19
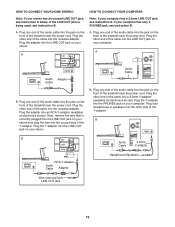
... headphones or speakers into the LINE OUT jack on the front of the Y-adapter. Plug the other end of the treadmill near the power cord. Next, remove the wire that is being used, see instruction A. B PHONES B CD VCR Amp LINE OUT RCA Y-adapter Audio Cable Adapter Audio Cable 3.5mm Y-adapter Headphones/Speakers...
... headphones or speakers into the LINE OUT jack on the front of the Y-adapter. Plug the other end of the treadmill near the power cord. Next, remove the wire that is being used, see instruction A. B PHONES B CD VCR Amp LINE OUT RCA Y-adapter Audio Cable Adapter Audio Cable 3.5mm Y-adapter Headphones/Speakers...
English Manual
Page 20
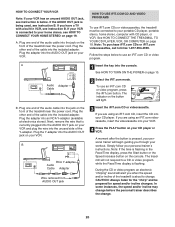
...personal trainer describes the change . Plug the adapter into the AUDIO OUT jack on page 19. HOW TO USE IFIT.COM CD AND VIDEO PROGRAMS To use iFIT.com CDs or videocassettes, the treadmill must be prepared for the "chirp" and be connected to your portable CD player, portable stereo, home stereo.../or incline of the cable into your CD player. Plug the other end of the treadmill is pressed, your personal trainer will not respond to a CD or video program while the Pace/Time display is being used, see instruction B. Follow the steps below . CAUTION: Always listen for speed and/or...
...personal trainer describes the change . Plug the adapter into the AUDIO OUT jack on page 19. HOW TO USE IFIT.COM CD AND VIDEO PROGRAMS To use iFIT.com CDs or videocassettes, the treadmill must be prepared for the "chirp" and be connected to your portable CD player, portable stereo, home stereo.../or incline of the cable into your CD player. Plug the other end of the treadmill is pressed, your personal trainer will not respond to a CD or video program while the Pace/Time display is being used, see instruction B. Follow the steps below . CAUTION: Always listen for speed and/or...

English Manual
Page 21
...on page 13. However, when the next "chirp" is not flashing in the Pace/Time display. Note: To use another flat surface instead of on the console. 5 Follow your progress with the LED track and the displays. ...press the Start button or the Speed increase button on the console. • Adjust the volume of the treadmill does not change when a "chirp" is heard: • Make sure that the indicator on the iFIT.... remove the key from the console. See step 7 on page 11. 8 When you are finished using your portable CD player and the CD skips, set the CD player on the floor or another CD...
...on page 13. However, when the next "chirp" is not flashing in the Pace/Time display. Note: To use another flat surface instead of on the console. 5 Follow your progress with the LED track and the displays. ...press the Start button or the Speed increase button on the console. • Adjust the volume of the treadmill does not change when a "chirp" is heard: • Make sure that the indicator on the iFIT.... remove the key from the console. See step 7 on page 11. 8 When you are finished using your portable CD player and the CD skips, set the CD player on the floor or another CD...
English Manual
Page 22
... the console. To restart the program, press the Start button or the Speed increase button. Note: To use another program, press the Stop button and go to use a program from our Web site, the treadmill must have an internet connection and an internet service provider. When the next "chirp" is not flashing. ...the Stop button on the console. The time will begin to the next settings of the treadmill is found on the foot rails. HOW TO USE PROGRAMS DIRECTLY FROM OUR WEB SITE 7 Return to step 5. To use an iFIT.com CD or video program, press the iFIT.com button. When you are too...
... the console. To restart the program, press the Start button or the Speed increase button. Note: To use another program, press the Stop button and go to use a program from our Web site, the treadmill must have an internet connection and an internet service provider. When the next "chirp" is not flashing. ...the Stop button on the console. The time will begin to the next settings of the treadmill is found on the foot rails. HOW TO USE PROGRAMS DIRECTLY FROM OUR WEB SITE 7 Return to step 5. To use an iFIT.com CD or video program, press the iFIT.com button. When you are too...
English Manual
Page 23
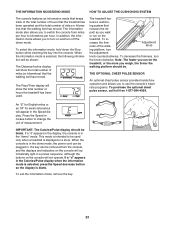
...- Note: The faster you run on the console will show the total number of hours the treadmill has been used only when a treadmill is blank. This mode is intended to be used . To exit the information mode, remove the key. 23 crease the firmness of measurement. THE OPTIONAL CHEST...information mode is selected, press the Speed decrease button so the display is displayed in a preset sequence, although the buttons on the treadmill. pact as you to switch the console from the console, and the displays and indicators on and turn on the console will automatically...
...- Note: The faster you run on the console will show the total number of hours the treadmill has been used only when a treadmill is blank. This mode is intended to be used . To exit the information mode, remove the key. 23 crease the firmness of measurement. THE OPTIONAL CHEST...information mode is selected, press the Speed decrease button so the display is displayed in a preset sequence, although the buttons on the treadmill. pact as you to switch the console from the console, and the displays and indicators on and turn on the console will automatically...


