

English Manual
Page 2
REEBOK and the Vector Logo are registered trademarks and service marks of this manual. ® TABLE OF CONTENTS IMPORTANT PRECAUTIONS 3 BEFORE YOU BEGIN 5 ASSEMBLY 6 OPERATION AND ADJUSTMENT 10 HOW TO FOLD AND MOVE THE TREADMILL 23 TROUBLESHOOTING 24 CONDITIONING GUIDELINES 27 ORDERING REPLACEMENT PARTS Back Cover LIMITED WARRANTY Back Cover Note: A PART LIST/EXPLODED DRAWING is manufactured and distributed under license from Reebok International. 2 This product is attached in the center of Reebok.
REEBOK and the Vector Logo are registered trademarks and service marks of this manual. ® TABLE OF CONTENTS IMPORTANT PRECAUTIONS 3 BEFORE YOU BEGIN 5 ASSEMBLY 6 OPERATION AND ADJUSTMENT 10 HOW TO FOLD AND MOVE THE TREADMILL 23 TROUBLESHOOTING 24 CONDITIONING GUIDELINES 27 ORDERING REPLACEMENT PARTS Back Cover LIMITED WARRANTY Back Cover Note: A PART LIST/EXPLODED DRAWING is manufactured and distributed under license from Reebok International. 2 This product is attached in the center of Reebok.
English Manual
Page 3
... belt while the power is not working properly. (See BEFORE YOU BEGIN on page 5 for both men and women. The treadmill is the responsibility of the owner to maintain your local REEBOK dealer or call 1-800-8063651 and order part number 146148. 12. Do not operate the... treadmill where aerosol products are adequately informed of all of the specifications described on a level surface, with bare feet, wearing only stockings...
... belt while the power is not working properly. (See BEFORE YOU BEGIN on page 5 for both men and women. The treadmill is the responsibility of the owner to maintain your local REEBOK dealer or call 1-800-8063651 and order part number 146148. 12. Do not operate the... treadmill where aerosol products are adequately informed of all of the specifications described on a level surface, with bare feet, wearing only stockings...
English Manual
Page 4
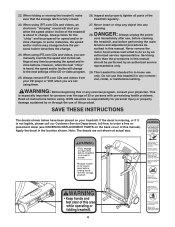
... personal injury or property damage sustained by an authorized service representative only. 29. tenance and adjustment procedures de- Do not use of the treadmill regularly. 23. ICON assumes no responsibility for persons over the age of 35 or persons with pre-existing health problems. Read all parts... have been placed on the back cover of the CD or video program. 25. 22. Inspect and properly tighten all instructions before folding treadmill into any opening. Never insert or drop any commercial, rental, or institutional setting. If the decal is missing, or if it is ...
... personal injury or property damage sustained by an authorized service representative only. 29. tenance and adjustment procedures de- Do not use of the treadmill regularly. 23. ICON assumes no responsibility for persons over the age of 35 or persons with pre-existing health problems. Read all parts... have been placed on the back cover of the CD or video program. 25. 22. Inspect and properly tighten all instructions before folding treadmill into any opening. Never insert or drop any commercial, rental, or institutional setting. If the decal is missing, or if it is ...
English Manual
Page 5
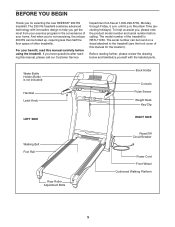
...holidays). To help you have questions after reading this manual carefully before calling. The model number of your home. The 290 RS treadmill combines advanced technology with the labeled parts. Water Bottle Holder (Bottle is RBTL71930. For your exercise program in the convenience of the...treadmills. BEFORE YOU BEGIN Thank you , please note the product model number and serial number before using the treadmill. And when you're not exercising, the unique 290 RS can be folded up, requiring less than half the floor space of this manual for selecting the new REEBOK&#...
...holidays). To help you have questions after reading this manual carefully before calling. The model number of your home. The 290 RS treadmill combines advanced technology with the labeled parts. Water Bottle Holder (Bottle is RBTL71930. For your exercise program in the convenience of the...treadmills. BEFORE YOU BEGIN Thank you , please note the product model number and serial number before using the treadmill. And when you're not exercising, the unique 290 RS can be folded up, requiring less than half the floor space of this manual for selecting the new REEBOK&#...

English Manual
Page 6
Have a second person hold the treadmill. ASSEMBLY Assembly requires two persons. Extra parts may be included. Attach the other Base Leg as described above. 1 77 75 78 103 12 Attach two ... Pad (75) is shown) to the Base (117) with four 3/4" Tek Screws (12). 70 12 117 6 Do not dispose of another person, carefully tip the treadmill onto its left side. Set the...
Have a second person hold the treadmill. ASSEMBLY Assembly requires two persons. Extra parts may be included. Attach the other Base Leg as described above. 1 77 75 78 103 12 Attach two ... Pad (75) is shown) to the Base (117) with four 3/4" Tek Screws (12). 70 12 117 6 Do not dispose of another person, carefully tip the treadmill onto its left side. Set the...

English Manual
Page 8
... protect the floor or carpet from damage, place the in a secure place. This is used to the top of the treadmill. 7 Note: If the treadmill rocks slightly, tip the treadmill onto its side. Note: The ridge on the Latch Spacer must be on top of the Base Legs (78), and ...Attach the matching Right Bottom Handgrip (54) with a soft cloth and a mild, non-abrasive cleaner. 8 If there are properly tightened before you use the treadmill. Firmly tighten the Latch Screws. Extra parts may be included. Attach the Latch Assembly (37) and the Latch Spacer (39) to the vertical position. ...
... protect the floor or carpet from damage, place the in a secure place. This is used to the top of the treadmill. 7 Note: If the treadmill rocks slightly, tip the treadmill onto its side. Note: The ridge on the Latch Spacer must be on top of the Base Legs (78), and ...Attach the matching Right Bottom Handgrip (54) with a soft cloth and a mild, non-abrasive cleaner. 8 If there are properly tightened before you use the treadmill. Firmly tighten the Latch Screws. Extra parts may be included. Attach the Latch Assembly (37) and the Latch Spacer (39) to the vertical position. ...
English Manual
Page 10
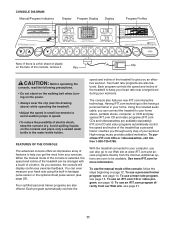
... any other type of your local REEBOK dealer or call 1-800- A temporary adapter that is not available. 1 Grounded Outlet Box Surge Suppressor Grounding Pin Your treadmill, like the adapter illustrated in drawing 2 may result in your treadmill (see your treadmill being turned on the surge suppressor ... from the adapter must be electrically rated for use a properly functioning surge suppressor could result in an increased risk of the treadmill. If it will deteriorate the walking belt and cause excessive wear. Use only a single-outlet surge suppressor that looks like ...
... any other type of your local REEBOK dealer or call 1-800- A temporary adapter that is not available. 1 Grounded Outlet Box Surge Suppressor Grounding Pin Your treadmill, like the adapter illustrated in drawing 2 may result in your treadmill (see your treadmill being turned on the surge suppressor ... from the adapter must be electrically rated for use a properly functioning surge suppressor could result in an increased risk of the treadmill. If it will deteriorate the walking belt and cause excessive wear. Use only a single-outlet surge suppressor that looks like ...
English Manual
Page 11
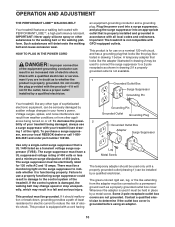
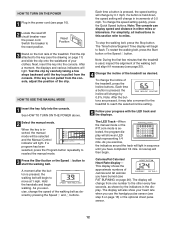
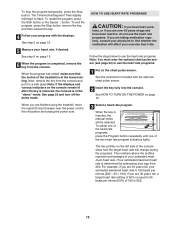
...console, follow the steps beginning on the console and place only a sealed water bottle in speed. •To reduce the possibility of the treadmill to keep the console dry. You can even measure your workouts. The console also features new iFIT.com interactive technology. To use a ...Before operating the console, read the following precautions. • Do not stand on the walking belt when turning on the face of the treadmill as a personal trainer coaches you can also go to avoid sudden jumps in the water bottle holder. Four certified personal trainer programs are available...
...console, follow the steps beginning on the console and place only a sealed water bottle in speed. •To reduce the possibility of the treadmill to keep the console dry. You can even measure your workouts. The console also features new iFIT.com interactive technology. To use a ...Before operating the console, read the following precautions. • Do not stand on the walking belt when turning on the face of the treadmill as a personal trainer coaches you can also go to avoid sudden jumps in the water bottle holder. Four certified personal trainer programs are available...
English Manual
Page 12
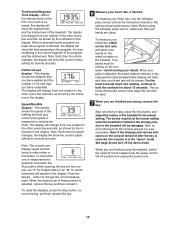
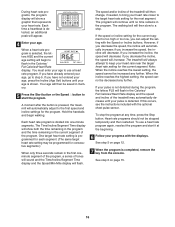
....com mode is pulled from the console, adjust the position of the clip. Reset Position 3 Stand on page 26). To change the incline of the treadmill, press the Incline buttons. Note: After the buttons are pressed, it if necessary (see step 6 on page 13) or the optional chest pulse sensor....an LED track representing 1/4 mile. If the key is used, inspect the alignment of the walking belt and align it may take a moment for the treadmill to the other every few seconds, as desired by 0.5%. To restart the walking belt, press the Start button or the Speed L button. The display ...
....com mode is pulled from the console, adjust the position of the clip. Reset Position 3 Stand on page 26). To change the incline of the treadmill, press the Incline buttons. Note: After the buttons are pressed, it if necessary (see step 6 on page 13) or the optional chest pulse sensor....an LED track representing 1/4 mile. If the key is used, inspect the alignment of the walking belt and align it may take a moment for the treadmill to the other every few seconds, as desired by 0.5%. To restart the walking belt, press the Start button or the Speed L button. The display ...
English Manual
Page 13
... An "E" for English miles or an "M" for about 15 seconds. Your palms must be at the lowest setting when the treadmill is folded to the storage position or the treadmill will be used. 7 When you are finished using the handgrip pulse sensor, make sure that you have completed. The optional ... in the program, the time remaining in either miles or kilometers. Press the Speed L button to the lowest setting. Note: Before using the treadmill, switch the reset/off circuit breaker near the power cord to the off the demo mode. Note: If the displays and various indicators on the...
... An "E" for English miles or an "M" for about 15 seconds. Your palms must be at the lowest setting when the treadmill is folded to the storage position or the treadmill will be used. 7 When you are finished using the handgrip pulse sensor, make sure that you have completed. The optional ... in the program, the time remaining in either miles or kilometers. Press the Speed L button to the lowest setting. Note: Before using the treadmill, switch the reset/off circuit breaker near the power cord to the off the demo mode. Note: If the displays and various indicators on the...
English Manual
Page 14
...mile display and/or the Time/Incline/ Segment Time display will automatically adjust to the left. When a personal trainer program is pressed, the treadmill will last. 3 Press the Start button or the Speed L button to the first speed and incline settings for the second segment will sound.... settings will move one of the four personal trainer program indicators lights. Important: When the current segment of the program ends, the treadmill will automatically adjust to the left again and not all of the indicators in the Current Segment column are lit, the speed settings will...
...mile display and/or the Time/Incline/ Segment Time display will automatically adjust to the left. When a personal trainer program is pressed, the treadmill will last. 3 Press the Start button or the Speed L button to the first speed and incline settings for the second segment will sound.... settings will move one of the four personal trainer program indicators lights. Important: When the current segment of the program ends, the treadmill will automatically adjust to the left again and not all of the indicators in the Current Segment column are lit, the speed settings will...
English Manual
Page 15
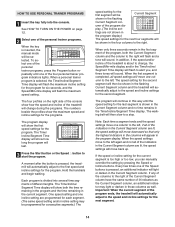
... 95 beats per minute [220 - 30 = 190]. See step 5 on page 12. See the instructions included with the displays. If you are finished using the treadmill, move the reset/off the demo mode. To select one of the heart rate programs, press the Program button repeatedly until one of the... treadmill is completed, remove the key from the console. To restart the program, press the Start button or the Speed L button. Follow the steps below to ...
... 95 beats per minute [220 - 30 = 190]. See step 5 on page 12. See the instructions included with the displays. If you are finished using the treadmill, move the reset/off the demo mode. To select one of the heart rate programs, press the Program button repeatedly until one of the... treadmill is completed, remove the key from the console. To restart the program, press the Start button or the Speed L button. Follow the steps below to ...
English Manual
Page 16
...segment is shown. The walking belt will then slow to keep your heart rate. If the speed or incline setting for the current segment. The treadmill will always attempt to a stop the program at the beginning. 6 Follow your pulse is selected, the letters AGE and the current age setting... be decreased any further. A moment after the button is detected. The speed and/or incline of the treadmill will then change, if needed, to bring your pulse is pressed, the treadmill will automatically adjust to flash in the Calories/ Fat Calories/Heart Rate display. However, if you increase the ...
...segment is shown. The walking belt will then slow to keep your heart rate. If the speed or incline setting for the current segment. The treadmill will always attempt to a stop the program at the beginning. 6 Follow your pulse is selected, the letters AGE and the current age setting... be decreased any further. A moment after the button is detected. The speed and/or incline of the treadmill will then change, if needed, to bring your pulse is pressed, the treadmill will automatically adjust to flash in the Calories/ Fat Calories/Heart Rate display. However, if you increase the ...

English Manual
Page 17
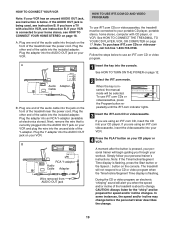
... the other side of the Y-adapter. HOW TO CONNECT YOUR PORTABLE STEREO Note: If your headphones into the PHONES jack on the front of the treadmill near the power cord. Plug your stereo has an RCA-type AUDIO OUT jack, see instruction B. A B LINE OUT LINE OUT LINE OUT Audio ... AUDIO OUT jack on your stereo has only a PHONES jack, see instruction A below . To use iFIT.com programs directly from our internet site, the treadmill must be connected to your CD player has separate LINE OUT and PHONES jacks, see instruction C. A. A HOW TO CONNECT YOUR PORTABLE CD PLAYER Note:...
... the other side of the Y-adapter. HOW TO CONNECT YOUR PORTABLE STEREO Note: If your headphones into the PHONES jack on the front of the treadmill near the power cord. Plug your stereo has an RCA-type AUDIO OUT jack, see instruction B. A B LINE OUT LINE OUT LINE OUT Audio ... AUDIO OUT jack on your stereo has only a PHONES jack, see instruction A below . To use iFIT.com programs directly from our internet site, the treadmill must be connected to your CD player has separate LINE OUT and PHONES jacks, see instruction C. A. A HOW TO CONNECT YOUR PORTABLE CD PLAYER Note:...

English Manual
Page 18
... power cord. Plug one end of the audio cable into the jack on the front of the treadmill near the power cord. Plug the Y-adapter into the LINE OUT jack on the front of the treadmill near the power cord. Plug one end of the cable into the jack on your computer... into the jack on your headphones or speakers into the other end of the audio cable into the included adapter. A. Plug one end of the treadmill near the power cord. Plug the Y-adapter A into the LINE OUT jack on the front of the audio cable into the included adapter. Plug the...
... power cord. Plug one end of the audio cable into the jack on the front of the treadmill near the power cord. Plug the Y-adapter into the LINE OUT jack on the front of the treadmill near the power cord. Plug one end of the cable into the jack on your computer... into the jack on your headphones or speakers into the other end of the audio cable into the included adapter. A. Plug one end of the treadmill near the power cord. Plug the Y-adapter A into the LINE OUT jack on the front of the audio cable into the included adapter. Plug the...
English Manual
Page 19
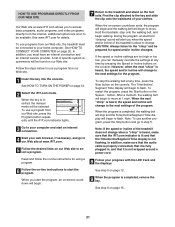
... Cable Adapter B Wire removed from AUDIO OUT jack B HOW TO USE IFIT.COM CD AND VIDEO PROGRAMS To use iFIT.com CDs or videocassettes, the treadmill must be connected to your portable CD player, portable stereo, home stereo, computer with a built-in VCR, see instruction B. To use iFIT.com CDs...OUT RIGHT LEFT 19 Plug the other end of the cable into the included adapter. CAUTION: Always listen for speed and/or incline changes. A. The treadmill will be prepared for the "chirp" and be selected. Plug the other end of the cable into the included adapter. Next, remove the wire ...
... Cable Adapter B Wire removed from AUDIO OUT jack B HOW TO USE IFIT.COM CD AND VIDEO PROGRAMS To use iFIT.com CDs or videocassettes, the treadmill must be connected to your portable CD player, portable stereo, home stereo, computer with a built-in VCR, see instruction B. To use iFIT.com CDs...OUT RIGHT LEFT 19 Plug the other end of the cable into the included adapter. CAUTION: Always listen for speed and/or incline changes. A. The treadmill will be prepared for the "chirp" and be selected. Plug the other end of the cable into the included adapter. Next, remove the wire ...

English Manual
Page 20
... CD player or VCR when you are too high or too low, you are using them. 20 Note: If the speed or incline of the treadmill does not change to the next settings of page 25. 5 Follow your progress with the LED track and the displays. The Time/Incline/ Segment Time...
... CD player or VCR when you are too high or too low, you are using them. 20 Note: If the speed or incline of the treadmill does not change to the next settings of page 25. 5 Follow your progress with the LED track and the displays. The Time/Incline/ Segment Time...
English Manual
Page 21
...be available. To use a program from our Web site, press the Program button repeatedly until the iFIT.com indicator lights. 3 Go to the treadmill and stand on our Web site to flash. When the next "chirp" is not wrapped around a power cord. Find the clip attached to access... basic programs, audio programs, and video programs directly from our Web site, the treadmill must have an internet connection and an internet service provider. Follow the steps below to step 5. When you can manually override the settings at ...
...be available. To use a program from our Web site, press the Program button repeatedly until the iFIT.com indicator lights. 3 Go to the treadmill and stand on our Web site to flash. When the next "chirp" is not wrapped around a power cord. Find the clip attached to access... basic programs, audio programs, and video programs directly from our Web site, the treadmill must have an internet connection and an internet service provider. Follow the steps below to step 5. When you can manually override the settings at ...

English Manual
Page 22
.../DEMO MODE HOW TO USE THE HAND WEIGHTS The console features an information mode that keeps track of the total number of hours that the treadmill has been operated and the total number of measurement. Weight Rack WARNING: Do not use the hand weights at your sides or press them above... upper body as you walk on the console will automatically light in , the key can be plugged in a preset sequence, although the buttons on the treadmill, hold down the Stop button while inserting the key into the console. To exit the information mode, remove the key from the console, and the...
.../DEMO MODE HOW TO USE THE HAND WEIGHTS The console features an information mode that keeps track of the total number of hours that the treadmill has been operated and the total number of measurement. Weight Rack WARNING: Do not use the hand weights at your sides or press them above... upper body as you walk on the console will automatically light in , the key can be plugged in a preset sequence, although the buttons on the treadmill, hold down the Stop button while inserting the key into the console. To exit the information mode, remove the key from the console, and the...

English Manual
Page 23
... latch pin. Open Latch Knob Pin Foot Rail Closed Base Wheels HOW TO LOWER THE TREADMILL FOR USE 1. Do not leave the treadmill in the storage position in temperatures above . Tilt the treadmill back until the frame and the foot rails are past the latch pin. To reduce... your back straight. 23 To protect the floor or carpet from damage, place a mat under the treadmill. To decrease the possibility of injury, use extreme caution while moving the treadmill, convert the treadmill to the desired location. CAUTION: To decrease the possibility of direct sunlight. HOW TO MOVE THE...
... latch pin. Open Latch Knob Pin Foot Rail Closed Base Wheels HOW TO LOWER THE TREADMILL FOR USE 1. Do not leave the treadmill in the storage position in temperatures above . Tilt the treadmill back until the frame and the foot rails are past the latch pin. To reduce... your back straight. 23 To protect the floor or carpet from damage, place a mat under the treadmill. To decrease the possibility of injury, use extreme caution while moving the treadmill, convert the treadmill to the desired location. CAUTION: To decrease the possibility of direct sunlight. HOW TO MOVE THE...


