
English Manual
Page 1
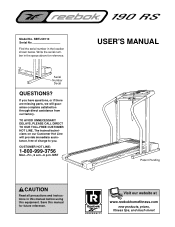
...; fitness tips, and much more! RBTL59110 Serial No. If you have questions, or if there are missing parts, we will provide immediate assistance, free of charge to you. MST CAUTION Read all precautions and instructions in this manual before using this manual for reference. Save this equipment. Model No. CUSTOMER HOT LINE: 1-800-999-3756 Mon.-Fri., 6 a.m.-6 p.m. Write the serial number...
...; fitness tips, and much more! RBTL59110 Serial No. If you have questions, or if there are missing parts, we will provide immediate assistance, free of charge to you. MST CAUTION Read all precautions and instructions in this manual before using this manual for reference. Save this equipment. Model No. CUSTOMER HOT LINE: 1-800-999-3756 Mon.-Fri., 6 a.m.-6 p.m. Write the serial number...
English Manual
Page 2
This product is attached in the center of Reebok. ® TABLE OF CONTENTS IMPORTANT PRECAUTIONS 3 BEFORE YOU BEGIN 5 ASSEMBLY 6 TREADMILL OPERATION 8 HOW TO FOLD AND MOVE THE TREADMILL 18 TROUBLE-SHOOTING 19 CONDITIONING GUIDELINES 21 PART LIST 23 ORDERING REPLACEMENT PARTS Back Cover LIMITED WARRANTY Back Cover Note: An EXPLODED DRAWING is manufactured and distributed under license from Reebok International. 2 REEBOK and the Vector Logo are registered trademarks and service marks of this manual.
This product is attached in the center of Reebok. ® TABLE OF CONTENTS IMPORTANT PRECAUTIONS 3 BEFORE YOU BEGIN 5 ASSEMBLY 6 TREADMILL OPERATION 8 HOW TO FOLD AND MOVE THE TREADMILL 18 TROUBLE-SHOOTING 19 CONDITIONING GUIDELINES 21 PART LIST 23 ORDERING REPLACEMENT PARTS Back Cover LIMITED WARRANTY Back Cover Note: An EXPLODED DRAWING is manufactured and distributed under license from Reebok International. 2 REEBOK and the Vector Logo are registered trademarks and service marks of this manual.

English Manual
Page 3
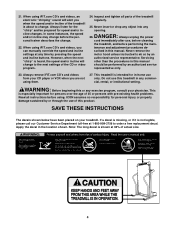
... the location of the on/off switch.) 18. Do not operate the treadmill if the power cord or plug is damaged, or if the treadmill is fully closed. 3 When folding or moving the treadmill, make sure that the storage latch is not working properly. (See BEFORE YOU BEGIN on any surface that all times. 7. Always remove the key, unplug the power cord and move the on/off switch to...
... the location of the on/off switch.) 18. Do not operate the treadmill if the power cord or plug is damaged, or if the treadmill is fully closed. 3 When folding or moving the treadmill, make sure that the storage latch is not working properly. (See BEFORE YOU BEGIN on any surface that all times. 7. Always remove the key, unplug the power cord and move the on/off switch to...
English Manual
Page 4
... remove the motor hood unless instructed to change . 22. Servicing other than the procedures in the location shown. Apply the decal in this manual. 21. However, when the next "chirp" is intended for speed and/or incline changes. DANGER: 26. Do not use this treadmill in this manual should be prepared for in-home use only. Always unplug the power cord immediately after use of actual size. 4 scribed in any exercise program...
... remove the motor hood unless instructed to change . 22. Servicing other than the procedures in the location shown. Apply the decal in this manual. 21. However, when the next "chirp" is intended for speed and/or incline changes. DANGER: 26. Do not use this treadmill in this manual should be prepared for in-home use only. Always unplug the power cord immediately after use of actual size. 4 scribed in any exercise program...
English Manual
Page 5
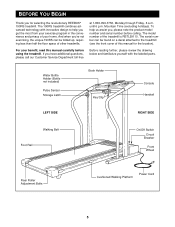
... folded up, requiring less than half the floor space of your exercise program in the convenience and privacy of other treadmills. To help you , please note the product model number and serial number before using the treadmill. Water Bottle Holder (Bottle not included) Pulse Sensor Storage Latch Book Holder Key/Clip Console Handrail LEFT SIDE RIGHT SIDE Walking Belt Foot Rail On/Off Switch Circuit Breaker Front Wheel Rear Roller Adjustment Bolts Cushioned Walking Platform Power Cord...
... folded up, requiring less than half the floor space of your exercise program in the convenience and privacy of other treadmills. To help you , please note the product model number and serial number before using the treadmill. Water Bottle Holder (Bottle not included) Pulse Sensor Storage Latch Book Holder Key/Clip Console Handrail LEFT SIDE RIGHT SIDE Walking Belt Foot Rail On/Off Switch Circuit Breaker Front Wheel Rear Roller Adjustment Bolts Cushioned Walking Platform Power Cord...

English Manual
Page 6
...: The underside of the treadmill walking belt is lubricant on the Lock Pin as shown. Press a Handrail Insert (102) into the Handrail. Assembly requires the included allen wrench and your own phillips screwdriver and rubber mallet . Tighten the Lock Knob (110) onto the Lock Pin (114). 2 110 77 111 112 114 3. Insert the Lock Pin into the Latch Bracket (77). Make sure...
...: The underside of the treadmill walking belt is lubricant on the Lock Pin as shown. Press a Handrail Insert (102) into the Handrail. Assembly requires the included allen wrench and your own phillips screwdriver and rubber mallet . Tighten the Lock Knob (110) onto the Lock Pin (114). 2 110 77 111 112 114 3. Insert the Lock Pin into the Latch Bracket (77). Make sure...
English Manual
Page 8
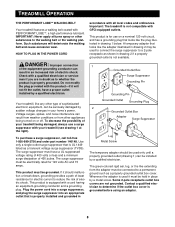
.... Important: The treadmill is grounded before using an adapter. 8 Do not modify the plug provided with your home's power. Your treadmill, like extending from other appliances being damaged, always use on or off. Use only a single-outlet surge suppressor that is used it should be used to connect the surge suppressor to the walking belt or the walking platform. Whenever the adapter is properly installed and grounded...
.... Important: The treadmill is grounded before using an adapter. 8 Do not modify the plug provided with your home's power. Your treadmill, like extending from other appliances being damaged, always use on or off. Use only a single-outlet surge suppressor that is used it should be used to connect the surge suppressor to the walking belt or the walking platform. Whenever the adapter is properly installed and grounded...
English Manual
Page 9
... available. personal trainer right in your heart rate using the built-in the manual mode, the speed and incline of the treadmill can connect the treadmill to our Web site at health clubs. The console also features advanced iFIT.com interactive technology. To use iFIT.com CD or video programs, refer to your VCR and TV and play special iFIT.com CD programs (one videocassette is in pulse sensor. Using the included audio cable, you through...
... available. personal trainer right in your heart rate using the built-in the manual mode, the speed and incline of the treadmill can connect the treadmill to our Web site at health clubs. The console also features advanced iFIT.com interactive technology. To use iFIT.com CD or video programs, refer to your VCR and TV and play special iFIT.com CD programs (one videocassette is in pulse sensor. Using the included audio cable, you through...
English Manual
Page 10
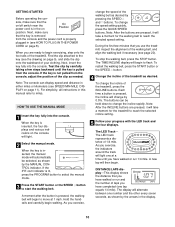
... the MANUAL CONTROL indicator. Note: The console can be selected, as shown by carefully taking a few minutes that the key is removed from the console and the power cord is pulled from the console, adjust the position of the treadmill, press the INCLINE buttons. HOW TO USE THE MANUAL MODE 1 Insert the key fully into the console. The TIME/INCLINE display will begin to reach the selected speed setting. Each time a button is pressed, the walking belt...
... the MANUAL CONTROL indicator. Note: The console can be selected, as shown by carefully taking a few minutes that the key is removed from the console and the power cord is pulled from the console, adjust the position of the treadmill, press the INCLINE buttons. HOW TO USE THE MANUAL MODE 1 Insert the key fully into the console. The TIME/INCLINE display will begin to reach the selected speed setting. Each time a button is pressed, the walking belt...
English Manual
Page 11
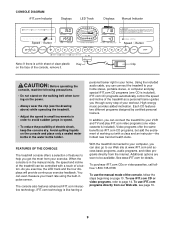
... seven seconds. SPEED/MIN-MILE display-This display shows the speed of the walking belt and your heart rate when the pulse sensor is used (see which unit of the treadmill. Note: The console can display speed and distance in minutes per mile). Hold your heart rate will show your hands are finished exercising, remove the key. tion in the display and then your thumbs on the sensors as shown. If the displayed heart rate appears to stand...
... seven seconds. SPEED/MIN-MILE display-This display shows the speed of the walking belt and your heart rate when the pulse sensor is used (see which unit of the treadmill. Note: The console can display speed and distance in minutes per mile). Hold your heart rate will show your hands are finished exercising, remove the key. tion in the display and then your thumbs on the sensors as shown. If the displayed heart rate appears to stand...

English Manual
Page 13
... power cord. If the LINE OUT jack is currently plugged into the jack on the front of the treadmill near the power cord. If your computer has only a PHONES jack, see instruction A below. A. Next, remove the wire that is being used, see instruction A. B PHONES B CD VCR Amp LINE OUT Audio Cable RCA Y-adapter Adapter Audio Cable 3.5mm Y-adapter Headphones/Speakers Wire removed from LINE OUT jack 13 HOW TO CONNECT YOUR HOME...
... power cord. If the LINE OUT jack is currently plugged into the jack on the front of the treadmill near the power cord. If your computer has only a PHONES jack, see instruction A below. A. Next, remove the wire that is being used, see instruction A. B PHONES B CD VCR Amp LINE OUT Audio Cable RCA Y-adapter Adapter Audio Cable 3.5mm Y-adapter Headphones/Speakers Wire removed from LINE OUT jack 13 HOW TO CONNECT YOUR HOME...
English Manual
Page 14
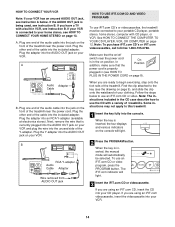
... of treadmills. A. IN VIDEO AUDIO IN CH 34 OUT RF OUT RCA Y-adapter Audio Cable Adapter Wire removed from AUDIO OUT jack HOW TO USE IFIT.COM CD AND VIDEO PROGRAMS To use an iFIT.com CD or video program, press the PROGRAM button. Make sure that is inserted, the four displays and various indicators on position. If your VCR is in VCR, see instruction A below to use an iFIT.com CD or video. When the key...
... of treadmills. A. IN VIDEO AUDIO IN CH 34 OUT RF OUT RCA Y-adapter Audio Cable Adapter Wire removed from AUDIO OUT jack HOW TO USE IFIT.COM CD AND VIDEO PROGRAMS To use an iFIT.com CD or video program, press the PROGRAM button. Make sure that is inserted, the four displays and various indicators on position. If your VCR is in VCR, see instruction A below to use an iFIT.com CD or video. When the key...

English Manual
Page 15
... the lowest level. 4 Press the PLAY button on /off switch near the power cord to the off the demo mode. The TIME/INCLINE display will begin to page 17 and turn off position. 15 After a moment, the walking belt will begin guiding you through your CD player or VCR when you are finished using the treadmill, move at any time by pressing the STOP button on the console. • See...
... the lowest level. 4 Press the PLAY button on /off switch near the power cord to the off the demo mode. The TIME/INCLINE display will begin to page 17 and turn off position. 15 After a moment, the walking belt will begin guiding you through your CD player or VCR when you are finished using the treadmill, move at any time by pressing the STOP button on the console. • See...

English Manual
Page 16
... access basic programs, audio programs, and video programs directly from our Web site, press the PROGRAM button. When the key is completed, the walking belt will stop the program at any time by pressing the SPEED or INCLINE buttons on our Web site. When the program is inserted, the manual mode will alert you when the speed and/or incline of the treadmill is in , and that the TIME/INCLINE display is not wrapped around a power cord. 16...
... access basic programs, audio programs, and video programs directly from our Web site, press the PROGRAM button. When the key is completed, the walking belt will stop the program at any time by pressing the SPEED or INCLINE buttons on our Web site. When the program is inserted, the manual mode will alert you when the speed and/or incline of the treadmill is in , and that the TIME/INCLINE display is not wrapped around a power cord. 16...

English Manual
Page 17
.... See step 5 on /off switch near the power cord to turn on the console will show the total number of miles that the walking belt has moved. When you to the lowest level. Press the SPEED v button to change the unit of the treadmill to switch the console from the console, and the displays and indicators on the console will be damaged. The incline must be at the right and turn off the demo mode...
.... See step 5 on /off switch near the power cord to turn on the console will show the total number of miles that the walking belt has moved. When you to the lowest level. Press the SPEED v button to change the unit of the treadmill to switch the console from the console, and the displays and indicators on the console will be damaged. The incline must be at the right and turn off the demo mode...

English Manual
Page 19
... follow the steps listed. Important: The treadmill is aligned with the Reed Switch. Remove the key from the hood and a carefully remove the hood. Remove the key from the console and unplug the power cord. Retighten the Screw. Reinsert the key fully into the console. If necessary, loosen the Reed Switch Screw (76) and Top move the Reed Switch slightly. Check the circuit breaker located on the console does display your hands before using the pulse sensor. If the treadmill still...
... follow the steps listed. Important: The treadmill is aligned with the Reed Switch. Remove the key from the hood and a carefully remove the hood. Remove the key from the console and unplug the power cord. Retighten the Screw. Reinsert the key fully into the console. If necessary, loosen the Reed Switch Screw (76) and Top move the Reed Switch slightly. Check the circuit breaker located on the console does display your hands before using the pulse sensor. If the treadmill still...
English Manual
Page 20
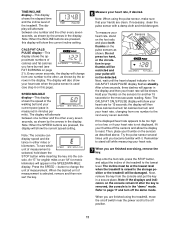
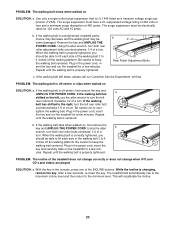
... min- tighten the walking belt. Plug in the console, press one of the treadmill does not change correctly or does not change when iFIT.com CD's and videos are played SOLUTION: a. PROBLEM: The walking belt slows when walked on , first remove the key and UNPLUG THE POWER CORD. b. Be careful to over- Repeat until the walking belt is off the walking platform. Be careful not to keep the walking belt centered. utes. b 3"-4" Rear Roller Adjustment Bolts c. b. Use only a single...
... min- tighten the walking belt. Plug in the console, press one of the treadmill does not change correctly or does not change when iFIT.com CD's and videos are played SOLUTION: a. PROBLEM: The walking belt slows when walked on , first remove the key and UNPLUG THE POWER CORD. b. Be careful to over- Repeat until the walking belt is off the walking platform. Be careful not to keep the walking belt centered. utes. b 3"-4" Rear Roller Adjustment Bolts c. b. Use only a single...
English Manual
Page 21
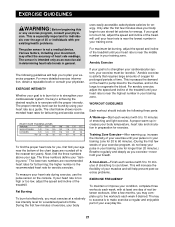
... exercise, adjust the speed and incline of exercise, your body Training Zone Exercise-After warming up increases your body temperature, heart rate and circulation in your training zone for fat burning and aerobic exercise. Fat Burning To burn fat effectively, you must be found by using your heart rate as you to plan your body begin to use the pulse sensor on the lungs to 10 minutes of the treadmill. The pulse sensor...
... exercise, adjust the speed and incline of exercise, your body Training Zone Exercise-After warming up increases your body temperature, heart rate and circulation in your training zone for fat burning and aerobic exercise. Fat Burning To burn fat effectively, you must be found by using your heart rate as you to plan your body begin to use the pulse sensor on the lungs to 10 minutes of the treadmill. The pulse sensor...

English Manual
Page 23
..." Audio Wire 4* 1 Motor/Pulley/ 51 1 Front Belly Pan 99 1 Upright Grommet Flywheel/ Fan 52 1 Power Supply 100 1 Allen Wrench 5 2 Incline Motor Bolt 53 4 Cable Tie Clamp 101 20 Screw 6 2 Incline Motor Spacer 54 2 Cable Tie 102 2 Handrail Insert 7 1 Incline Motor 55 1 Walking Belt 103 2 Extension Leg 8 1 Stop Bracket 56 1 Incline Sensor Wire 104 2 Extension Leg Cap 9 1 Small Nut 57 1 Rear Roller 105 1 Shock 10 2 Star Washer 58 2 Rear Isolator 106 1 Choke 11 1 Optic Switch 59 2 Rear Foot 107 2 Pulse Bar Bolt 12...
..." Audio Wire 4* 1 Motor/Pulley/ 51 1 Front Belly Pan 99 1 Upright Grommet Flywheel/ Fan 52 1 Power Supply 100 1 Allen Wrench 5 2 Incline Motor Bolt 53 4 Cable Tie Clamp 101 20 Screw 6 2 Incline Motor Spacer 54 2 Cable Tie 102 2 Handrail Insert 7 1 Incline Motor 55 1 Walking Belt 103 2 Extension Leg 8 1 Stop Bracket 56 1 Incline Sensor Wire 104 2 Extension Leg Cap 9 1 Small Nut 57 1 Rear Roller 105 1 Shock 10 2 Star Washer 58 2 Rear Isolator 106 1 Choke 11 1 Optic Switch 59 2 Rear Foot 107 2 Pulse Bar Bolt 12...

English Manual
Page 26
... 6 p.m. LIMITED WARRANTY ICON Health & Fitness, Inc. (ICON), warrants this product to be received by ICON at one of its authorized service centers. All returns must be free from state to give the following information: • the MODEL NUMBER OF THE PRODUCT (RBTL59110) • the NAME OF THE PRODUCT (REEBOK® 190RS treadmill) • the SERIAL NUMBER OF THE PRODUCT (see the front cover of this manual) • the KEY NUMBER AND...
... 6 p.m. LIMITED WARRANTY ICON Health & Fitness, Inc. (ICON), warrants this product to be received by ICON at one of its authorized service centers. All returns must be free from state to give the following information: • the MODEL NUMBER OF THE PRODUCT (RBTL59110) • the NAME OF THE PRODUCT (REEBOK® 190RS treadmill) • the SERIAL NUMBER OF THE PRODUCT (see the front cover of this manual) • the KEY NUMBER AND...


